标签:-- gen disco pre command 分布式系统 bec 而不是 情况
Sentinel(哨兵)是Redis 的高可用性解决方案:通过哨兵可以创建一个当主服务器出现故障时自动将从服务器升级为主服务器的一个分布式系统。解决了主从复制出现故障时需要人为干预的问题。
这篇介绍哨兵的搭建,以及哨兵是如何进行哨兵发现和主从切换等功能。
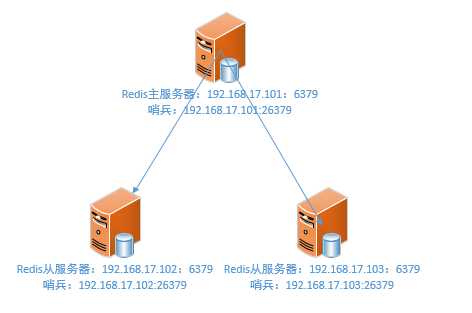
在原先主从的基础上,每台机器启动一个哨兵。架构图如下

配置文件如下
daemonize yes

bind 0.0.0.0

port 26379
dir "/usr/soft/redis"
loglevel notice
logfile "/usr/soft/redis/sentinel.log"

# 修改改成5秒
sentinel monitor learnSentinelMaster 192.168.17.101 6379 2
sentinel down-after-milliseconds learnSentinelMaster 5000
sentinel config-epoch learnSentinelMaster 1有两种方式
src/redis-sentinel sentinel.confsrc/redis-server sentinel.conf --sentinel哨兵搭建的过程如下

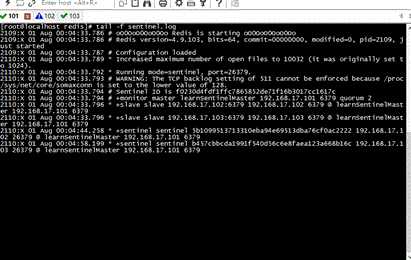
哨兵集群搭建完毕后,日志内容如下

启动后配置文件sentinel.conf会增加内容
daemonize yes

bind 0.0.0.0

port 26379
dir "/usr/soft/redis"
loglevel notice
logfile "/usr/soft/redis/sentinel.log"

# 修改改成5秒
sentinel myid b457cbbcda1991f540d56c6e8faea123a668b16c
sentinel monitor learnSentinelMaster 192.168.17.101 6379 2
sentinel down-after-milliseconds learnSentinelMaster 5000
# Generated by CONFIG REWRITE
sentinel config-epoch learnSentinelMaster 1
sentinel leader-epoch learnSentinelMaster 0
sentinel known-slave learnSentinelMaster 192.168.17.102 6379
sentinel known-slave learnSentinelMaster 192.168.17.103 6379
sentinel known-sentinel learnSentinelMaster 192.168.17.101 26379 f0230d4fdf1ffc7865852de71f16b3017cc1617c
sentinel known-sentinel learnSentinelMaster 192.168.17.102 26379 5b1099513713310eba94e69513dba76cf0ac2222
sentinel current-epoch 1接下来看看哨兵集群启动过程中,Redis内部发生了什么。步骤如下
Sentinel 本质上只是一个运行在特殊模式下的Redis服务器,所以初始化时和不同的Redis服务器初始化没什么较大的区别。有区别的就是哨兵服务器并不会载入RDB文件和AOF文件,还有一些命令功能哨兵服务器不使用。
初始化服务器之后,哨兵服务器会将一部分普通Redis的服务器使用的代码替换成哨兵专用的代码。以下就是哨兵的命令列表,代码文件在https://github.com/antirez/redis/blob/unstable/src/sentinel.c
struct redisCommand sentinelcmds[] = {
    {"ping",pingCommand,1,"",0,NULL,0,0,0,0,0},
    {"sentinel",sentinelCommand,-2,"",0,NULL,0,0,0,0,0},
    {"subscribe",subscribeCommand,-2,"",0,NULL,0,0,0,0,0},
    {"unsubscribe",unsubscribeCommand,-1,"",0,NULL,0,0,0,0,0},
    {"psubscribe",psubscribeCommand,-2,"",0,NULL,0,0,0,0,0},
    {"punsubscribe",punsubscribeCommand,-1,"",0,NULL,0,0,0,0,0},
    {"publish",sentinelPublishCommand,3,"",0,NULL,0,0,0,0,0},
    {"info",sentinelInfoCommand,-1,"",0,NULL,0,0,0,0,0},
    {"role",sentinelRoleCommand,1,"l",0,NULL,0,0,0,0,0},
    {"client",clientCommand,-2,"rs",0,NULL,0,0,0,0,0},
    {"shutdown",shutdownCommand,-1,"",0,NULL,0,0,0,0,0}
};在应用了哨兵专用的代码之后,哨兵会初始化状态,这个哨兵状态结构包含了服务器中所有和哨兵功能有关的状态。结构体代码位置在也在entinel.c文件中,结构体代码如下
/* Main state. */
struct sentinelState {
    char myid[CONFIG_RUN_ID_SIZE+1]; /* 当前哨兵ID. */
    uint64_t current_epoch;         /* 当前纪元. */
    dict *masters;      /* 存放哨兵监视的主服务器,key是主服务器的名字,value是指向主服务器的指针tances. */
    int tilt;           /* 是否处于TILT模式? */
    int running_scripts;    /* 目前执正在执行的脚本数量 */
    mstime_t tilt_start_time;       /* 进入TITL开始的时间 */
    mstime_t previous_time;         /* 最后一次执行时间处理器的时间*/
    list *scripts_queue;            /* 包含了所有需要执行的用户脚本 */
    char *announce_ip;  /* 当配置文件中的announce_ip不为空时,记录着这些IP地址 */
    int announce_port;  /* 配置文件中的announce_port */
    unsigned long simfailure_flags; /* 故障模拟 */
    int deny_scripts_reconfig; /* 是否允许哨兵在运行时修改脚本位置? */
} sentinel;
启动哨兵出现的日志如下
# oO0OoO0OoO0Oo Redis is starting oO0OoO0OoO0Oo
# Redis version=4.9.103, bits=64, commit=00000000, modified=0, pid=2100, just started
# Configuration loaded
* Increased maximum number of open files to 10032 (it was originally set to 1024).
* Running mode=sentinel, port=26379.
# WARNING: The TCP backlog setting of 511 cannot be enforced because /proc/sys/net/core/somaxconn is set to the lower value of 128.
哨兵id如下
# Sentinel ID is b457cbbcda1991f540d56c6e8faea123a668b16c初始化哨兵的最后一步是创建连向被监视的主服务器的网络连接,哨兵将会成为主服务器的客户端。哨兵会向主服务器创建两个异步网络连接
启动哨兵过程到这里就结束了,接下来将进入下个环节。
获取信息阶段会获取主服务器信息和从服务器信息以及哨兵的相关信息。
哨兵默认会以10s一次的频率,发送命令连接向被监视的主服务器发送INFO命令,并通过分析INFO命令的回复来获取主服务器的当前信息。
监控主服务器
# +monitor master learnSentinelMaster 192.168.17.101 6379 quorum 2通过分析主服务器返回的信息,可以获取到两方面的信息
获取到从服务器信息之后,哨兵会更新保存主服务器实例结构的slaves字典。
当哨兵发现主服务器有新的从服务器出现时,哨兵会为这个新的从服务器创建相应的实例结构之外,还会创建到从服务器的命令连接和订阅连接。
发现新的从服务器会出现如下日志
* +slave slave 192.168.17.102:6379 192.168.17.102 6379 @ learnSentinelMaster 192.168.17.101 6379
* +slave slave 192.168.17.103:6379 192.168.17.103 6379 @ learnSentinelMaster 192.168.17.101 6379
在创建命令连接之后,会发送INFO命令获取信息。通过从服务器回复的信息中,可以获得以下内容
获取到这些信息之后,会对之前创建的从服务器实例结构进行更新。
在获取其他哨兵的信息之前,先要知道向主服务器和从服务器发送信息和接收来自主服务器和从服务器的频道信息。
发送的命令格式如下
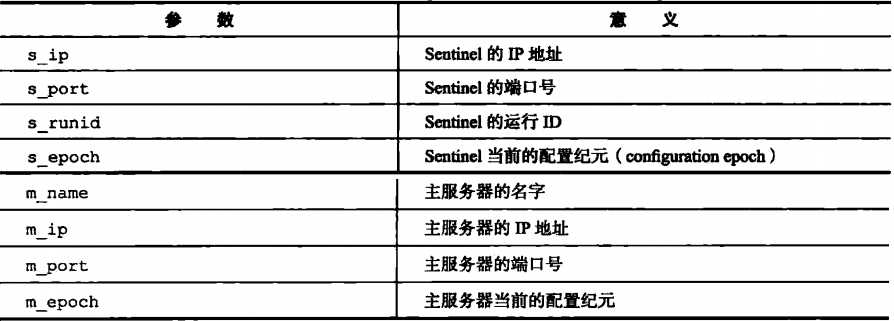
PUBLISH __sentinel__:hello "<s_ip>,<s_port>,<s_runid>,<s_epoch>,<m_name>,<m_ip>,<m_port>,<m_epoch>"PUBLISH是发布消息的命令,__sentinel__:hello是频道的名称,后面就是一些参数,参数信息如下

当Sentinel与一个主服务器或者从服务器建立起订阅连接之后,Sentinel就会通过订阅连接,向服务器发送命令:
SUBSCRIBE __sentinel__:hello表示哨兵订阅__sentinel__:hello这个频道,接收这个频道的消息。
其他哨兵可以通过接收这个频道的消息来发现其他哨兵的存在。
通过接收__sentinel__:hello频道的消息可以发现其他哨兵的存在。当哨兵接收到一条来自__sentinel__:hello频道的消息时,会出现下方
注:sentinels字典是专门保存哨兵信息的
当Sentinel通过频道信息发现一个新的Sentinel时,不仅会在自身的sentinels字典中为新Sentinel创建实例结构,还会创建一个连向新Sentinel的命令连接,同时新的Sentinel也会创建一个连向这个Sentinel的命令连接,最终多个Sentinel将形成一个互相连接的网络。
注:哨兵之间不会创建订阅连接
发现哨兵的日志如下
* +sentinel sentinel f0230d4fdf1ffc7865852de71f16b3017cc1617c 192.168.17.101 26379 @ learnSentinelMaster 192.168.17.101 6379
* +sentinel sentinel 5b1099513713310eba94e69513dba76cf0ac2222 192.168.17.102 26379 @ learnSentinelMaster 192.168.17.101 6379模拟101主服务器掉钱的过程如下

断线重连的日志内容如下

接下来开始分析断线过程中的每一步骤
在默认情况下,Sentinel会以每秒一次的频率向所有与它创建了命令连接的实例(主,从,其他Sentinel)发送 PING命令 ,通过判断返回的内容来判断是否在线,命令分为有效回复和无效回复两种。
配置文件中的down-after-milliseconds参数可以设置指定时间,在这个时间段内没有收到回复则判定该服务器处于主观下线状态。
sentinel down-after-milliseconds learnSentinelMaster 5000现在101客户端上输入以下命令,让服务器睡眠30秒
debug sleep 30此时查看哨兵日志,等待5秒后出现以下内容
# +sdown master learnSentinelMaster 192.168.17.101 6379当一个哨兵将一个主服务器判断为主观下线之后,会向其他监视该主服务器的哨兵进行询问,当有足够数量的哨兵判定主服务器下线时,会执行故障转移操作 。
注:这里不对哨兵之间互相发送的消息进行说明
在配置中可以决定判定主服务器进入客观下线状态所需要的服务器数量,下方配置的最后一个参数就是所需的哨兵数量,这里填写的是2
sentinel monitor learnSentinelMaster 192.168.17.101 6379 2下面的日志说明了主服务器101已经进入客观下线状态
# +odown master learnSentinelMaster 192.168.17.101 6379 #quorum 2/2当前纪元被更新 ,试图故障恢复
# +new-epoch 2
# +try-failover master learnSentinelMaster 192.168.17.101 6379
此时开始准备选举领头哨兵进行故障转移
当主服务器被判定为客观下线之后,各个哨兵服务器将会选举出一个领头哨兵,有这个领头哨兵对下线服务器进行故障转移操作,选举领头哨兵的规则如下:
下方就是选举领头哨兵的日志内容
# +vote-for-leader b457cbbcda1991f540d56c6e8faea123a668b16c 2
# 5b1099513713310eba94e69513dba76cf0ac2222 voted for b457cbbcda1991f540d56c6e8faea123a668b16c 2
# f0230d4fdf1ffc7865852de71f16b3017cc1617c voted for b457cbbcda1991f540d56c6e8faea123a668b16c 2在选举出领头哨兵之后,领头哨兵需要执行故障转移操作,操作主要分为三个步骤
此时,领头哨兵需要选出新的主服务器,然后向新的主服务器发送SLAVEOF no one命令,将这个从服务器转换为主服务器。
选择过程会过滤掉不符合要求的服务器:
新的主服务器只选择通过上面的测试,并在上面的标准基础上排序:
选出合适的从节点作为新的主节点
2101:X 31 Jul 19:13:35.709 # +failover-state-select-slave master learnSentinelMaster 192.168.17.101 6379
2101:X 31 Jul 19:13:35.793 # +selected-slave slave 192.168.17.102:6379 192.168.17.102 6379 @ learnSentinelMaster 192.168.17.101 6379
开始讲102转换为主节点
* +failover-state-send-slaveof-noone slave 192.168.17.102:6379 192.168.17.102 6379 @ learnSentinelMaster 192.168.17.101 6379
* +failover-state-wait-promotion slave 192.168.17.102:6379 192.168.17.102 6379 @ learnSentinelMaster 192.168.17.101 6379
# +promoted-slave slave 192.168.17.102:6379 192.168.17.102 6379 @ learnSentinelMaster 192.168.17.101 6379
# +failover-state-reconf-slaves master learnSentinelMaster 192.168.17.101 6379当新的主服务器出现之后,领头哨兵会向其他从服务器发送slaveof 命令去复制新的主服务器。
下方记录了领头哨兵向从服务器发送 SALVEOF命令去复制新的主服务器。
* +slave-reconf-sent slave 192.168.17.103:6379 192.168.17.103 6379 @ learnSentinelMaster 192.168.17.101 6379
* +slave-reconf-inprog slave 192.168.17.103:6379 192.168.17.103 6379 @ learnSentinelMaster 192.168.17.101 6379
* +slave-reconf-done slave 192.168.17.103:6379 192.168.17.103 6379 @ learnSentinelMaster 192.168.17.101 6379这时候如果下线的主服务器重启上线了怎么办?这也是故障转移要做的最后一步,将已下线的主服务器设置为新的主服务器的从服务器。当下线的主服务器重新上线时,哨兵就会向它发送SLAVEOF命令,让他成为新的主服务器的从服务器。
此时101服务器上线
# -odown master learnSentinelMaster 192.168.17.101 6379故障转移成功完成。所有slaves被重新配置为新master的从
# +failover-end master learnSentinelMaster 192.168.17.101 6379
# +switch-master learnSentinelMaster 192.168.17.101 6379 192.168.17.102 6379
转换101状态
* +slave slave 192.168.17.101:6379 192.168.17.101 6379 @ learnSentinelMaster 192.168.17.102 6379
# +sdown slave 192.168.17.101:6379 192.168.17.101 6379 @ learnSentinelMaster 192.168.17.102 6379
# -sdown slave 192.168.17.101:6379 192.168.17.101 6379 @ learnSentinelMaster 192.168.17.102 6379
* +convert-to-slave slave 192.168.17.101:6379 192.168.17.101 6379 @ learnSentinelMaster 192.168.17.102 6379
这时候再次查看配置文件会发现多了一行sentinel current-epoch 2
#后台启动
daemonize yes

bind 0.0.0.0

port 26379
dir "/usr/soft/redis"
loglevel notice
logfile "/usr/soft/redis/sentinel.log"

# 修改改成5秒
sentinel myid f0230d4fdf1ffc7865852de71f16b3017cc1617c
sentinel monitor learnSentinelMaster 192.168.17.102 6379 2
sentinel down-after-milliseconds learnSentinelMaster 5000
# Generated by CONFIG REWRITE
sentinel config-epoch learnSentinelMaster 2
sentinel leader-epoch learnSentinelMaster 2
sentinel known-slave learnSentinelMaster 192.168.17.103 6379
sentinel known-slave learnSentinelMaster 192.168.17.101 6379
sentinel known-sentinel learnSentinelMaster 192.168.17.103 26379 b457cbbcda1991f540d56c6e8faea123a668b16c
sentinel known-sentinel learnSentinelMaster 192.168.17.102 26379 5b1099513713310eba94e69513dba76cf0ac2222
sentinel current-epoch 2# Example sentinel.conf
# 绑定IP地址
# bind 127.0.0.1 192.168.1.1
# 保护模式(是否禁止外部链接,除绑定的ip地址外)
# protected-mode no
# 当前Sentinel服务运行的端口
port 26379
#
# sentinel announce-ip <ip>
# sentinel announce-port <port>
# Sentinel服务运行时使用的临时文件夹
dir /tmp
# 监听地址为ip:port的一个master
sentinel monitor mymaster 127.0.0.1 6379 2
# 设置连接master和slave时的密码,注意的是sentinel不能分别为master和slave设置不同的密码,因此master和slave的密码应该设置相同。
# sentinel auth-pass mymaster MySUPER--secret-0123passw0rd
# 指定了Sentinel认为Redis实例已经失效所需的毫秒数
sentinel down-after-milliseconds mymaster 30000
# 指定了在执行故障转移时,最多可以有多少个从Redis实例在同步新的主实例,在从Redis实例较多的情况下这个数字越小,同步的时间越长,完成故障转移所需的时间就越长
sentinel parallel-syncs mymaster 1
# 如果在该时间(ms)内未能完成故障转移操作,则认为该故障转移失败
sentinel failover-timeout mymaster 180000
# 指定sentinel检测到该监控的redis实例指向的实例异常时,调用的报警脚本。该配置项可选,但是很常用
# sentinel notification-script mymaster /var/redis/notify.sh
# 当一个master由于failover而发生改变时,这个脚本将会被调用,通知相关的客户端关于master地址已经发生改变的信息。
# sentinel client-reconfig-script mymaster /var/redis/reconfig.sh
哨兵的配置文件:https://github.com/rainbowda/learnWay/tree/master/learnRedis/sentinel,有需要的可以下载。
标签:-- gen disco pre command 分布式系统 bec 而不是 情况
原文地址:https://www.cnblogs.com/fixzd/p/9410812.html