# cat /etc/redhat-release
CentOS Linux release 7.3.1611 (Core)
# ifconfig
ens33: flags=4163mtu 1500
inet 192.168.1.104 netmask 255.255.255.0 broadcast 192.168.1.255
二、安装nexus
# rpm -e --nodeps $(rpm -qa | grep -i openjdk)
# wget https://sonatype-download.global.ssl.fastly.net/nexus/3/nexus-3.5.0-02-unix.tar.gz
# tar zxvf nexus-3.5.0-02-unix.tar.gz -C /opt
# tar zxvf jdk-8u131-linux-x64.tar.gz -C /opt
# ls /opt/
nexus-3.5.0-02 sonatype-work jdk8u_131
# groupadd -g 2017 cmp
# useradd -u 2017 -g 2017 cmp
# ln -s /opt/jdk1.8.0_131/bin/java /usr/bin/java
# echo "JAVA_HOME=/opt/jdk1.8.0_131" >> /etc/environment
# source /etc/environment
# echo "export PATH=$JAVA_HOME/bin:$PATH" >> /home/cmp/.bash_profile
# source /home/cmp/.bash_profile
# java -version

# vim /opt/nexus-3.5.0-02/bin/nexus.rc
run_as_user="cmp"
# vim /opt/nexus-3.5.0-02/bin/nexus
INSTALL4J_JAVA_HOME="/opt/jdk1.8.0_131"
# vim /etc/systemd/system/nexus.service
########################
[Unit]
Description=nexus service
After=network.target
[Service]
Type=forking
LimitNOFILE=65536
ExecStart=/opt/nexus-3.5.0-02/bin/nexus start
ExecStop=/opt/nexus-3.5.0-02/bin/nexus stop
User=cmp
Restart=on-abort
[Install]
WantedBy=multi-user.target
#####################################
# chown -R cmp:cmp /opt/nexus-3.5.0-02
# chown -R cmp:cmp /opt/sonatype-work
# systemctl daemon-reload
# systemctl start nexus.service
# ss -tan | grep 8081
# cd /opt/nexus-3.5.0-02/etc/ssl
# keytool \
-genkeypair \
-keystore nexus.jks \
-alias cmp_nexus \
-keypass nexuspasswd123# \
-storepass nexuspasswd123# \
-keyalg RSA \
-keysize 2048 \
-validity 5000 \
-dname "CN=*.huawei.com,OU=CMP,O=Huawei,L=ShenZhen,ST=GuangDong,C=CN" \
-ext "SAN=IP:192.168.1.104" \
-ext "BC=ca:true"
###########################################
NEXUS_IP_ADDRESS=xx.xx.xx.xx //nexus服务器的IP
NEXUS_DOMAIN=xxx //nexus服务器IP对应的域名,如 nexus.abc.com, 没有可不写
keytool \
-genkeypair \
-keystore nexus.jks \
-storepass 123456 \
-keypass 123456 \
-alias nexus \
-keyalg RSA \
-keysize 2048 \
-validity 5000 \
-dname "CN=${NEXUS_DOMAIN},OU=Example,O=Sonatype,L=Unspecified,ST=Unspecified,C=US" \
-ext "SAN=DNS:${NEXUS_DOMAIN},IP:${NEXUS_IP_ADDRESS}" \
-ext "BC=ca:true"
##############################################
# ls
nexus.jks
# chown -R cmp:cmp /opt/nexus-3.5.0-02
# chown -R cmp:cmp /opt/sonatype-work
# find /opt/nexus-3.5.0-02/etc/* -type d -exec chmod 700 {} \;
# find /opt/nexus-3.5.0-02/etc/ -type f -exec chmod 600 {} \;
# vim /opt/sonatype-work/nexus3/etc/nexus.properties
nexus-args=${jetty.etc}/jetty.xml,${jetty.etc}/jetty-http.xml,${jetty.etc}/jetty-requestlog.xml,${jetty.etc}/jetty-https.xml
application-port-ssl=8443
如果想要设置重定向 redirect http request to http requests (可选)
那么在上面设置的基础上,再添加一个配置:
########################
nexus-args=${jetty.etc}/jetty.xml,${jetty.etc}/jetty-http.xml,${jetty.etc}/jetty-requestlog.xml,${jetty.etc}/jetty-https.xml,${jetty.etc}/jetty-http-redirect-to-https.xml
application-port-ssl=8443
#########################
# application-host=0.0.0.0 默认监听所有IP
如果想要端口监听绑定特定IP:
application-host=xx.xx.xx.xx
# vim /opt/nexus-3.5.0-02/etc/jetty/jetty-https.xml
注:此处跟上面用keytool生成nexus.jks相关
如果定期修改秘钥文件 nexus.jks:
1.用keytool工具用新密码重新生成nexus.jks,此处配置文件相应修改
2.如果使用root用户生成,注意将数主 数组 chown 为相应的nexus运行用户
3.默认生成的nexus.jks文件权限为644,安全起见,请将nexus.jks文件权限 chmod 为 600
# systemctl restart nexus
# systemctl status nexus
# systemctl enable nexus
# ss -tan | grep 8081
# ss -tan | grep 8443
浏览器访问 http://192.168.1.104:8081
浏览器访问 https://192.168.1.104:8443
注意:
如果设置启用了重定向,那么nexus server只会监听 8081端口,但是访问 http://192.168.1.104:8081会被重定向到
https://192.168.1.104:8443 ,所以设置防火墙策略时也要开放8443端口。
如果没有设置启用重定向,那么 nexus server 会同时监听 8081 和8443 端口。
三、创建仓库
1.访问 https://192.168.1.104:8443
2.登录
用户名:admin
密码:admin123
登录后需要按 F5 手动刷新页面
3.创建一个docker仓库
4.创建对接账号
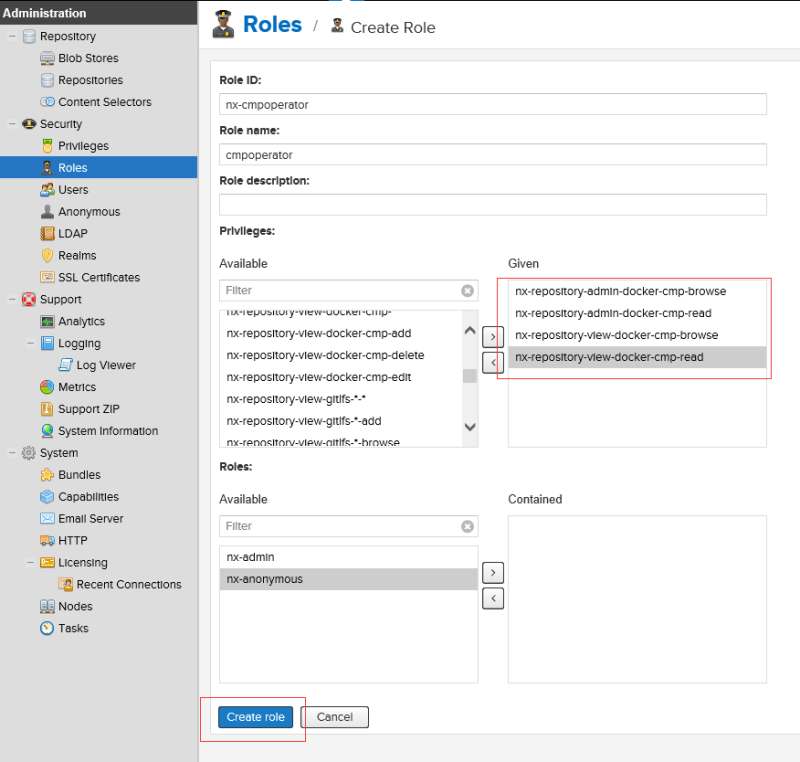
创建一个role,role是一个权限的集合,可以将其授予某个用户

创建用户,选择授予的role权限集合
现在我们成功创建了一个docker仓库
dokcer仓库名称:cmp
dokcer仓库地址:192.168.1.104:10086
登录用户:
admin/admin123
cmpdokcer/123456
四、修改密码
1.修改admin的密码
2.修改cmpdocker的密码
用admin 登录,然后修改
五、安全加固
1. nexus监听端口绑定特定IP
# vim /opt/sonatype-work/nexus3/etc/nexus.properties
application-host=192.168.1.103
2.自定义防火墙策略
# touch iptables.rules
# cat iptables.rules
#@@@@@@@@@@@@@@@@@@@@@@@@@@@@@@@@@@@@@@@@@@@@@@@#
# Generated by iptables-save v1.4.21 on Fri Sep 8 00:07:19 2017
*raw
:PREROUTING ACCEPT [594:196067]
:OUTPUT ACCEPT [503:260590]
COMMIT
# Completed on Fri Sep 8 00:07:19 2017
# Generated by iptables-save v1.4.21 on Fri Sep 8 00:06:38 2017
*mangle
:PREROUTING ACCEPT [661:205439]
:INPUT ACCEPT [661:205439]
:FORWARD ACCEPT [0:0]
:OUTPUT ACCEPT [554:272157]
:POSTROUTING ACCEPT [554:272157]
COMMIT
# Completed on Fri Sep 8 00:06:38 2017
# Generated by iptables-save v1.4.21 on Fri Sep 8 00:08:32 2017
*filter
:INPUT DROP [0:0]
:FORWARD ACCEPT [0:0]
:OUTPUT ACCEPT [1220:447081]
-A INPUT -p tcp -m tcp --dport 22 -m state --state NEW,RELATED,ESTABLISHED -j ACCEPT
-A INPUT -p tcp -m tcp --dport 8443 -m state --state NEW,RELATED,ESTABLISHED -j ACCEPT
-A INPUT -p tcp -m tcp --dport 10086 -m state --state NEW,RELATED,ESTABLISHED -j ACCEPT
-A INPUT -m state --state ESTABLISHED,RELATED -j ACCEPT
COMMIT
# Completed on Fri Sep 8 00:08:32 2017
*nat
:PREROUTING ACCEPT [192:12171]
:INPUT ACCEPT [0:0]
:OUTPUT ACCEPT [88:5529]
:POSTROUTING ACCEPT [88:5529]
COMMIT
# Completed on Fri Sep 8 00:09:06 2017
#@@@@@@@@@@@@@@@@@@@@@@@@@@@@@@@@@@@@@@@@@@@@@@@@@@@@@@@#
我们不需要设置为永久策略,设置为开机加载我们得默认策略就OK了。
那么我们需要定义一个系统服务 iptables-rules ,设为开机自启,加载我们的默认防火墙策略。
我们需要编写一个iptables的service文件:
# touch iptables-rules.service
# cat iptables-rules.service
#######################################
[Unit]
Description=iptables rules
[Service]
ExecStart=/usr/sbin/iptables-restore /etc/iptables.rules
After=network.target
[Install]
WantedBy=multi-user.target
#######################################
# mv iptables.rules /etc
# mv iptables-rules.service /etc/systemd/system
# systemctl start iptables-rules.service
# systemctl enable iptables-rules.service
加固效果:
# ss -tan
# iptables -nvL --line
安全加固后的nexus服务器8081端口被封了,所以 http://192.168.1.104:8081 无法访问,要访问走 https://192.168.1.104:8443
六、获取公钥及刷新信任列表
说明:命令中端口请输入上面Create Repository步骤配置的https端口(举例中是10086,请按实际输入)
# source /home/cmp/.bash_profile
# keytool -printcert -sslserver 192.168.1.104:10086 -rfc >/etc/pki/ca-trust/source/anchors/nexus.crt
# update-ca-trust
注意:如果nexus服务器有 inside_ip 和 outside_ip,做了NAT,用keytool 生成nexus.jks应该是用outside_ip,不然其他有拉取需要的主机无法正确获取nexus.crt。
在有拉取需要的主机:
方法一:
# scp 镜像库IP:/etc/pki/ca-trust/source/anchors/nexus.crt /etc/pki/ca-trust/source/anchors
# update-ca-trust
方法二:
# keytool -printcert -sslserver 192.168.1.104:10086 -rfc >/etc/pki/ca-trust/source/anchors/nexus.crt
# update-ca-trust
测试:
# curl https://192.168.1.104:8443 无需使用 -k 参数
curl -k https://ip:port
-k insecure SSL , will not check the cert
允许不使用证书到SSL站点
登录方式
交互式
# docker login 192.168.1.104:10086
username:
password:
非交互式
# docker login xx.xx.xx.xx:xx -u "XXX" -p "XXX"
# echo "XXX" | docker login xx.xx.xx.xx:xx --username "XXX" --password-stdin
七、关于dokcer节点获取公钥后的免验证登录问题
# docker login 192.168.1.104:10086
根据提示,输入用户名和密码即可。
如果登录成功,会在/root/.docker/config.json文件中保存账户信息。
这个文件类似sshd的 /root/.ssh/known_hosts
如果测试环境同一台nexus服务器重装了,那么相应的docker节点要先清除 /root/.docker/config.json后重新获取新的公钥,再登录,否则会报错!
Error response from daemon:
Get https://192.168.1.104:10086/v1/users/:x509: certificate signed by unknown authority
1
# rm -rf /root/.docker/config.json
# systemctl restart dokcer
# scp 镜像库IP:/etc/pki/ca-trust/source/anchors/nexus.crt /etc/pki/ca-trust/source/anchors
# update-ca-trust
八、在dokcer节点向nexus上传和从下载docker镜像
admin 有上传和下载权限
cmpdocker 只有下载权限
# docker login 192.168.1.104:10086
# docker tag redis:3.2.5 192.168.1.104:10086/redis:v1
# docker push 192.168.1.104:10086/redis:v1
# docker rmi 192.168.1.104:10086/redis:v1
# docker pull 192.168.1.104:10086/redis:v1


