标签:link date 装包 使用 mys img 地方 file chm
笔者采用的是CentOS7,先对系统进行Update,然后安装军哥的LNMPA,详情请参考lnmp.org
注意:安装LNMPA前需要修改lnmp.conf中这一行为下面,也就是要安装PHP的Fileinfo扩展。
Enable_PHP_Fileinfo=‘y‘
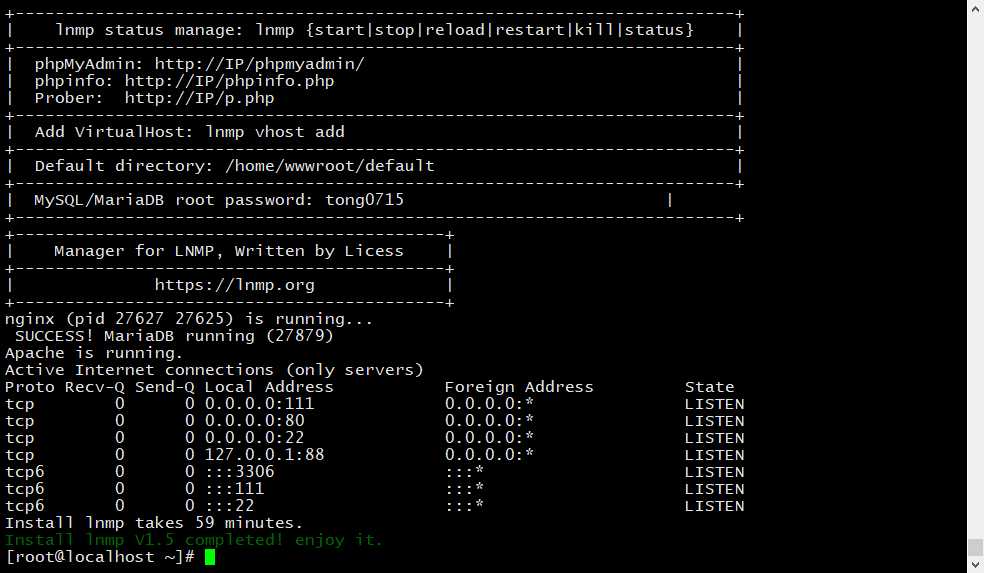
安装完毕后一键安装包会弹出本次安装成功的详细提示如下

即表示安装成功。
下面开始安装Snipe-IT的准备工作
一、创建数据库
[root@localhost ~]# mysql -u root -p
1 create database snipeit;     //后面的是你想要的数据库名
2 show databases;     //确定数据库创建成功
3 create user snipe_user;       //创建用户,后面的是用户名
4 grant all on snipeit.* to ‘snipe_user‘@‘localhost‘ identified by ‘YOUR_DB_PASSWORD_HERE‘;        //指定数据库权限和密码,后面的是你创建用户的密码
二、下载最新版的Snipe-IT到本地,这里采用的是Git的方式,当然你也可以自己下载了通过FTP上传
[root@localhost ~]# git clone https://github.com/snipe/snipe-it /home/wwwroot/snipeit //后面一部分为你想安装的文件夹,如果没有Git会自动创建
三、安装Composer
通常网上找到的安装教程会把这一步分开,但是实际上我们只需要做一次就行了
[root@localhost ~]# cd /home/wwwroot/snipeit            //进入文件夹,这一步可以省略
[root@localhost snipeit]# curl -sS https://getcomposer.org/installer | php        //下载composer
[root@localhost snipeit]# cp composer.phar /usr/bin/composer      //拷贝到执行文件夹,这一步不是必须
[root@localhost snipeit]# composer install --no-dev --prefer-source //运行安装缺少的扩展
四、修改.env文件
 1 cp .env.example .env    # Snipe的配置文件
 2 vi .env
 3 APP_DEBUG=false   //需要调试的时候改为true
 4 APP_TIMEZONE=Asia/Shanghai   # 设置时区
 5 APP_URL=127.0.0.1   # 设置Snipe的域名,这里填什么就确定了用这个域名访问时才能看到图片
 6 APP_KEY=   # 这里不要管
 7 APP_LOCALE=zh-CN  # 设置默认语言
 8
 9 DB_HOST=127.0.0.1   # 设置数据库的地址
10 DB_DATABASE=snipeit    # 设置数据库名
11 DB_USERNAME=snipe_user   # 设置连接数据库的用户名
12 DB_PASSWORD=password   # 前面设置好的连接数据库用户的密码
五、计算HASH码
php artisan key:generate
六、设置目录权限
1 [root@localhost snipeit]# chown -R www:www storage public/uploads
2 [root@localhost snipeit]# chmod -R 755 storage public/uploads
3 //这里的权限设置很重要,如果后面出现一些莫名其妙的问题,那一定是这里权限设置不正确。
七、配置虚拟服务器
由于采用的LNMPA的构架,需要配置的地方有点复杂,一共3个,首先利用LNMP添加虚拟机
lnmp vhost add
修改3个地方好让Nginx转发session到Apache
1.先修改Apache的监听端口
[root@localhost ~]# vi /usr/local/apache/conf/httpd.conf
添加想要监听的端口,这里使用的是8081
Listen 8081
2.修改Apache虚拟机配置
[root@localhost ~]# vi /usr/local/apache/conf/httpd.conf
 1 <VirtualHost *:8081>
 2 ServerAdmin 123@123.com
 3 php_admin_value open_basedir "/home/wwwroot/snipeit/public:/tmp/:/var/tmp/:/proc/"
 4 DocumentRoot "/home/wwwroot/snipeit/public"
 5 ServerName snipeit
 6 #ErrorLog "/home/wwwlogs/snipeit-error_log"
 7 #CustomLog "/home/wwwlogs/snipeit-access_log" combined
 8 <Directory "/home/wwwroot/snipeit/public">
 9     SetOutputFilter DEFLATE
10     Options FollowSymLinks
11     AllowOverride All
12     Order allow,deny
13     Allow from all
14     DirectoryIndex index.html index.php
15 </Directory>
16 </VirtualHost>
3.修改Nginx虚拟机配置
[root@localhost ~]# vi /usr/local/nginx/conf/vhost/snipeit.conf
 1 server
 2     {
 3         listen 8080;
 4         #listen [::]:8080;
 5         server_name 192.168.208.128:8080 ;
 6         index index.html index.htm index.php default.html default.htm default.php;
 7         root  /home/wwwroot/snipeit/public;
 8
 9         #error_page   404   /404.html;
10
11         # Deny access to PHP files in specific directory
12         #location ~ /(wp-content|uploads|wp-includes|images)/.*\.php$ { deny all; }
13
14         #include proxy-pass-php.conf;
15
16         location /
17         {
18           try_files $uri @apache;
19         }
20
21         location @apache
22         {
23           internal;
24           proxy_pass http://127.0.0.1:8081;
25           include proxy.conf;
26         }
27
28         location ~ [^/]\.php(/|$)
29         {
30             proxy_pass http://127.0.0.1:8081;
31             include proxy.conf;
32         }
      …………以后省略
CentOS7上安装Snipe-IT4.6.3详细过程及注意事项
标签:link date 装包 使用 mys img 地方 file chm
原文地址:https://www.cnblogs.com/5kyRang3r/p/9474828.html