标签:支持 term indent 这一 完全 演示 嵌入 加载 lock
在第一章中,我们学习了使用Tornado创建一个Web应用的基础知识。包括处理函数、HTTP方法以及Tornado框架的总体结构。在这章中,我们将学习一些你在创建Web应用时经常会用到的更强大的功能。
和大多数Web框架一样,Tornado的一个重要目标就是帮助你更快地编写程序,尽可能整洁地复用更多的代码。尽管Tornado足够灵活,可以使用几乎所有Python支持的模板语言,Tornado自身也提供了一个轻量级、快速并且灵活的模板语言在tornado.template模块中。
让我们以一个叫作Poem Maker Pro的简单例子开始。Poem Maker Pro这个Web应用有一个让用户填写的HTML表单,然后处理表单的结果。代码清单2-1是它的Python代码。
import os.path

import tornado.httpserver
import tornado.ioloop
import tornado.options
import tornado.web

from tornado.options import define, options
define("port", default=8000, help="run on the given port", type=int)

class IndexHandler(tornado.web.RequestHandler):
    def get(self):
        self.render(‘index.html‘)

class PoemPageHandler(tornado.web.RequestHandler):
    def post(self):
        noun1 = self.get_argument(‘noun1‘)
        noun2 = self.get_argument(‘noun2‘)
        verb = self.get_argument(‘verb‘)
        noun3 = self.get_argument(‘noun3‘)
        self.render(‘poem.html‘, roads=noun1, wood=noun2, made=verb,
                difference=noun3)

if __name__ == ‘__main__‘:
    tornado.options.parse_command_line()
    app = tornado.web.Application(
        handlers=[(r‘/‘, IndexHandler), (r‘/poem‘, PoemPageHandler)],
        template_path=os.path.join(os.path.dirname(__file__), "templates")
    )
    http_server = tornado.httpserver.HTTPServer(app)
    http_server.listen(options.port)
    tornado.ioloop.IOLoop.instance().start()
除了poemmaker.py,你还需要将代码清单2-2和代码清单2-3中的两个文件加入到templates子文件夹中。
<!DOCTYPE html>
<html>
    <head><title>Poem Maker Pro</title></head>
    <body>
        <h1>Enter terms below.</h1>
        <form method="post" action="/poem">
        <p>Plural noun<br><input type="text" name="noun1"></p>
        <p>Singular noun<br><input type="text" name="noun2"></p>
        <p>Verb (past tense)<br><input type="text" name="verb"></p>
        <p>Noun<br><input type="text" name="noun3"></p>
        <input type="submit">
        </form>
    </body>
</html>
<!DOCTYPE html>
<html>
    <head><title>Poem Maker Pro</title></head>
    <body>
        <h1>Your poem</h1>
        <p>Two {{roads}} diverged in a {{wood}}, and I—<br>
I took the one less travelled by,<br>
And that has {{made}} all the {{difference}}.</p>
    </body>
</html>
在命令行执行下述命令:
$ python poemmaker.py --port=8000
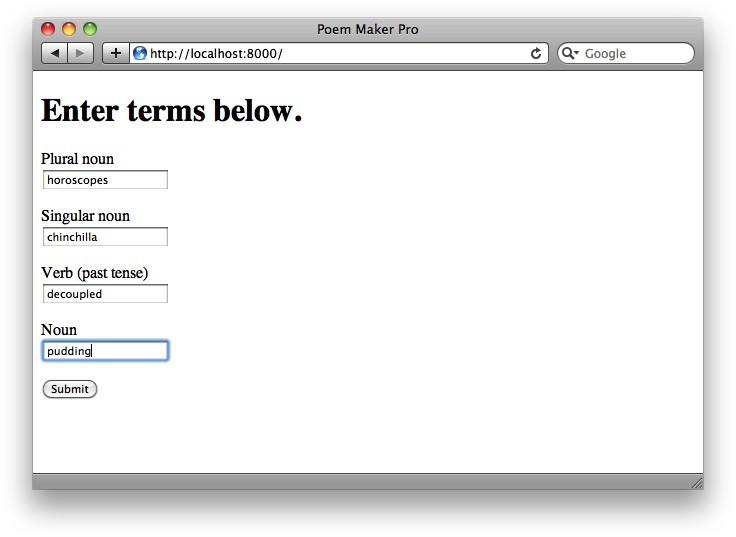
现在,在浏览器中打开http://localhost:8000。当浏览器请求根目录(/)时,Tornado程序将渲染index.html,展示如图2-1所示的简单HTML表单。

图2-1 Poem Maker Pro:输入表单
这个表单包括多个文本域(命名为noun1、noun2等),其中的内容将在用户点击"Submit"按钮时以POST请求的方式送到/poem。现在往里面填写东西然后点击提交吧。
为了响应这个POST请求,Tornado应用跳转到poem.html,插入你在表单中填写的值。结果是Robert Frost的诗《The Road Not Taken》的轻微修改版本。图2-2展示了这个结果。

图2-2 Poem Maker Pro:输出
从结构上讲,poemmaker.py和第一章中的例子很相似。我们定义了几个RequestHandler子类并把它们传给tornado.web.Application对象。那么有什么不一样的地方呢?首先,我们向Application对象的__init__方法传递了一个template_path参数。
template_path=os.path.join(os.path.dirname(__file__), "templates")
template_path参数告诉Tornado在哪里寻找模板文件。我们将在本章和第三章中讲解其确切性质和语法,而它的基本要点是:模板是一个允许你嵌入Python代码片段的HTML文件。上面的代码告诉Python在你Tornado应用文件同目录下的templates文件夹中寻找模板文件。
一旦我们告诉Tornado在哪里找到模板,我们可以使用RequestHandler类的render方法来告诉Tornado读入模板文件,插入其中的模版代码,并返回结果给浏览器。比如,在IndexHandler中,我们发现了下面的语句:
self.render(‘index.html‘)
这段代码告诉Tornado在templates文件夹下找到一个名为index.html的文件,读取其中的内容,并且发送给浏览器。
实际上index.html完全不能称之为"模板",它所包含的完全是已编写好的HTML标记。这可以是模板的一个不错的使用方式,但在更通常的情况下我们希望HTML输出可以结合我们的程序传入给模板的值。模板poem.html使用PoemPageHandler渲染,是这种方式的一个很好的例子。让我们看看它是如何工作的吧。
在poem.html中,你可以看到模板中有一些被双大括号({{和}})括起来的字符串,就像这样:
<p>Two {{roads}} diverged in a {{wood}}, and I—<br/>
I took the one less travelled by,<br>
And that has {{made}} all the {{difference}}.</p>
在双大括号中的单词是占位符,当我们渲染模板时希望以实际值代替。我们可以使用向render函数中传递关键字参数的方法指定什么值将被填充到HTML文件中的对应位置,其中关键字对应模板文件中占位符的名字。下面是在PoemPageHandler中相应的代码部分:
noun1 = self.get_argument(‘noun1‘)
noun2 = self.get_argument(‘noun2‘)
verb = self.get_argument(‘verb‘)
noun3 = self.get_argument(‘noun3‘)
self.render(‘poem.html‘, roads=noun1, wood=noun2, made=verb, difference=noun3)
在这里,我们告诉模板使用变量noun1(该变量是从get_argument方法取得的)作为模板中roads的值,noun2作为模板中wood的值,依此类推。假设用户在表单中按顺序键入了pineapples、grandfather clock、irradiated和supernovae,那么结果HTML将会如下所示:
<p>Two pineapples diverged in a grandfather clock, and I—<br>
I took the one less travelled by,<br>
And that has irradiated all the supernovae.</p>
既然我们已经看到了一个模板在实际应用中的简单例子,那么让我们深入地了解它们是如何工作的吧。Tornado模板是被Python表达式和控制语句标记的简单文本文件。Tornado的语法非常简单直接。熟悉Django、Liquid或其他相似框架的用户会发现它们非常相似,很容易学会。
在2.1节中,我们展示了如何在一个Web应用中使用render方法传送HTML给浏览器。你可以在Tornado应用之外使用Python解释器导入模板模块尝试模板系统,此时结果会被直接输出出来。
>>> from tornado.template import Template
>>> content = Template("<html><body><h1>{{ header }}</h1></body></html>")
>>> print content.generate(header="Welcome!")
<html><body><h1>Welcome!</h1></body></html>
在代码清单2-1中,我们演示了填充Python变量的值到模板的双大括号中的使用。实际上,你可以将任何Python表达式放在双大括号中。Tornado将插入一个包含任何表达式计算结果值的字符串到输出中。下面是几个可能的例子:
>>> from tornado.template import Template
>>> print Template("{{ 1+1 }}").generate()
2
>>> print Template("{{ ‘scrambled eggs‘[-4:] }}").generate()
eggs
>>> print Template("{{ ‘, ‘.join([str(x*x) for x in range(10)]) }}").generate()
0, 1, 4, 9, 16, 25, 36, 49, 64, 81
你同样可以在Tornado模板中使用Python条件和循环语句。控制语句以{%和%}包围,并以类似下面的形式被使用:
{% if page is None %}
或
{% if len(entries) == 3 %}
控制语句的大部分就像对应的Python语句一样工作,支持if、for、while和try。在这些情况下,语句块以{%开始,并以%}结束。
所以这个模板:
<html>
    <head>
        <title>{{ title }}</title>
    </head>
    <body>
        <h1>{{ header }}</h1>
        <ul>
            {% for book in books %}
                <li>{{ book }}</li>
            {% end %}
        </ul>
    </body>
</html>
当被下面这个处理函数调用时:
class BookHandler(tornado.web.RequestHandler):
    def get(self):
        self.render(
            "book.html",
            title="Home Page",
            header="Books that are great",
            books=[
                "Learning Python",
                "Programming Collective Intelligence",
                "Restful Web Services"
            ]
        )
将会渲染得到下面的输出:
<html>
    <head>
        <title>Home Page</title>
    </head>
    <body>
        <h1>Books that are great</h1>
        <ul>
            <li>Learning Python</li>
            <li>Programming Collective Intelligence</li>
            <li>Restful Web Services</li>
        </ul>
    </body>
</html>
不像许多其他的Python模板系统,Tornado模板语言的一个最好的东西是在if和for语句块中可以使用的表达式没有限制。因此,你可以在你的模板中执行所有的Python代码。
同样,你也可以在你的控制语句块中间使用{% set foo = ‘bar‘ %}来设置变量。你还有很多可以在控制语句块中做的事情,但是在大多数情况下,你最好使用UI模块来做更复杂的划分。我们稍后会更详细的看到这一点。
Tornado在所有模板中默认提供了一些便利的函数。它们包括:
替换字符串s中的&、<、>为他们对应的HTML字符。
使用urllib.quote_plus替换字符串s中的字符为URL编码形式。
将val编码成JSON格式。(在系统底层,这是一个对json库的dumps函数的调用。查阅相关的文档以获得更多关于该函数接收和返回参数的信息。)
过滤字符串s,把连续的多个空白字符替换成一个空格。
在Tornado 1.x中,模版不是被自动转义的。在Tornado 2.0中,模板被默认为自动转义(并且可以在Application构造函数中使用autoscaping=None关闭)。在不同版本的迁移时要注意向后兼容。
在模板中使用一个你自己编写的函数也是很简单的:只需要将函数名作为模板的参数传递即可,就像其他变量一样。
>>> from tornado.template import Template
>>> def disemvowel(s):
...     return ‘‘.join([x for x in s if x not in ‘aeiou‘])
...
>>> disemvowel("george")
‘grg‘
>>> print Template("my name is {{d(‘mortimer‘)}}").generate(d=disemvowel)
my name is mrtmr
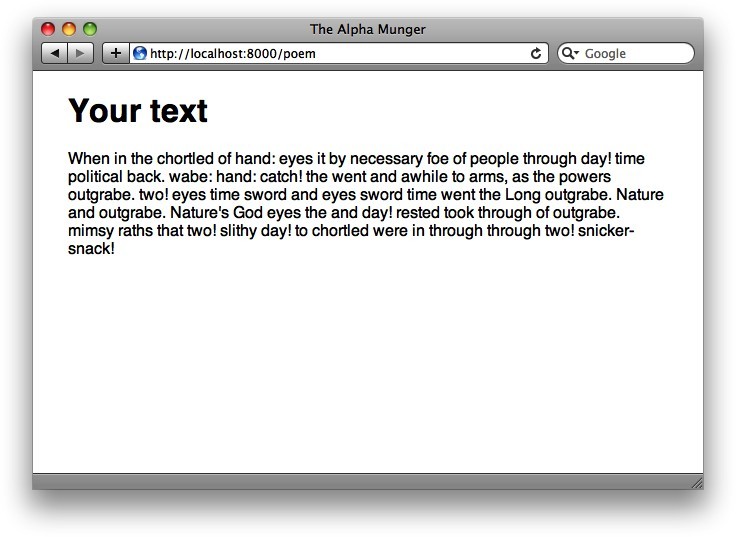
在代码清单2-4中,我们把在这一章中谈论过的所有东西都放了进来。这个应用被称为The Alpha Munger。用户输入两个文本:一个"源"文本和一个"替代"文本。应用会返回替代文本的一个副本,并将其中每个单词替换成源文本中首字母相同的某个单词。图2-3展示了要填的表单,图2-4展示了结果文本。
这个应用包括四个文件:main.py(Tornado程序)、style.css(CSS样式表文件)、index.html和munged.html(Tornado模板)。让我们看看代码吧:
import os.path
import random

import tornado.httpserver
import tornado.ioloop
import tornado.options
import tornado.web

from tornado.options import define, options
define("port", default=8000, help="run on the given port", type=int)

class IndexHandler(tornado.web.RequestHandler):
    def get(self):
        self.render(‘index.html‘)

class MungedPageHandler(tornado.web.RequestHandler):
    def map_by_first_letter(self, text):
        mapped = dict()
        for line in text.split(‘\r\n‘):
            for word in [x for x in line.split(‘ ‘) if len(x) > 0]:
                if word[0] not in mapped: mapped[word[0]] = []
                mapped[word[0]].append(word)
        return mapped

    def post(self):
        source_text = self.get_argument(‘source‘)
        text_to_change = self.get_argument(‘change‘)
        source_map = self.map_by_first_letter(source_text)
        change_lines = text_to_change.split(‘\r\n‘)
        self.render(‘munged.html‘, source_map=source_map, change_lines=change_lines,
                choice=random.choice)

if __name__ == ‘__main__‘:
    tornado.options.parse_command_line()
    app = tornado.web.Application(
        handlers=[(r‘/‘, IndexHandler), (r‘/poem‘, MungedPageHandler)],
        template_path=os.path.join(os.path.dirname(__file__), "templates"),
        static_path=os.path.join(os.path.dirname(__file__), "static"),
        debug=True
    )
    http_server = tornado.httpserver.HTTPServer(app)
    http_server.listen(options.port)
    tornado.ioloop.IOLoop.instance().start()

图2-3 Alpha Munger:输入表单

图2-4 Alpha Munger:输出
记住Application构造函数中的static_path参数。我们将在下面进行详细的介绍,但是现在你所需要知道的就是static_path参数指定了你应用程序放置静态资源(如图像、CSS文件、JavaScript文件等)的目录。另外,你还需要在templates文件夹下添加index.html和munged.html这两个文件。
<!DOCTYPE html>
<html>
    <head>
        <link rel="stylesheet" href="{{ static_url("style.css") }}">
        <title>The Alpha Munger</title>
    </head>
    <body>
        <h1>The Alpha Munger</h1>
        <p>Enter two texts below. The replacement text will have its words
            replaced by words beginning with the same letter in the source text.</p>
        <form method="post" action="/poem">
        <p>Source text<br>
            <textarea rows=4 cols=55 name="source"></textarea></p>
        <p>Text for replacement<br>
            <textarea rows=4 cols=55 name="change"></textarea></p>
        <input type="submit">
        </form>
    </body>
</html>
<!DOCTYPE html>
<html>
    <head>
        <link rel="stylesheet" href="{{ static_url("style.css") }}">
        <title>The Alpha Munger</title>
    </head>
    <body>
        <h1>Your text</h1>
        <p>
{% for line in change_lines %}
    {% for word in line.split(‘ ‘) %}
        {% if len(word) > 0 and word[0] in source_map %}
            <span class="replaced"
                    title="{{word}}">{{ choice(source_map[word[0]]) }}</span>
        {% else %}
            <span class="unchanged" title="unchanged">{{word}}</span>
        {% end %}
    {% end %}
            <br>
{% end %}
        </p>
    </body>
</html>
最后,将代码清单2-7中的内容写到static子目录下的style.css文件中。
body {
    font-family: Helvetica,Arial,sans-serif;
    width: 600px;
    margin: 0 auto;
}
.replaced:hover { color: #00f; }
这个Tornado应用定义了两个请求处理类:IndexHandler和MungedPageHandler。IndexHandler类简单地渲染了index.html中的模板,其中包括一个允许用户POST一个源文本(在source域中)和一个替换文本(在change域中)到/poem的表单。
MungedPageHandler类用于处理到/poem的POST请求。当一个请求到达时,它对传入的数据进行一些基本的处理,然后为浏览器渲染模板。map_by_first_letter方法将传入的文本(从source域)分割成单词,然后创建一个字典,其中每个字母表中的字母对应文本中所有以其开头的单词(我们将其放入一个叫作source_map的变量)。再把这个字典和用户在替代文本(表单的change域)中指定的内容一起传给模板文件munged.html。此外,我们还将Python标准库的random.choice函数传入模板,这个函数以一个列表作为输入,返回列表中的任一元素。
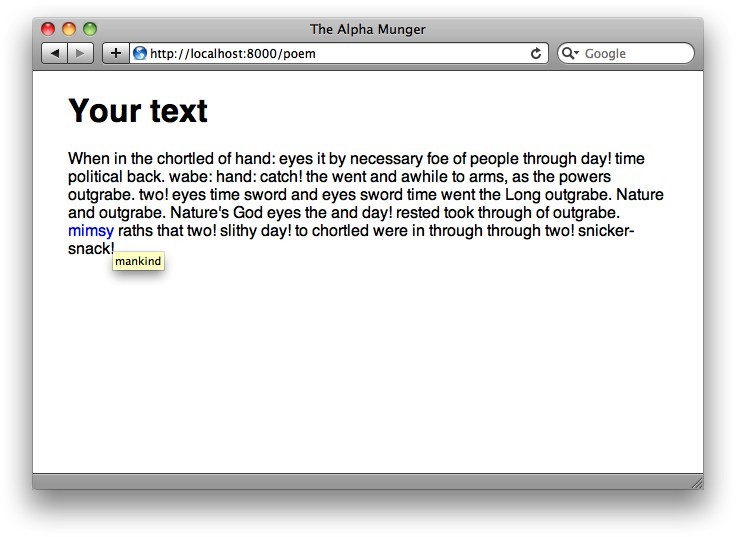
在munged.html中,我们迭代替代文本中的每行,再迭代每行中的每个单词。如果当前单词的第一个字母是source_map字典的一个键,我们使用random.choice函数从字典的值中随机选择一个单词并展示它。如果字典的键中没有这个字母,我们展示源文本中的原始单词。每个单词包括一个span标签,其中的class属性指定这个单词是替换后的(class="replaced")还是原始的(class="unchanged")。(我们还将原始单词放到了span标签的title属性中,以便于用户在鼠标经过单词时可以查看是什么单词被替代了。你可以在图2-5中看到这个动作。)

图2-5 含有被替换单词提示的Alpha Munger
在这个例子中,你可能注意到了debug=True的使用。它调用了一个便利的测试模式:tornado.autoreload模块,此时,一旦主要的Python文件被修改,Tornado将会尝试重启服务器,并且在模板改变时会进行刷新。对于快速改变和实时更新这非常棒,但不要再生产上使用它,因为它将防止Tornado缓存模板!
当编写Web应用时,你总希望提供像样式表、JavaScript文件和图像这样不需要为每个文件编写独立处理函数的"静态内容"。Tornado提供了几个有用的捷径来使其变得容易。
你可以通过向Application类的构造函数传递一个名为static_path的参数来告诉Tornado从文件系统的一个特定位置提供静态文件。Alpha Munger中的相关代码片段如下:
app = tornado.web.Application(
    handlers=[(r‘/‘, IndexHandler), (r‘/poem‘, MungedPageHandler)],
    template_path=os.path.join(os.path.dirname(__file__), "templates"),
    static_path=os.path.join(os.path.dirname(__file__), "static"),
    debug=True
)
在这里,我们设置了一个当前应用目录下名为static的子目录作为static_path的参数。现在应用将以读取static目录下的filename.ext来响应诸如/static/filename.ext的请求,并在响应的主体中返回。
Tornado模板模块提供了一个叫作static_url的函数来生成static目录下文件的URL。让我们来看看在index.html中static_url的调用的示例代码:
<link rel="stylesheet" href="{{ static_url("style.css") }}">
这个对static_url的调用生成了URL的值,并渲染输出类似下面的代码:
<link rel="stylesheet" href="/static/style.css?v=ab12">
那么为什么使用static_url而不是在你的模板中硬编码呢?有如下几个原因。其一,static_url函数创建了一个基于文件内容的hash值,并将其添加到URL末尾(查询字符串的参数v)。这个hash值确保浏览器总是加载一个文件的最新版而不是之前的缓存版本。无论是在你应用的开发阶段,还是在部署到生产环境使用时,都非常有用,因为你的用户不必再为了看到你的静态内容而清除浏览器缓存了。
另一个好处是你可以改变你应用URL的结构,而不需要改变模板中的代码。例如,你可以配置Tornado响应来自像路径/s/filename.ext的请求时提供静态内容,而不是默认的/static路径。如果你使用static_url而不是硬编码的话,你的代码不需要改变。比如说,你想把静态资源从我们刚才使用的/static目录移到新的/s目录。你可以简单地改变静态路径由static变为s,然后每个使用static_url包裹的引用都会被自动更新。如果你在每个引用静态资源的文件中硬编码静态路径部分,你将不得不手动修改每个模板。
标签:支持 term indent 这一 完全 演示 嵌入 加载 lock
原文地址:https://www.cnblogs.com/navysummer/p/9496447.html