标签:异步 后台 shutdown 服务端 模拟 控制 联网 sync 成功
1.1、Future模式是什么
先简单举个例子介绍,当我们平时写一个函数,函数里的语句一行行同步执行,如果某一行执行很慢,程序就必须等待,直到执行结束才返回结果;但有时我们可能并不急着需要其中某行的执行结果,想让被调用者立即返回。比如小明在某网站上成功创建了一个账号,创建完账号后会有邮件通知,如果在邮件通知时因某种原因耗时很久(此时账号已成功创建),使用传统同步执行的方式那就要等完这个时间才会有创建成功的结果返回到前端,但此时账号创建成功后我们并不需要立即关心邮件发送成功了没,此时就可以使用Future模式,让安在后台慢慢处理这个请求,对于调用者来说,则可以先处理一些其他任务,在真正需要数据的场合(比如某时想要知道邮件发送是否成功)再去尝试获取需要的数据。
使用Future模式,获取数据的时候可能无法立即得到需要的数据。而是先拿到一个包装,可以在需要的时候再去get获取需要的数据。
1.2、Future模式与传统模式的区别
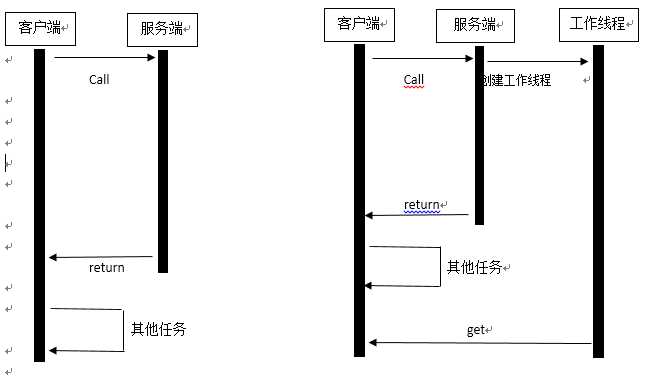
先看看请求返回的时序图,明显传统的模式是串行同步执行的,在遇到耗时操作的时候只能等待。反观Future模式,发起一个耗时操作后,函数会立刻返回,并不会阻塞客户端线程。所以在执行实际耗时操作时候客户端无需等待,可以做其他事情,直到需要的时候再向工作线程获取结果。

2.1、动手实现简易Future模式
下面的DataFuture类只是一个包装类,创建它时无需阻塞等待。在工作线程准备好数据后使用setRealData方法将数据传入。客户端只要在真正需要数据时调用getRealData方法即可,如果此时数据已准备好则立即返回,否则getRealData方法就会等待,直到获取数据完成。
public class DataFuture<T> {
    private T realData;
    private boolean isOK = false;

    public synchronized T getRealData() {
        while (!isOK) {
            try {
                // 数据未准备好则等待
                wait();
            } catch (Exception e) {
                e.printStackTrace();
            }
        }
        return realData;
    }

    public synchronized void setRealData(T data) {
        isOK = true;
        realData = data;
        notifyAll();
    }
}
下面实现一服务端,客户端向服务端请求数据时,服务端并不会立刻去加载真正数据,只是创建一个DataFuture,创建子线程去加载真正数据,服务端直接返回DataFuture即可。
public class Server {

    public DataFuture<String> getData() {
        final DataFuture<String> data = new DataFuture<>();
        Executors.newSingleThreadExecutor().execute(new Runnable() {
            @Override
            public void run() {
                try {
                    Thread.sleep(5000);
                } catch (InterruptedException e) {
                    e.printStackTrace();
                }
                data.setRealData("最终数据");
            }
        });
        return data;
    }
}
最终客户端调用 代码如下:
long start = System.currentTimeMillis();
Server server = new Server();
DataFuture<String> dataFuture = server.getData();

try {
    // 先执行其他操作
    Thread.sleep(5000);
    // 模拟耗时...
} catch (InterruptedException e) {
    e.printStackTrace();
}

System.out.print("结果数据:" + dataFuture.getRealData());
System.out.println("耗时: " + (System.currentTimeMillis() - start));
结果:
结果数据:最终数据
耗时: 5021
执行最终数据耗时都在5秒左右,如果串行执行的话就是10秒左右。
2.2、JDK中的Future与FutureTask
先来看看Future接口源码:
public interface Future<V> {

    /**
     * 用来取消任务,取消成功则返回true,取消失败则返回false。
     * mayInterruptIfRunning参数表示是否允许取消正在执行却没有执行完毕的任务,设为true,则表示可以取消正在执行过程中的任务。
     * 如果任务已完成,则无论mayInterruptIfRunning为true还是false,此方法都返回false,即如果取消已经完成的任务会返回false;
     * 如果任务正在执行,若mayInterruptIfRunning设置为true,则返回true,若mayInterruptIfRunning设置为false,则返回false;
     * 如果任务还没有执行,则无论mayInterruptIfRunning为true还是false,肯定返回true。
     */
    boolean cancel(boolean mayInterruptIfRunning);

    /**
     * 表示任务是否被取消成功,如果在任务正常完成前被取消成功,则返回true
     */
    boolean isCancelled();

    /**
     * 表示任务是否已经完成,若任务完成,则返回true
     */
    boolean isDone();

    /**
     * 获取执行结果,如果最终结果还没得出该方法会产生阻塞,直到任务执行完毕返回结果
     */
    V get() throws InterruptedException, ExecutionException;

    /**
     * 获取执行结果,如果在指定时间内,还没获取到结果,则抛出TimeoutException
     */
    V get(long timeout, TimeUnit unit) throws InterruptedException, ExecutionException, TimeoutException;
}
从上面源码可看出Future就是对于Runnable或Callable任务的执行进行查询、中断任务、获取结果。下面就以一个计算1到1亿的和为例子,看使用传统方式和使用Future耗时差多少。先看传统方式代码:
public class FutureTest {

    public static void main(String[] args) {
        long start = System.currentTimeMillis();
        List<Integer> retList = new ArrayList<>();

        // 计算1000次1至1亿的和
        for (int i = 0; i < 1000; i++) {
            retList.add(Calc.cal(100000000));
        }
        System.out.println("耗时: " + (System.currentTimeMillis() - start));

        for (int i = 0; i < 1000; i++) {
            try {
                Integer result = retList.get(i);
                System.out.println("第" + i + "个结果: " + result);
            } catch (Exception e) {
            }
        }
        System.out.println("耗时: " + (System.currentTimeMillis() - start));
    }

    public static class Calc implements Callable<Integer> {

        @Override
        public Integer call() throws Exception {
            return cal(10000);
        }

        public static int cal (int num) {
            int sum = 0;
            for (int i = 0; i < num; i++) {
                sum += i;
            }
            return sum;
        }
    }
}
执行结果(耗时40+秒):
耗时: 43659
第0个结果: 887459712
第1个结果: 887459712
第2个结果: 887459712
...
第999个结果: 887459712
耗时: 43688
再来看看使用Future模式下程序:
public class FutureTest {

    public static void main(String[] args) {
        long start = System.currentTimeMillis();
        ExecutorService executorService = Executors.newCachedThreadPool();
        List<Future<Integer>> futureList = new ArrayList<>();

        // 计算1000次1至1亿的和
        for (int i = 0; i < 1000; i++) {
            // 调度执行
            futureList.add(executorService.submit(new Calc()));
        }
        System.out.println("耗时: " + (System.currentTimeMillis() - start));

        for (int i = 0; i < 1000; i++) {
            try {
                Integer result = futureList.get(i).get();
                System.out.println("第" + i + "个结果: " + result);
            } catch (InterruptedException | ExecutionException e) {
            }
        }
        System.out.println("耗时: " + (System.currentTimeMillis() - start));
    }

    public static class Calc implements Callable<Integer> {

        @Override
        public Integer call() throws Exception {
            return cal(100000000);
        }

        public static int cal (int num) {
            int sum = 0;
            for (int i = 0; i < num; i++) {
                sum += i;
            }
            return sum;
        }
    }
}
执行结果(耗时12+秒):
耗时: 12058
第0个结果: 887459712
第1个结果: 887459712
...
第999个结果: 887459712
耗时: 12405
可以看到,计算1000次1至1亿的和,使用Future模式并发执行最终的耗时比使用传统的方式快了30秒左右,使用Future模式的效率大大提高。
2.3、FutureTask
说完Future,Future因为是接口不能直接用来创建对象,就有了下面的FutureTask。
先看看FutureTask的实现:
public class FutureTask<V> implements RunnableFuture<V>
可以看到FutureTask类实现了RunnableFuture接口,接着看RunnableFuture接口源码:
public interface RunnableFuture<V> extends Runnable, Future<V> {
    /**
     * Sets this Future to the result of its computation
     * unless it has been cancelled.
     */
    void run();
}
可以看到RunnableFuture接口继承了Runnable接口和Future接口,也就是说其实FutureTask既可以作为Runnable被线程执行,也可以作为Future得到Callable的返回值。
看下面FutureTask的两个构造方法,可以看出就是为这两个操作准备的。
public FutureTask(Callable<V> var1) {
    if (var1 == null) {
        throw new NullPointerException();
    } else {
        this.callable = var1;
        this.state = 0;
    }
}

public FutureTask(Runnable var1, V var2) {
    this.callable = Executors.callable(var1, var2);
    this.state = 0;
}
FutureTask使用实例:
public class FutureTest {

    public static void main(String[] args) {
        ExecutorService executor = Executors.newCachedThreadPool();
        Calc task = new Calc();
        FutureTask<Integer> futureTask = new FutureTask<Integer>(task);
        executor.submit(futureTask);
        executor.shutdown();
    }

    public static class Calc implements Callable<Integer> {

        @Override
        public Integer call() throws Exception {
            return cal(100000000);
        }

        public static int cal (int num) {
            int sum = 0;
            for (int i = 0; i < num; i++) {
                sum += i;
            }
            return sum;
        }
    }
}
2.4、Future不足之处
上面例子可以看到使用Future模式比传统模式效率明显提高了,使用Future一定程度上可以让一个线程池内的任务异步执行;但同时也有个明显的缺点:就是回调无法放到与任务不同的线程中执行,传统回调最大的问题就是不能将控制流分离到不同的事件处理器中。比如主线程要等各个异步执行线程返回的结果来做下一步操作,就必须阻塞在future.get()方法等待结果返回,这时其实又是同步了,如果遇到某个线程执行时间太长时,那情况就更糟了。
到Java8时引入了一个新的实现类CompletableFuture,弥补了上面的缺点,在下篇会讲解CompletableFuture的使用。
作者注:原文发表在公号(点击查看),定期分享IT互联网、金融等工作经验心得、人生感悟,欢迎订阅交流,目前就职阿里-移动事业部,需要大厂内推的也可到公号砸简历。(公众号ID:weknow619)

标签:异步 后台 shutdown 服务端 模拟 控制 联网 sync 成功
原文地址:https://www.cnblogs.com/weknow619/p/9485420.html