标签:lte beta image 需要 with ase 学习 lin prot
继续layer的学习。
cafee中的卷积层:
layer {
  name: "conv1"
  type: "Convolution"
  bottom: "data"
  top: "conv1"
  param {
    lr_mult: 1
  }
  param {
    lr_mult: 2
  }
  convolution_param {
    num_output: 20
    kernel_size: 5
    stride: 1
    weight_filler {
      type: "xavier"
    }
    bias_filler {
      type: "constant"
    }
  }
}
param:只有一个为权重的学习率,两个的话第二个为bias的学习率,最终的学习率需要这个数乘以solver.prototxt配置文件中的base_lr。
num_output:卷积核个数
kernel_size": filter size,如果 h 和w不等,则用kenel_h 和kenel_w分别设定
weight_filter: constant为0, xavier,gaussian为初始化的算法
bias_filter: the same
输入:n*c0*w0*h0
layer {
  name: "pool1"
  type: "Pooling"
  bottom: "conv1"
  top: "pool1"
  pooling_param {
    pool: MAX
    kernel_size: 3
    stride: 2
  }
}
LRN layer:
layers {
  name: "norm1"
  type: LRN
  bottom: "pool1"
  top: "norm1"
  lrn_param {
    local_size: 5
    alpha: 0.0001
    beta: 0.75
  }
}
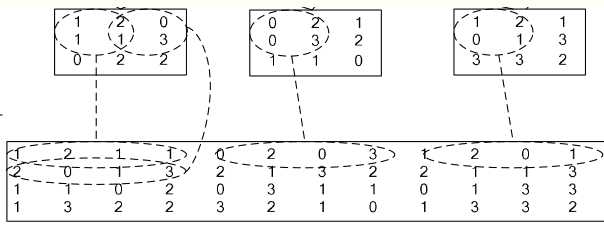
im2col层:它先将一个大矩阵,重叠地划分为多个子矩阵,对每个子矩阵序列化成向量,最后得到另外一个矩阵。

在 caffe中,卷积运算就是先对数据进行im2col操作,在进行内积运算(inner product)。速度快
Activiation Layers:
1.Sigmoid: 没有额外参数
layer {
  name: "encode1neuron"
  bottom: "encode1"
  top: "encode1neuron"
  type: "Sigmoid"
}
2.RELU:
可选参数:
negative_slope:默认为0. 对标准的ReLU函数进行变化,如果设置了这个值,那么数据为负数时,就不再设置为0,而是用原始数据乘以negative_slope
layer {
  name: "relu1"
  type: "ReLU"
  bottom: "pool1"
  top: "pool1"
}
3.tanh:
layer {
  name: "layer"
  bottom: "in"
  top: "out"
  type: "TanH"
}
softmax-loss layer:
layer {
  name: "loss"
  type: "SoftmaxWithLoss"
  bottom: "ip1"
  bottom: "label"
  top: "loss"
}
softmax layer:
layers {
  bottom: "cls3_fc"
  top: "prob"
  name: "prob"
  type: “Softmax"
}
Inner Product: 也就是全连接层:
layer {
  name: "ip1"
  type: "InnerProduct"
  bottom: "pool2"
  top: "ip1"
  param {
    lr_mult: 1
  }
  param {
    lr_mult: 2
  }
  inner_product_param {
    num_output: 500
    weight_filler {
      type: "xavier"
    }
    bias_filler {
      type: "constant"
    }
  }
}
3.预测层accuracy:
layer {
  name: "accuracy"
  type: "Accuracy"
  bottom: "ip2"
  bottom: "label"
  top: "accuracy"
  include {
    phase: TEST
  }
}
4.Reshape操作:
 layer {
    name: "reshape"
    type: "Reshape"
    bottom: "input"
    top: "output"
    reshape_param {
      shape {
        dim: 0  # copy the dimension from below
        dim: 2
        dim: 3
        dim: -1 # infer it from the other dimensions
      }
    }
  }
假设原数据为:64*3*28*28, 表示64张3通道的28*28的彩色图片
经过reshape变换:
   reshape_param {
      shape {
        dim: 0
        dim: 0
        dim: 14
        dim: -1
      }
    }
输出数据为:64*3*14*56
5. drop out:
layer {
  name: "drop7"
  type: "Dropout"
  bottom: "fc7-conv"
  top: "fc7-conv"
  dropout_param {
    dropout_ratio: 0.5
  }
}
标签:lte beta image 需要 with ase 学习 lin prot
原文地址:https://www.cnblogs.com/ChrisInsistPy/p/9583465.html