标签:参数 cat 服务端 cli put file 登录接口 windows gis
前面【Locust性能测试2-先登录场景案例】讲了登录的案例,这种是直接传账号和密码就能登录了,有些登录的网站会复杂一点,
需要先从页面上动态获取参数,作为登录接口的请求参数,如【学信网:https://account.chsi.com.cn/passport/login】的登录接口请求参数
需要先发个get请求,从返回的html页面中解析出需要的数据
备注:
lt 参数是每次打开浏览器,访问登录首页时服务端会返回一个新的数据
execution 参数是表示网站刷新次数,可以刷新下再登录,就变成 e2s1了
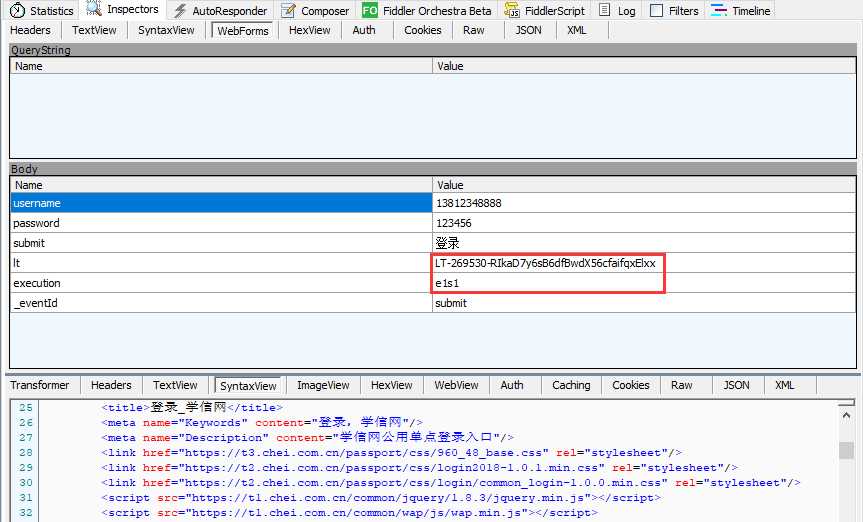
<input class="btn_login" name="submit" accesskey="l" value="登录" tabindex="4" type="submit" title="登录" />

<div class="account-oprate clearfix">
       <a class="find-yhm" href="https://account.chsi.com.cn/account/password!rtvlgname">找回用户名</a>
       <a class="find-mm" href="https://account.chsi.com.cn/account/password!retrive">找回密码</a>
       <a href="https://account.chsi.com.cn/account/preregister.action?from=account-login" class="regist-btn">注册</a>
</div>
<input type="hidden" name="lt" value="LT-279621-fnisPBt0FVGNFrfWzJJqhTEyw6VkfH" />
<input type="hidden" name="execution" value="e2s1" />
<input type="hidden" name="_eventId" value="submit" />前面用篇专门讲了requests实现接口的参数关联案例,这里直接转化成locust脚本就行了
# coding:utf-8
from locust import HttpLocust, TaskSet, task
from lxml import etree

class LoginDemo(TaskSet):
    '''用户行为描述'''
    def get_it_execution(self):
        result = {}
        h1 = {
            "User-Agent": "Mozilla/5.0 (Windows NT 10.0; Win64; x64) AppleWebKit/537.36 (KHTML, like Gecko) Chrome/68.0.3440.106 Safari/537.36",
        }
        self.client.headers.update(h1)
        r = self.client.get("/passport/login", verify=False)
        # 从返回html页面,解析出lt、execution
        dom = etree.HTML(r.content.decode("utf-8"))
        try:
            result["lt"] = dom.xpath('//input[@name="lt"]')[0].get("value")
            result["execution"] = dom.xpath('//input[@name="execution"]')[0].get("value")
            print(result)
        except:
            print("lt、execution参数获取失败!")
        return result

    def login(self, user, psw):
        result = self.get_it_execution()
        loginurl = "/passport/login"
        h2 = {
            "Referer": loginurl,
            "User-Agent": "Mozilla/5.0 (Windows NT 10.0; Win64; x64) AppleWebKit/537.36 (KHTML, like Gecko) Chrome/68.0.3440.106 Safari/537.36",
            "Accept": "text/html,application/xhtml+xml,application/xml;q=0.9,image/webp,image/apng,*/*;q=0.8",
            "Origin": "https://account.chsi.com.cn",
            "Content-Length": "119",
            "Cache-Control": "max-age=0",
            "Upgrade-Insecure-Requests": "1",
            "Content-Type": "application/x-www-form-urlencoded"
            }
        body = {
            "username": user,
            "password": psw,
            "rememberMe": "true",
            "lt": result["lt"],
            "execution": result["execution"],
            "_eventId": "submit"
        }
        self.client.headers.update(h2)
        print(self.client.headers)
        r1 = self.client.post(loginurl, data=body, verify=False)
        # print(r1.text)

    @task(1)
    def test_login(self):
        # 测试数据
        user = "13888888888"
        psw = "111111"
        self.login(user, psw)

class websitUser(HttpLocust):
    task_set = LoginDemo
    host = "https://account.chsi.com.cn"
    min_wait = 3000  # 单位毫秒
    max_wait = 6000  # 单位毫秒

if __name__ == "__main__":
    import os
os.system("locust -f locustfile3.py")标签:参数 cat 服务端 cli put file 登录接口 windows gis
原文地址:https://www.cnblogs.com/yoyoketang/p/9672096.html