标签:core exp 展示 log code 表数据 用户 png template
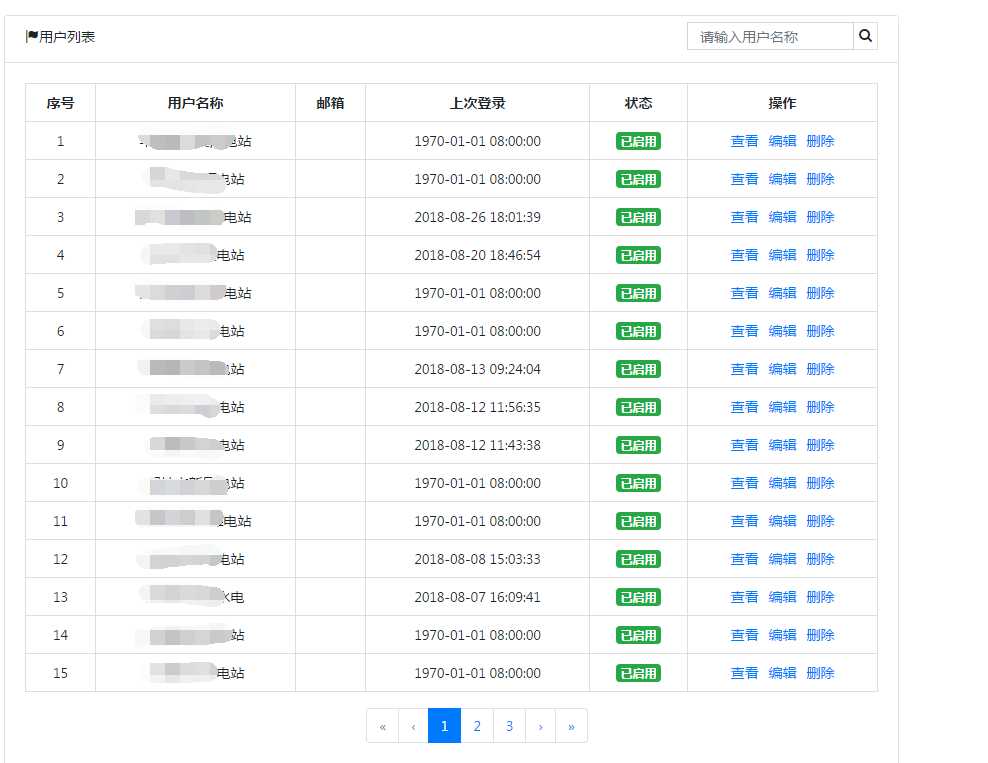
本组件主要是实现了分页组件显示功能,通过使用 ngx-bootstrap Pagination分页组件实现。
基本逻辑:
1.创建一个分页组件,如:ng g component pager
2.父组件调用子组件,并向子组件传入基础配置信息
3.分页组件接收父组件传参,并在模板上进行配置,在html模板上定义点击事件,调用分页子组件自身一个方法
4.分页组件定义发射器,当页码发生变化时,发射通知
5.父组件模板调用分页组件处,监听分页组件发射方法,并调用自身组件方法,接收分页组件发射携带的数据,执行自身业务逻辑
第一步:搭建Angular4 环境,可以参考 我的博客 《Angular环境搭建》
第二步:安装ngx-bootstrap插件
使用Bootstrap4:
打开命令窗口,在当前项目下运行指令 npm install ngx-bootstrap --save (推荐)
使用Bootstrap3:
<link href="https://maxcdn.bootstrapcdn.com/bootstrap/3.3.7/css/bootstrap.min.css" rel="stylesheet">
第三步:注入PaginationModule
1   imports: [
2     CommonModule,
3     FormsModule,
4     ReactiveFormsModule,
5     RouterModule.forChild(homeRoutes),
6     PaginationModule.forRoot()
7   ],
第一步:创建分页组件
ng g component pager
第二步:编写分页组件模板
1 <div> 2 <pagination [totalItems]="totalItems" [(ngModel)]="currentPage" [itemsPerPage]="itemsPerPage" [maxSize]="maxSize" (pageChanged)="pageChanged($event)" previousText="‹" nextText="›" [boundaryLinks]="true" firstText="«" lastText="»" style="text-align: center;position: relative;left: 40%;"></pagination> 3 </div>
第三步:分页组件ts文件代码,如下:
 1 import { Component, OnInit, Input, Output, EventEmitter } from ‘@angular/core‘;
 2
 3 @Component({
 4   selector: ‘app-pager‘,
 5   templateUrl: ‘./pager.component.html‘,
 6   styleUrls: [‘./pager.component.css‘]
 7 })
 8 export class PagerComponent implements OnInit {
 9   //存在多页,显示页码数量
10   maxSize:number = 3;
11   //每页展示条数
12   itemsPerPage:number = 15;
13   //总条数
14   @Input() totalItems:number;
15   //当前页码
16   @Input() currentPage:number;
17   //定义发射器,当页码变化时候,将变化后的数据发射出去,供监听者接收使用
18   @Output() pageChanges:EventEmitter<Page> = new EventEmitter();
19
20   pageChanged(event: any): void {
21     //通过发射器发射数据,数据包含在event中
22     this.pageChanges.emit(event);
23   }
24
25   constructor() {}
26
27   ngOnInit() {
28   }
29
30
31 }
32
33 export class Page{
34   constructor(
35     public itemsPerPage:number,
36     public page:number
37   ){
38     this.itemsPerPage = 15;
39     this.page = 1;
40   }
41 }
第四步:父组件ts文件中配置传入分页组件配置项,如:
1   //分页组件配置项
2   private itemsPerpage:number ;
3   //总条数
4   private totalcounts:number;
5   //当前页码
6   private currentPage:number = 1;
第五步:父组件htaml模板调用子组件,代码如下:
 1 <div class="card-body" style="font-size:14px;">
 2    <table class="table table-bordered ">
 3        <thead>
 4           <tr>
 5              <th>序号</th>
 6              <th>用户名称</th>
 7               <th>邮箱</th>
 8               <th>上次登录</th>
 9               <th>状态</th>
10               <th>操作</th>
11           </tr>
12         </thead>
13         <tbody >
14            <tr *ngFor="let user of users,let i = index;">
15                <td>{{(currentPage-1)*15+i+1}}</td>
16                <td>{{user.username}}</td>
17                <td>{{user.email}}</td>
18                <td>{{user.lastlogintime * 1000 | date:‘yyyy-MM-dd HH:mm:ss‘}}</td>
19                <td><span class="badge badge-success">已启用</span></td>
20                <td>
21                   <a href="javascript:;" (click)="switchToCheckUser(user)">查看</a>
22                   <a href="javascript:;" (click)="switchToEditUser(user)" style="margin-left:10px;">编辑</a>
23                   <a href="javascript:;" (click)="deleteUser(user)" style="margin-left:10px;">删除</a>
24                </td>
25            </tr>
26          </tbody>
27      </table>
28      <app-pager [totalItems]="totalcounts" [currentPage]="currentPage" (pageChanges)="pageChanged($event)"></app-pager>
29 </div>
第六步:父组件定义监听页码变化的 pageChanged($event)方法,代码如下:
1   //页码变化,重新获取用户列表数据
2   pageChanged(event){
3     //查看监听到的数据
4     console.log(‘event:‘,event);
5     this.currentPage = event.page;
6     this.itemsPerpage = event.itemsPerPage;
7     //重新获取用户列表数据
8     this.getUserData();
9   }

1.关于ngx-bootstrap使用,可以参考 http://ngx-bootstrap.com/。
2.关于分页模板使用可以参考http://ngx-bootstrap.com/。
Angular4.+ ngx-bootstrap Pagination 自定义分页组件
标签:core exp 展示 log code 表数据 用户 png template
原文地址:https://www.cnblogs.com/mycnblogs-guoguo/p/9680202.html