标签:server head img 文件名 仓库管理 版本库 bsp 最新 yum
Gitlab 是一个基于Git实现的在线代码仓库托管软件,你可以用Gitlab自己搭建一个类似于Github一样的系统平台,一般搭建gitlab私服就是用在公司的内部
Gitlab 功能就是能够对代码的提交审核和问题跟踪,这个对于软件工程质量的管理是至关重要的
Gitlab分为社区版(CE) 和 企业版(EE) 我感觉大多数的公司还是会选择社区版,反正我们公司是要用社区版的
部署Gitlab 是对服务器有配置要求的 建议是CPU两核,内存4G以上(其实这就是废话了,谁家公司还没这样配置的服务器呀,主要还是给虚拟机玩的朋友们提示一下)
其实gitlab的原理就是git的原理,GitHub不是也是基于Git的呀,所有简单说一下Git的原理吧

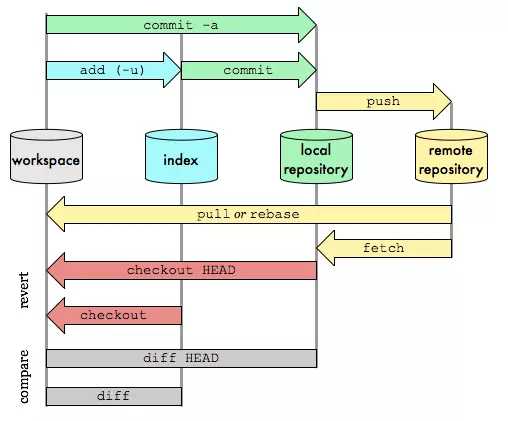
上面的就是整个Git的工作流程:
其实上面的都是一些GIt的命令,先不管命令是做什么的,这里面有四个大块的东西,他们分别是
Remote远程仓库:

远程仓库的内容可能被分布在多个地点的处于协作关系的本地仓库修改,因此它可能与本地仓库同步,也可能不同步,但是它的内容是最旧的


Repository本地仓库:

这里面保存了对象被提交过的各个版本,比起工作区和暂存区的内容,它更旧一些

git commit 后同步index的目录树到本地仓库,方便下一步通过git push同步本地仓库与远程仓库的同步


index暂存区:

.git目录下的index文件,暂存区会记录git add 添加文件的相关信息(文件名、大小),不保存文件实体,通过id指向每个文件的实体,可以使用git status查看暂存区的状态,暂存区标记了你当前工作区中那些内容是被git管理的

当你完成某个需求或者功能后需要提交代码,那么第一步就是通过git add 先提交到暂存区,被git管理


workspace工作区:

程序员进行开发改动的地方,是你当前看到的,内容也是最新的

平常我们开发就是拷贝远程仓库中的分支,基于该分支进行开发,在开发的过程就是在工作区的操作


总结:

任何对象都是在工作区中诞生和修改的

任何修改都是从进入index区才开始被版本控制的

只有把修改的代码提交到本地仓库,该修改才能在仓库中留下痕迹

与协助者分享本地的修改,可以push到远程仓库来共享
下面这张图很明确的表现了他们的关系

Gitlab有好多个东西一起构成的,分别是:
[root@web1134 ~]# yum install -y curl openssh-server openssh-clients postfix cronie policycoreutils-python
[root@web1134 ~]# systemctl start postfix
[root@web1134 ~]# systemctl enable postfix
firewall-cmd --add-service=http --permanent
firewall-cmd --reload

或者
关闭防火墙
systemctl stop firewalld.service #停止firewall

systemctl disable firewalld.service #禁止firewall开机启动
清华开源镜像站 :https://mirrors.tuna.tsinghua.edu.cn/
[root@web1134 ~]# wget https://mirrors.tuna.tsinghua.edu.cn/gitlab-ce/yum/el7/gitlab-ce-11.1.6-ce.0.el7.x86_64.rpm

[root@web1134 ~]# rpm -i gitlab-ce-11.1.6-ce.0.el7.x86_64.rpm
## GitLab configuration settings
##! This file is generated during initial installation and **is not** modified
##! during upgrades.
##! Check out the latest version of this file to know about the different
##! settings that can be configured by this file, which may be found at:
##! https://gitlab.com/gitlab-org/omnibus-gitlab/raw/master/files/gitlab-config-template/gitlab.rb.template


## GitLab URL
##! URL on which GitLab will be reachable.
##! For more details on configuring external_url see:
##! https://docs.gitlab.com/omnibus/settings/configuration.html#configuring-the-external-url-for-gitlab
#external_url ‘http://gitlab.example.com‘
external_url ‘http://192.168.73.134‘        # 修改这个地方
[root@web1134 ~]# gitlab-ctl reconfigure
[root@web1134 ~]# gitlab-ctl restart
[root@web1134 ~]# head -1 /opt/gitlab/version-manifest.txt
[root@web1134 ~]# git clone https://gitlab.com/xhang/gitlab.git
这个时间下载的挺长的
[root@web1134 ~]# gitlab-ctl stop
[root@web1134 ~]# cd /root/gitlab
[root@web1134 gitlab]# git diff v11.1.6 v11.1.6-zh > ../11.1.6-zh.diff
[root@web1134 gitlab]# cd ~
[root@web1134 ~]# yum install patch -y
[root@web1134 ~]# patch -d /opt/gitlab/embedded/service/gitlab-rails -p1 < 11.1.6-zh.diff


# 一路回车 覆盖文件
[root@web1134 ~]# gitlab-ctl start
[root@web1134 ~]# gitlab-ctl reconfigure
[root@web1134 ~]# vim /etc/gitlab/gitlab.rb

修改下面信息
# 配置发送邮箱

gitlab_rails[‘smtp_enable‘] = true

gitlab_rails[‘smtp_address‘] = "smtp.163.com"

gitlab_rails[‘smtp_port‘] = 25

gitlab_rails[‘smtp_user_name‘] = "smtp user@163.com"

gitlab_rails[‘smtp_password‘] = "password"

gitlab_rails[‘smtp_domain‘] = "163.com"

gitlab_rails[‘smtp_authentication‘] = "login"

gitlab_rails[‘smtp_enable_starttls_auto‘] = true

# 修改gitlab配置的发信人

gitlab_rails[‘gitlab_email_from‘] = "smtp user@163.com"

user["git_user_email"] = "smtp user@163.com"
[root@web1134 ~]# gitlab-ctl reconfigure
[root@web1134 ~]# gitlab-ctl restart
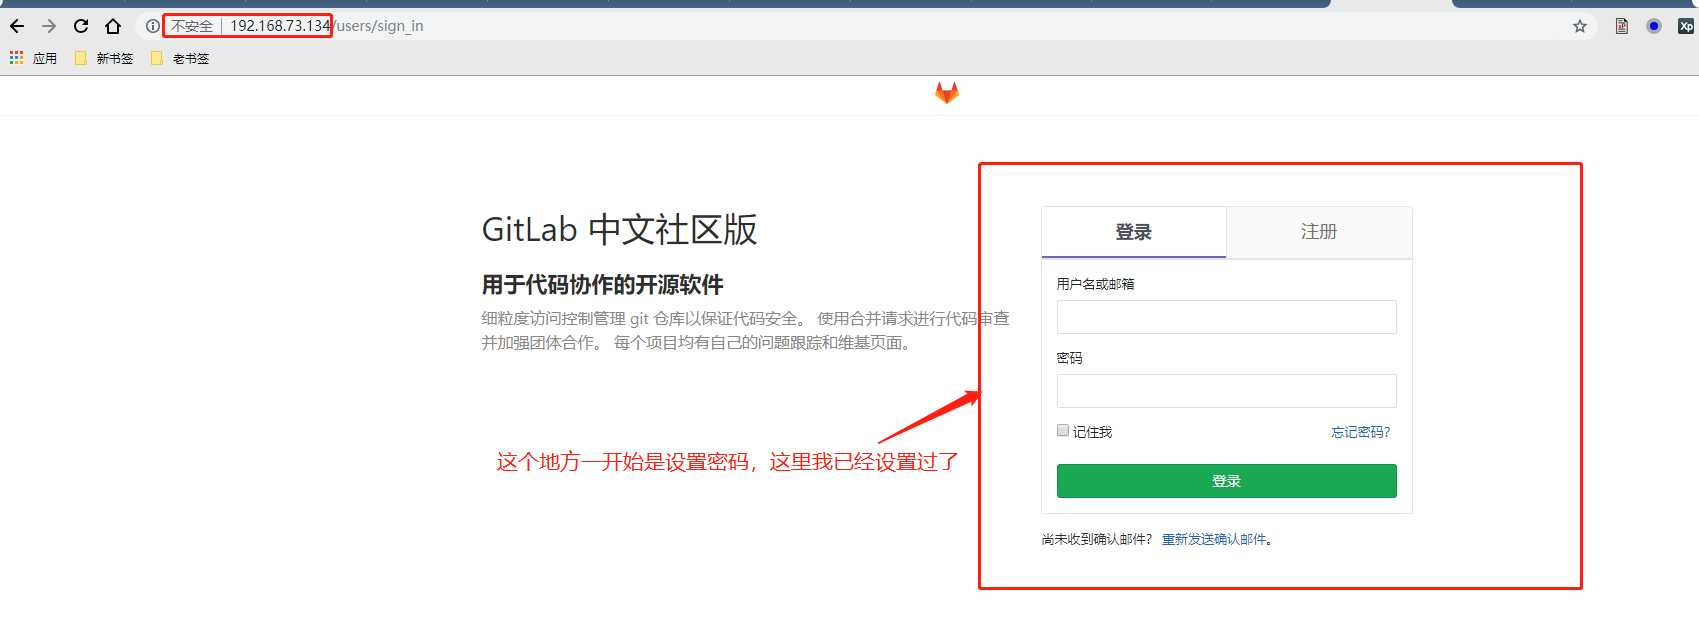
登录地址就是服务器IP地址 http://192.168.73.134
用户名是root

标签:server head img 文件名 仓库管理 版本库 bsp 最新 yum
原文地址:https://www.cnblogs.com/zhujingzhi/p/9703457.html