标签:http llb __init__ enc dump 直接 json www 是什么
1.概念:scrapy。框架。  Scrapy是一个为了爬取网站数据,提取结构性数据而编写的应用框架,
非常出名,非常强悍。所谓的框架就是一个已经被集成了各种功能(高性能异步下载,队列,分布式,解析,持久化等)
的具有很强通用性的项目模板。对于框架的学习,重点是要学习其框架的特性、各个功能的用法即可。
2.安装:Linux:

      pip3 install scrapy

  Windows:
      a. pip3 install wheel
      b. 下载twisted http://www.lfd.uci.edu/~gohlke/pythonlibs/#twisted
      c. 进入下载目录,执行 pip3 install Twisted?17.1.0?cp35?cp35m?win_amd64.whl
      d. pip3 install pywin32
      e. pip3 install scrapy

3.创建工程:scrapy startprroject proName
4.创建爬虫文件:scrapy genspider fileName xxx.com
5.执行爬虫文件:scrapy crawl name
6.持久化操作:
    1.scrapy crawl name -o file.xxx
    2.pipeline:
        1.获取解析内容
        2.创建item对象,将解析内容存储到item对象中(items类中进行相应属性的声明(scrapy.Filed()))
        3.yiled关键字将item提交给管道文件
        4.管道文件负责接收item对象,进行持久化操作
        5.settings中开启管道

scrapy 不需要考虑session&cookie的问题


firstblood 初识scrapy

# -*- coding: utf-8 -*-
import scrapy


class FirsttestSpider(scrapy.Spider):#爬虫类是基于Spider这个父类
    name = ‘firstTest‘ #爬虫文件的名称
    #允许的域名:
    #allowed_domains = [‘www.qiushibaike.com‘]
    #起始url列表:当前的爬虫文件可以从该列表中存储的url中爬取数据
    start_urls = [‘https://www.qiushibaike.com/text/‘]

    #继承与父类的方法:用于解析请求到的页面数据
    def parse(self, response):
        print(‘haha this is  hehe‘)
        print(response)
        #xpath函数的返回值是Selector对象(使用xpath表达式解析出来的内容是被存储在了Selecotr对象中)
        #title = response.xpath(‘//*[@id="qiushi_tag_121076506"]/div[1]/a[2]/h2/text()‘)[0].extract()
        #extract系列函数的作用是将Selector中的文本数据取出。
        #Selector对象可以直接调用xpath函数。
        title = response.xpath(‘//*[@id="qiushi_tag_121056271"]/div[1]/a[2]/h2/text()‘).extract_first()
        title = response.xpath(‘//*[@id="qiushi_tag_121056271"]/div[1]/a[2]/h2/text()‘)[0]
        print(title)
修改内容及其结果如下:
19行:USER_AGENT = ‘Mozilla/5.0 (Macintosh; Intel Mac OS X 10_12_0) AppleWebKit/537.36 (KHTML, like Gecko) Chrome/68.0.3440.106 Safari/537.36‘ #伪装请求载体身份

22行:ROBOTSTXT_OBEY = False  #可以忽略或者不遵守robots协议
qiubai 基础+持久化
# -*- coding: utf-8 -*-
import scrapy
from qiubai.items import QiubaiItem

class QiubaitestSpider(scrapy.Spider):
    name = ‘qiubaiTest‘
    #allowed_domains = [‘www.qiushibaike.com/text‘]
    start_urls = [‘http://www.qiushibaike.com/text/‘]

    def parse(self, response): #返回值类型必须为None 或者迭代器类型
        div_list = response.xpath(‘//div[@id="content-left"]/div‘)#该列表中存储的元素为Selecoter对象
        content_list = []
        for div in div_list:
            #step 1
            author = div.xpath(‘.//h2/text()‘).extract_first()
            content = div.xpath(‘.//div[@class="content"]/span[1]//text()‘).extract_first()

            #使用管道进行持久化存储的流程:
                #1.使用爬虫文件获得解析到的数据
                #2.将解析到的数据封装存储到items对象中
                #3.将封装好的items对象提交给管道文件
                #4.在管道文件中编写持久化存储的代码
                #5.在settings中开启管道
            # step 2
            item = QiubaiItem() #创建items对象
            item[‘author‘] = author
            item[‘content‘] = content

            #step 3:
            yield item
# -*- coding: utf-8 -*-

# Define here the models for your scraped items
#
# See documentation in:
# https://doc.scrapy.org/en/latest/topics/items.html

import scrapy


class QiubaiItem(scrapy.Item):
    # define the fields for your item here like:
    # name = scrapy.Field()
    author = scrapy.Field()
    content = scrapy.Field()
# -*- coding: utf-8 -*-

# Define your item pipelines here
#
# Don‘t forget to add your pipeline to the ITEM_PIPELINES setting
# See: https://doc.scrapy.org/en/latest/topics/item-pipeline.html


class QiubaiPipeline(object):
    def __init__(self):
        self.fp = None

    #该函数在整个爬虫过程中只会被执行一次:开始进行爬虫时被调用
    def open_spider(self,spider):
        print(‘开始爬取数据‘)
        self.fp = open(‘./qiubaiText.txt‘,‘w‘,encoding=‘utf-8‘)
    #该函数作用:当爬虫文件中,通过yiled每向管道中提交一次items,该函数就会被执行一次。
    def process_item(self, item, spider):
        print(‘向文件中写入了一条数据!‘)
        self.fp.write(item[‘author‘]+‘:‘+item[‘content‘]+"\n\n\n")
        return item
    # 该函数在整个爬虫过程中只会被执行一次:结束爬虫的时候被调用
    def close_spider(self,spider):
        self.fp.close()
        print(‘结束爬取数据‘)
#修改部分

USER_AGENT = ‘Mozilla/5.0 (Windows NT 10.0; WOW64) AppleWebKit/537.36 (KHTML, like Gecko) Chrome/69.0.3497.100 Safari/537.36‘

# Obey robots.txt rules
ROBOTSTXT_OBEY = False

ITEM_PIPELINES = {
    ‘qiubai.pipelines.QiubaiPipeline‘: 300,
}
qiubai_all 基础+持久化+分页
# -*- coding: utf-8 -*-
import scrapy
from qiubai_all.items import QiubaiAllItem

class QiutuSpider(scrapy.Spider):
    name = ‘qiutu‘
    #allowed_domains = [‘www.qiushibaike.com/pic/‘]
    start_urls = [‘http://www.qiushibaike.com/pic/‘]

    #指定一个页码通用的url
    url = ‘https://www.qiushibaike.com/pic/page/%d/?s=5127014‘
    pageNum = 1 #控制页码

    def parse(self, response):
        div_list = response.xpath(‘//*[@id="content-left"]/div‘)
        for div in div_list:
            item = QiubaiAllItem() #创建item对象
            item[‘author‘]=div.xpath(‘.//h2/text()‘).extract_first()
            item[‘content‘]=div.xpath(‘.//div[@class="content"]/span/text()‘).extract_first()

            yield item

        #想要对应不同页码的url发起请求
        if self.pageNum <= 35:
            self.pageNum += 1 #从第二页发起请求

            print(‘开始爬取第%d页的数据‘%self.pageNum)

            new_url = format(self.url%self.pageNum) #是新页码的url
            #发起请求
            #url:请求的url
            #callback:回调函数(指定解析数据的规则)
            yield scrapy.Request(url=new_url,callback=self.parse)
# -*- coding: utf-8 -*-

# Define here the models for your scraped items
#
# See documentation in:
# https://doc.scrapy.org/en/latest/topics/items.html

import scrapy


class QiubaiAllItem(scrapy.Item):
    # define the fields for your item here like:
    # name = scrapy.Field()
    author = scrapy.Field()
    content = scrapy.Field()
# -*- coding: utf-8 -*-

# Define your item pipelines here
#
# Don‘t forget to add your pipeline to the ITEM_PIPELINES setting
# See: https://doc.scrapy.org/en/latest/topics/item-pipeline.html


class QiubaiAllPipeline(object):
    def __init__(self):
        self.fp = None
    def open_spider(self,spider):
        print(‘开始爬虫‘)
        self.fp = open(‘./data.txt‘,‘w‘,encoding=‘utf-8‘)


    def process_item(self, item, spider):
        #1.获取item中的数据
        self.fp.write(item[‘author‘]+‘:‘+item[‘content‘]+‘\n\n‘)
        return item


    def close_spider(self,spider):
        print(‘爬虫结束‘)
        self.fp.close()
ROBOTSTXT_OBEY = False

USER_AGENT = ‘Mozilla/5.0 (Windows NT 10.0; WOW64) AppleWebKit/537.36 (KHTML, like Gecko) Chrome/69.0.3497.100 Safari/537.36‘

ITEM_PIPELINES = {
    ‘qiubai_all.pipelines.QiubaiAllPipeline‘: 300,
}
校花网 图片 分页
# -*- coding: utf-8 -*-
import scrapy
from xiaohuaPro.items import XiaohuaproItem

class XiaohuaSpider(scrapy.Spider):
    name = ‘xiaohua‘
    #allowed_domains = [‘www.521609.com/daxuemeinv‘]
    start_urls = [‘http://www.521609.com/daxuemeinv/‘]
    url = ‘http://www.521609.com/daxuemeinv/list8%d.html‘
    page_num = 1
    def parse(self, response):
        li_list = response.xpath(‘//*[@id="content"]/div[2]/div[2]/ul/li‘)
        for li in li_list:
            item = XiaohuaproItem()
            item[‘img_url‘] = li.xpath(‘./a/img/@src‘).extract_first()
            item[‘img_url‘] = ‘http://www.521609.com‘+item[‘img_url‘]
            item[‘img_name‘] = li.xpath(‘./a/img/@alt‘).extract_first()

            yield item
        if self.page_num <= 23:
            self.page_num += 1
            url = format(self.url%self.page_num)
            yield scrapy.Request(url=url,callback=self.parse)
# -*- coding: utf-8 -*-

# Define here the models for your scraped items
#
# See documentation in:
# https://doc.scrapy.org/en/latest/topics/items.html

import scrapy


class XiaohuaproItem(scrapy.Item):
    # define the fields for your item here like:
    # name = scrapy.Field()
    img_url = scrapy.Field()
    img_name = scrapy.Field()
# -*- coding: utf-8 -*-

# Define your item pipelines here
#
# Don‘t forget to add your pipeline to the ITEM_PIPELINES setting
# See: https://doc.scrapy.org/en/latest/topics/item-pipeline.html

import json
import urllib.request
import os
class XiaohuaproPipeline(object):
    def __init__(self):
        self.fp = None
    def open_spider(self,spider):
        print(‘开始爬虫‘)
        self.fp = open(‘./data.json‘,‘w‘,encoding=‘utf-8‘)
    def process_item(self, item, spider):
        img_dic = {
            ‘img_url‘:item[‘img_url‘],
            ‘img_name‘:item[‘img_name‘]
        }
        json_string = json.dumps(img_dic,ensure_ascii=False)
        self.fp.write(json_string)

        #下载图片操作
        if not os.path.exists(‘xiaohua‘):
            os.mkdir(‘xiaohua‘)
        filePath=‘xiaohua/‘+item[‘img_name‘]+‘.png‘
        urllib.request.urlretrieve(url=item[‘img_url‘],filename=filePath)
        print(filePath+ ‘:下载成功‘)

        return item
    def close_spider(self,spider):
        self.fp.close()
        print(‘爬虫结束‘)
ROBOTSTXT_OBEY = False
USER_AGENT = ‘Mozilla/5.0 (Windows NT 10.0; WOW64) AppleWebKit/537.36 (KHTML, like Gecko) Chrome/69.0.3497.100 Safari/537.36‘

ITEM_PIPELINES = {
    ‘xiaohuaPro.pipelines.XiaohuaproPipeline‘: 300,
}
post请求 百度翻译
# -*- coding: utf-8 -*-
import scrapy


class PostdemoSpider(scrapy.Spider):
    name = ‘postDemo‘
    allowed_domains = [‘https://fanyi.baidu.com/sug‘]
    #start_urls = [‘http://https://fanyi.baidu.com/sug/‘]

    #该方法就是对start_urls列表中的url发起请求
    #def start_requests(self):  #父类对该方法的默认实现
        #for url in self.start_urls:
            #yield scrapy.Request(url=url,callback=parse)

    #重写父类的start_requests方法:该方法默认发起的是get请求
    def start_requests(self):
        post_url = ‘https://fanyi.baidu.com/sug/‘
        data = {
            ‘kw‘:‘dog‘
        }
        #FormRequest该函数用来发起post请求
        #Request使用用来发起get请求
        yield scrapy.FormRequest(url=post_url,formdata=data,callback=self.parse)

    def parse(self, response):
        print(response.text)
ROBOTSTXT_OBEY = False
USER_AGENT = ‘Mozilla/5.0 (Windows NT 10.0; WOW64) AppleWebKit/537.36 (KHTML, like Gecko) Chrome/69.0.3497.100 Safari/537.36‘
scrapy组件介绍,流程分析
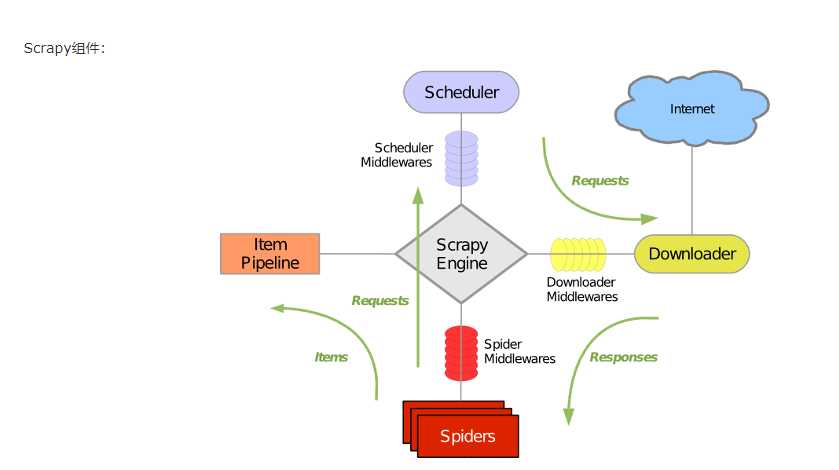
* 解释:引擎首先会将爬虫文件中的起始url获取,并且提交到调度器中。如果需要从url中下载数据,则调度器会将url通过引擎提交给下载器,下载器根据url去下载指定内容(响应体)。下载好的数据会通过引擎移交给爬虫文件,爬虫文件可以将下载的数据进行指定格式的解析。如果解析出的数据需要进行持久化存储,则爬虫文件会将解析好的数据通过引擎移交给管道进行持久化存储。
如果最终需要将爬取到的数据值一份存储到磁盘文件,一份存储到数据库中,则应该如何操作scrapy?
答:
管道文件中的代码为:
#该类为管道类,该类中的process_item方法是用来实现持久化存储操作的。
class DoublekillPipeline(object):

    def process_item(self, item, spider):
        #持久化操作代码 (方式1:写入磁盘文件)
        return item

#如果想实现另一种形式的持久化操作,则可以再定制一个管道类:
class DoublekillPipeline_db(object):

    def process_item(self, item, spider):
        #持久化操作代码 (方式1:写入数据库)
        return item
在settings.py开启管道操作代码为:
#下列结构为字典,字典中的键值表示的是即将被启用执行的管道文件和其执行的优先级。
ITEM_PIPELINES = {
   ‘doublekill.pipelines.DoublekillPipeline‘: 300,
    ‘doublekill.pipelines.DoublekillPipeline_db‘: 200,
}

#上述代码中,字典中的两组键值分别表示会执行管道文件中对应的两个管道类中的process_item方法,实现两种不同形式的持久化操作。
标签:http llb __init__ enc dump 直接 json www 是什么
原文地址:https://www.cnblogs.com/xujinjin18/p/9720973.html
