标签:增加 pre soft window line and 还需 pip strong
笔者在《Jenkins 在声明式 pipeline 中并行执行任务》一文中介绍了如何在声明式 pipeline 中执行并行的任务。前一段时间,Jenkins 发布了 1.3 版的声明式 pipeline(declarative pipeline),这个版本继续增强了并行执行任务的能力:并行执行的任务可以是个任务流。官方称这一功能为 "sequential stages",本文将解释 "sequential stages",并通过 demo 演示其用法。
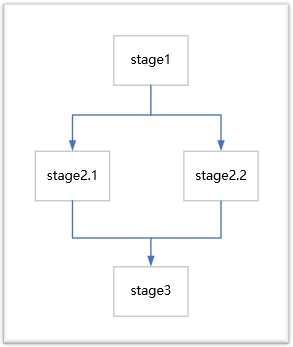
就是笔者在《Jenkins 在声明式 pipeline 中并行执行任务》一文中介绍的方式,我们在一个 stage 中设置多个子 stage 并行执行:
stages {
    stage(‘Stage1‘) {
        ...
    }
    stage(‘并行执行的 Stage‘) {
        parallel {
            stage(‘Stage2.1‘) {
                agent { label "test1" }
                steps {
                    echo "在 agent test1 上执行的并行任务 1."
                }
            }
            stage(‘Stage2.2‘) {
                agent { label "test2" }
                steps {
                    echo "在 agent test2 上执行的并行任务 2."
                }
            }
        }
    }
    stage(‘Stage3‘) {
        ...
    }
}
上面代码中任务的执行过程如下图所示:

任务 2.1 和任务 2.2 并行执行。
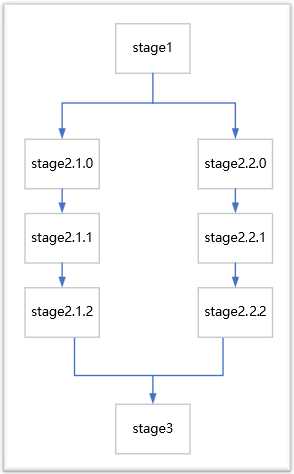
过去并行执行的任务都是单个的,但实际情况中我们还需要任务流级别的并行能力,如下图所示:

上图中显示有两条任务流在并行的执行,我们可以通过下面的代码来实现:
pipeline {
    agent none

    stages {
        stage(‘Stage1‘) {
            agent { label "master" }
            steps {
                timestamps {
                    echo ‘这是第一个被执行的 stage.‘
                    sleep 5
                }
            }
        }
        stage("build, deploy and test on Windows and Linux") {
            parallel {
                stage("windows") {
                    agent {
                        label "master"
                    }
                    stages {
                        stage("build") {
                            steps {
                                timestamps {
                                    echo "build on windows."
                                }
                            }
                        }
                        stage("deploy") {
                            steps {
                                timestamps {
                                    echo "deploy on windows."
                                }
                            }
                        }
                        stage("test") {
                            steps {
                                timestamps {
                                    echo "test on windows."
                                    sleep 5
                                }
                            }
                        }
                    }
                }

                stage("linux") {
                    agent {
                        label "worker1"
                    }
                    stages {
                        stage("build") {
                            steps {
                                timestamps {
                                    echo "build on linux."
                                }
                            }
                        }
                        stage("deploy") {
                             steps {
                                 timestamps {
                                     echo "deploy on linux."
                                 }
                            }
                        }
                        stage("test") {
                            steps {
                                timestamps {
                                    echo "test on linux."
                                    sleep 5
                                }
                            }
                        }
                    }
                }
            }
        }
        stage(‘Stage3‘) {
            agent { label "worker1" }
            steps {
                timestamps {
                    echo ‘这是最后一个被执行的 stage.‘
                }
            }
        }
    }
}
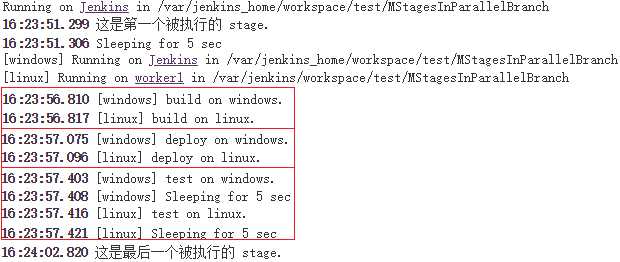
为了显示任务的执行时间,笔者使用了 timestamper 插件。下图显示了笔者精简后的运行日志:

红框中的内容说明我们的两个任务流是完全并行执行的。这就是 1.3 版的声明式 pipeline 中增加的 "sequential stages" 功能。
如今 jenkins 对声明式 pipeline 中并行任务的执行支持的非常给力(虽然经历了一个稍显漫长的过程)。笔者在 2017 年初调研时发现声明式 pipeline 无法支持并行的任务,后来开始支持比较初级的并行任务,笔者在《Jenkins 在声明式 pipeline 中并行执行任务》一文中进行了介绍。到今年(2018) 7 月份声明式 pipeline 发布了版本 1.3,这个版本中开始支持本文介绍的任务流级别的并行。至此笔者认为 jenkins 声明式 pipeline 中任务的并行执行功能已经比较完善了。
参考:
Sequential Stages (declarative pipeline 1.3 的新功能)
标签:增加 pre soft window line and 还需 pip strong
原文地址:https://www.cnblogs.com/sparkdev/p/9742739.html