标签:style blog http color io 使用 ar sp div
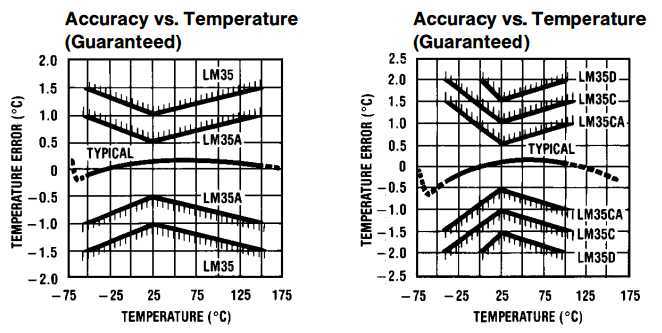
LM35是美国国家半导体(后被TI收购)推出的精密温度传感IC系列,其信号输出方式为模拟输出,输出电压值与摄氏温度值呈正比,且用户不需额外的校正就能获得较高的测量精度。其主要特性有:

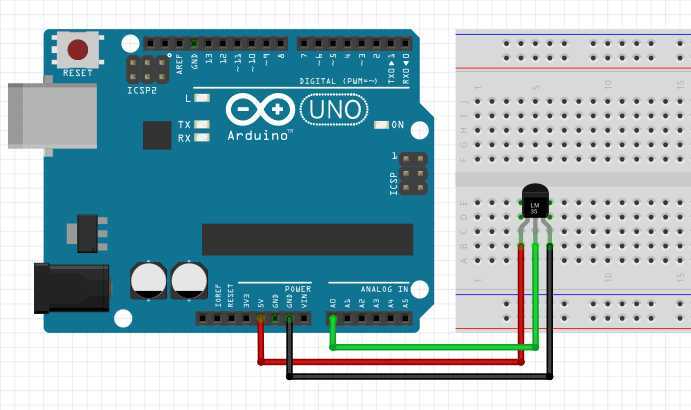
LM35D采用Arduino UNO板上的5V电压供电,信号输出端与A0管脚相连。

转换采用Arduino的ADC功能实现,测量电压与AD采样值的关系为:

其中,Vin是被测量(输入)电压;Vref是参考电压,若不特殊设置的话即为供电电压,对于UNO板为5V;resolution是ADC的比特数(不含符号位),对于atmega328p为10比特;ADC为读取的转换结果。严格来讲,上式的分母应该再减去1,但是否减1对结果的影响可以忽略不计。实现的代码非常简单:
 1 /*
 2 Measuring the temperature using the LM35 sensor
 3 Connection:
 4 LM35        UNO
 5 Vs <------> 5V
 6 GND <-----> GND
 7 Vout <----> A0
 8
 9 */
10
11 const int PIN_LM35 = A0; //pin connection
12
13 float sensorVolt; //unit: mV
14 float temperature; //unit: centigrade
15
16 void setup()
17 {
18     Serial.begin(115200); //initialize serial communication
19 }
20
21 void loop()
22 {
23     sensorVolt = analogRead(PIN_LM35)*5000.0/1023; //do conversion
24     temperature = sensorVolt/10.0;
25
26     Serial.print("Temperature: "); //print the result
27     Serial.print(temperature);
28     Serial.println(" `C");
29
30     delay(1000); //delay 1s
31 }
除了采用电源电压作为基准源外,atmega328p提供了1.1V的内部基准源。在室温条件下测量时,LM35的输出电压在几百mV量级,因此可以利用内部基准源获得更高的测量分辨率。
代码也很简单,只需增加analogReference()语句及更改转换参数即可:
 1 /*
 2 Measuring the temperature using the LM35 sensor
 3 Connection:
 4 LM35        UNO
 5 Vs <------> 5V
 6 GND <-----> GND
 7 Vout <----> A0
 8
 9 */
10
11 const int PIN_LM35 = A0; //pin connection
12
13 float sensorVolt; //unit: mV
14 float temperature; //unit: centigrade
15
16 void setup()
17 {
18     analogReference(INTERNAL); //use internal voltage reference
19     Serial.begin(115200); //initialize serial communication
20 }
21
22 void loop()
23 {
24     sensorVolt = analogRead(PIN_LM35)*1100.0/1023; //do conversion
25     temperature = sensorVolt/10.0;
26
27     Serial.print("Temperature: "); //print the result
28     Serial.print(temperature);
29     Serial.println(" `C");
30
31     delay(1000); //delay 1s
32 }
然而,atmega328p的手册中描述内部基准源本身的误差有+-9%左右。因此,使用内部基准源在提高分辨能力的同时,也引入了额外的测量误差。更好的方法是采用外部的高精度基准源。
datasheet: LM35 Precision Centigrade Temperature Sensors - TI
Tutorial: Analog to Digital Conversion - Thanks to SparkFun
How to Build a LM35 Temperature Sensor Circuit
Arduino LM35 Sensor (包含利用Processing实现结果可视化的程序)
TMP36 Temperature Sensor - from Adafruit
标签:style blog http color io 使用 ar sp div
原文地址:http://www.cnblogs.com/zlbg/p/4014506.html