标签:namespace 位置 add ice enter margin 高度宽度 实现 back
通过这篇文章你将了解到xamarin forms中最简单常用的布局StackLayout。至于其他几种布局使用起来,效果相对较差,目前在项目中使用最多的也就是这两种布局StackLayout和Grid。
之前上一家的的同事在写xamarin android的时候,聊天给我说他写axml布局的时候都是拖控件,这有点刷新我认知的下线,一直拖控件“历史原因”,造成的坏处是显而易见的,无法熟练掌握布局的常用属性,至于xamarin forms能不能拖控件,就目前来说是不能的,布局的设计有两种实现方式,一种是以c#代码的方式,一种是以xaml布局的方式。
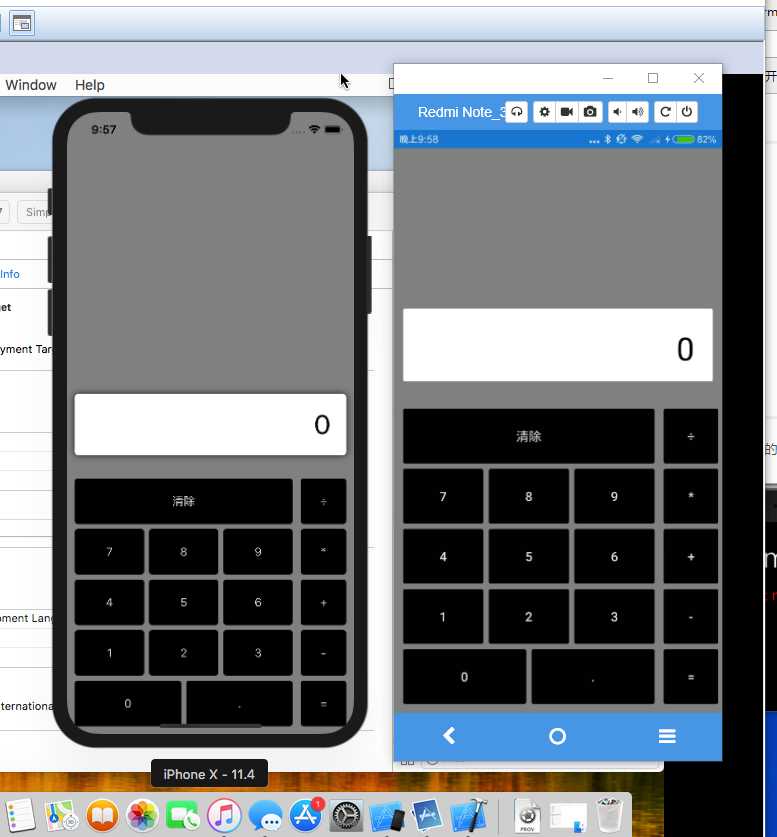
如下图是xamarin forms中最见的五种布局,本篇文章将使用最常用的一种布局StackLayout,实现一个简易计算器的布局,便于熟悉和掌握这种布局的各种属性。

StackLayout相似于android中LinearLayout、前端css中的默认的Static定位;Grid相似于android中GridLayout,html中的Table布局。
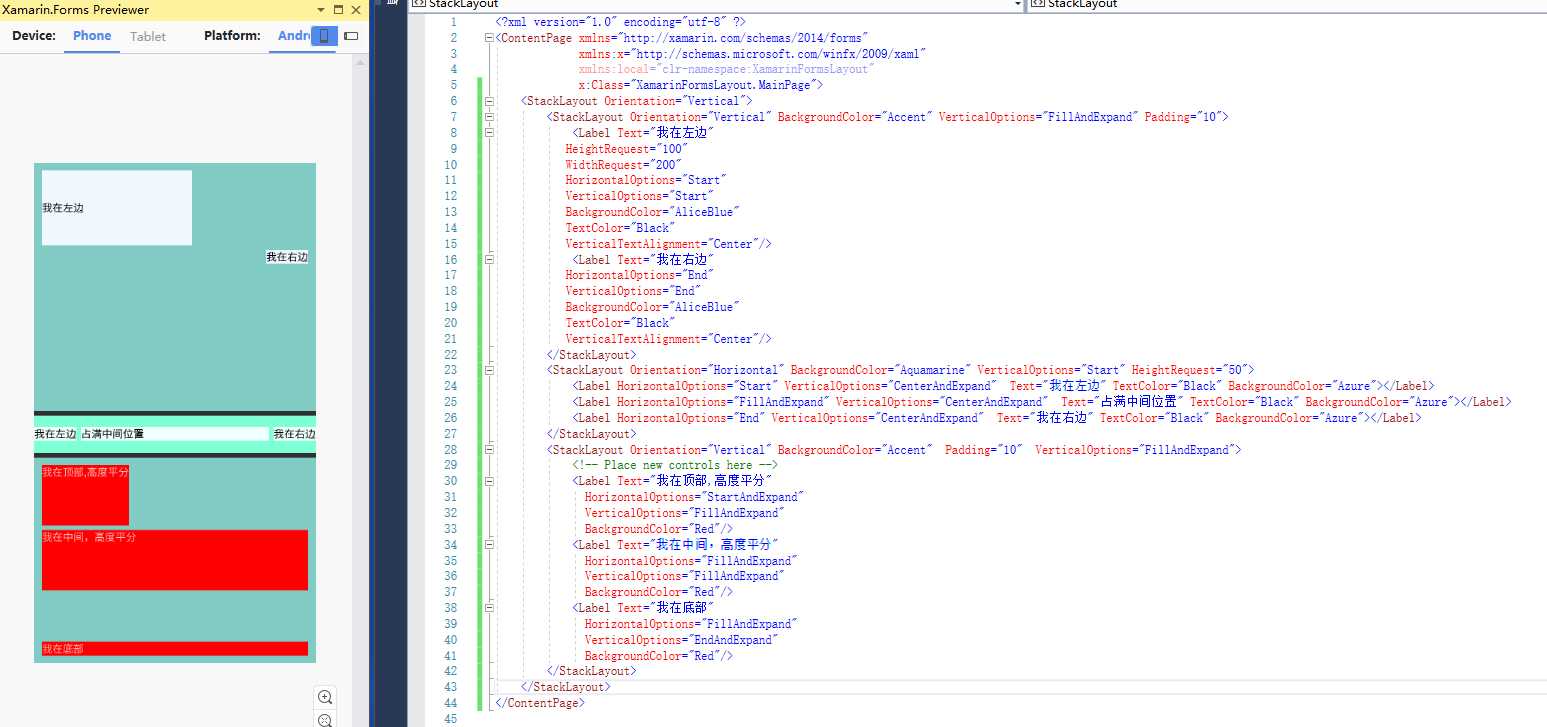
顾名思义,StackLayout是一种可以在上下方向、左右方向堆叠的布局,简单而又常用的布局,我们需要掌握它的三个重要属性,最重要的是布局方向和布局定位。

<?xml version="1.0" encoding="utf-8" ?>
<ContentPage xmlns="http://xamarin.com/schemas/2014/forms"
             xmlns:x="http://schemas.microsoft.com/winfx/2009/xaml"
             xmlns:local="clr-namespace:XamarinFormsLayout"
             x:Class="XamarinFormsLayout.MainPage">
    <StackLayout Orientation="Vertical">
        <StackLayout Orientation="Vertical" BackgroundColor="Accent" VerticalOptions="FillAndExpand" Padding="10">
            <Label Text="我在左边"
           HeightRequest="100"
           WidthRequest="200"
           HorizontalOptions="Start"
           VerticalOptions="Start"
           BackgroundColor="AliceBlue"
           TextColor="Black"
           VerticalTextAlignment="Center"/>
            <Label Text="我在右边"
           HorizontalOptions="End"
           VerticalOptions="End"
           BackgroundColor="AliceBlue"
           TextColor="Black"
           VerticalTextAlignment="Center"/>
        </StackLayout>
        <StackLayout Orientation="Horizontal" BackgroundColor="Aquamarine" VerticalOptions="Start" HeightRequest="50">
            <Label HorizontalOptions="Start" VerticalOptions="CenterAndExpand"  Text="我在左边" TextColor="Black" BackgroundColor="Azure"></Label>
            <Label HorizontalOptions="FillAndExpand" VerticalOptions="CenterAndExpand"  Text="占满中间位置" TextColor="Black" BackgroundColor="Azure"></Label>
            <Label HorizontalOptions="End" VerticalOptions="CenterAndExpand"  Text="我在右边" TextColor="Black" BackgroundColor="Azure"></Label>
        </StackLayout>
        <StackLayout Orientation="Vertical" BackgroundColor="Accent"  Padding="10"  VerticalOptions="FillAndExpand">
            <!-- Place new controls here -->
            <Label Text="我在顶部,高度平分"
              HorizontalOptions="StartAndExpand"
              VerticalOptions="FillAndExpand"
              BackgroundColor="Red"/>
            <Label Text="我在中间,高度平分"
              HorizontalOptions="FillAndExpand"
              VerticalOptions="FillAndExpand"
              BackgroundColor="Red"/>
            <Label Text="我在底部"
              HorizontalOptions="FillAndExpand"
              VerticalOptions="EndAndExpand"
              BackgroundColor="Red"/>
        </StackLayout>
    </StackLayout>
</ContentPage>
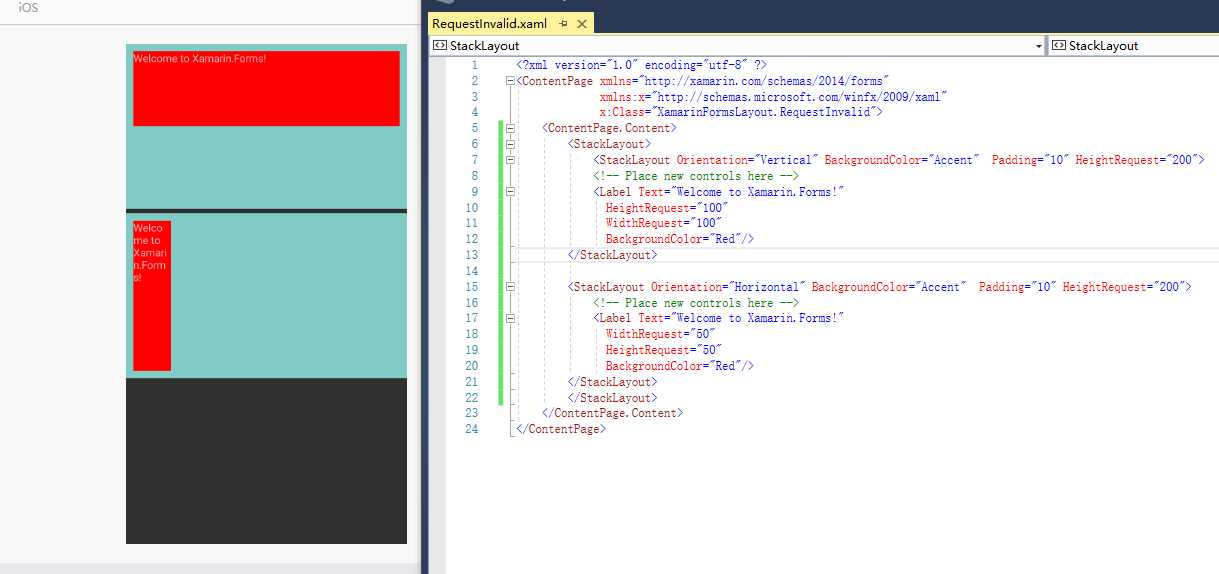
直接设置高度宽度可以用HeightRequest和WidthRequest;
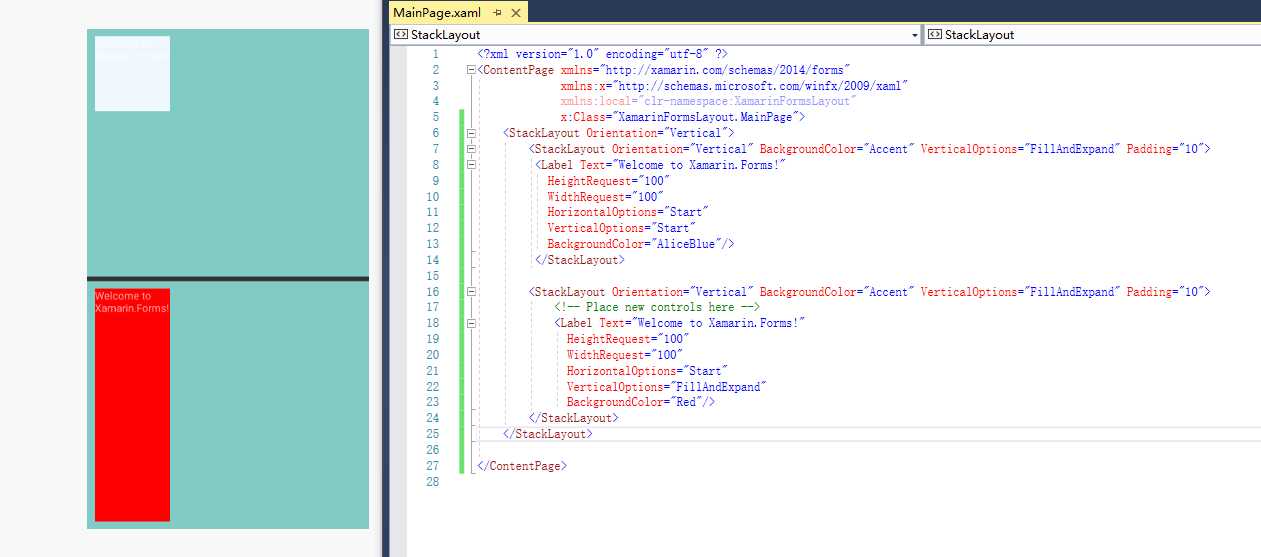
这一点容易混淆,我们已经知道VerticalOptions和HorizontalOptions是用来定位和设置大小的,WidthRequest和HeightRequest是double类型,只能用来设置控件大小。当都设置了这四个属性,会出现什么样的结果。

里面两个子StackLayout的高度各占50%,我们发现** Options和**Request 的属性值所定义的大小谁大就以谁的值为主。


代码如下:
<?xml version="1.0" encoding="utf-8" ?>
<ContentPage xmlns="http://xamarin.com/schemas/2014/forms"
             xmlns:x="http://schemas.microsoft.com/winfx/2009/xaml"
             x:Class="XamarinFormsLayout.CalculatorPage"
             BackgroundColor="#808080">
    <ContentPage.Resources>
        <ResourceDictionary>
            <Style x:Key="DefaultButton" TargetType="Button">
                <Setter Property="BackgroundColor" Value="Black"></Setter>
                <Setter Property="TextColor" Value="#dedede"></Setter>
            </Style>
        </ResourceDictionary>
    </ContentPage.Resources>
    <StackLayout Orientation="Vertical"  Spacing="10" VerticalOptions="End" Padding="10">
        <Frame BackgroundColor="White" HeightRequest="40" Margin="0,0,0,20">
            <Label Text="0" VerticalOptions="Center" HorizontalOptions="End"TextColor="Black"FontSize="35"/>
        </Frame>
        <StackLayout Orientation="Vertical">
            <StackLayout Orientation="Horizontal"   Spacing="10">
                <StackLayout Orientation="Vertical" HorizontalOptions="FillAndExpand">
                    <Button  Text="清除" HeightRequest="60" Style="{StaticResource DefaultButton}"/>
                    <StackLayout Orientation="Horizontal" HeightRequest="60">
                        <Button HorizontalOptions="FillAndExpand"   Text="7"  Style="{StaticResource DefaultButton}"/>
                        <Button HorizontalOptions="FillAndExpand"  Text="8" Style="{StaticResource DefaultButton}" />
                        <Button HorizontalOptions="FillAndExpand"  Text="9" Style="{StaticResource DefaultButton}" />
                    </StackLayout>
                    <StackLayout Orientation="Horizontal" HeightRequest="60">
                        <Button HorizontalOptions="FillAndExpand"  Text="4" Style="{StaticResource DefaultButton}" />
                        <Button HorizontalOptions="FillAndExpand"  Text="5" Style="{StaticResource DefaultButton}"/>
                        <Button HorizontalOptions="FillAndExpand"  Text="6" Style="{StaticResource DefaultButton}"/>
                    </StackLayout>
                    <StackLayout Orientation="Horizontal" HeightRequest="60">
                        <Button HorizontalOptions="FillAndExpand"   Text="1" Style="{StaticResource DefaultButton}" />
                        <Button HorizontalOptions="FillAndExpand"  Text="2" Style="{StaticResource DefaultButton}"/>
                        <Button HorizontalOptions="FillAndExpand"   Text="3" Style="{StaticResource DefaultButton}"/>
                    </StackLayout>
                    <StackLayout Orientation="Horizontal" HeightRequest="60">
                        <Button HorizontalOptions="FillAndExpand"  Text="0" Style="{StaticResource DefaultButton}"/>
                        <Button HorizontalOptions="FillAndExpand"  Text="." Style="{StaticResource DefaultButton}"/>
                    </StackLayout>
                </StackLayout>
                <StackLayout Orientation="Vertical" WidthRequest="60">
                    <Button  Text="÷"  HeightRequest="60" Style="{StaticResource DefaultButton}"/>
                    <Button Text="*" HeightRequest="60" Style="{StaticResource DefaultButton}"/>
                    <Button Text="+" HeightRequest="60" Style="{StaticResource DefaultButton}"/>
                    <Button Text="-" HeightRequest="60" Style="{StaticResource DefaultButton}"/>
                    <Button Text="=" HeightRequest="60" Style="{StaticResource DefaultButton}"/>
                </StackLayout>
            </StackLayout>
        </StackLayout>
    </StackLayout>
</ContentPage>xamarin forms的布局都是基于wpf的思想,padding和margin的四个方向是左上右下,这和android、前端css的四个方向上右下左有点区别。
常用的布局就我个人而言StackLayout和Grid使用的最为广泛和简单,其他的几种布局写起来相对复杂,效果也相对不佳。
xamarin forms常用的布局stacklayout详解
标签:namespace 位置 add ice enter margin 高度宽度 实现 back
原文地址:https://www.cnblogs.com/zhangmumu/p/9751788.html