标签:1.2 project lines context elf 密码 OLE nes 默认
课程介绍


pip list

pip freeze
pip install django==1.8.2
pip install django==1.11.4
import django

django.get_version()
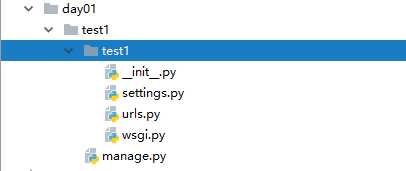
django-admin startproject test1
在settings.py文件中,通过DATABASES项进行数据库设置
django支持的数据库包括:sqlite、mysql等主流数据库
Django默认使用SQLite数据库
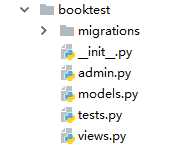
python manage.py startapp booktest
from django.db import models

class BookInfo(models.Model):
    btitle = models.CharField(max_length=20)
    bpub_date = models.DateTimeField()
    def __str__(self):
        return "%d" % self.pk

class HeroInfo(models.Model):
    hname = models.CharField(max_length=20)
    hgender = models.BooleanField()
    hcontent = models.CharField(max_length=100)
    hBook = models.ForeignKey(‘BookInfo‘)
    def __str__(self):
        return "%d" % self.pk
生成迁移文件:根据模型类生成sql语句
python manage.py makemigrations
迁移文件被生成到应用的migrations目录

执行迁移:执行sql语句生成数据表
python manage.py migrate
python manage.py shell

# 引入需要的包:
from booktest.models import BookInfo,HeroInfo
from django.utils import timezone
from datetime import *
# 查询所有图书信息:
BookInfo.objects.all()
# 新建图书信息:
b = BookInfo()
b.btitle="射雕英雄传"
b.bpub_date=datetime(year=1990,month=1,day=10)
b.save()
# 查找图书信息:
b=BookInfo.objects.get(pk=1)
# 输出图书信息:
b
b.id
b.btitle
# 修改图书信息:
b.btitle=u"天龙八部"
b.save()
# 删除图书信息:
b.delete()
# 关联对象的操作
# 对于HeroInfo可以按照上面的操作方式进行
# 添加,注意添加关联对象
h=HeroInfo()
h.hname=u‘郭靖‘
h.hgender=True
h.hcontent=u‘降龙十八掌‘
h.hBook=b
h.save()
# 获得关联集合:返回当前book对象的所有hero
b.heroinfo_set.all()
# 有一个HeroInfo存在,必须要有一个BookInfo对象,提供了创建关联的数据:
h=b.heroinfo_set.create(hname=u‘黄蓉‘,hgender=False,hcontent=u‘打狗棍法‘)
python manage.py runserver ip:port

python manage.py runserver 8080

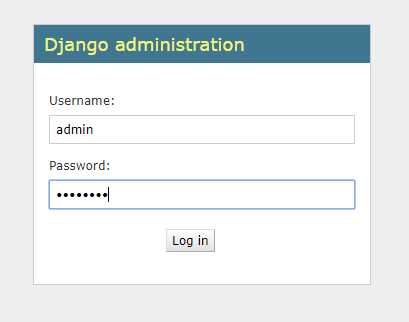
python manage.py createsuperuser,按提示输入用户名、邮箱、密码

LANGUAGE_CODE = ‘zh-Hans‘
TIME_ZONE = ‘Asia/Shanghai‘
from django.contrib import admin
from models import BookInfo
admin.site.register(BookInfo)
class QuestionAdmin(admin.ModelAdmin):
    ...
admin.site.register(Question, QuestionAdmin)
# list_display:显示字段,可以点击列头进行排序
list_display = [‘pk‘, ‘btitle‘, ‘bpub_date‘]
# list_filter:过滤字段,过滤框会出现在右侧
list_filter = [‘btitle‘]
# search_fields:搜索字段,搜索框会出现在上侧
search_fields = [‘btitle‘]
# list_per_page:分页,分页框会出现在下侧
list_per_page = 10
# 添加、修改页属性
# fields:属性的先后顺序
fields = [‘bpub_date‘, ‘btitle‘]
# fieldsets:属性分组
fieldsets = [
    (‘basic‘,{‘fields‘: [‘btitle‘]}),
    (‘more‘, {‘fields‘: [‘bpub_date‘]}),
]
# 接下来实现关联注册
from django.contrib import admin
from models import BookInfo,HeroInfo

class HeroInfoInline(admin.StackedInline):
    model = HeroInfo
    extra = 2

class BookInfoAdmin(admin.ModelAdmin):
    inlines = [HeroInfoInline]

admin.site.register(BookInfo, BookInfoAdmin)
# 可以将内嵌的方式改为表格
class HeroInfoInline(admin.TabularInline)
# 布尔值的显示
# 发布性别的显示不是一个直观的结果,可以使用方法进行封装
def gender(self):
    if self.hgender:
        return ‘男‘
    else:
        return ‘女‘
gender.short_description = ‘性别‘
# 在admin注册中使用gender代替hgender
class HeroInfoAdmin(admin.ModelAdmin):
    list_display = [‘id‘, ‘hname‘, ‘gender‘, ‘hcontent‘]
#coding:utf-8
from django.http import HttpResponse

def index(request):
    return HttpResponse("index")
def detail(request,id):
    return HttpResponse("detail %s" % id)
# 在test1/urls.py插入booktest,使主urlconf连接到booktest.urls模块
url(r‘^‘, include(‘booktest.urls‘)),

# 在booktest中的urls.py中添加urlconf
from django.conf.urls import url
from . import views
urlpatterns = [
    url(r‘^$‘, views.index),
    url(r‘^([0-9]+)/$‘, views.detail),
]
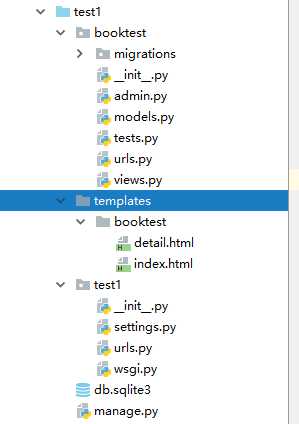
‘DIRS‘: [os.path.join(BASE_DIR, ‘templates‘)],
{{输出值,可以是变量,也可以是对象.属性}}
{%执行代码段%}

<!DOCTYPE html>
<html>
<head>
  <title>首页</title>
</head>
<body>
<h1>图书列表</h1>
<ul>
{%for book in booklist%}
<li>
  <a href="{{book.id}}">
    {{book.btitle}}
  </a>
</li>
{%endfor%}
</ul>
</body>
</html>

<!DOCTYPE html>
<html>
<head>
  <title>详细页</title>
</head>
<body>
<h1>{{book.btitle}}</h1>
<ul>
  {%for hero in book.heroinfo_set.all%}
  <li>{{hero.hname}}---{{hero.hcontent}}</li>
  {%endfor%}
</ul>
</body>
</html>

from django.http import HttpResponse
from django.template import RequestContext, loader
from models import BookInfo

def index(request):
    booklist = BookInfo.objects.all()
    template = loader.get_template(‘booktest/index.html‘)
    context = RequestContext(request, {‘booklist‘: booklist})
    return HttpResponse(template.render(context))


def detail(reqeust, id):
    book = BookInfo.objects.get(pk=id)
    template = loader.get_template(‘booktest/detail.html‘)
    context = RequestContext(reqeust, {‘book‘: book})
    return HttpResponse(template.render(context))
# 在index.html模板中,超链接是硬编码的,此时的请求地址为“127.0.0.1/1/”
<a href="{{book.id}}">

# 看如下情况:将urlconf中详细页改为如下,链接就找不到了
url(r‘^book/([0-9]+)/$‘, views.detail),

#此时的请求地址应该为“127.0.0.1/book/1/”
#问题总结:如果在模板中地址硬编码,将来urlconf修改后,地址将失效
#解决:使用命名的url设置超链接
#修改test1/urls.py文件,在include中设置namespace
url(r‘^admin/‘, include(admin.site.urls)),
url(r‘^‘, include(‘booktest.urls‘, namespace=‘booktest‘)),

# 修改booktest/urls.py文件,设置name
url(r‘^book/([0-9]+)/$‘, views.detail, name="detail"),

# 修改index.html模板中的链接
<a href="{%url ‘booktest:detail‘ book.id%}">
from django.shortcuts import render
from models import BookInfo

def index(reqeust):
    booklist = BookInfo.objects.all()
    return render(reqeust, ‘booktest/index.html‘, {‘booklist‘: booklist})


def detail(reqeust, id):
    book = BookInfo.objects.get(pk=id)
    return render(reqeust, ‘booktest/detail.html‘, {‘book‘: book})
标签:1.2 project lines context elf 密码 OLE nes 默认
原文地址:https://www.cnblogs.com/Mint-diary/p/9753386.html