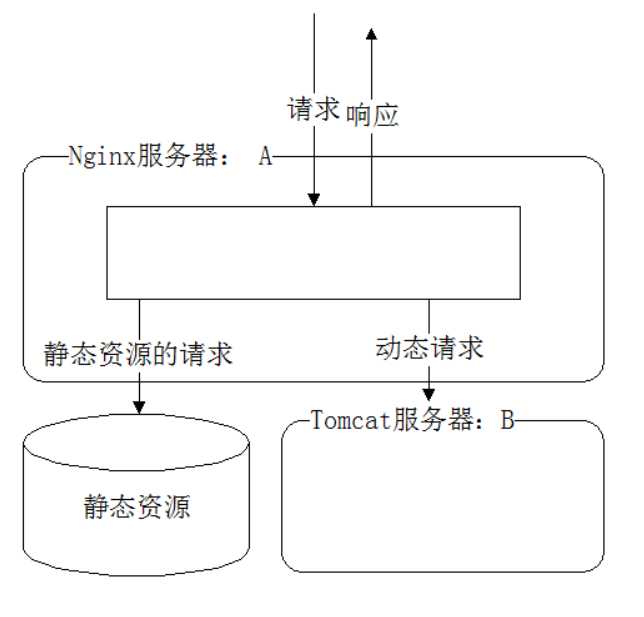
标签:code 分享图片 marker logs ref ade 应用 分离 insert
为什么要动静分离呢?
拿Nginx来说,Nginx是Web服务器,仅仅只能处理静态资源(例如js,img,css等等),而Tomcat属于应用服务器既能处理静态资源又能处理动态资源(例如jsp,freemarker,volocity等等)。但是Nginx处理静态资源的效率要高于Tomcat,而Tomcat处理静态资源的效率要低于Nginx很多,术业有专攻是也。由此,我相信大家明白了为什么要动静分离了。
如果还有不明白的,简单的说,web开发的本质就是HTTP请求,将成千上万的请求归类进行分发,谁谁处理这个,谁谁处理那个,取其优势,应用之。这样,毋庸置疑,效率肯定会上去的。
另外说下常用的应用服务器和web服务器?
常用的web服务器:Nginx、Apache等等。
常用的应用服务器:Tomcat、Jboss、Resin、WebLogic等等。
其实Apache也可以做动静分离,只不过我认为Nginx更简单。
关于Nginx的安装可以参考菜鸟教程:http://www.runoob.com/linux/nginx-install-setup.html
关于Nginx的学习和各个模块的含义可以参考这个网址:http://www.nginx.cn/doc/
关于负载均衡和集群均可以参考我的这两篇文章:
nginx反向代理和tomcat集群(适用于ubutnu16.04及其centos7)
1.动静分离架构图

2.Nginx配置
主要修改nginx.conf配置文件
 upstream  yctech{
         server   192.168.126.128:8080;
    }


    server {
        listen       80;
        server_name  yctech;

        #charset koi8-r;

        #access_log  logs/host.access.log  main;
         root  /test;
        location / {
           proxy_pass http://yctech;
           root   html;
           index  index.html index.htm;
        }

        location ~ ^/yctech1/(.*){
                 proxy_set_header Host $host;
                 proxy_set_header X-Real-IP $remote_addr;
                 proxy_pass http://yctech;    #转向tomcat处理

         }


         location ~ ^/yctech2/(.*){
                 proxy_set_header Host $host;
                 proxy_set_header X-Real-IP $remote_addr;
                 proxy_pass http://yctech;    #转向tomcat处理

         }

        location ~ ^/yctech3/(.*){
                 proxy_set_header Host $host;
                 proxy_set_header X-Real-IP $remote_addr;
                    proxy_pass http://yctech; #转向tomcat处理

         }


        location ~ ^/yctech4/(.*){
                 proxy_set_header Host $host;
                 proxy_set_header X-Real-IP $remote_addr;
                 proxy_pass http://yctech;    #转向tomcat处理

         }

         location ~ .*\.(gif|jpg|jpeg|png|bmp|swf|css)$ {
          expires      30d;
         }
root 对应的html是nginx的一个目录,这个目录下通常是官网的主页。
像root /test;
是因为html下有test目录,而test目录主要放置静态资源,同时也是处理静态资源。

3.编写index.jsp页面测试
<%@ page language="java" contentType="text/html; charset=UTF-8"
    pageEncoding="UTF-8"%>
<!DOCTYPE html PUBLIC "-//W3C//DTD HTML 4.01 Transitional//EN" "http://www.w3.org/TR/html4/loose.dtd">
<html>
<head>
<meta http-equiv="Content-Type" content="text/html; charset=ISO-8859-1">
<title>Insert title here</title>
</head>
<body>
<img src="logo_small.png" width="500px" height="500px"/>
</body>
</html>
jsp页面中的logo_small.png其实是放在test目录下的。
4.重启Nginx
./sbin/nginx -s reload 并在浏览器上输入对应的地址,即可看到对应的效果。
参考思路博文为:https://www.cnblogs.com/xiaoblog/p/4241086.html
标签:code 分享图片 marker logs ref ade 应用 分离 insert
原文地址:https://www.cnblogs.com/youcong/p/9762706.html