标签:原理 指定 bin 哈哈 二级缓存 cond 会话 snapshot eva
一、首先Session
Session 是客户端与服务器通讯会话技术, 比如浏览器登陆、记录整个浏览会话信息。session存放在服务器,关闭浏览器不会失效。
客户对向服务器端发送请求后,Session 创建在服务器端,返回Sessionid给客户端浏览器保存在本地,当下次发送请求的时候,在请求头中传递sessionId获取对应的从服务器上获取对应的Sesison
请求过程:
服务器端接受到客户端请求,会创建一个session,使用响应头返回 sessionId给客户端。客户端获取到sessionId后,保存到本地。
下次请求:客户端将本地的sessionId通过请求头发送到服务器。服务器从请求头获取到对应的sessionId,使用sessionId在本地session内存中查询。

HttpSession session = request.getSession(); //默认创建一个session 默认值为true 没有找到对应的session 自动创建session
HttpSession session = request.getSession(false) //true的情况是 客户端使用对应的sessionId查询不到对应的session 会直接创建一个新的session 如果有的话直接覆盖之前的
//false 客户端使用对应的sessionId查询不到对应的session 不会创建新的session
session 包括 sessionId和sessionValue
session本身是临时的 token(令牌)与 sessionId很相似 保证了临时且唯一
玩下session:
前提需要安装nginx
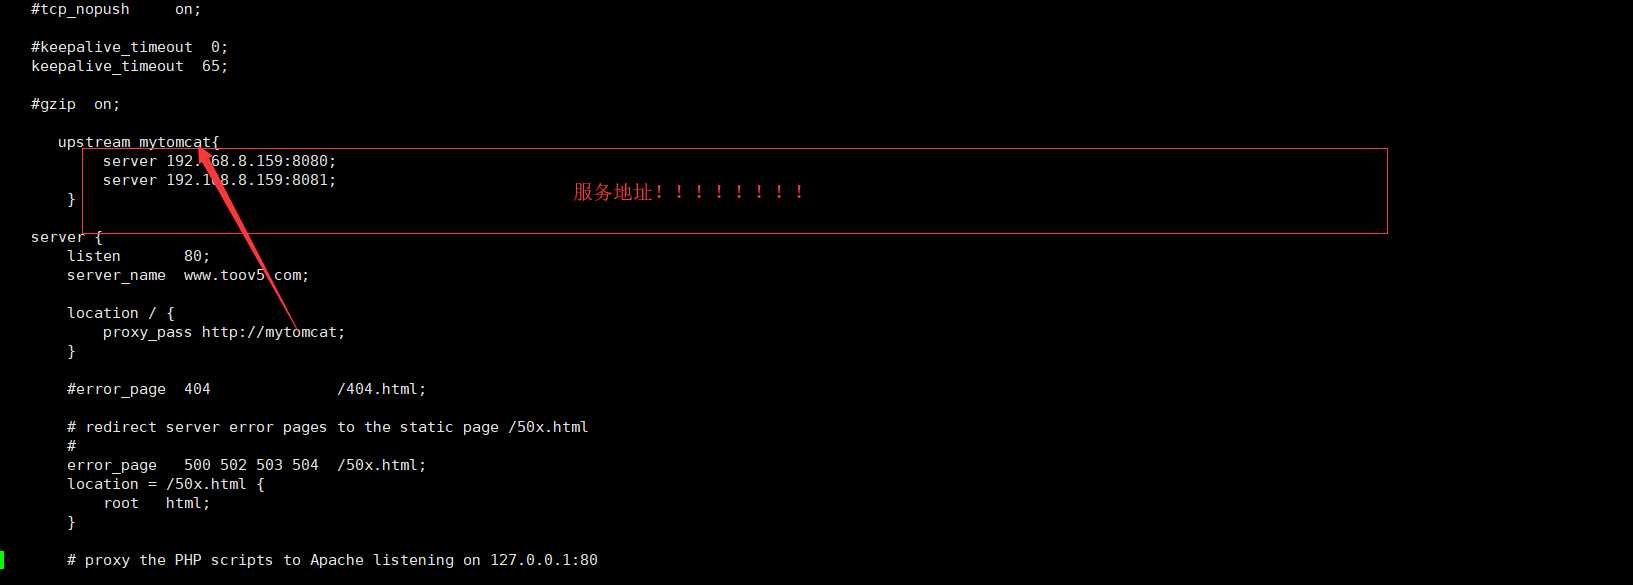
配置如下:
host文件:c:\windows\system32\drivers\etc
访问 www.toov5.com时候 走的nginx的服务器域名 然后默认监听的端口号80。 进而通过配置upstream 负载均衡!

lz在玩时候,弄到了半夜,也没排查出来原因,妈的气死了! 地址写成了 127.0.0.1

yml:
server:
  port: 8080
pom:
<project xmlns="http://maven.apache.org/POM/4.0.0" xmlns:xsi="http://www.w3.org/2001/XMLSchema-instance" xsi:schemaLocation="http://maven.apache.org/POM/4.0.0 http://maven.apache.org/xsd/maven-4.0.0.xsd">
  <modelVersion>4.0.0</modelVersion>
  <groupId>com.toov5.loveCode</groupId>
  <artifactId>loveCode</artifactId>
  <version>0.0.1-SNAPSHOT</version>

  <parent>
		<groupId>org.springframework.boot</groupId>
		<artifactId>spring-boot-starter-parent</artifactId>
		<version>2.0.0.RELEASE</version>
		<relativePath /> <!-- lookup parent from repository -->
	</parent>
	<properties>
		<weixin-java-mp.version>2.8.0</weixin-java-mp.version>
		<maven.compiler.source>1.8</maven.compiler.source>
		<maven.compiler.target>1.8</maven.compiler.target>
		<maven.compiler.encoding>UTF-8</maven.compiler.encoding>
		<project.build.sourceEncoding>UTF-8</project.build.sourceEncoding>
		<project.build.locales>zh_CN</project.build.locales>
	</properties>

	<dependencies>
		<dependency>
			<groupId>org.projectlombok</groupId>
			<artifactId>lombok</artifactId>
		</dependency>
		<dependency>
			<groupId>org.springframework.boot</groupId>
			<artifactId>spring-boot-starter-web</artifactId>
			<!-- <exclusions> <exclusion> <groupId>com.fasterxml.jackson.core</groupId>
				<artifactId>jackson-databind</artifactId> </exclusion> </exclusions> -->
		</dependency>
		<!-- https://mvnrepository.com/artifact/com.alibaba/fastjson -->
		<dependency>
			<groupId>com.alibaba</groupId>
			<artifactId>fastjson</artifactId>
			<version>1.2.47</version>
		</dependency>
		<!-- Testing Dependencies -->
		<dependency>
			<groupId>org.springframework.boot</groupId>
			<artifactId>spring-boot-starter-test</artifactId>
			<scope>test</scope>
		</dependency>
		<dependency>
			<groupId>org.springframework.boot</groupId>
			<artifactId>spring-boot-starter-data-redis</artifactId>
		</dependency>
		<!--spring session 与redis应用基本环境配置,需要开启redis后才可以使用,不然启动Spring boot会报错 -->
		<!-- <dependency>
			<groupId>org.springframework.session</groupId>
			<artifactId>spring-session-data-redis</artifactId>
		</dependency> -->
		<dependency>
			<groupId>org.apache.commons</groupId>
			<artifactId>commons-pool2</artifactId>
		</dependency>
		<dependency>
			<groupId>redis.clients</groupId>
			<artifactId>jedis</artifactId>
		</dependency>

	</dependencies>
	<build>
		<plugins>
			<plugin>
				<groupId>org.apache.maven.plugins</groupId>
				<artifactId>maven-compiler-plugin</artifactId>
				<configuration>
					<source>1.8</source>
					<target>1.8</target>
				</configuration>
			</plugin>
			<plugin>
				<groupId>org.springframework.boot</groupId>
				<artifactId>spring-boot-maven-plugin</artifactId>
				<configuration>
					<maimClass>com.meiteedu.WxMpApplication</maimClass>
				</configuration>
				<executions>
					<execution>
						<goals>
							<goal>repackage</goal>
						</goals>
					</execution>
				</executions>

			</plugin>
		</plugins>
	</build>

</project>
服务器端代码:
package com.toov5.loveCode;

import javax.servlet.http.HttpServletRequest;
import javax.servlet.http.HttpSession;

import org.springframework.beans.factory.annotation.Value;
import org.springframework.boot.autoconfigure.SpringBootApplication;
import org.springframework.web.bind.annotation.RequestMapping;
import org.springframework.web.bind.annotation.RestController;

@SpringBootApplication
@RestController
public class TestSessionController {
    @Value("${server.port}")
    private String serverPort;

    @RequestMapping("/")
    public String index() {
        return serverPort;
    }

    // 创建session 会话
    @RequestMapping("/createSession")
    public String createSession(HttpServletRequest request, String nameValue) {
        // 默认 创建一个session,
        HttpSession session = request.getSession();
        System.out.println(
                "存入Session  sessionid:信息" + session.getId() + ",nameValue:" + nameValue + ",serverPort:" + serverPort);
        session.setAttribute("name", nameValue);
        return "success-" + serverPort;
    }

    // 获取session 会话
    @RequestMapping("/getSession")
    public Object getSession(HttpServletRequest request) {
        // 设置为true 情况下的时候,客户端使用对应的sessionid 查询不到对应的sesison 会直接创建一个新的session
        // 设置为false 情况下的时候,客户端使用对应的sessionid 查询不到对应的sesison 不 会直接创建一个新的session
        HttpSession session = request.getSession(true);
        if (session == null) {
            return serverPort + "  该服务器上没有存放对应的session值";
        }
        System.out.println("获取Session sessionid:信息" + session.getId() + "serverPort:" + serverPort);
        Object value = session.getAttribute("name");
        return serverPort + "-" + value;
    }

}
启动类:启动两次 端口号修改8080、 8081
package com.toov5.loveCode;

import org.springframework.boot.SpringApplication;
import org.springframework.boot.autoconfigure.EnableAutoConfiguration;
import org.springframework.boot.autoconfigure.SpringBootApplication;


@EnableAutoConfiguration
@SpringBootApplication
public class AppSession {

    public static void main(String[] args) {
        SpringApplication.run(AppSession.class, args);
    }

}
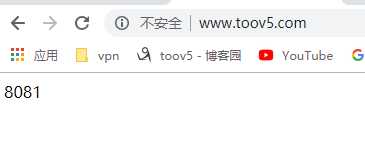
运行结果:8080 和 8081来回切换 负载均衡

调用服务器端方法: fist 存放在8080


查询不到哦!

8081 没有 就创建新的session 覆盖原来的sessionId true没有就创建
下次 又去8080 又没有 又创建 来回折腾..............

此时:

修改false 没有时候不创建

然后传入 value 然后继续轮训访问;


二、分布式Session
1、直接使用cookie替代session 不安全(存客户端)
2、Nginx的IP绑定 目的是同一个IP只能指定同一个机器访问(相当于没做集群了)
3、 使用数据库(效率低)
4、tomcat内置Session同步,通过广播可能产生延迟,占用带宽
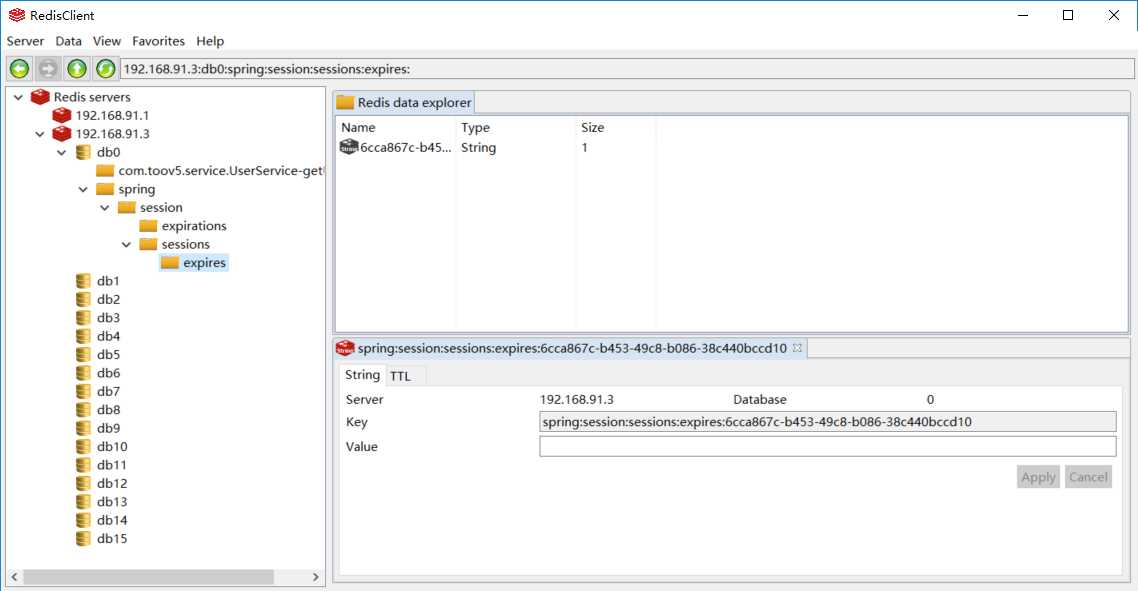
5、使用 Spring-Session框架,相当于把session缓存缓存到redis中 ( 缓存框架,缓存Session的值 )
6、可以使用token替代session功能。自定义令牌替代session
Spring-Session 重写httpsession框架,将对应的值缓存到redis中,有点类似于一级、二级缓存。
必须要有的!

yml文件:
<project xmlns="http://maven.apache.org/POM/4.0.0" xmlns:xsi="http://www.w3.org/2001/XMLSchema-instance" xsi:schemaLocation="http://maven.apache.org/POM/4.0.0 http://maven.apache.org/xsd/maven-4.0.0.xsd">
  <modelVersion>4.0.0</modelVersion>
  <groupId>com.toov5.loveCode</groupId>
  <artifactId>loveCode</artifactId>
  <version>0.0.1-SNAPSHOT</version>

  <parent>
		<groupId>org.springframework.boot</groupId>
		<artifactId>spring-boot-starter-parent</artifactId>
		<version>2.0.0.RELEASE</version>
		<relativePath /> <!-- lookup parent from repository -->
	</parent>
	<properties>
		<weixin-java-mp.version>2.8.0</weixin-java-mp.version>
		<maven.compiler.source>1.8</maven.compiler.source>
		<maven.compiler.target>1.8</maven.compiler.target>
		<maven.compiler.encoding>UTF-8</maven.compiler.encoding>
		<project.build.sourceEncoding>UTF-8</project.build.sourceEncoding>
		<project.build.locales>zh_CN</project.build.locales>
	</properties>

	<dependencies>
		<dependency>
			<groupId>org.projectlombok</groupId>
			<artifactId>lombok</artifactId>
		</dependency>
		<dependency>
			<groupId>org.springframework.boot</groupId>
			<artifactId>spring-boot-starter-web</artifactId>
			<!-- <exclusions> <exclusion> <groupId>com.fasterxml.jackson.core</groupId>
				<artifactId>jackson-databind</artifactId> </exclusion> </exclusions> -->
		</dependency>
		<!-- https://mvnrepository.com/artifact/com.alibaba/fastjson -->
		<dependency>
			<groupId>com.alibaba</groupId>
			<artifactId>fastjson</artifactId>
			<version>1.2.47</version>
		</dependency>
		<!-- Testing Dependencies -->
		<dependency>
			<groupId>org.springframework.boot</groupId>
			<artifactId>spring-boot-starter-test</artifactId>
			<scope>test</scope>
		</dependency>
		<dependency>
			<groupId>org.springframework.boot</groupId>
			<artifactId>spring-boot-starter-data-redis</artifactId>
		</dependency>
		<!--spring session 与redis应用基本环境配置,需要开启redis后才可以使用,不然启动Spring boot会报错 -->
           <dependency>
			<groupId>org.springframework.session</groupId>
			<artifactId>spring-session-data-redis</artifactId>
		</dependency>
		<dependency>
			<groupId>org.apache.commons</groupId>
			<artifactId>commons-pool2</artifactId>
		</dependency>
		<dependency>
			<groupId>redis.clients</groupId>
			<artifactId>jedis</artifactId>
		</dependency>

	</dependencies>
	<build>
		<plugins>
			<plugin>
				<groupId>org.apache.maven.plugins</groupId>
				<artifactId>maven-compiler-plugin</artifactId>
				<configuration>
					<source>1.8</source>
					<target>1.8</target>
				</configuration>
			</plugin>
			<plugin>
				<groupId>org.springframework.boot</groupId>
				<artifactId>spring-boot-maven-plugin</artifactId>
				<configuration>
					<maimClass>com.meiteedu.WxMpApplication</maimClass>
				</configuration>
				<executions>
					<execution>
						<goals>
							<goal>repackage</goal>
						</goals>
					</execution>
				</executions>

			</plugin>
		</plugins>
	</build>

</project>
非常非常重要的:一定要jredis引入 同时这个对session提供了大力支持哈哈

yml 的redis配置文件:
server:
  port: 8080
spring:
  redis:
    database: 0
    host:  192.168.91.3
    port:  6379
    password:  123
    jedis:
      pool:
        max-active: 8
        max-wait: -1
        max-idle: 8
        min-idle: 0
    timeout: 10000
redis:
  hostname: 192.168.91.3
  port:  6379
  password:  123
后台业务逻辑:
package com.toov5.loveCode;

import javax.servlet.http.HttpServletRequest;
import javax.servlet.http.HttpSession;

import org.springframework.beans.factory.annotation.Value;
import org.springframework.boot.autoconfigure.SpringBootApplication;
import org.springframework.web.bind.annotation.RequestMapping;
import org.springframework.web.bind.annotation.RestController;

@SpringBootApplication
@RestController
public class TestSessionController {
    @Value("${server.port}")
    private String serverPort;

    @RequestMapping("/")
    public String index() {
        return serverPort;
    }

    // 创建session 会话
    @RequestMapping("/createSession")
    public String createSession(HttpServletRequest request, String nameValue) {
        // 默认 创建一个session,
        HttpSession session = request.getSession();
        System.out.println(
                "存入Session  sessionid:信息" + session.getId() + ",nameValue:" + nameValue + ",serverPort:" + serverPort);
        session.setAttribute("name", nameValue);
        return "success-" + serverPort;
    }

    // 获取session 会话
    @RequestMapping("/getSession")
    public Object getSession(HttpServletRequest request) {
        // 设置为true 情况下的时候,客户端使用对应的sessionid 查询不到对应的sesison 会直接创建一个新的session
        // 设置为false 情况下的时候,客户端使用对应的sessionid 查询不到对应的sesison 不 会直接创建一个新的session
        HttpSession session = request.getSession(false);
        if (session == null) {
            return serverPort + "  该服务器上没有存放对应的session值";
        }
        System.out.println("获取Session sessionid:信息" + session.getId() + "serverPort:" + serverPort);
        Object value = session.getAttribute("name");
        return serverPort + "-" + value;
    }

}
配置:
package com.toov5.loveCode;
import org.springframework.beans.factory.annotation.Value;
import org.springframework.context.annotation.Bean;
import org.springframework.data.redis.connection.jedis.JedisConnectionFactory;
import org.springframework.session.data.redis.config.annotation.web.http.EnableRedisHttpSession;

//这个类用配置redis服务器的连接
//maxInactiveIntervalInSeconds为SpringSession的过期时间(单位:秒)
@EnableRedisHttpSession(maxInactiveIntervalInSeconds = 1800)
public class SessionConfig {

    // 冒号后的值为没有配置文件时,制动装载的默认值
    @Value("${redis.hostname:localhost}")
    String HostName;
    @Value("${redis.port:6379}")
    int Port;
    @Value("${redis.password}")
    String password;

    @Bean
    public JedisConnectionFactory connectionFactory() {
        JedisConnectionFactory connection = new JedisConnectionFactory();
        connection.setPort(Port);
        connection.setHostName(HostName);
        connection.setPassword(password);
        return connection;
    }
}
初始化:
package com.toov5.loveCode;

import org.springframework.session.web.context.AbstractHttpSessionApplicationInitializer;

//初始化Session配置
public class SessionInitializer extends AbstractHttpSessionApplicationInitializer{
    public SessionInitializer() {
        super(SessionConfig.class);
    }
}
启动类:
package com.toov5.loveCode;

import org.springframework.boot.SpringApplication;
import org.springframework.boot.autoconfigure.EnableAutoConfiguration;
import org.springframework.boot.autoconfigure.SpringBootApplication;


@EnableAutoConfiguration
@SpringBootApplication
public class AppSession {

    public static void main(String[] args) {
        SpringApplication.run(AppSession.class, args);
    }

}


虽然是存放在8081,但是访问时候 都有哦~ 大家试试玩玩吧~~
引入的jar包重写了 HttpSession类 去解决Session共享问题
而此时的:redis

控制台:

标签:原理 指定 bin 哈哈 二级缓存 cond 会话 snapshot eva
原文地址:https://www.cnblogs.com/toov5/p/9903017.html