标签:准备 轮播 dde export 获取 模拟 this ber tor
本节的内容会在上期搭建的框架基础上进行数据的填充,顺便回顾之前介绍过的插值表达式,属性绑定等知识,本节的数据只是在组件中模拟数据,后面会有专门的章节讲解如何从服务器获取数据。
首先把轮播图使用的图片放在项目的src/assets目录下(图片请自行准备),然后在carousel.component.ts中定义轮播使用的图片属性:
import { Component, OnInit } from ‘@angular/core‘;

@Component({
    selector: ‘app-carousel‘,
    templateUrl: ‘./carousel.component.html‘,
    styleUrls: [‘./carousel.component.css‘]
})
export class CarouselComponent implements OnInit {

    //step2.定义三张图片
    private img1:Img;
    private img2:Img;
    private img3:Img;

    constructor() { }

    //step3.然后初始化图片
    ngOnInit() {
        this.img1 = new Img("../assets/1.jpg","图片一");
        this.img2 = new Img("../assets/2.jpg","图片二");
        this.img3 = new Img("../assets/3.jpg","图片三");

    }

}

//step1.定义轮播的图片对象
export class Img {
    constructor(
        public imgSrc: String,
        public imgAlt: String
    ) {

    }
}carousel.component.html修改如下:
<div id="carousel-ex" class="carousel slide" data-ride="carousel">
    <ol class="carousel-indicators">
        <li data-target="carousel-ex" data-slide-to="0" class="active"></li>
        <li data-target="carousel-ex" data-slide-to="1"></li>
        <li data-target="carousel-ex" data-slide-to="2"></li>
    </ol>

    <div class="carousel-inner listbox">
        <div class="item active">
            <!-- 属性绑定 -->
            <img [src]="img1.imgSrc" [alt]="img1.imgAlt">
            <div class="carousel-caption">
                {{img1.imgAlt}}
            </div>
        </div>
        <div class="item">
            <img [src]="img2.imgSrc" [alt]="img2.imgAlt">
            <div class="carousel-caption">
                {{img2.imgAlt}}
            </div>
        </div>
        <div class="item">
            <img [src]="img3.imgSrc" [alt]="img3.imgAlt">
            <div class="carousel-caption">
                {{img3.imgAlt}}
            </div>
        </div>
    </div>

    <a href="#carousel-ex" class="left carousel-control" role="button" data-slide="prev">
        <span class="glyphicon glyphicon-chevron-left" aria-hidden="true"></span>
        <span class="sr-only">Previous</span>
    </a>
    <a href="#carousel-ex" class="right carousel-control" role="button" data-slide="next">
        <span class="glyphicon glyphicon-chevron-right" aria-hidden="true"></span>
        <span class="sr-only">Next</span>
    </a>
</div>
页面效果如下:

首先修改article.component.ts初始化文章数据:
import { Component, OnInit } from ‘@angular/core‘;

@Component({
    selector: ‘app-article‘,
    templateUrl: ‘./article.component.html‘,
    styleUrls: [
        ‘./article.component.css‘
    ]
})
export class ArticleComponent implements OnInit {

    //step2.声明文章对象数组
    private articles: Array<Article>;

    constructor() {
    }

    //step3.初始化数组数据
    ngOnInit() {
        this.articles = [
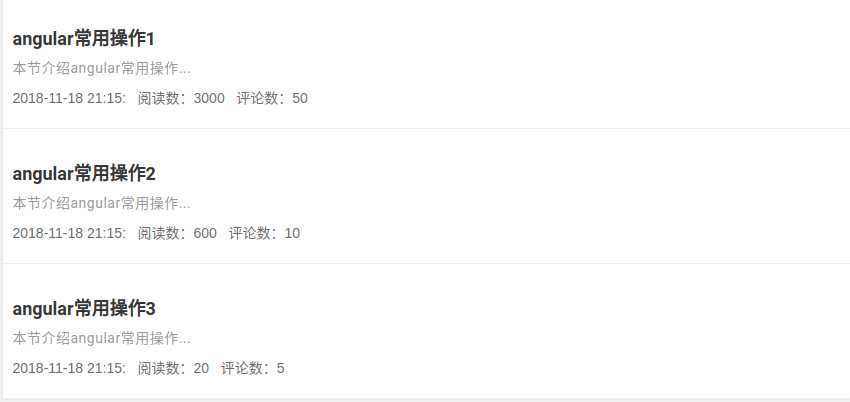
            new Article(1,"angular常用操作1","admin","本节介绍angular常用操作...",3000,50),
            new Article(2,"angular常用操作2","admin","本节介绍angular常用操作...",600,10),
            new Article(3,"angular常用操作3","admin","本节介绍angular常用操作...",20,5),
        ]
    }
}

//step1. 定义文章对象
export class Article{
    constructor(
        public id: number,      //文章Id
        public title: String,   //文章标题
        public author: String,  //文章作者
        public zy: String,      //文章摘要
        public yd: number,      //阅读数
        public pl: number       //评论数
    ){

    }
}然后修改article.component.html 内容如下:
<div class="content-wrap">
<div *ngFor="let article of articles" class="article">
<h3 class="title">{{article.title}}</h3>
<p class="zy">
{{article.zy}}
</p>
<p class="info">
<span>2018-11-18 21:15:</span>
<span>阅读数:{{article.yd}}</span>
<span>评论数:{{article.pl}}</span>
</p>
</div>
</div>页面效果如下所示:

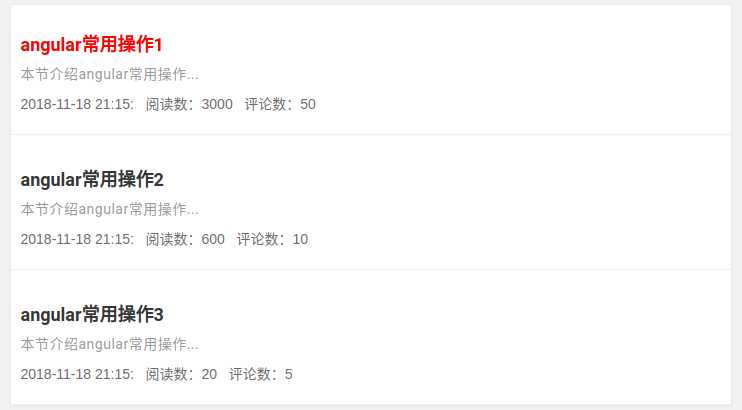
现在实现这样一个需求,当文章的阅读量超过1000时,文章的标题以红色显示。
首先,我们在article.component.css中增加样式:
.hot{
    color: red !important;
}然后在article.component.html中需要添加样式的地方添加如下代码:
<!-- 当article.yd>1000时,h3会加上hot样式,否则不加 -->
<h3 class="title" [class.hot]="article.yd>1000">{{article.title}}</h3>
页面效果如下所示:

标签:准备 轮播 dde export 获取 模拟 this ber tor
原文地址:https://www.cnblogs.com/dwllm/p/9985330.html