标签:系统资源 rip 含义 mct 操作系统 内存 大连 多个 min
1、什么是Nginx
Nginx正式成立于2011年7月,由Igor Sysoev担任CTO。Nginx是一款跨平台的Web服务器,可运行在Linux、Windows、Mac、 FreeBSD、Solaris、AIX等操作系统上,并且它还可以使当前操作系统特有的一些高效API来提高自己的性能。对于高效处理大规模并发连接,它支持高效的epoll(Linux2.6内核)、kqueue(FreeBSD)、event port(Solaris10)等,能够支持高达50000个并发连接数的响应,而内存、CPU等系统资源消耗却非常低、运行非常稳定。
2、为什么使用Nginx

更快
在正常情况下,单次请求会得到更快的响应;
在高峰期,Nginx可以比其他Web服务器更快地响应请求;高扩展性
Nginx的设计极具扩展性,它完全是由多个不同功能、不同层次、不同类型且耦合度极低的模块组成
高可靠性
低内存消耗
最自由的BSD许可协议-- BSD开源协议,为所欲为
需要内核为Linux 2.6及以上的操作系统;#uname –a 查询内核版本
安装必备
1. GCC编译器-是必须的编译工具;
查询: #rpm –qa|grep gcc
安装:#yum install –y gcc
2. PCRE库-函数库; 支持rewrite功能 yum install –y pcre*
查询: #rpm –qa|grep pcre
安装:#yum install –y pcre
安装:#yum install -y pcre-devel
3. zlib库-gzip格式压缩
查询: #rpm –qa|grep zlib
安装:#yum install –y zlib
安装:# yum install –y zlib-devel
4. Openssl开发库 SSL(Secure Sockets Layer 安全套接层).SSL证书—数字证书,配置在服务器上,也称为SSL服务器证书。客户端浏览器和Web服务器之间建立一条SSL安全通道。yum install –y openssl*
查询: #rpm –qa|grep openssl
安装:#yum install –y openssl
nginx版本下载:http://nginx.org/en/download.html
命令: wget http://nginx.org/download/nginx-1.14.1.tar.gz
解压: tar zxvf nginx-1.14.1.tar.gz
1.进入解压后的目录 nginx-1.14.1
2.执行./configure
3.make
4.make install
会在/usr/local/下生成nginx路径,进入后
5.启动Nginx ./nginx
netstat -lnp|grep 80
注:第二部执行 ./configure 可加参数执行。
开放端口
firewall-cmd --zone=public --add-port=80/tcp --permanent
返回success成功
命令含义:
--zone #作用域
--add-port=80/tcp #添加端口,格式为:端口/通讯协议
--permanent #永久生效
重启防火墙:systemctl restart firewalld.service
关闭防火墙:systemctl stop firewalld.service
检查端口进程占用
netstat -lnp|grep 80
-- yum install net-tools
启动Nginx ./nginx
检查 nginx.conf配置文件 ./nginx -t
重启 ./nginx -s reload
停止 ./nginx -s stop
配置环境变量
vim ~/.bash_profile
添加两条
Export NGINX_HOME=/usr/local/nginx
Export PATH=$PATH:$NGINX_HOME/sbin
source ~/.bash_profile
启动Nginx nginx
检查 nginx.conf配置文件 nginx -t
重启 nginx -s reload
停止 nginx -s stop
访问成功

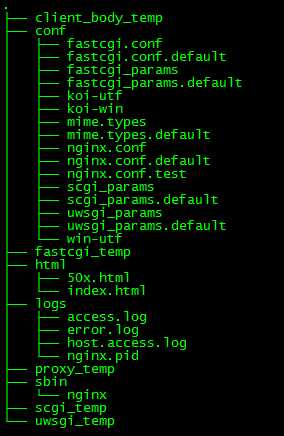
一. Nginx目录结构:
conf目录:主要用来放置配置文件;
html目录:主要用来放置html文件;
logs目录 :主要用来放置日志文件;
sbin目录 :主要用来放置启动文件;

#定义Nginx运行的用户和用户组
#user  nobody;

#nginx进程数,建议设置为等于CPU总核心数。
worker_processes  1;

#全局错误日志定义类型,[ debug | info | notice | warn | error | crit ]
#error_log  logs/error.log;
#error_log  logs/error.log  notice;
#error_log  logs/error.log  info;

#进程文件
#pid        logs/nginx.pid;

#一个nginx进程打开的最多文件描述符数目,理论值应该是最多打开文件数(系统的值ulimit -n)与nginx进程数相除,但是nginx分配请求并不均匀,所以建议与ulimit -n的值保持一致。
worker_rlimit_nofile  65535;


#工作模式与连接数上限
events {
    #参考事件模型,use [ kqueue | rtsig | epoll | /dev/poll | select | poll ]; epoll模型是Linux 2.6以上    版本内核中的高性能网络I/O模型,如果跑在FreeBSD上面,就用kqueue模型。
    use epoll;

    #单个进程最大连接数(最大连接数=连接数*进程数)
    worker_connections  1024;
}

#设定http服务器
http {


    upstream nginx.demo    {
        #ip_hash;    代表使用ip地址方式分配跳转后端服务器,同一ip请求每次都会访问同一台后端服务器

        #upstream的负载均衡,weight是权重,可以根据机器配置定义权重。weigth参数表示权值,权值越高被分配到的几率越大。
        server  10.199.255.217:8080 weight=3;
        server  10.199.255.218:8080 weight=1;
    }

    include       mime.types;    #文件扩展名与文件类型映射表
    default_type  application/octet-stream;        #默认文件类型
    #charset utf-8;        #默认编码

    server_names_hash_bucket_size 128;     #服务器名字的hash表大小
    client_header_buffer_size 32k;     #上传文件大小限制
    large_client_header_buffers 4 64k; #设定请求缓
    client_max_body_size 8m; #设定请求缓
    sendfile on;     #开启高效文件传输模式,sendfile指令指定nginx是否调用sendfile函数    来输出文件,对于普通应用设为 on,如果用来进行下载等应用磁盘IO重负载应用,    可设置为off,以平衡磁盘与网络I/O处理速度,降低系统的负载。注意:如果图片显示不正常把这个改成off。
    autoindex on;     #开启目录列表访问,合适下载服务器,默认关闭。

    #日志格式设定
    #log_format  main  ‘$remote_addr - $remote_user [$time_local] "$request" ‘
    #                  ‘$status $body_bytes_sent "$http_referer" ‘
    #                  ‘"$http_user_agent" "$http_x_forwarded_for"‘;

    #定义本虚拟主机的访问日志
    #access_log  logs/access.log  main;

    #sendfile        on;
    #tcp_nopush     on;        #防止网络阻塞
    #tcp_nodelay     on;    #防止网络阻塞

    #keepalive_timeout  0;
    keepalive_timeout  120;    #长连接超时时间,单位是秒

    #FastCGI相关参数是为了改善网站的性能:减少资源占用,提高访问速度。
    fastcgi_connect_timeout 300;
    fastcgi_send_timeout 300;
    fastcgi_read_timeout 300;
    fastcgi_buffer_size 64k;
    fastcgi_buffers 4 64k;
    fastcgi_busy_buffers_size 128k;
    fastcgi_temp_file_write_size 128k;


    #gzip  on;    #开启gzip压缩输出
    gzip_min_length 1k; #最小压缩文件大小
    gzip_buffers 4 16k; #压缩缓冲区
    gzip_http_version 1.0; #压缩版本(默认1.1,前端如果是squid2.5请使用1.0)
    gzip_comp_level 2; #压缩等级
    gzip_types text/plain application/x-javascript text/css application/xml;    #压缩类型,默认就已经包含text/html,所以下面就不用再写了,写上去也不会有问题,但是会有一个warn。
    gzip_vary on;
    #limit_zone crawler $binary_remote_addr 10m;     #开启限制IP连接数的时候需要使用

    #虚拟主机的配置
    server {
        listen       80;    #监听端口
        server_name  localhost;    #域名可以有多个,用空格隔开

        #charset koi8-r;

        #access_log  logs/host.access.log  main;

        location / {
            root   html;
            index  index.html index.htm;
        }

        #图片缓存时间设置
        location ~ .*\.(gif|jpg|jpeg|png|bmp|swf)$ {
            expires 10d;
        }

        #JS和CSS缓存时间设置
        location ~ .*\.(js|css)?$ {
            expires 1h;
        }

        #对 "/" 启用反向代理
        location / {
            proxy_pass http://127.0.0.1:88;
            proxy_redirect off;
            proxy_set_header X-Real-IP $remote_addr;
            #后端的Web服务器可以通过X-Forwarded-For获取用户真实IP
            proxy_set_header X-Forwarded-For $proxy_add_x_forwarded_for;
            #以下是一些反向代理的配置,可选。
            proxy_set_header Host $host;
            client_max_body_size 10m; #允许客户端请求的最大单文件字节数
            client_body_buffer_size 128k; #缓冲区代理缓冲用户端请求的最大字节数,
            proxy_connect_timeout 90; #nginx跟后端服务器连接超时时间(代理连接超时)
            proxy_send_timeout 90; #后端服务器数据回传时间(代理发送超时)
            proxy_read_timeout 90; #连接成功后,后端服务器响应时间(代理接收超时)
            proxy_buffer_size 4k; #设置代理服务器(nginx)保存用户头信息的缓冲区大小
            proxy_buffers 4 32k; #proxy_buffers缓冲区,网页平均在32k以下的设置
            proxy_busy_buffers_size 64k; #高负荷下缓冲大小(proxy_buffers*2)
            proxy_temp_file_write_size 64k;
            #设定缓存文件夹大小,大于这个值,将从upstream服务器传
        }


        #error_page  404              /404.html;

        # redirect server error pages to the static page /50x.html
        #
        error_page   500 502 503 504  /50x.html;
        location = /50x.html {
            root   html;
        }

        # proxy the PHP scripts to Apache listening on 127.0.0.1:80
        #
        #location ~ \.php$ {
        #    proxy_pass   http://127.0.0.1;
        #}

        # pass the PHP scripts to FastCGI server listening on 127.0.0.1:9000
        #
        #location ~ \.php$ {
        #    root           html;
        #    fastcgi_pass   127.0.0.1:9000;
        #    fastcgi_index  index.php;
        #    fastcgi_param  SCRIPT_FILENAME  /scripts$fastcgi_script_name;
        #    include        fastcgi_params;
        #}

        # deny access to .htaccess files, if Apache‘s document root
        # concurs with nginx‘s one
        #
        #location ~ /\.ht {
        #    deny  all;
        #}
    }


    # another virtual host using mix of IP-, name-, and port-based configuration
    #
    #server {
    #    listen       8000;
    #    listen       somename:8080;
    #    server_name  somename  alias  another.alias;

    #    location / {
    #        root   html;
    #        index  index.html index.htm;
    #    }
    #}


    # HTTPS server
    #
    #server {
    #    listen       443 ssl;
    #    server_name  localhost;

    #    ssl_certificate      cert.pem;
    #    ssl_certificate_key  cert.key;

    #    ssl_session_cache    shared:SSL:1m;
    #    ssl_session_timeout  5m;

    #    ssl_ciphers  HIGH:!aNULL:!MD5;
    #    ssl_prefer_server_ciphers  on;

    #    location / {
    #        root   html;
    #        index  index.html index.htm;
    #    }
    #}

}
标签:系统资源 rip 含义 mct 操作系统 内存 大连 多个 min
原文地址:https://www.cnblogs.com/mituxiaoshutong/p/10009163.html