标签:linux org 进程 lin -- install modprobe linu creat
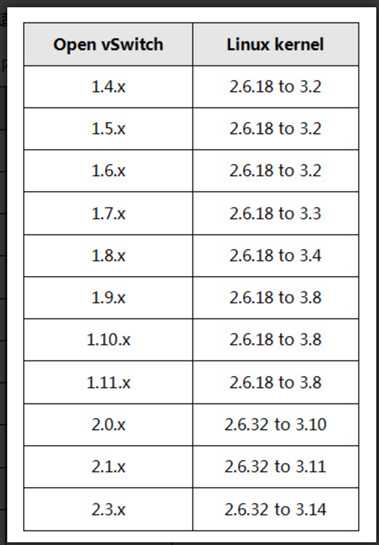
uname -a

在官网下载对应版本
#!/bin/bash
cd /home/gejuncheng/ovs/openvswitch-2.3.1/

# 安装基于内核的switch
./configure --with-linux=/lib/modules/$(uname -r)/build

# 如果不想装基于内核的ovs
./configure

make

make install

#这一步会报错,下面会讲到。 如果没安装基于内核的ovs,忽略这一步
make modules_install

#如果没安装基于内核的ovs,忽略这一步
/sbin/modprobe openvswitch

#确认openvswitch模块是否加载
/sbin/lsmod | grep openvswitch

#如果没有加载成功,就查看下最新的几个内核日志信息(例如 dmesg | tail)

mkdir -p /usr/local/etc/openvswitch

ovsdb-tool create /usr/local/etc/openvswitch/conf.db     vswitchd/vswitch.ovsschema

mkdir -p /usr/local/var/run/openvswitch

#如果不采用ovs支持SSL模式,忽略--private-key, --certificate, and --bootstrap-ca-cert
ovsdb-server --remote=punix:/usr/local/var/run/openvswitch/db.sock     --remote=db:Open_vSwitch,Open_vSwitch,manager_options     --private-key=db:Open_vSwitch,SSL,private_key     --certificate=db:Open_vSwitch,SSL,certificate     --bootstrap-ca-cert=db:Open_vSwitch,SSL,ca_cert     --pidfile --detach --log-file

ovs-vsctl --no-wait init

ovs-vswitchd --pidfile --detach --log-file
注意:我下的是ovs2.3.1版本,放的文件夹和你不一样,要改动!
建议关机重启一下,因为第二步中的进程有的没关掉
使用脚本:
#!/bin/bash
ovsdb-server --remote=punix:/usr/local/var/run/openvswitch/db.sock                      --remote=db:Open_vSwitch,Open_vSwitch,manager_options                      --pidfile --detach
ovs-vsctl --no-wait init
ovs-vswitchd --pidfile --detach
进行完后重新用二中的脚本
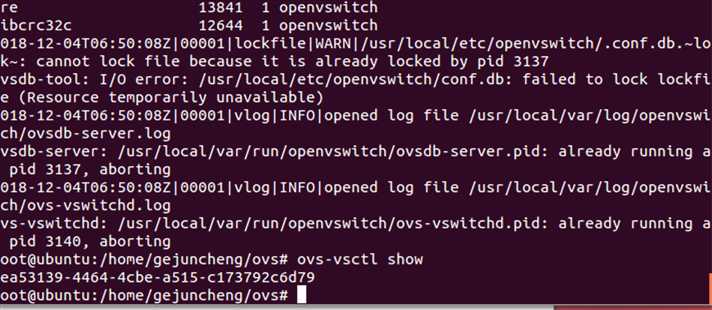
ovs-vsctl show

如上,表示成功!
标签:linux org 进程 lin -- install modprobe linu creat
原文地址:https://www.cnblogs.com/gejuncheng/p/10064177.html