标签:自己 header stat post .gz wan 设置 选项 step
eclipse 的安装
sudo apt-get install eclipse
sudo apt-get install eclipse-cdt
1.下载软件
首先先下载ns-allinone-2.35.tar.gz(http://sourceforge.net/projects/nsnam/files/),
将其放到/home/administrator/zhouhui/soft/下(zhouhui是我的文件名,soft是我建立的一个文件夹)
打开终端(Ctrl+Alt+T),在其中输入
cd /home/administrator/zhouhui/soft<回车>
tar zxvf ns-allinone-2.35.tar.gz <回车>
将ns2.35解压到当前目录下
2.安装前的准备工作
为了更好的安装ns2,需要更新ubuntu系统文件,在终端中输入命令
sudo apt-get update
sudo apt-get upgrade
sudo apt-get dist-upgrade
安装过程需要较长时间,请耐心等待,可以用这段时间做些其他事。
首次采用sudo时,需要用户密码,也就是安装ubuntu时设置的。
还需要进行一些package的安装,输入命令
sudo apt-get install build-essential
如果有依赖问题就换为163的源。
sudo apt-get install tcl8.5 tcl8.5-dev tk8.5 tk8.5-dev
sudo apt-get install libxmu-dev libxmu-headers
安装过程需要一会
3.准备工作做好后,开始安装软件
似乎还会有个地方要修改,上网查。。。。
修改ls文件:
ns-2.35/linkstate/ls.h 第137行
void eraseAll() { erase(baseMap::begin(), baseMap::end()); }
改为:
void eraseAll() { this->erase(baseMap::begin(), baseMap::end()); }
然后重新 ./install
$cd ns-allinone-2.35
$./install(别忘了前面的那个点)
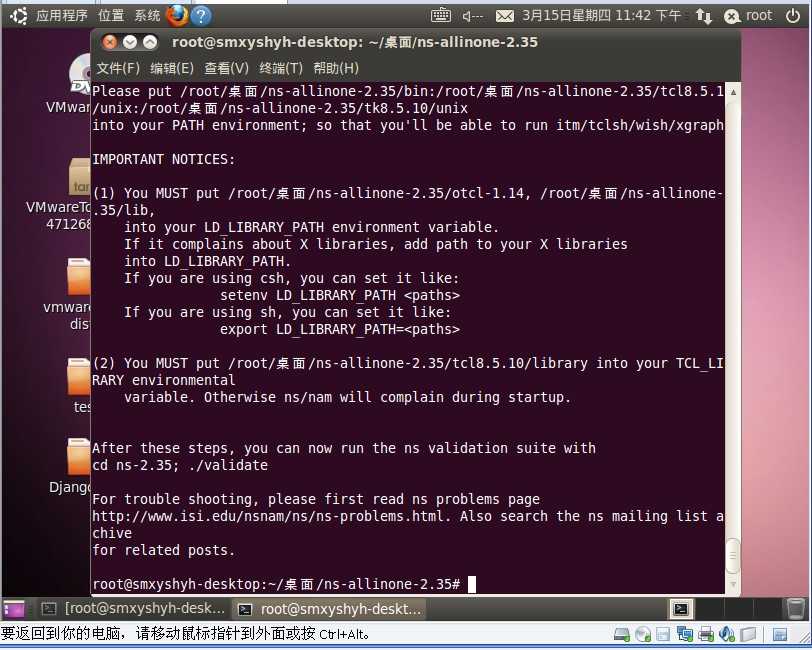
安装过程需要一会。安装正确的话应该可以看到:
Please put /home/wangtiantian/mysoft/ns-allinone-2.35/bin:/home/wangtiantian/mysoft/ns-allinone-2.35/tcl8.5.10/unix:/home/wangtiantian/mysoft/ns-allinone-2.35/tk8.5.10/unix
into your PATH environment; so that you‘ll be able to run itm/tclsh/wish/xgraph.
IMPORTANT NOTICES:
(1) You MUST put /home/wangtiantian/mysoft/ns-allinone-2.35/otcl-1.14, /home/wangtiantian/mysoft/ns-allinone-2.35/lib,
into your LD_LIBRARY_PATH environment variable.
If it complains about X libraries, add path to your X libraries
into LD_LIBRARY_PATH.
If you are using csh, you can set it like:
setenv LD_LIBRARY_PATH <paths>
If you are using sh, you can set it like:
export LD_LIBRARY_PATH=<paths>
(2) You MUST put /home/wangtiantian/mysoft/ns-allinone-2.35/tcl8.5.10/library into your TCL_LIBRARY environmental
variable. Otherwise ns/nam will complain during startup.
After these steps, you can now run the ns validation suite with
cd ns-2.35; ./validate
For trouble shooting, please first read ns problems page
http://www.isi.edu/nsnam/ns/ns-problems.html. Also search the ns mailing list archive
for related posts.
在终端输入:gedit /home/administrator/.bashrc
在弹出来的窗口的文件末尾加入:(注意:下列代码中/home/administrator/zhouhui/soft/是我的ns-allinone-2.35文件路径,要按照你自己的更改)
export PATH=$PATH:/home/liuxize/soft/ns-allinone-2.35/bin:/home/liuxize/soft/ns-allinone-2.35/tcl8.4.18/unix:/home/liuxize/soft/ns-allinone-2.35/tk8.4.18/unix
export LD_LIBRARY_PATH=$LD_LIBRARY_PATH:/home/liuxize/soft/ns-allinone-2.35/otcl-1.13:/home/liuxize/soft/ns-allinone-2.35/lib
export TCL_LIBRARY=$TCL_LIBRARY:/home/liuxize/soft/ns-allinone-2.35/tcl8.4.18/library
保存退出。
在ns2目录下./configure -with-tcl-ver=8.5,生成的Makefile,然后修改之。。。
找到以“CCOPT =”开头的这一行,原始信息为:
CCOPT = -Wall -Wno-write-strings
修改为:
CCOPT =-g-Wall -Wno-write-strings
然后依次在NS2的主目录下执行命令:make clean, make, sudo make install完成支持debug的NS2版本的编译和安装。有心的朋友可以比较一下支持debug和不支持debug的NS2程序,其大小相差大概有10M左右。
(应该是NAM没有安装好,你进入ns文件夹,然后是nam文件夹,进入后./configure,然后make
,最后sudo make install,安装成功)
重新打开一个终端,输入ns并回车
$ns
(如果正常的话,会出现“%”操作提示符)
输入一段TCL脚本代码进行测试
%puts "Hello ns2"
Hello ns2
%
说明安装成功。真是不容易呀!
测试方法二:
重新打开一个终端,输入ns并回车
$ns
(如果正常的话,会出现“%”操作提示符)
然后运行
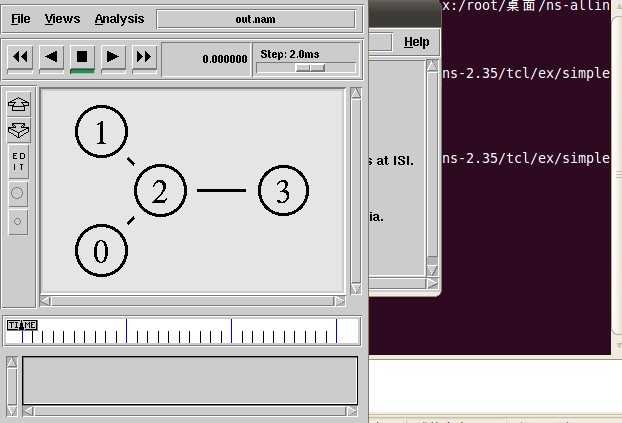
ns /home/administrator/zhouhui/soft/ns-allinone-2.35/ns-2.35/tcl/ex/simple.tcl
出现如下窗口:
6. eclipse调试
1)把NS2作为工程引入Eclipse
选择菜单【File -> New -> Project -> C++ Project】,在弹出的窗口中选择【Project type:】为【Makefile project->Empty Project】,选择】为"Linux GCC"。然后去除“Use default location”选项,然后点击【Browse】按钮选择NS2的主目录(以我所使用的NS2.34为例,其主目录即为../ns-allinone-2.34/ns-2.34)。然后取一个项目名,输入【Project name:】,然后点击【Next】和【Finish】即完成工程导入。
2)使用Eclipse调试NS2
选择菜单【Run -> Debug Configurations...】,在弹出的窗口中:
a)点击【Arguments】标签页,输入需要执行的tcl脚本、以及该脚本对应的参数
b)在Run->Debug Configurations,在C/C++ Application一栏加入ns运行文件
NS2仿真环境安装
标签:自己 header stat post .gz wan 设置 选项 step
原文地址:https://www.cnblogs.com/Moonshade/p/10066960.html

