标签:monit clust mini 软件 ipa att random inux deb
一、环境准备本次我们采用 yum 官方仓库进行安装,之前采用 rpm 包安装的文档大家请看 http://blog.51cto.com/wzlinux/2175836 。
Filebeat 6.5.1
Logstash 6.5.1
Elasticsearch 6.5.1
Kibana 6.5.1
JDK 1.8.0_181
| IP | 系统 | 角色 |
|---|---|---|
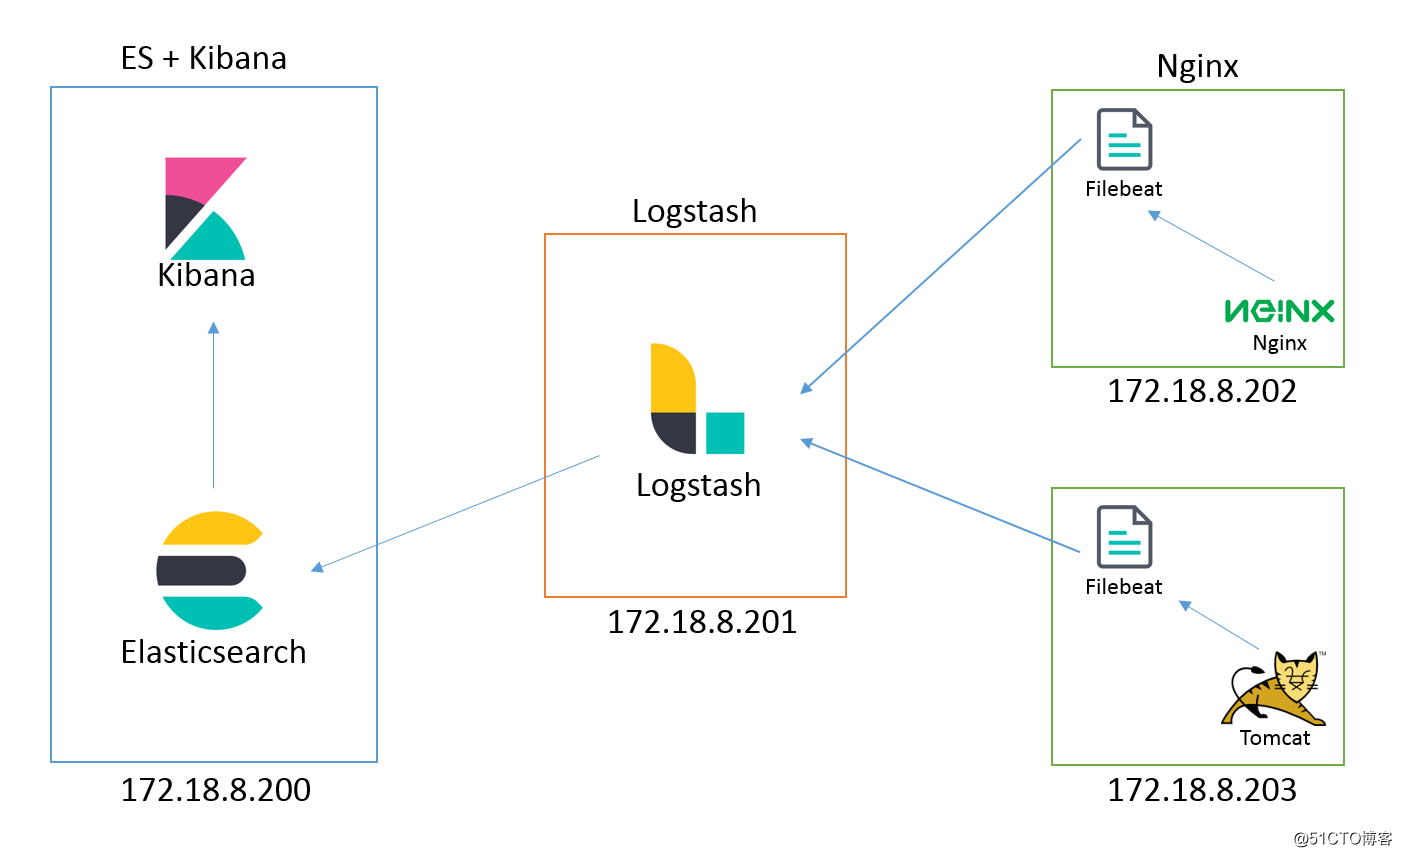
| 172.18.8.200 | CentOS 7.5 Minimal | Elasticsearch + Kibana |
| 172.18.8.201 | CentOS 7.5 Minimal | Logstash |
| 172.18.8.202 | CentOS 7.5 Minimal | Filebeat + Nginx |
角色规划架构图如下所示:
关闭防火墙。
systemctl stop firewalld.service
systemctl disable firewalld.service
添加时间同步。
echo "$((RANDOM%60)) $((RANDOM%24)) * * * /usr/sbin/ntpdate time1.aliyun.com" >> /var/spool/cron/root配置主机名。
关闭SELinux。
sed -i ‘s#SELINUX=enforcing#SELINUX=disabled#g‘ /etc/selinux/config
setenforce 0安装JDK。
rpm -ivh jdk-8u181-linux-x64.rpm导入Elasticsearch PGP Key。
rpm --import https://artifacts.elastic.co/GPG-KEY-elasticsearch创建仓库。
cat >> /etc/yum.repos.d/elasticsearch.repo <<EOF
[elasticsearch-6.x]
name=Elasticsearch repository for 6.x packages
baseurl=https://artifacts.elastic.co/packages/6.x/yum
gpgcheck=1
gpgkey=https://artifacts.elastic.co/GPG-KEY-elasticsearch
enabled=1
autorefresh=1
type=rpm-md
EOF
软件安装。
yum install elasticsearch -y修改配置文件/etc/elasticsearch/elasticsearch.yml,修改为如下内容:
cluster.name: my-application
node.name: node-1
path.data: /var/lib/elasticsearch
path.logs: /var/log/elasticsearch
network.host: 172.18.8.200
http.port: 9200
action.auto_create_index: .monitoring*,.watches,.triggered_watches,.watcher-history*,.ml*
启动服务。
systemctl daemon-reload
systemctl enable elasticsearch.service
systemctl start elasticsearch.service
检查启动状态。
[root@es ~]# curl http://172.18.8.200:9200
{
  "name" : "node-1",
  "cluster_name" : "my-application",
  "cluster_uuid" : "SK5_gP5eSQaRyWRaJMPG7Q",
  "version" : {
    "number" : "6.5.2",
    "build_flavor" : "default",
    "build_type" : "rpm",
    "build_hash" : "9434bed",
    "build_date" : "2018-11-29T23:58:20.891072Z",
    "build_snapshot" : false,
    "lucene_version" : "7.5.0",
    "minimum_wire_compatibility_version" : "5.6.0",
    "minimum_index_compatibility_version" : "5.0.0"
  },
  "tagline" : "You Know, for Search"
}
看到这个结果,证明我们安装已经完成。
详细安装步骤,请参见官方文档。
为了节省机器资源,我们这里使用安装在一台机器上面,因为环境上面已经配置好,我们这里直接进行安装。
yum install kibana -y编辑配置文件`/etc/kibana/kibana.yml,修改如下内容:
server.port: 5601
server.host: "172.18.8.200"
elasticsearch.url: "http://172.18.8.200:9200"
启动服务。
systemctl daemon-reload
systemctl enable kibana.service
systemctl start kibana.service访问http://172.18.8.200:5601,画面正常显示即我们安装完成。
具体配置,请参见官方文档。
安装JDK。
rpm -ivh jdk-8u181-linux-x64.rpm导入Elasticsearch PGP Key。
rpm --import https://artifacts.elastic.co/GPG-KEY-elasticsearch创建仓库。
cat >> /etc/yum.repos.d/elasticsearch.repo <<EOF
[elasticsearch-6.x]
name=Elasticsearch repository for 6.x packages
baseurl=https://artifacts.elastic.co/packages/6.x/yum
gpgcheck=1
gpgkey=https://artifacts.elastic.co/GPG-KEY-elasticsearch
enabled=1
autorefresh=1
type=rpm-md
EOF
软件安装。
yum install logstash -y一个Logstash的pipeline由3部分组成:input, filter, output,在配置文件中我们也分为三部分。
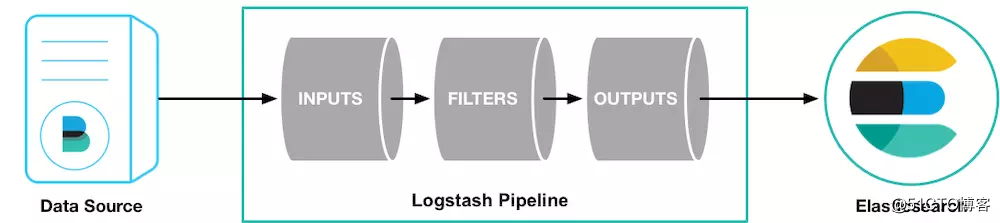
创建配置文件/etc/logstash/conf.d/logstash.conf,增加如下内容:
input {
  beats {
    port => 5044
  }
}

filter {
  if [type] == "nginx_access" {
    grok {
      match => { "message" => "%{NGINXACCESS}" }
    }
  }
  if [type] == "apache_access" {
    grok {
      match => { "message" => "%{COMBINEDAPACHELOG}" }
    }
  }
  geoip {
    source => "clientip"
  }
  date {
    match => [ "timestamp" , "dd/MMM/yyyy:HH:mm:ss Z" ]
  }
}

output {
  if [type] == "nginx_access" {
    elasticsearch {
      hosts => "172.18.8.200:9200"
      index => "nginx_access-%{+YYYY.MM.dd}"
    }
        stdout { codec => rubydebug }
  }

  if [type] == "apache_access" {
    elasticsearch {
      hosts => "172.18.8.200:9200"
      index => "apache_access-%{+YYYY.MM.dd}"
    }
        stdout { codec => rubydebug }
  }
}
%{NGINXACCESS} 是一个frok patterns,可以对我们的日志进行标准化输出,系统安装好之后,会支持很多patterns,可以使用命令rpm -ql logstash|grep patterns。
然而我们刚刚使用的%{NGINXACCESS},默认不存在,需要我们自定义,找到grok-patterns文件,在最后面加入下面内容:
# Nginx logs
NGUSERNAME [a-zA-Z\.\@\-\+_%]+
NGUSER %{NGUSERNAME}
NGINXACCESS %{IPORHOST:clientip} %{NGUSER:ident} %{NGUSER:auth} \[%{HTTPDATE:timestamp}\] "%{WORD:verb} %{URIPATHPARAM:request} HTTP/%{NUMBER:httpversion}" %{NUMBER:response} (?:%{NUMBER:bytes}|-) (?:"(?:%{URI:referrer}|-)"|%{QS:referrer}) %{QS:agent}启动程序。
systemctl daemon-reload
systemctl enable logstash.service
systemctl start logstash.service
检测端口5044是否已经启动。
[root@logstash ~]# netstat -tlnp
Active Internet connections (only servers)
Proto Recv-Q Send-Q Local Address           Foreign Address         State       PID/Program name
tcp        0      0 0.0.0.0:22              0.0.0.0:*               LISTEN      1098/sshd
tcp        0      0 127.0.0.1:25            0.0.0.0:*               LISTEN      1234/master
tcp6       0      0 127.0.0.1:9600          :::*                    LISTEN      24546/java
tcp6       0      0 :::5044                 :::*                    LISTEN      24546/java
tcp6       0      0 :::22                   :::*                    LISTEN      1098/sshd
tcp6 0 0 ::1:25 :::* LISTEN 1234/master 因为我们默认的仓库里面没有nginx软件包,所以我们首先添加epel源。
wget -P /etc/yum.repos.d/ https://mirrors.aliyun.com/repo/epel-7.repo配置Filebeat仓库,导入Elasticsearch PGP Key。
rpm --import https://artifacts.elastic.co/GPG-KEY-elasticsearch创建仓库。
cat >> /etc/yum.repos.d/elasticsearch.repo <<EOF
[elasticsearch-6.x]
name=Elasticsearch repository for 6.x packages
baseurl=https://artifacts.elastic.co/packages/6.x/yum
gpgcheck=1
gpgkey=https://artifacts.elastic.co/GPG-KEY-elasticsearch
enabled=1
autorefresh=1
type=rpm-md
EOF
软件安装。
yum install filebeat nginx -y编辑文件/etc/filebeat/filebeat.yml,修改为如下内容:
filebeat.inputs:
- type: log
  enabled: true
  paths:
    - /var/log/nginx/access.log
  fields:
    type: nginx_access
filebeat.config.modules:
  path: ${path.config}/modules.d/*.yml
  reload.enabled: false
setup.template.settings:
  index.number_of_shards: 3
output.logstash:
  hosts: ["172.18.8.201:5044"]
processors:
  - add_host_metadata: ~
  - add_cloud_metadata: ~
ELK + Filebeat +Nginx 集中式日志分析平台(一)
标签:monit clust mini 软件 ipa att random inux deb
原文地址:http://blog.51cto.com/wzlinux/2327253