标签:目录 width from 分享 too 版本 service 接收 tac
一般App都会有消息推送的功能,如果是原生安卓或者IOS集成消息推送很容易,各大推送平台都有相关的Sample,但是关于Xamarin.Forms的消息推送集成的资料非常少,下面就说下Xamarin.Forms(Android)怎么集成极光推送
准备工作:
1、了解极光推送原理:https://docs.jiguang.cn/jpush/client/Android/android_sdk/
2、下载极光官方Android SDK :https://docs.jiguang.cn/jpush/resources//
3、注册极光账号,拿到AppKey和Master Secret
4、学习xamarin绑定jar包 :https://developer.xamarin.com/guides/android/advanced_topics/binding-a-java-library/binding-a-jar/
以上是准备工作,熟悉以上的内容之后,我们正式进入极光推送集成
一、把极光官方的jar包转换成Dll
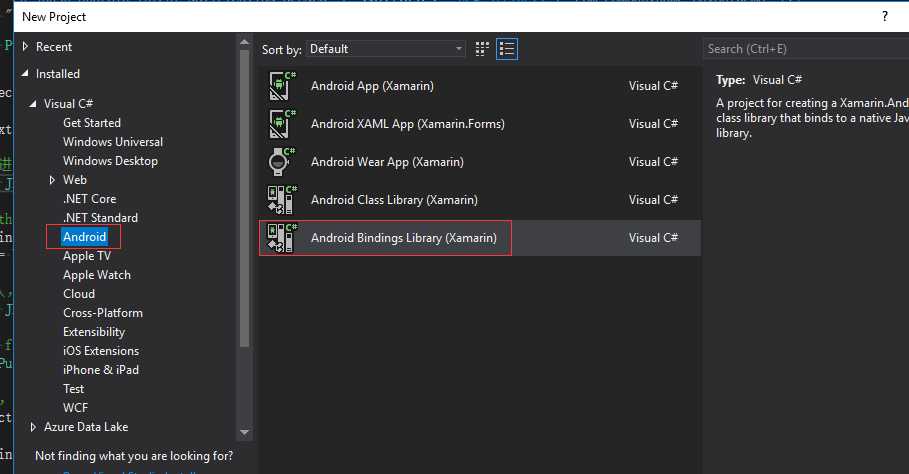
1、建立一个android Bindings Libary项目
2、解压极光官方Android SDK,我下载的版本是3.1.7
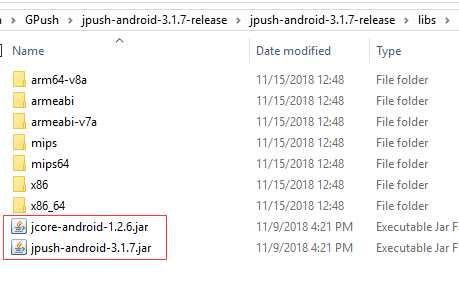
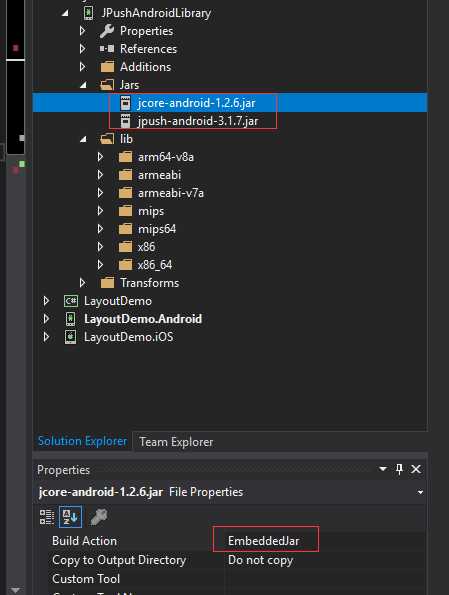
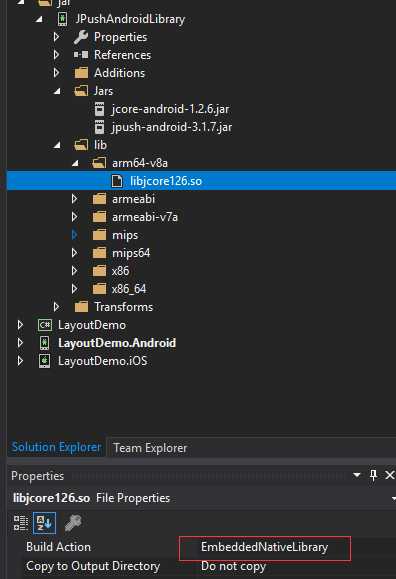
3、把jar包和so文件拷入对应文件夹下面,并设置Build Action,jar文件的Build Action设置为EmbeddedJar,so文件的Build Action设置为EmbeddedNativeLibrary,然后编译就OK了,我们可以在\bin\Debug目录看到dll了,可以用反编译工具检查下dll是否有效
二、修改AndroidManifest配置
我的配置并不是和极光官方Android SDK的AndroidManifest配置一样,我参考了网上的别人的代码,配置如下:
<?xml version="1.0" encoding="utf-8"?>
<manifest xmlns:android="http://schemas.android.com/apk/res/android" android:versionCode="1" android:versionName="1.0" package="com.companyname.LayoutDemo">
  <uses-sdk android:minSdkVersion="21" android:targetSdkVersion="27" />
  <uses-permission android:name="android.permission.INTERNET" />
  <uses-permission android:name="android.permission.ACCESS_NETWORK_STATE" />
  <!--JPush Required-->
  <permission  android:name="com.companyname.LayoutDemo.permission.JPUSH_MESSAGE"  android:protectionLevel="signature" />
  <uses-permission android:name="com.companyname.LayoutDemo.permission.JPUSH_MESSAGE" />
  <uses-permission android:name="android.permission.RECEIVE_USER_PRESENT" />
  <uses-permission android:name="android.permission.INTERNET" />
  <uses-permission android:name="android.permission.WAKE_LOCK" />
  <uses-permission android:name="android.permission.READ_PHONE_STATE" />
  <uses-permission android:name="android.permission.WRITE_EXTERNAL_STORAGE" />
  <uses-permission android:name="android.permission.READ_EXTERNAL_STORAGE" />
  <uses-permission android:name="android.permission.VIBRATE" />
  <uses-permission android:name="android.permission.MOUNT_UNMOUNT_FILESYSTEMS" />
  <uses-permission android:name="android.permission.ACCESS_NETWORK_STATE" />
  <uses-permission android:name="android.permission.WRITE_SETTINGS" />
  <uses-permission android:name="android.permission.ACCESS_WIFI_STATE" />

  <application android:label="LayoutDemo" android:icon="@drawable/xamarin_logo">
    <!-- since 3.0.9 Required SDK-->
    <provider   android:authorities="com.companyname.LayoutDemo.DataProvider"   android:name="cn.jpush.android.service.DataProvider" android:exported="true"  />
    <!-- Required SDK 核心功能-->
    <!-- 可配置android:process参数将PushService放在其他进程中 -->
    <service   android:name="cn.jpush.android.service.PushService"     android:enabled="true"  android:exported="false" >
      <intent-filter>
        <action android:name="cn.jpush.android.intent.REGISTER" />
        <action android:name="cn.jpush.android.intent.REPORT" />
        <action android:name="cn.jpush.android.intent.PushService" />
        <action android:name="cn.jpush.android.intent.PUSH_TIME" />
      </intent-filter>
    </service>
    <!-- since 1.8.0 option 可选项。用于同一设备中不同应用的JPush服务相互拉起的功能。 -->
    <!-- 若不启用该功能可删除该组件,将不拉起其他应用也不能被其他应用拉起 -->
    <service
        android:name="cn.jpush.android.service.DaemonService"
        android:enabled="true"
        android:exported="true">
      <intent-filter >
        <action android:name="cn.jpush.android.intent.DaemonService" />
        <category android:name="com.companyname.LayoutDemo"/>
      </intent-filter>
    </service>
    <!-- Required SDK核心功能-->
    <receiver
        android:name="cn.jpush.android.service.PushReceiver"
        android:enabled="true" >
      <intent-filter android:priority="1000">
        <action android:name="cn.jpush.android.intent.NOTIFICATION_RECEIVED_PROXY" />
        <category android:name="com.companyname.LayoutDemo"/>
      </intent-filter>
      <intent-filter>
        <action android:name="android.intent.action.USER_PRESENT" />
        <action android:name="android.net.conn.CONNECTIVITY_CHANGE" />
      </intent-filter>
      <!-- Optional-->
      <intent-filter>
        <action android:name="android.intent.action.PACKAGE_ADDED" />
        <action android:name="android.intent.action.PACKAGE_REMOVED" />
        <data android:scheme="package" />
      </intent-filter>
    </receiver>
    <!-- Required SDK核心功能-->
    <activity
        android:name="cn.jpush.android.ui.PushActivity"
        android:configChanges="orientation|keyboardHidden"
        android:theme="@android:style/Theme.NoTitleBar"
        android:exported="false" >
      <intent-filter>
        <action android:name="cn.jpush.android.ui.PushActivity" />
        <category android:name="android.intent.category.DEFAULT" />
        <category android:name="com.companyname.LayoutDemo" />
      </intent-filter>
    </activity>
    <!-- SDK核心功能-->
    <activity
        android:name="cn.jpush.android.ui.PopWinActivity"
        android:configChanges="orientation|keyboardHidden"
        android:exported="false"
        android:theme="@android:style/Theme.NoTitleBar">
      <intent-filter>
        <category android:name="android.intent.category.DEFAULT" />
        <category android:name="com.companyname.LayoutDemo" />
      </intent-filter>
    </activity>
    <!-- Required SDK核心功能-->
    <service
        android:name="cn.jpush.android.service.DownloadService"
        android:enabled="true"
        android:exported="false" >
    </service>
    <!-- Required SDK核心功能-->
    <receiver android:name="cn.jpush.android.service.AlarmReceiver" />
    <!-- Required. For publish channel feature -->
    <!-- JPUSH_CHANNEL 是为了方便开发者统计APK分发渠道。-->
    <!-- 例如: -->
    <!-- 发到 Google Play 的APK可以设置为 google-play; -->
    <!-- 发到其他市场的 APK 可以设置为 xxx-market。 -->
    <!-- 目前这个渠道统计功能的报表还未开放。-->
    <meta-data android:name="JPUSH_CHANNEL" android:value="developer-default"/>
    <!-- Required. AppKey copied from Portal -->
    <meta-data android:name="JPUSH_APPKEY" android:value="替换成你的APPKEY"/>
  </application>

</manifest>
把配置中所有com.companyname.LayoutDemo替换成你自己的app包名,然后替换Appkey,就ok了
三、在Android 项目的MainActivity中初始化PushNotification
public class MainActivity : global::Xamarin.Forms.Platform.Android.FormsAppCompatActivity
    {
        protected override void OnCreate(Bundle savedInstanceState)
        {
            TabLayoutResource = Resource.Layout.Tabbar;
            ToolbarResource = Resource.Layout.Toolbar;

            base.OnCreate(savedInstanceState);

            initPushNotification();

            global::Xamarin.Forms.Forms.Init(this, savedInstanceState);
            LoadApplication(new App());
        }

        private void initPushNotification()
        {
            IntentFilter filter = new IntentFilter();
            filter.AddAction(JPushInterface.ActionNotificationOpened);
            filter.AddAction(JPushInterface.ActionNotificationReceived);
            filter.AddAction(JPushInterface.ActionMessageReceived);
            filter.AddAction(JPushInterface.ActionRegistrationId);
            filter.AddAction(JPushInterface.ActionConnectionChange);
            NotificationReceiver receiver = new NotificationReceiver();
            RegisterReceiver(receiver, filter);
            JPushInterface.SetDebugMode(true);
            JPushInterface.Init(this.ApplicationContext);
        }

    }
添加NotificationReceiver类,把配置中的IntentFilter放在了代码中,这里和官方sample有点不一样
[BroadcastReceiver]
    [IntentFilter(new string[] { "cn.jpush.android.intent.REGISTRATION" }, Categories = new string[] { "com.companyname.LayoutDemo" })]
    [IntentFilter(new string[] { "cn.jpush.android.intent.MESSAGE_RECEIVED" }, Categories = new string[] { "com.companyname.LayoutDemo" })]
    [IntentFilter(new string[] { "cn.jpush.android.intent.NOTIFICATION_RECEIVED" }, Categories = new string[] { "com.companyname.LayoutDemo" })]
    [IntentFilter(new string[] { "cn.jpush.android.intent.NOTIFICATION_OPENED" }, Categories = new string[] { "com.companyname.LayoutDemo" })]
    [IntentFilter(new string[] { "cn.jpush.android.intent.CONNECTION" }, Categories = new string[] { "com.companyname.LayoutDemo" })]
    class NotificationReceiver : PushReceiver
    {
        public override void OnReceive(Context context, Intent intent)
        {
            base.OnReceive(context, intent);

            //当点击消息时进入,进入对应的页面
            if (intent.Action == JPushInterface.ActionNotificationOpened)
            {
                //When user tap the notification on notification center
                Bundle bundle = intent.Extras;
                string jsonData = bundle.GetString(JPushInterface.ExtraExtra);
            }
            //第一次安装app时进入,会拿到registrationID,保存registrationID,当用户登录之后把用户id和registrationID关联,方便之后一对一发送消息
            if (intent.Action == JPushInterface.ActionRegistrationId)
            {
                //Only call when first launch, get the registrationID
                string regID = JPushInterface.GetRegistrationID(context);
            }
            //当接收到信息时进入,弹出消息框
            if (JPushInterface.ActionMessageReceived.Equals(intent.Action))
            {

            }

 //当接收到信息时进入,弹出消息框
            if (JPushInterface.ActionNotificationReceived.Equals(intent.Action))
           {

            }
            if (JPushInterface.ActionNotificationReceived.Equals(intent.Action))
            {

            }
        }

    }
四、在极光推送网站注册,并测试发送
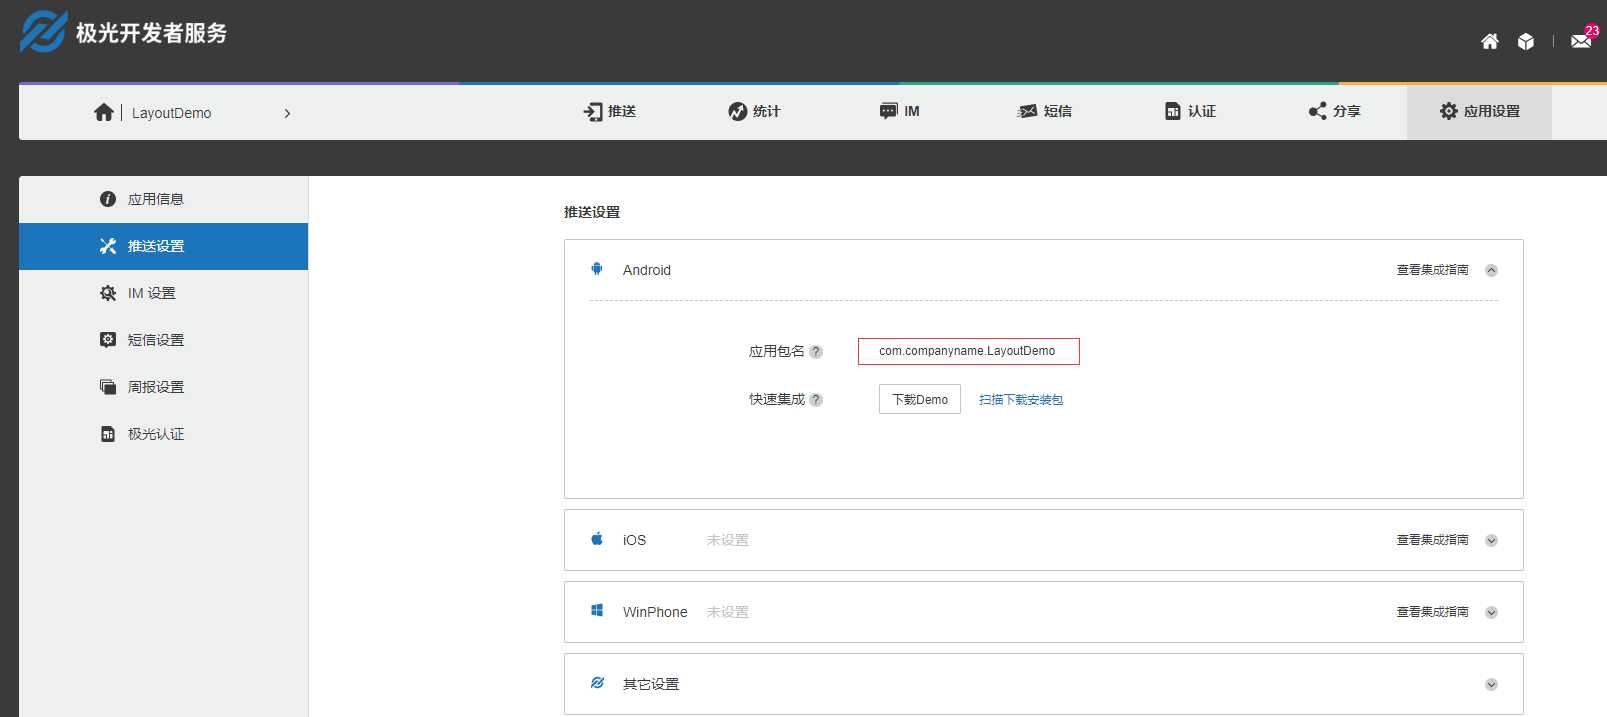
注意应用包名必须和配置文件保持一致,极光推送根据应用包名和AppKey进行识别,这两个参数必须正确。
如果是真机测试,必须开启软件的通知权限。
参考文章:
https://www.jianshu.com/p/5abe3924acab
https://github.com/JimmyPun610/XamarinAndroidJiGuangPushNotification
标签:目录 width from 分享 too 版本 service 接收 tac
原文地址:https://www.cnblogs.com/fengchao1000/p/10084406.html