标签:它的 axis2 idt object 好玩的 points attribute nim const

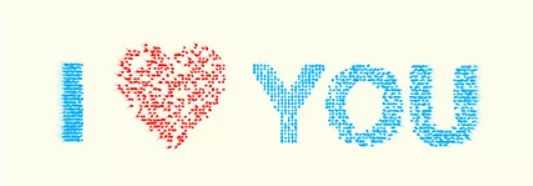
最近听女神说想谈恋爱了,?(? ? ?) 嘿嘿,一定不能放过这个机会,给她来个不一样的表白。
那么咱们就一起来把这个粒子系统玩出花来吧
演示地址:
https://es2049.studio/work-show/textPraticle/
如何将一系列的粒子组成一句表白呢?

实现原理其实很简单,Canvas 中有个 getImageData 的方法,可以得到一个矩形范围所有像素点数据。那么我们就试试来获取一个文字的形状吧。
第一步,用 measureText 的方法来计算出文字适当的尺寸和位置。
// 创建一个跟画布等比例的 canvas
const width = 100;
const height = ~~(width * this.height / this.width); // this.width , this.height 说整个画布的尺寸
const offscreenCanvas =document.createElement(‘canvas‘);
const offscreenCanvasCtx =offscreenCanvas.getContext(‘2d‘);
offscreenCanvas.setAttribute(‘width‘, width);
offscreenCanvas.setAttribute(‘height‘, height);
// 在这离屏 canvas 中将我们想要的文字 textAll 绘制出来后,再计算它合适的尺寸
offscreenCanvasCtx.fillStyle = ‘#000‘;
offscreenCanvasCtx.font = ‘bold 10px Arial‘;
constmeasure=offscreenCanvasCtx.measureText(textAll); // 测量文字,用来获取宽度
const size = 0.8;
// 宽高分别达到屏幕0.8时的size
const fSize=Math.min(height * size * 10 / lineHeight, width * size * 10 / measure.width); // 10像素字体行高 lineHeight=7 magic
offscreenCanvasCtx.font = `bold ${fSize}px Arial`;
// 根据计算后的字体大小,在将文字摆放到适合的位置,文字的坐标起始位置在左下方
const measureResize =offscreenCanvasCtx.measureText(textAll);
// 文字起始位置在左下方
let left = (width - measureResize.width) / 2;
const bottom=(height + fSize / 10 * lineHeight) / 2;
offscreenCanvasCtx.fillText(textAll, left, bottom);
咱们可以 appendChild 到 body 里看眼

同学们注意,我要开始变形了 [推眼镜] 。
getImageData 获取的像素数据是一个 Uint8ClampedArray (值是 0 - 255 的数组),4 个数一组分别对应一个像素点的 R G B A 值。我们只需要判断 i * 4 + 3 不为 0 就可以得到需要的字体形状数据了。
// texts 所有的单词分别获取 data ,上文的 textAll 是 texts 加一起
Object.values(texts).forEach(item => {
offscreenCanvasCtx.clearRect(0, 0, width, height);
offscreenCanvasCtx.fillText(item.text, left, bottom);
left += offscreenCanvasCtx.measureText(item.text).width;
const data = offscreenCanvasCtx.getImageData(0, 0, width, height);
const points = [];
// 判断第 i * 4 + 3 位是否为0,获得相对的 x,y 坐标(使用时需乘画布的实际长宽, y 坐标也需要取反向)
for (let i = 0, max = data.width * data.height; i < max; i++) {
if (data.data[i * 4 + 3]) {
points.push({
x: (i % data.width) / data.width,
y: (i / data.width) / data.height
});
}
}
// 保存到一个对象,用于后面的绘制
geometry.push({
color: item.hsla,
points
});
})
制定场景,绘制图形
文字图形的获取方式以及搞定了,那么咱们就可以把内容整体输出了。咱们定义一个简单的脚本格式。
// hsla 格式方便以后做色彩变化的扩展
const color1 = {h:197,s:‘100%‘,l:‘50%‘,a:‘80%‘};
const color2 = {h:197,s:‘100%‘,l:‘50%‘,a:‘80%‘};
// lifeTime 祯数
const Actions = [
{lifeTime:60,text:[{text:3,hsla:color1}]},
{lifeTime:60,text:[{text:2,hsla:color1}]},
{lifeTime:60,text:[{text:1,hsla:color1}],
{lifeTime:120,text:[
{text:‘I‘,hsla:color1},
{text:‘??‘,hsla:color2},
{text:‘Y‘,hsla:color1},
{text:‘O‘,hsla:color1},
{text:‘U‘,hsla:color1}
]},
];
根据预设的脚本解析出每个场景的图形,加一个 tick 判断是否到了 lifeTime 切换到下一个图形重新绘制图形。
function draw() {
this.tick++;
if (this.tick >= this.actions[this.actionIndex].lifeTime) {
this.nextAction();
}
this.clear();
this.renderParticles(); // 绘制点
this.raf = requestAnimationFrame(this.draw);
}
function nextAction() {
....//切换场景 balabala..
this.setParticle(); // 随机将点设置到之前得到的 action.geometry.points 上
}
这样咱们基本的功能已经完成了。
能不能再给力一点
说好的粒子系统,现在只是 context.arc 简单的画了一点。那咱们就来加个粒子系统吧。
class PARTICLE {
// x,y,z 为当前的坐标,vx,vy,vz 则是3个方向的速度
constructor(center) {
this.center = center;
this.x = 0;
this.y = 0;
this.z = 0;
this.vx = 0;
this.vy = 0;
this.vz = 0;
}
// 设置这些粒子需要运动到的终点(下一个位置)
setAxis(axis) {
this.nextX = axis.x;
this.nextY = axis.y;
this.nextZ = axis.z;
this.color = axis.color;
}
step() {
// 弹力模型 距离目标越远速度越快
this.vx += (this.nextX - this.x) * SPRING;
this.vy += (this.nextY - this.y) * SPRING;
this.vz += (this.nextZ - this.z) * SPRING;
// 摩擦系数 让粒子可以趋向稳定
this.vx *= FRICTION;
this.vy *= FRICTION;
this.vz *= FRICTION;
this.x += this.vx;
this.y += this.vy;
this.z += this.vz;
}
getAxis2D() {
this.step();
// 3D 坐标下的 2D 偏移,暂且只考虑位置,不考虑大小变化
const scale = FOCUS_POSITION / (FOCUS_POSITION + this.z);
return {
x: this.center.x + (this.x * scale),
y: this.center.y - (this.y * scale),
};
}
}
大功告成!
既然是 3D 的粒子,其实这上面还有不是文章可做,同学们可以发挥想象力来点更酷炫的。
还有什么好玩的
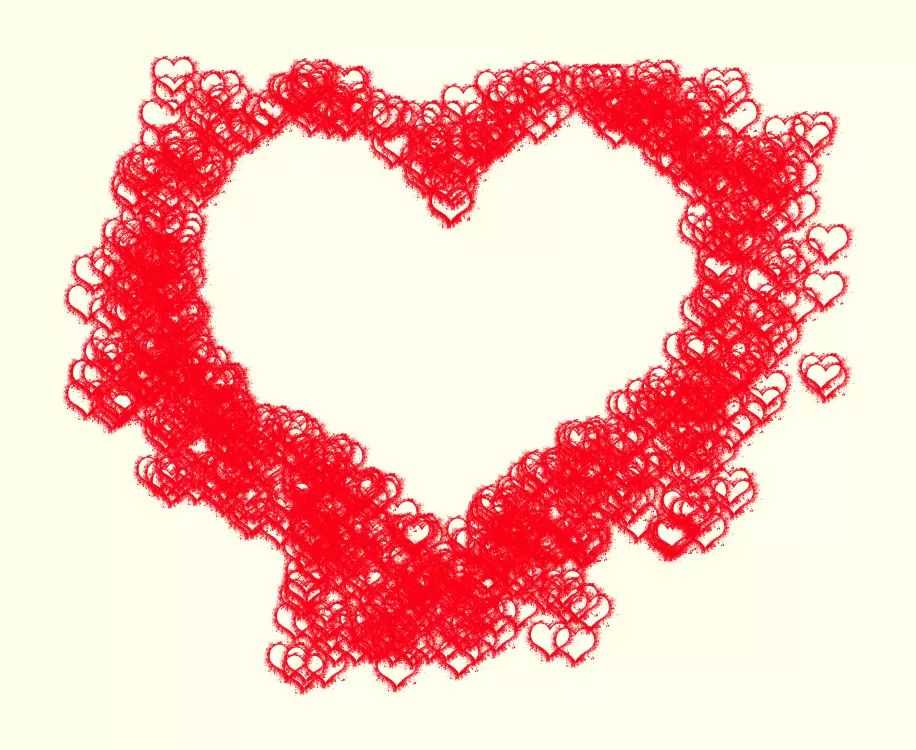
上面是将粒子摆成文字。那咱们当然也可以直接写公式摆出个造型。
// Actions 中用 func 代替 texts
{
lifeTime: 100,
func: (radius) => {
const i = Math.random() * 1200;
let x = (i - 1200 / 2) / 300;
let y = Math.sqrt(Math.abs(x)) - Math.sqrt(Math.cos(x)) * Math.cos(30 * x);
return {
x: x * radius / 2,
y: y * radius / 2,
z: ~~(Math.random() * 30),
color: color3
};
}
}
再把刚才文字转换形状的方法用一下
{
lifeTime: Infinity,
func: (width, height) => {
if(!points.length){
const img = document.getElementById("tulip");
constoffscreenCanvas = document.createElement(‘canvas‘);
constoffscreenCanvasCtx = offscreenCanvas.getContext(‘2d‘);
const imgWidth = 200;
const imgHeight = 200;
offscreenCanvas.setAttribute(‘width‘, imgWidth);
offscreenCanvas.setAttribute(‘height‘, imgHeight);
offscreenCanvasCtx.drawImage( img, 0, 0, imgWidth, imgHeight);
let imgData=offscreenCanvasCtx.getImageData( 0, 0, imgWidth, imgHeight);
for ( let i = 0, max = imgData.width * imgData.height; i < max; i++) {
if (imgData.data[i * 4 + 3]) {
points.push({
x: (i % imgData.width) / imgData.width,
y: (i / imgData.width) / imgData.height
});
}
}
}
const p= points[~~(Math.random() * points.length)]
const radius = Math.min(width * 0.8, height * 0.8);
return {
x: p.x * radius - radius / 2,
y: (1 - p.y) * radius - radius / 2,
z: ~~(Math.random() * 30),
color: color3
};
}
}
完美 ??
然后咱也可以用 drawImage 绘制图片来代替 arc 画点。

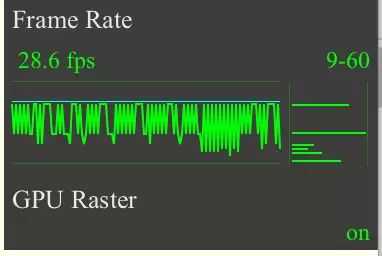
等等!!前面的效果总觉得哪里不对劲,好像有些卡 。
优化小提示
1、分层。如果还需要增加一些其他的内容到 Canvas 中的话,可以考虑拆出多个 Canvas 来做。
2、减少属性设置。包括 lineWidth、fillStyle 等等。Canvas 上下文是很复杂的一个对象,当你调它的一些属性设置时消耗的性能还是不少的。arc 之类的画图方法也要减少。
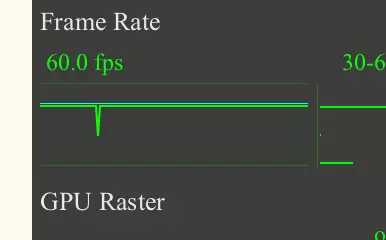
3、离屏绘制。不用 arc 画点,要怎么办。上面的延迟其实就是每次画点时都调用了一遍 fillStyle、arc。但是当我们绘制图片 drawImage 时,性能明显会好上很多。drawImage 除了直接绘图片外,还能绘制另一个 Canvas,所以我们提前将这些点画到一个不在屏幕上的 Canvas 里就可以了。
4、减少 js 计算,避免堵塞进程,可以使用 web worker。当然咱们目前的计算完全用不上这个
我这使用了 3000 个粒子,对比下使用离屏绘制前后的帧率。


总结
现在唯一限制你的就是想象力了。大家一起去征服老板,征服女神!
参考:
deformable particles
https://codepen.io/airen/pen/owRMoY
Canvas 参考手册
http://www.w3school.com.cn/tags/html_ref_canvas.asp
y=sqrt(abs(x))-sqrt(cos(x))*cos(40x)
作者:ES2049
来源:https://juejin.im/post/5bdfe1dbe51d45054771f9d4
标签:它的 axis2 idt object 好玩的 points attribute nim const
原文地址:https://www.cnblogs.com/Highdoudou/p/10101778.html