标签:related apple init tle reg isp cts mep bin
现在我们已经为我们的应用建立了一个良好的结构,是时候添加更多的功能了。通过添加一些JSON格式的发票数据,我们开始探索数据绑定的更多特性,这些发票数据显示在面板下面的列表中。
Preview

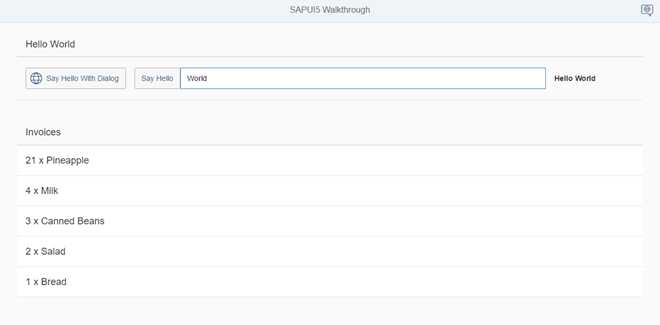
A list of invoices is displayed below the panel
Coding
You can view and download all files at Walkthrough - Step 20.
webapp/Invoices.json (New)
{

  "Invoices": [

        {

          "ProductName": "Pineapple",

          "Quantity": 21,

          "ExtendedPrice": 87.2000,

          "ShipperName": "Fun Inc.",

          "ShippedDate": "2015-04-01T00:00:00",

          "Status": "A"

        },

        {

          "ProductName": "Milk",

          "Quantity": 4,

          "ExtendedPrice": 9.99999,

          "ShipperName": "ACME",

          "ShippedDate": "2015-02-18T00:00:00",

          "Status": "B"

        },

        {

          "ProductName": "Canned Beans",

          "Quantity": 3,

          "ExtendedPrice": 6.85000,

          "ShipperName": "ACME",

          "ShippedDate": "2015-03-02T00:00:00",

          "Status": "B"

        },

        {

          "ProductName": "Salad",

          "Quantity": 2,

          "ExtendedPrice": 8.8000,

          "ShipperName": "ACME",

          "ShippedDate": "2015-04-12T00:00:00",

          "Status": "C"

        },

        {

          "ProductName": "Bread",

          "Quantity": 1,

          "ExtendedPrice": 2.71212,

          "ShipperName": "Fun Inc.",

          "ShippedDate": "2015-01-27T00:00:00",

          "Status": "A"

        }

  ]

}
发票文件仅包含5张JSON格式的发票,我们可以使用它们在应用程序中绑定控件。JSON是一种非常轻量级的数据存储格式,可以直接用作SAPUI5应用程序的数据源。
webapp/manifest.json
{

…

  "sap.ui5": {

        "rootView": "sap.ui.demo.walkthrough.view.App",

[…]

        "models": {

          "i18n": {

               "type": "sap.ui.model.resource.ResourceModel",

               "settings": {

                 "bundleName": "sap.ui.demo.walkthrough.i18n.i18n"

               }

          },

          "invoice": {

               "type": "sap.ui.model.json.JSONModel",

               "uri": "Invoices.json"

          }

        }

  }

}
我们将一个新的模型发票添加到描述符的sa .ui5部分。这次我们需要一个JSONModel,因此我们将类型设置为sa .ui.model.json.JSONModel。uri键是相对于组件的测试数据的路径。通过这个小配置,我们的组件将自动实例化一个新的JSONModel,它从发票装载Invoices.json文件。最后,实例化的JSONModel作为命名模型发票放到组件上。命名的模型在我们的应用程序中是可见的。
请注意:自动模型实例化仅在SAPUI5 1.30版本中可用。如果使用旧版本,可以在组件的onInit方法中手动实例化应用程序的资源包和其他模型。就像我们在步骤9:组件配置中对资源包所做的那样。Step 9: Component Configuration.
webapp/view/App.view.xml
<mvc:View

   controllerName="sap.ui.demo.walkthrough.controller.App"

   xmlns="sap.m"

   xmlns:mvc="sap.ui.core.mvc"

   displayBlock="true" >

   <App class="myAppDemoWT">

      <pages>

         <Page title="{i18n>homePageTitle}">

            <headerContent>

               <Button

                  icon="sap-icon://hello-world"

                  press="onOpenDialog"/>

            </headerContent>

            <content>

               <mvc:XMLView viewName="sap.ui.demo.walkthrough.view.HelloPanel"/>

               <mvc:XMLView viewName="sap.ui.demo.walkthrough.view.InvoiceList"/>

            </content>

         </Page>

      </pages>

   </App>

</mvc:View>
在app视图中,我们添加了第二个视图来显示面板下面的发票。
webapp/view/InvoiceList.view.xml (New)
<mvc:View

   xmlns="sap.m"

   xmlns:mvc="sap.ui.core.mvc">

   <List

      headerText="{i18n>invoiceListTitle}"

      class="sapUiResponsiveMargin"

      width="auto"

      items="{invoice>/Invoices}" >

      <items>

         <ObjectListItem

            title="{invoice>Quantity} x {invoice>ProductName}"/>

      </items>

   </List>

</mvc:View>
新视图显示一个带有自定义标题文本的列表控件。列表的项聚合绑定到JSON数据的根路径发票。由于我们定义了一个命名模型,我们必须在每个绑定定义前面加上标识符invoice>。
在items聚合中,我们为列表定义模板,该列表将为我们的测试数据的每个发票自动重复。更准确地说,我们使用ObjectListItem为项聚合的每个聚合子控件创建控件。列表项的title属性绑定到单个发票的属性。这是通过定义一个相对路径(没有/在开头)来实现的。这是因为我们通过items={invoice>/ invoice}将项目聚合绑定到发票上。
webapp/i18n/i18n.properties
# App Descriptor

appTitle=Hello World

appDescription=A simple walkthrough app that explains the most important concepts of SAPUI5


# Hello Panel

showHelloButtonText=Say Hello

helloMsg=Hello {0}

homePageTitle=Walkthrough

helloPanelTitle=Hello World

openDialogButtonText=Say Hello With Dialog

dialogCloseButtonText=Ok


# Invoice List

invoiceListTitle=Invoices
Parent topic: WalkthroughIn the text bundle the title of the list is added.
Previous: Step 19: Reuse Dialogs
Next: Step 21: Data Types
Related Information
List Binding (Aggregation Binding)
UI5-文档-4.20-Aggregation Binding
标签:related apple init tle reg isp cts mep bin
原文地址:https://www.cnblogs.com/ricoo/p/10102949.html