标签:oat als axis alpha 参数 new collect Alexnet fir
隐去背景, 作者最近第一次用Tensorflow实现训练了几个模型, 其中遇到了一些错误, 把它记录下来
以下提到的所有代码, 都可以在github上面找到. 仓库地址 https://github.com/spxcds/neural_network_code/
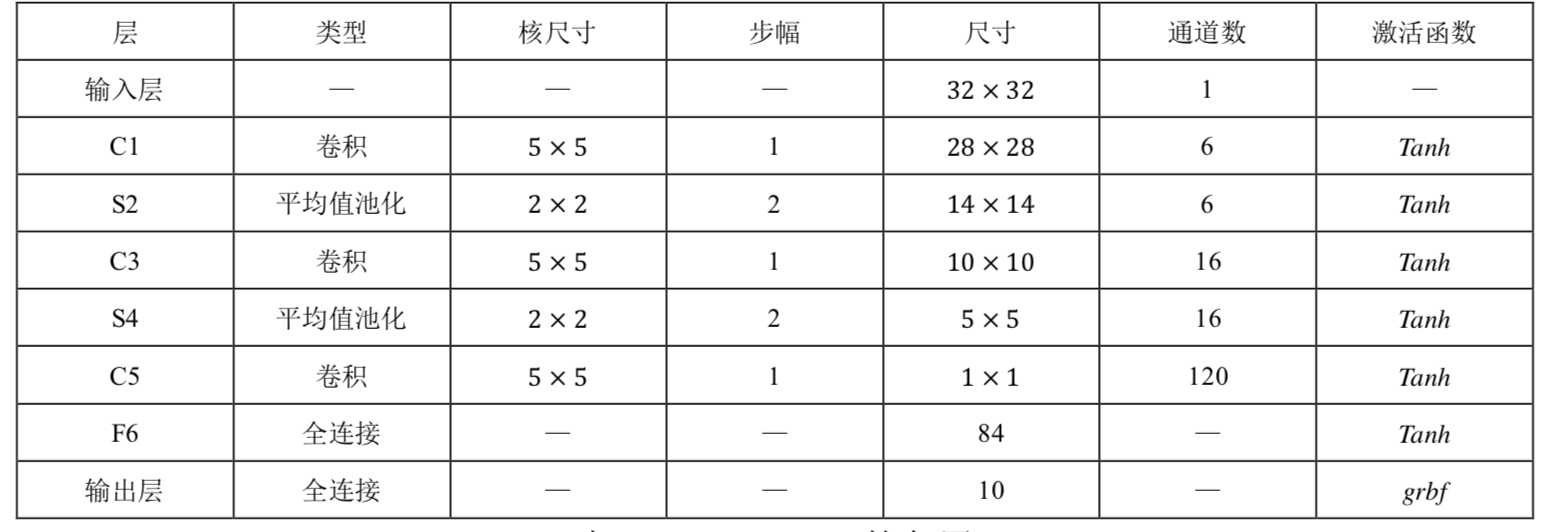
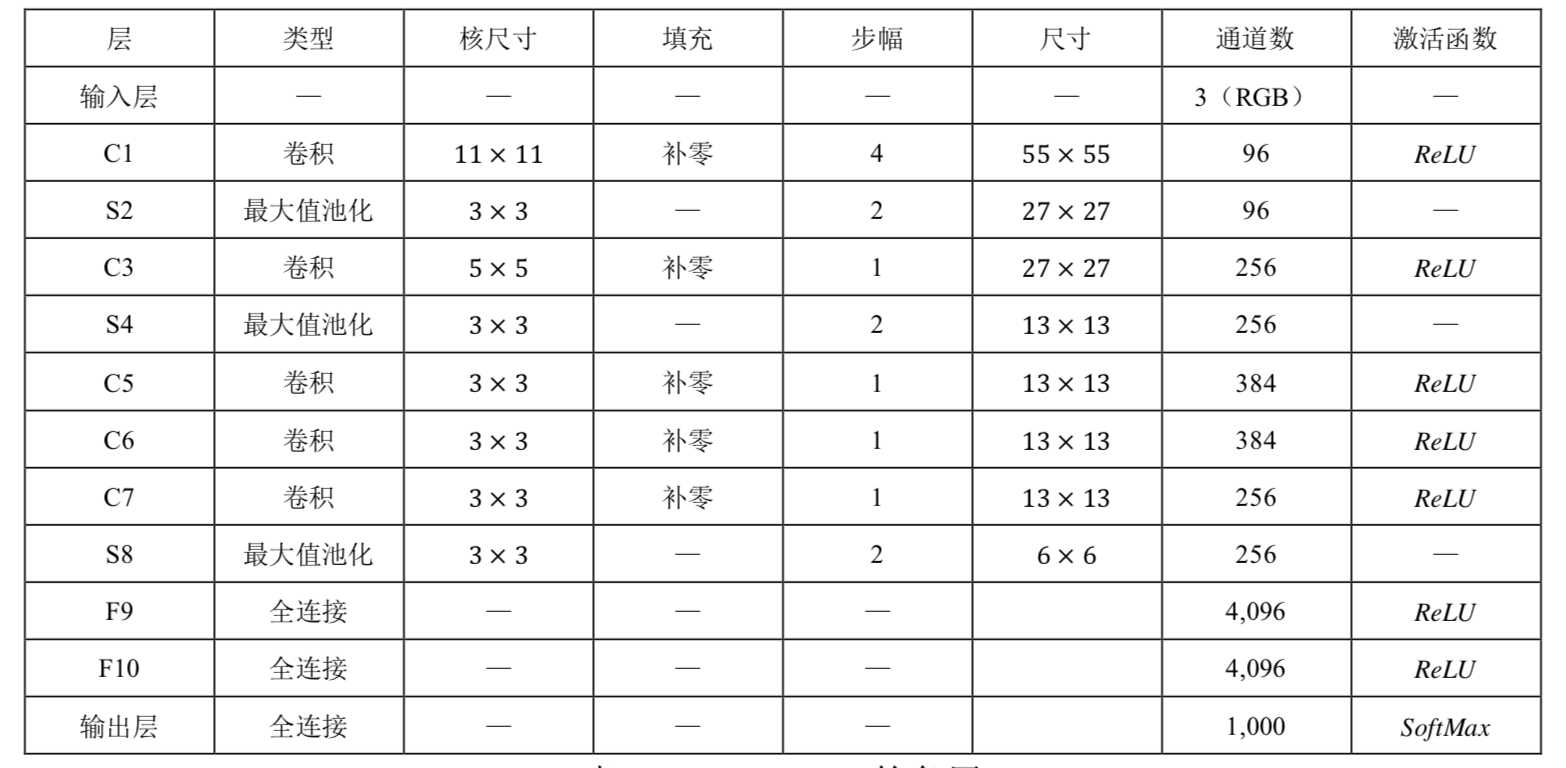
这个仓库里提到的几段代码, 分别实现在从最简单的lr, 到全连接神经网络, 再到卷积神经网络. 从最简单的自己实现交叉熵损失函数, 计算L2正则化, 到后来直接调用库函数, 由简到难, 由浅入深, 截止目前为止, 只实现了MLR, MLP, LeNet-5, AlexNet, VGG-16等几个算法
LeNet-5

AlexNet

几个重要的函数
卷积操作
def conv(self, input_tensor, name, kh, kw, dh, dw, n_output, padding=‘SAME‘):
    n_input = input_tensor.get_shape()[-1].value

    kernel = tf.get_variable(
        name=name + ‘kernel‘,
        shape=[kh, kw, n_input, n_output],
        dtype=tf.float32,
        initializer=tf.truncated_normal_initializer(stddev=0.05))
    bias = tf.get_variable(
        name=name + ‘bias‘, shape=[n_output], dtype=tf.float32, initializer=tf.constant_initializer(0.0))

    c = tf.nn.conv2d(input_tensor, kernel, (1, dh, dw, 1), padding=padding) # SAME, VALID
    return tf.nn.relu(tf.nn.bias_add(c, bias), name=name)
全连接操作
def fc(self, input_tensor, name, n_output):
    n_input = input_tensor.get_shape()[-1].value
    weights = tf.get_variable(
        name=name + ‘weights‘,
        shape=[n_input, n_output],
        dtype=tf.float32,
        initializer=tf.truncated_normal_initializer(stddev=0.05))
    tf.add_to_collection(‘losses‘, tf.nn.l2_loss(weights)) # l2_lambda * tf.add_n(tf.get_collection(‘losses‘))
    bias = tf.get_variable(
        name=name + ‘bias‘, shape=[n_output], dtype=tf.float32, initializer=tf.constant_initializer(0.0))

    return tf.nn.bias_add(tf.matmul(input_tensor, weights), bias)
交叉熵
cost_cross_entropy = tf.reduce_mean(-tf.reduce_sum(y * tf.log(tf.clip_by_value(p, 1e-10, 1.0)), axis=1))def plot(self, save_path):
df = pd.DataFrame(self.train_history, columns=[‘iterations‘, ‘train_acc‘, ‘val_acc‘, ‘train_loss‘, ‘val_loss‘])
# loss曲线
fig = plt.figure(figsize=(20, 10))
ax = fig.add_subplot(121)
ax.grid(True)
ax.plot(df.iterations, df.train_loss, ‘k‘, label=‘训练集损失‘, linewidth=1.2, alpha=0.4)
ax.plot(df.iterations, df.val_loss, ‘k--‘, label=‘验证集损失‘, linewidth=2)
ax.legend(fontsize=16)
ax.set_xlabel(‘Iterations‘, fontsize=16)
ax.set_ylabel(‘Loss‘, fontsize=16)
ax.set_xlim(np.min(df.iterations), np.max(df.iterations) + 0.1, auto=True)
ax.tick_params(axis=‘both‘, which=‘major‘)
ax.set_title(‘损失曲线‘, fontsize=22)
# 混淆矩阵
fig_matrix_confusion = plt.figure(figsize=(10, 10))
ax = fig_matrix_confusion.add_subplot(111)
confusion_matrix = self.get_confusion_matrix(mnist.test.images, mnist.test.labels)
sns.heatmap(
confusion_matrix,
fmt=‘‘,
cmap=plt.cm.Greys,
square=True,
cbar=False,
ax=ax,
annot=True,
xticklabels=np.arange(10),
yticklabels=np.arange(10),
annot_kws={‘fontsize‘: 20})
ax.set_xlabel(‘Predicted‘, fontsize=16)
ax.set_ylabel(‘True‘, fontsize=16)
ax.tick_params(labelsize=14)
ax.set_title(‘混淆矩阵‘, fontsize=22)
plt.savefig(save_path + ‘_confusion_matrix‘)
plt.close()tf.train.GradientDescentOptimizer优化算法, 跑了几千个batch才有效果, 换成tf.train.AdamOptimizer, 几十个batch就开始收敛了log(0)*0的;情况, 使用tf.clip_by_value(t=value,clip_value_min=1e-8,clip_value_min=1.0)避免这种情况标签:oat als axis alpha 参数 new collect Alexnet fir
原文地址:https://www.cnblogs.com/spxcds/p/10205562.html