标签:nec 常用 load vim collision cat name ror lis
1、基于域名的虚拟主机:
绝大多数企业对外提供服务的网站使用的都是基于域名的主机,通过不同的域名区分不同的虚拟主机。
首先我们进入安装nginxd的目录下:/application/nginx-1.6.3/conf
我们去除掉默认配置文件里的注释和空行并重定向到nginx.conf文件里,同时我们需要配置如下:
egrep -v "#|^$" nginx.conf.default >nginx.conf //去掉包含#号和空行的内容
[root@lamp01 conf]# vim nginx.conf
worker_processes  1;
events {
    worker_connections  1024;
}
http {
    include       mime.types;
    default_type  application/octet-stream;
    sendfile        on;
    keepalive_timeout  65;
    server {
        listen       80;
        server_name  www.jyw1.com;
        location / {
            root   html/www;
            index  index.html index.htm;
        }
    }
     server {
        listen       80;
        server_name  bbs.jyw2.com;
        location / {
            root   html/bbs;
            index  index.html index.htm;
         }
     }
}
创建站点目录文件:
mkdir ../html/{www,bbs} -p
[root@lamp01 conf]# tree ../html/
../html/
├── 50x.html
├── bbs
│   └── index.html
├── index.html
└── www
     └── index.html
为站点目录生成首页并追加内容:
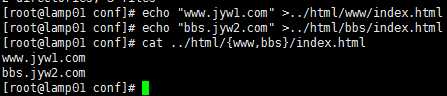
通过hosts来做dns解析
[root@lamp01 conf]# echo "www.jyw1.com" >../html/www/index.html
[root@lamp01 conf]# echo "bbs.jyw2.com" >../html/bbs/index.html
[root@lamp01 conf]# cat ../html/{www,bbs}/index.html
www.jyw1.com
bbs.jyw2.com
[root@lamp01 conf]# /application/nginx/sbin/nginx -t #检查语法
nginx: the configuration file /application/nginx-1.6.3/conf/nginx.conf syntax is ok
nginx: configuration file /application/nginx-1.6.3/conf/nginx.conf test is successful
[root@lamp01 conf]# /application/nginx/sbin/nginx -s reload #刷新配置
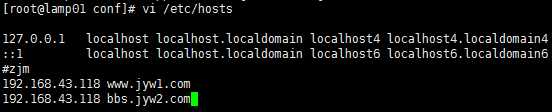
[root@lamp01 conf]# vi /etc/hosts
[root@lamp01 conf]# ping www.jyw1.com
PING www.jyw1.com (192.168.43.118) 56(84) bytes of data.
64 bytes from www.jyw1.com (192.168.43.118): icmp_seq=1 ttl=64 time=0.022 ms
64 bytes from www.jyw1.com (192.168.43.118): icmp_seq=2 ttl=64 time=0.020 ms
^C
--- www.jyw1.com ping statistics ---
2 packets transmitted, 2 received, 0% packet loss, time 1280ms
rtt min/avg/max/mdev = 0.020/0.021/0.022/0.001 ms
[root@lamp01 conf]# ping bbs.jyw2.com
PING bbs.jyw2.com (192.168.43.118) 56(84) bytes of data.
64 bytes from www.jyw1.com (192.168.43.118): icmp_seq=1 ttl=64 time=0.015 ms
64 bytes from www.jyw1.com (192.168.43.118): icmp_seq=2 ttl=64 time=0.020 ms
^C
--- bbs.jyw2.com ping statistics ---
2 packets transmitted, 2 received, 0% packet loss, time 1311ms
rtt min/avg/max/mdev = 0.015/0.017/0.020/0.004 ms
[root@lamp01 conf]# curl www.jyw1.com
www.jyw1.com
[root@lamp01 conf]# curl bbs.jyw2.com
bbs.jyw2.com
[root@lamp01 conf]#
我是用的windows系统,配置一下host在“C:\Windows\System32\drivers\etc”下的hosts中配置一下域名重定向
192.168.43.118 www.jyw1.com bbs.jyw2.com
然后cmd再ping一下这个域名是否正确指向了这个IP上
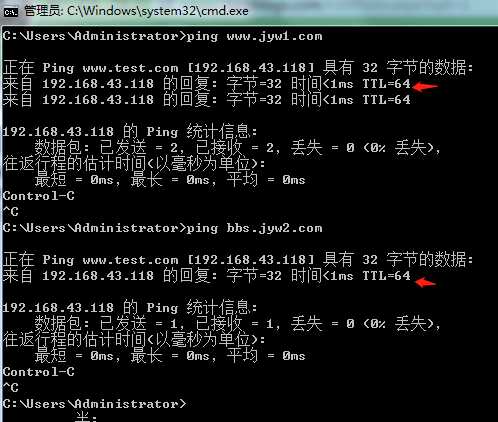
打开浏览器,输入www.test.com会得到以下结果,就说明外网访问成功
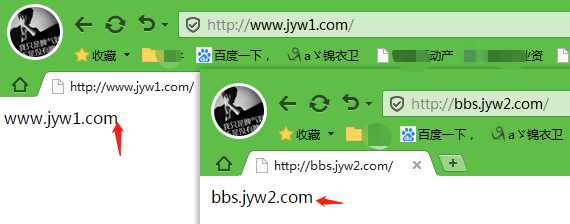
ok,通过多域名来访问站点,同样也可以一个站点多个域名。
2.基于端口的虚拟主机配置:
此类型的虚拟主机主要应用于企业内部的网站,需要加端口号才能访问,通过不同的端口来区分不同的虚拟主机,为企业网站安全优化,例如:企业的网站后台,资料共享等。
在前面配置的基于域名的虚拟主机的基础上只需要修改nginx.conf文件,刷新配置即可完成:
修改nginx.conf配置文件
[root@lamp01 conf]# vim nginx.conf

worker_processes  1;
events {
    worker_connections  1024;
}
http {
    include       mime.types;
    default_type  application/octet-stream;
    sendfile        on;
    keepalive_timeout  65;
    server {
        listen       8001;
        server_name  www.jyw1.com;
        location / {
            root   html/www;
            index  index.html index.htm;
        }
    }
     server {
        listen       8002;
        server_name  bbs.jyw2.com;
        location / {
            root   html/bbs;
            index  index.html index.htm;
         }
     }
}
刷新配置,测试结果如下
[root@lamp01 conf]# /application/nginx/sbin/nginx -t
nginx: the configuration file /application/nginx-1.6.3/conf/nginx.conf syntax is ok
nginx: configuration file /application/nginx-1.6.3/conf/nginx.conf test is successful
[root@lamp01 conf]# /application/nginx/sbin/nginx -s reload
[root@lamp01 conf]# curl www.jyw1.com
curl: (7) couldn‘t connect to host
[root@lamp01 conf]# curl www.jyw1.com:8001
www.jyw1.com
[root@lamp01 conf]# curl bbs.jyw2.com:8002
bbs.jyw2.com
[root@lamp01 conf]#
在windows下测试如下:

ok,既可以对应多个站点,多个端口访问,也可以对应一个站点多个端口访问。
3.基于IP地址虚拟主机:
通过不同的IP区分不同的虚拟主机,此类型企业应用于比较少,通常用到不通业务流中或者负载均衡上面。
在前面配置的基于域名的虚拟主机的基础上只需要修改nginx.conf文件,刷新配置即可完成:
修改nginx.conf配置文件
[root@lamp01 conf]# vim nginx.conf

worker_processes  1;
events {
    worker_connections  1024;
}
http {
    include       mime.types;
    default_type  application/octet-stream;
    sendfile        on;
    keepalive_timeout  65;
    server {
        listen      192.168.43.118:80;
        server_name  www.jyw1.com;
        location / {
            root   html/www;
            index  index.html index.htm;
        }
    }
     server {
        listen 192.168.43.88:80;
        server_name  bbs.jyw2.com;
        location / {
            root   html/bbs;
            index  index.html index.htm;
         }
     }
}
修改完配置文件后,我们需要虚拟一块网卡:
ip addr add //添加
ip addr del 192.168.43.88/24 dev eth0 //删除
临时性网卡: ip addr add 192.168.43.88/24 label eth0:1 dev eth0 或者 ifconfig eth0:1 192.168.43.88/24 up
[root@lamp01 conf]# ip addr add 192.168.43.88/24 label eth0:1 dev eth0  添加网卡(推荐使用ip addr)
[root@lamp01 conf]# ifconfig
eth0      Link encap:Ethernet  HWaddr 00:0C:29:01:4D:22
          inet addr:192.168.43.118  Bcast:192.168.43.255  Mask:255.255.255.0
          inet6 addr: fe80::20c:29ff:fe01:4d22/64 Scope:Link
          UP BROADCAST RUNNING MULTICAST  MTU:1500  Metric:1
          RX packets:1100 errors:0 dropped:0 overruns:0 frame:0
          TX packets:664 errors:0 dropped:0 overruns:0 carrier:0
          collisions:0 txqueuelen:1000
          RX bytes:94218 (92.0 KiB)  TX bytes:76354 (74.5 KiB)

eth0:1    Link encap:Ethernet  HWaddr 00:0C:29:01:4D:22
          inet addr:192.168.43.88  Bcast:192.168.43.255  Mask:255.255.255.0
          UP BROADCAST RUNNING MULTICAST  MTU:1500  Metric:1
[root@lamp01 conf]# ip addr del 192.168.43.99/24 dev eth0   删除网卡
[root@lamp01 conf]# ifconfig
eth0      Link encap:Ethernet  HWaddr 00:0C:29:01:4D:22
          inet addr:192.168.43.118  Bcast:192.168.43.255  Mask:255.255.255.0
          inet6 addr: fe80::20c:29ff:fe01:4d22/64 Scope:Link
          UP BROADCAST RUNNING MULTICAST  MTU:1500  Metric:1
          RX packets:1218 errors:0 dropped:0 overruns:0 frame:0
          TX packets:724 errors:0 dropped:0 overruns:0 carrier:0
          collisions:0 txqueuelen:1000
          RX bytes:103486 (101.0 KiB)  TX bytes:83366 (81.4 KiB)
[root@lamp01 conf]#
永久性网卡:
cd /etc/sysconfig/network-scripts/ //进入到网卡配置文件的目录
cp ifcfg-eth0 ifcfg-eth0:1 //拷贝配置文件并重命名
vim ifcfg-eth0:1 //编辑配置文件
/etc/init.d/network restart //重启网络服务
图略....
下面我们刷新配置,查看效果:
[root@lamp01 ~]# /application/nginx/sbin/nginx -t
nginx: the configuration file /application/nginx-1.6.3/conf/nginx.conf syntax is ok
nginx: configuration file /application/nginx-1.6.3/conf/nginx.conf test is successful
[root@lamp01 ~]# /application/nginx/sbin/nginx -s reload
[root@lamp01 ~]# curl 192.168.43.88
bbs.jyw2.com
[root@lamp01 ~]# curl 192.168.43.118
www.jyw1.com
[root@lamp01 ~]#
在windows下测试如下:

ok,既可以多个IP对应一个站点,也可以对应多个站点访问。
标签:nec 常用 load vim collision cat name ror lis
原文地址:https://www.cnblogs.com/su-root/p/10230994.html