标签:stat 获取 简单例子 存在 set addm pca .sh multi
前情提要:
上一篇我们已经说明了 Spark RPC 框架的一个简单例子,以及一些基本概念的说明。这一篇我们主要讲述其运行时序,从而揭露 Spark RPC 框架的运行原理。我们将分为两部分,分别从服务端和客户端来看。
所用 spark 版本:spark 2.1.0
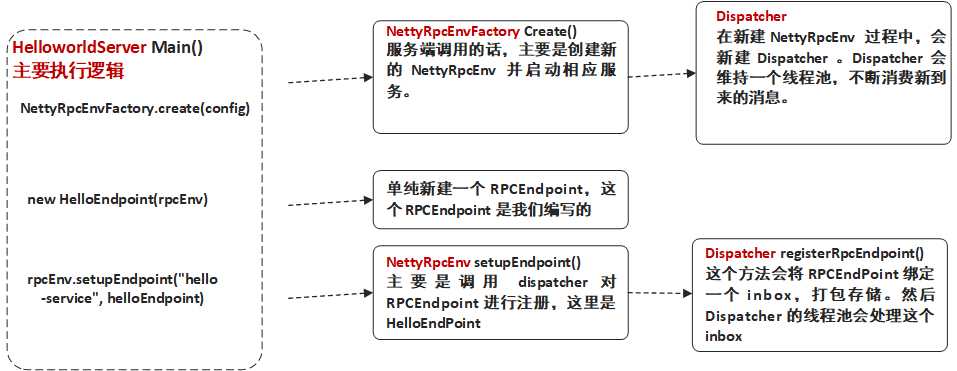
我们以上一篇 HelloworldServer 为线索,深入到 Spark RPC 框架来看看启动一个服务时都做了些什么。
HelloworldServer{
  ......
  def main(args: Array[String]): Unit = {
    //val host = args(0)
    val host = "localhost"
    val config = RpcEnvServerConfig(new RpcConf(), "hello-server", host, 52345)
    val rpcEnv: RpcEnv = NettyRpcEnvFactory.create(config)
    val helloEndpoint: RpcEndpoint = new HelloEndpoint(rpcEnv)
    rpcEnv.setupEndpoint("hello-service", helloEndpoint)
    rpcEnv.awaitTermination()
  }
  ......
}
这段代码中有两个主要流程,我们分别来说
首先是下面这条代码的运行流程:
val rpcEnv: RpcEnv = NettyRpcEnvFactory.create(config)
其实就是通过 NettyRpcEnvFactory 创建出一个 RPC Environment ,其具体类是 NettyRpcEnv 。
我们再来看看创建过程中会发生什么。
object NettyRpcEnvFactory extends RpcEnvFactory {
    ......
    def create(config: RpcEnvConfig): RpcEnv = {
        val conf = config.conf

        // Use JavaSerializerInstance in multiple threads is safe. However, if we plan to support
        // KryoSerializer in future, we have to use ThreadLocal to store SerializerInstance
        val javaSerializerInstance =
        new JavaSerializer(conf).newInstance().asInstanceOf[JavaSerializerInstance]
        //根据配置以及地址,new 一个 NettyRpcEnv ,
        val nettyEnv =
        new NettyRpcEnv(conf, javaSerializerInstance, config.bindAddress)
        //如果是服务端创建的,那么会启动服务。服务端和客户端都会通过这个方法创建一个 NettyRpcEnv ,但区别就在这里了。
        if (!config.clientMode) {
        val startNettyRpcEnv: Int => (NettyRpcEnv, Int) = { actualPort =>
            //启动服务的方法,下一步就是调用这个方法了
            nettyEnv.startServer(config.bindAddress, actualPort)
            (nettyEnv, nettyEnv.address.port)
        }
        try {
            Utils.startServiceOnPort(config.port, startNettyRpcEnv, conf, config.name)._1
        } catch {
            case NonFatal(e) =>
            nettyEnv.shutdown()
            throw e
        }
        }
        nettyEnv
    }
    ......
}
还没完,如果是服务端调用这段代码,那么主要的功能是创建 RPCEnv ,即 NettyRpcEnv(客户端在后面说) 。以及通过下面这行代码,
nettyEnv.startServer(config.bindAddress, actualPort)
去调用相应的方法启动服务端的服务。下面进入到这个方法中去看看。
class NettyRpcEnv(
                   val conf: RpcConf,
                   javaSerializerInstance: JavaSerializerInstance,
                   host: String) extends RpcEnv(conf) {
  ......
  def startServer(bindAddress: String, port: Int): Unit = {
    // here disable security
    val bootstraps: java.util.List[TransportServerBootstrap] = java.util.Collections.emptyList()
    //TransportContext 属于 spark.network 中的部分,负责 RPC 消息在网络中的传输
    server = transportContext.createServer(bindAddress, port, bootstraps)
    //在每个 RpcEndpoint 注册的时候都会注册一个默认的 RpcEndpointVerifier,它的作用是客户端调用的时候先用它来询问 Endpoint 是否存在。
    dispatcher.registerRpcEndpoint(
      RpcEndpointVerifier.NAME, new RpcEndpointVerifier(this, dispatcher))
  }
  ......
}
执行完毕之后这个 create 方法就结束。这个流程主要就是开启一些服务,然后返回一个新的 NettyRpcEnv 。
这条代码会去调用 NettyRpcEnv 中相应的方法
class NettyRpcEnv(
                   val conf: RpcConf,
                   javaSerializerInstance: JavaSerializerInstance,
                   host: String) extends RpcEnv(conf) {
  ......
  override def setupEndpoint(name: String, endpoint: RpcEndpoint): RpcEndpointRef = {
    dispatcher.registerRpcEndpoint(name, endpoint)
  }
  ......
}
我们看到,这个方法主要是调用 dispatcher 进行注册的。dispatcher 的功能上一节已经说了,
Dispatcher 的主要作用是保存注册的RpcEndpoint、分发相应的Message到RpcEndPoint中进行处理。Dispatcher 即是上图中 ThreadPool的角色。它同时也维系一个 threadpool,用来处理每次接受到的 InboxMessage 。而这里处理 InboxMessage 是通过 inbox 实现的。
,这里我们就说一说 dispatcher 的流程。
dispatcher 在 NettyRpcEnv 被创建的时候创建出来。
class NettyRpcEnv(
                   val conf: RpcConf,
                   javaSerializerInstance: JavaSerializerInstance,
                   host: String) extends RpcEnv(conf) {
    ......
    //初始化时创建 dispatcher
    private val dispatcher: Dispatcher = new Dispatcher(this)
    ......
}
dispatcher 类被创建的时候也有几个属性需要注意:
private[netty] class Dispatcher(nettyEnv: NettyRpcEnv) {
    ......
    //每个 RpcEndpoint 其实都会被整合成一个 EndpointData 。并且每个 RpcEndpoint 都会有一个 inbox。
    private class EndpointData(
                                val name: String,
                                val endpoint: RpcEndpoint,
                                val ref: NettyRpcEndpointRef) {
        val inbox = new Inbox(ref, endpoint)
    }

    //一个阻塞队列,当有 RpcEndpoint 相关请求(InboxMessage)的时候,就会将请求塞到这个队列中,然后被线程池处理。
    private val receivers = new LinkedBlockingQueue[EndpointData]

    //初始化便创建出来的线程池,当上面的 receivers 队列中没内容时,会阻塞。当有 RpcEndpoint 相关请求(即 InboxMessage )的时候就会立刻执行。
    //这里处理 InboxMessage 本质上是调用相应 RpcEndpoint 的 inbox 去处理。
    private val threadpool: ThreadPoolExecutor = {
        val numThreads = nettyEnv.conf.getInt("spark.rpc.netty.dispatcher.numThreads",
        math.max(2, Runtime.getRuntime.availableProcessors()))
        val pool = ThreadUtils.newDaemonFixedThreadPool(numThreads, "dispatcher-event-loop")
        for (i <- 0 until numThreads) {
            pool.execute(new MessageLoop)
        }
        pool
    }
    ......
}
了解一些 Dispatcher 的逻辑流程后,我们来正式看看 Dispatcher 的 registerRpcEndpoint 方法。
顾名思义,这个方法就是将 RpcEndpoint 注册到 Dispatcher 中去。当有 Message 到来的时候,便会分发 Message 到相应的 RpcEndPoint 中进行处理。
private[netty] class Dispatcher(nettyEnv: NettyRpcEnv) {
  ......
  def registerRpcEndpoint(name: String, endpoint: RpcEndpoint): NettyRpcEndpointRef = {
    val addr = RpcEndpointAddress(nettyEnv.address, name)
    //注册 RpcEndpoint 时需要的是 上面的 EndpointData ,其中就包含 endpointRef ,这个主要是供客户端使用的。
    val endpointRef = new NettyRpcEndpointRef(nettyEnv.conf, addr, nettyEnv)
    //多线程环境下,注册一个 RpcEndpoint 需要判断现在是否处于 stop 状态。
    synchronized {
      if (stopped) {
        throw new IllegalStateException("RpcEnv has been stopped")
      }
      //新建 EndpointData 并存储到一个 ConcurrentMap 中。
      if (endpoints.putIfAbsent(name, new EndpointData(name, endpoint, endpointRef)) != null) {
        throw new IllegalArgumentException(s"There is already an RpcEndpoint called $name")
      }
      val data = endpoints.get(name)
      endpointRefs.put(data.endpoint, data.ref)
      //将 这个 EndpointData 加入到 receivers 队列中,此时 dispatcher 中的 threadpool 会去处理这个加进来的 EndpointData
      //处理过程是调用它的 inbox 的 process()方法。然后 inbox 会等待消息到来。
      receivers.offer(data) // for the OnStart message
    }
    endpointRef
  }
  ......
}
Spark RPC 服务端逻辑小结:我们说明了 Spark RPC 服务端启动的逻辑流程,分为两个部分,第一个是 Spark RPC env ,即 NettyRpcEnv 的创建过程,第二个则是 RpcEndpoint 注册到 dispatcher 的流程。
1. NettyRpcEnvFactory 创建 NettyRpcEnv
2. Dispatcher 注册 RpcEndpoint
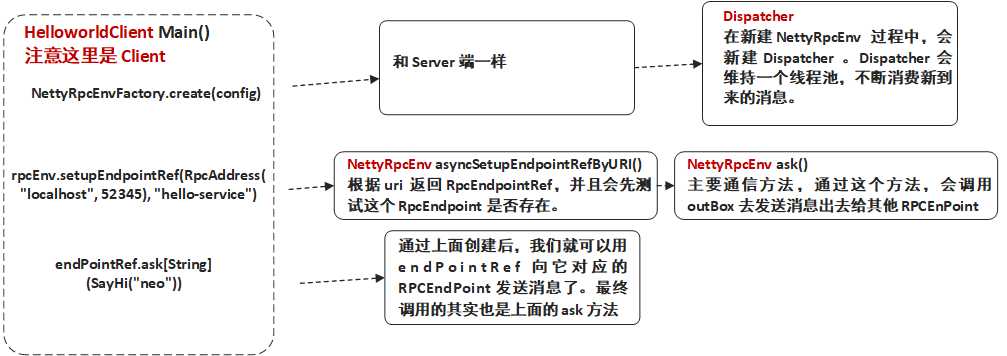
依旧是以上一节 Spark RPC 客户端 HelloWorld 的为线索,我们来逐层深入 Spark RPC 客户端 HelloworldClient 的 asyncCall() 方法。
object HelloworldClient {
  ......
  def asyncCall() = {
    val rpcConf = new RpcConf()
    val config = RpcEnvClientConfig(rpcConf, "hello-client")
    val rpcEnv: RpcEnv = NettyRpcEnvFactory.create(config)
    val endPointRef: RpcEndpointRef = rpcEnv.setupEndpointRef(RpcAddress("localhost", 52345), "hello-service")
    val future: Future[String] = endPointRef.ask[String](SayHi("neo"))
    future.onComplete {
      case scala.util.Success(value) => println(s"Got the result = $value")
      case scala.util.Failure(e) => println(s"Got error: $e")
    }
    Await.result(future, Duration.apply("30s"))
    rpcEnv.shutdown()
  }
  ......
}

创建 Spark RPC 客户端 Env(即 NettyRpcEnvFactory ) 部分和 Spark RPC 服务端是一样的,只是不会开启监听服务,这里就不详细展开。
我们从这一句开始看,这也是 Spark RPC 客户端和服务端区别的地方所在。
val endPointRef: RpcEndpointRef = rpcEnv.setupEndpointRef(RpcAddress("localhost", 52345), "hello-service")
上面的的 setupEndpointRef 最终会去调用下面 setupEndpointRef() 这个方法,这个方法中又进行一次跳转,跳转去 setupEndpointRefByURI 这个方法中 。需要注意的是这两个方法都是 RpcEnv 里面的,而 RpcEnv 是抽象类,它里面只实现部分方法,而 NettyRpcEnv 继承了它,实现了全部方法。
abstract class RpcEnv(conf: RpcConf) {
  ......
  def setupEndpointRef(address: RpcAddress, endpointName: String): RpcEndpointRef = {
    //会跳转去调用下面的方法
    setupEndpointRefByURI(RpcEndpointAddress(address, endpointName).toString)
  }

  def setupEndpointRefByURI(uri: String): RpcEndpointRef = {
    //其中 asyncSetupEndpointRefByURI() 返回的是 Future[RpcEndpointRef]。 这里就是阻塞,等待返回一个 RpcEndpointRef。
    // defaultLookupTimeout.awaitResult 底层调用 Await.result 阻塞 直到结果返回或返回异常
    defaultLookupTimeout.awaitResult(asyncSetupEndpointRefByURI(uri))
  }
  ......
}
这里最主要的代码其实就一句,
defaultLookupTimeout.awaitResult(asyncSetupEndpointRefByURI(uri))
这一段可以分为两部分, 第一部分的 defaultLookupTimeout.awaitResult 其实底层是调用 Await.result 阻塞等待一个异步操作,直到结果返回。
而asyncSetupEndpointRefByURI(uri) 则是根据给定的 uri 去返回一个 RpcEndpointRef ,它是在 NettyRpcEnv 中实现的:
class NettyRpcEnv(
                   val conf: RpcConf,
                   javaSerializerInstance: JavaSerializerInstance,
                   host: String) extends RpcEnv(conf) {
  ......
  def asyncSetupEndpointRefByURI(uri: String): Future[RpcEndpointRef] = {
    //获取地址
    val addr = RpcEndpointAddress(uri)
    //根据地址等信息新建一个 NettyRpcEndpointRef 。
    val RpcendpointRef = new NettyRpcEndpointRef(conf, addr, this)
    //每个新建的 RpcendpointRef 都有先有一个对应的verifier 去检查服务端存不存在对应的 Rpcendpoint 。
    val verifier = new NettyRpcEndpointRef(
      conf, RpcEndpointAddress(addr.rpcAddress, RpcEndpointVerifier.NAME), this)
    //向服务端发送请求判断是否存在对应的 Rpcendpoint。
    verifier.ask[Boolean](RpcEndpointVerifier.createCheckExistence(endpointRef.name)).flatMap { find =>
      if (find) {
        Future.successful(endpointRef)
      } else {
        Future.failed(new RpcEndpointNotFoundException(uri))
      }
    }(ThreadUtils.sameThread)
  }
  ......
}
asyncSetupEndpointRefByURI() 这个方法实现两个功能,第一个就是新建一个 RpcEndpointRef 。第二个是新建一个 verifier ,这个 verifier 的作用就是先给服务端发送一个请求判断是否存在 RpcEndpointRef 对应的 RpcEndpoint 。
这段代码中最重要的就是 verifiter.ask[Boolean](...) 了。如果有找到之后就会调用 Future.successful 这个方法,反之则会 通过 Future.failed 抛出一个异常。
ask 可以算是比较核心的一个方法,我们可以到 ask 方法中去看看。
class NettyRpcEnv{
    ......
    private[netty] def ask[T: ClassTag](message: RequestMessage, timeout: RpcTimeout): Future[T] = {
      val promise = Promise[Any]()
      val remoteAddr = message.receiver.address
      //
      def onFailure(e: Throwable): Unit = {
  //      println("555");
        if (!promise.tryFailure(e)) {
          log.warn(s"Ignored failure: $e")
        }
      }

      def onSuccess(reply: Any): Unit = reply match {
        case RpcFailure(e) => onFailure(e)
        case rpcReply =>
          println("666");
          if (!promise.trySuccess(rpcReply)) {
            log.warn(s"Ignored message: $reply")
          }
      }

      try {
        if (remoteAddr == address) {
          val p = Promise[Any]()
          p.future.onComplete {
            case Success(response) => onSuccess(response)
            case Failure(e) => onFailure(e)
          }(ThreadUtils.sameThread)
          dispatcher.postLocalMessage(message, p)
        } else {
          //跳转到这里执行
          //封装一个 RpcOutboxMessage ,同时 onSuccess 方法也是在这里注册的。
          val rpcMessage = RpcOutboxMessage(serialize(message),
            onFailure,
            (client, response) => onSuccess(deserialize[Any](client, response)))
          postToOutbox(message.receiver, rpcMessage)
          promise.future.onFailure {
            case _: TimeoutException =>  println("111");rpcMessage.onTimeout()
  //          case _ => println("222");
          }(ThreadUtils.sameThread)
        }

        val timeoutCancelable = timeoutScheduler.schedule(new Runnable {
          override def run(): Unit = {
  //          println("333");
            onFailure(new TimeoutException(s"Cannot receive any reply in ${timeout.duration}"))
          }
        }, timeout.duration.toNanos, TimeUnit.NANOSECONDS)
        //promise 对应的 future onComplete时会去调用,但当 successful 的时候,上面的 run 并不会被调用。
        promise.future.onComplete { v =>
  //        println("4444");
          timeoutCancelable.cancel(true)
        }(ThreadUtils.sameThread)

      } catch {
        case NonFatal(e) =>
          onFailure(e)
      }

      promise.future.mapTo[T].recover(timeout.addMessageIfTimeout)(ThreadUtils.sameThread)
    }
    ......
}
这里涉及到使用一些 scala 多线程的高级用法,包括 Promise 和 Future。如果想要对这些有更加深入的了解,可以参考这篇文章。
这个函数的作用从名字中就可以看得出,其实就是将要 发送的消息封装成一个 RpcOutboxMessage ,然后交给 OutBox 去发送,OutBox 和前面所说的 InBox 对应,对应 Actor 模型中的 MailBox(信箱)。用于发送和接收消息。
其中使用到了 Future 和 Promise 进行异步并发以及错误处理,比如当发送时间超时的时候 Promise 就会返回一个 TimeoutException ,而我们就可以设置自己的 onFailure 函数去处理这些异常。
OK,注册完 RpcEndpointRef 后我们便可以用它来向服务端发送消息了,而其实 RpcEndpointRef 发送消息还是调用 ask 方法,就是上面的那个 ask 方法。上面也有介绍,本质上就是通过 OutBox 进行处理。
我们来梳理一下客户端的发送流程。
客户端逻辑小结:客户端和服务端比较类似,都是需要创建一个 NettyRpcEnv 。不同的是接下来客户端创建的是 RpcEndpointRef ,并用之向服务端对应的 RpcEndpoint 发送消息。
1. NettyRpcEnvFactory 创建 NettyRpcEnv
2. 创建 RpcEndpointRef
3. RpcEndpointRef 使用同步或者异步的方式发送请求。
OK,以上就是 Spark RPC 时序的源码分析。下一篇会将一个实际的例子,Spark 的心跳机制和代码。喜欢的话就关注一波吧
推荐阅读 :
从分治算法到 MapReduce
Actor并发编程模型浅析
大数据存储的进化史 --从 RAID 到 Hadoop Hdfs
一个故事告诉你什么才是好的程序员
标签:stat 获取 简单例子 存在 set addm pca .sh multi
原文地址:https://www.cnblogs.com/listenfwind/p/10245572.html