标签:ima 实例 pip 如何 slist rap start code __init__
京东对于爬虫来说太友好了,不向天猫跟淘宝那样的丧心病狂,本次爬虫来爬取下京东,研究下京东的数据是如何获取的。
1 # 目标网址: jd.com
2 # 关键字: 手机(任意关键字,本文以手机入手)

得到url如下:
1 https://search.jd.com/Search?keyword=%E6%89%8B%E6%9C%BA&enc=utf-8&wq=%E6%89%8B%E6%9C%BA&pvid=c53afe790a6f440f9adf7edcaabd8703
往下拖拽的时候就会发现很明显部分数据是通过Ajax动态获取的。那既然设计到动态数据没啥好说的抓下包。不过在抓包之前不妨先翻几页看看url有没有什么变化。
点击下一页
https://search.jd.com/Search?keyword=手机BA&enc=utf-8&qrst=1&rt=1&stop=1&vt=2&wq=手机BA&cid2=653&cid3=655&page=3&s=60&click=0 # 关键信息page出现了
在点回第一页
https://search.jd.com/Search?keyword=手机BA&enc=utf-8&qrst=1&rt=1&stop=1&vt=2&wq=手机BA&cid2=653&cid3=655&page=1&s=1&click=0 # 这个时候其实规律就出来了
把page改成2试一下,结果出来的数据跟第一页的一样,page=4跟page=3出来的数据也是一样,那其实很好说了,每次打开新的页面的时候只需要确保page+2即可。
抓下包,获取下动态的数据:

拿到url访问下这个页面,结果却跳回了首页,很明显参数不够。看了几篇博客才知道原来是要携带referer信息的。

referer地址也很明显就是本页面的url。再来看看这些动态数据的url该怎么构造,多访问几个页面看看规律。
1 第一页:  https://search.jd.com/s_new.php?keyword=%E6%89%8B%E6%9C%BA&enc=utf-8&qrst=1&rt=1&stop=1&vt=2&wq=%E6%89%8B%E6%9C%BA&cid2=653&cid3=655&page=2&s=30&scrolling=y&log_id=1547824670.57168&tpl=3_M&show_items=7643003,5089235,100000822981,5089273,5821455,7437788,5089225,100001172674,8894451,7081550,100000651175,6946605,8895275,7437564,100000349372,100002293114,8735304,100000820311,6949475,100000773875,7357933,100000971366,8638898,7694047,8790521,7479912,7651927,7686683,100001464948,100000650837
2
3 第二页:  https://search.jd.com/s_new.php?keyword=%E6%89%8B%E6%9C%BA&enc=utf-8&qrst=1&rt=1&stop=1&vt=2&wq=%E6%89%8B%E6%9C%BA&cid2=653&cid3=655&page=4&s=86&scrolling=y&log_id=1547824734.86451&tpl=3_M&show_items=5283387,7428766,6305258,7049459,8024543,6994622,5826236,3133841,6577511,100000993102,5295423,5963066,8717360,100000400014,7425622,7621213,100000993265,100002727566,28331229415,2321948,6737464,7029523,34250730122,3133811,36121534193,11794447957,5159244,28751842981,100001815307,35175013603
4
5 第三页:  https://search.jd.com/s_new.php?keyword=%E6%89%8B%E6%9C%BA&enc=utf-8&qrst=1&rt=1&stop=1&vt=2&wq=%E6%89%8B%E6%9C%BA&cid2=653&cid3=655&page=6&s=140&scrolling=y&log_id=1547824799.50167&tpl=3_M&show_items=3889169,4934609,5242942,4270017,32399556682,7293054,28209134950,100000993265,32796441851,5980401,6176077,27424489997,27493450925,5424574,100000015166,6840907,30938386315,12494304703,7225861,34594345130,29044581673,28502299808,4577217,8348845,31426728970,6425153,31430342752,15501730722,100000322417,5283377
仔细观察关键字page,第一页page=2,第二页page=4,第三页page=6,后面的 show_items= 这里的参数一一直在变化,这是些什么鬼?
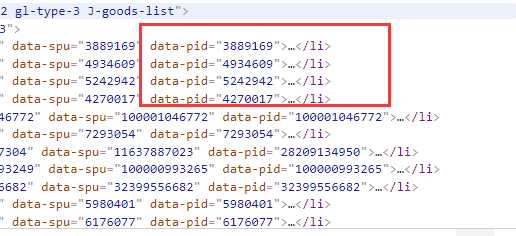
查看博客才知,原来啊京东每一页由60条数据,前30条直接显示出来,后30条数据是动态加载的,show_items=后面的这些数字其实是前30条数据的每一条pid在html源码中可以直接获取到。

OK,总结一下,访问首页前30条数据的url是这个。
https://search.jd.com/Search?keyword=%E6%89%8B%E6%9C%BA&enc=utf-8&qrst=1&rt=1&stop=1&vt=2&wq=%E6%89%8B%E6%9C%BA&cid2=653&cid3=655&page=1&s=1&click=0
后30条动态的数据是这个
https://search.jd.com/s_new.php?keyword=%E6%89%8B%E6%9C%BA&enc=utf-8&qrst=1&rt=1&stop=1&vt=2&wq=%E6%89%8B%E6%9C%BA&cid2=653&cid3=655&page=2&s=30&scrolling=y&log_id=1547825445.77300&tpl=3_M&show_items=7643003,5089235,100000822981,5089273,5821455,7437788,5089225,100001172674,8894451,7081550,100000651175,6946605,8895275,7437564,100000349372,100002293114,8735304,100000820311,6949475,100000773875,7357933,100000971366,8638898,8790521,7479912,7651927,7686683,100001464948,100000650837,1861091
且访问后30条的时候要带上referer以及pid,在获取下一页的时候只需要page+2即可。就可以动手整了。
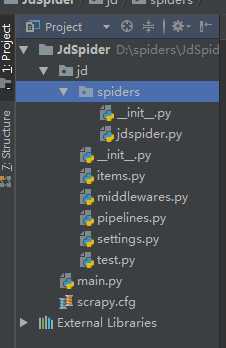
目录结构:

jdspider.py
  1 import scrapy
  2 from ..items import JdItem
  3
  4
  5 class JdSpider(scrapy.Spider):
  6     name = ‘jd‘
  7     allowed_domains = [‘jd.com‘]  # 有的时候写个www.jd.com会导致search.jd.com无法爬取
  8     keyword = "手机"
  9     page = 1
 10     url = ‘https://search.jd.com/Search?keyword=%s&enc=utf-8&qrst=1&rt=1&stop=1&vt=2&wq=%s&cid2=653&cid3=655&page=%d&click=0‘
 11     next_url = ‘https://search.jd.com/s_new.php?keyword=%s&enc=utf-8&qrst=1&rt=1&stop=1&vt=2&wq=%s&cid2=653&cid3=655&page=%d&scrolling=y&show_items=%s‘
 12
 13     def start_requests(self):
 14         yield scrapy.Request(self.url % (self.keyword, self.keyword, self.page), callback=self.parse)
 15
 16     def parse(self, response):
 17         """
 18         爬取每页的前三十个商品,数据直接展示在原网页中
 19         :param response:
 20         :return:
 21         """
 22         ids = []
 23         for li in response.xpath(‘//*[@id="J_goodsList"]/ul/li‘):
 24             item = JdItem()
 25             title = li.xpath(‘div/div/a/em/text()‘).extract_first("")  # 标题
 26             price = li.xpath(‘div/div/strong/i/text()‘).extract_first("")  # 价格
 27             p_id = li.xpath(‘@data-pid‘).extract_first("")  # id
 28             ids.append(p_id)
 29             url = li.xpath(‘div/div[@class="p-name p-name-type-2"]/a/@href‘).extract_first("")  # 需要跟进的链接
 30
 31             item[‘title‘] = title
 32             item[‘price‘] = price
 33             item[‘url‘] = url
 34             # 给url加上https:
 35             if item[‘url‘].startswith(‘//‘):
 36                 item[‘url‘] = ‘https:‘ + item[‘url‘]  # 粗心的同学请注意一定要加上冒号:
 37             elif not item[‘url‘].startswith(‘https:‘):
 38                 item[‘info‘] = None
 39                 yield item
 40                 continue
 41
 42             yield scrapy.Request(item[‘url‘], callback=self.info_parse, meta={"item": item})
 43
 44         headers = {‘referer‘: response.url}
 45         # 后三十页的链接访问会检查referer,referer是就是本页的实际链接
 46         # referer错误会跳转到:https://www.jd.com/?se=deny
 47         self.page += 1
 48         yield scrapy.Request(self.next_url % (self.keyword, self.keyword, self.page, ‘,‘.join(ids)),
 49                              callback=self.next_parse, headers=headers)
 50
 51     def next_parse(self, response):
 52         """
 53         爬取每页的后三十个商品,数据展示在一个特殊链接中:url+id(这个id是前三十个商品的id)
 54         :param response:
 55         :return:
 56         """
 57         for li in response.xpath(‘//li[@class="gl-item"]‘):
 58             item = JdItem()
 59             title = li.xpath(‘div/div/a/em/text()‘).extract_first("")  # 标题
 60             price = li.xpath(‘div/div/strong/i/text()‘).extract_first("")  # 价格
 61             url = li.xpath(‘div/div[@class="p-name p-name-type-2"]/a/@href‘).extract_first("")  # 需要跟进的链接
 62             item[‘title‘] = title
 63             item[‘price‘] = price
 64             item[‘url‘] = url
 65
 66             if item[‘url‘].startswith(‘//‘):
 67                 item[‘url‘] = ‘https:‘ + item[‘url‘]  # 粗心的同学请注意一定要加上冒号:
 68             elif not item[‘url‘].startswith(‘https:‘):
 69                 item[‘info‘] = None
 70                 yield item
 71                 continue
 72
 73             yield scrapy.Request(item[‘url‘], callback=self.info_parse, meta={"item": item})
 74
 75         if self.page < 200:
 76             self.page += 1
 77             yield scrapy.Request(self.url % (self.keyword, self.keyword, self.page), callback=self.parse)
 78
 79     def info_parse(self, response):
 80         """
 81         链接跟进,爬取每件商品的详细信息,所有的信息都保存在item的一个子字段info中
 82         :param response:
 83         :return:
 84         """
 85         item = response.meta[‘item‘]
 86         item[‘info‘] = {}
 87         name = response.xpath(‘//div[@class="inner border"]/div[@class="head"]/a/text()‘).extract_first("")
 88         type = response.xpath(‘//div[@class="item ellipsis"]/text()‘).extract_first("")
 89         item[‘info‘][‘name‘] = name
 90         item[‘info‘][‘type‘] = type
 91
 92         for div in response.xpath(‘//div[@class="Ptable"]/div[@class="Ptable-item"]‘):
 93             h3 = div.xpath(‘h3/text()‘).extract_first()
 94             if h3 == ‘‘:
 95                 h3 = "未知"
 96             dt = div.xpath(‘dl/dl/dt/text()‘).extract()  # 以列表的形式传参给zip()函数
 97             dd = div.xpath(‘dl/dl/dd[not(@class)]/text()‘).extract()
 98             item[‘info‘][h3] = {}
 99             for t, d in zip(dt, dd):
100                 item[‘info‘][h3][t] = d
101         yield item
items.py
 1 import scrapy
 2
 3
 4 class JdItem(scrapy.Item):
 5     title = scrapy.Field()  # 标题
 6
 7     price = scrapy.Field()  # 价格
 8
 9     url = scrapy.Field()  # 商品链接
10
11     info = scrapy.Field()  # 详细信息
piplines.py
 1 from scrapy.conf import settings
 2 from pymongo import MongoClient
 3
 4
 5 class JdphonePipeline(object):
 6     def __init__(self):
 7         # 获取setting中主机名,端口号和集合名
 8         host = settings[‘MONGODB_HOST‘]
 9         port = settings[‘MONGODB_PORT‘]
10         dbname = settings[‘MONGODB_DBNAME‘]
11         col = settings[‘MONGODB_COL‘]
12
13         # 创建一个mongo实例
14         client = MongoClient(host=host, port=port)
15
16         # 访问数据库
17         db = client[dbname]
18
19         # 访问集合
20         self.col = db[col]
21
22     def process_item(self, item, spider):
23         data = dict(item)
24         self.col.insert(data)
25         return item
settings.py
 1 USER_AGENT = ‘Mozilla/5.0 (Windows NT 6.1; WOW64; rv:23.0) Gecko/20100101 Firefox/23.0‘
 2
 3 ITEM_PIPELINES = {
 4    ‘jd.pipelines.JdphonePipeline‘: 300,
 5 }
 6
 7 # 主机环回地址
 8 MONGODB_HOST = ‘127.0.0.1‘
 9 # 端口号,默认27017
10 MONGODB_POST = 27017
11 # 设置数据库名称
12 MONGODB_DBNAME = ‘JingDong‘
13 # 设置集合名称
14 MONGODB_COL = ‘JingDongPhone‘
15 SQL_DATETIME_FORMAT = "%Y-%m-%d %H:%M:%S"
16 SQL_DATE_FORMAT = "%Y-%m-%d"
代码基本上copy了这位博主的代码,只是做了些许的修改。https://www.cnblogs.com/twoice/p/9742732.html
好吧这次京东的爬虫就到这里,其实关于京东的爬虫网上还有另外一个版本,下次在研究一下。京东是真的对爬虫友好。
标签:ima 实例 pip 如何 slist rap start code __init__
原文地址:https://www.cnblogs.com/pontoon/p/10290233.html