标签:des style blog http color io os ar for
在QTableView的一列里添加两个按钮,之前添加一个按钮的思路是一样的,只是计算了一下按钮的宽,放两个按钮而已。
添加一个按钮的例子:QTableView 添加按钮
本例源代码:QtTowButtons.rar
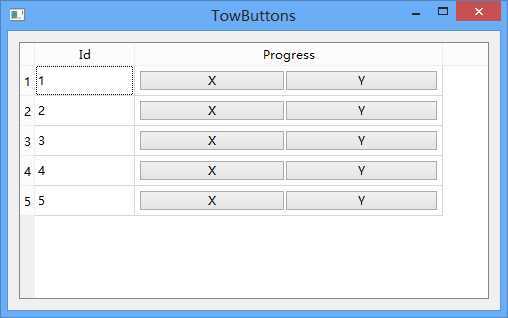
看一下列的效果

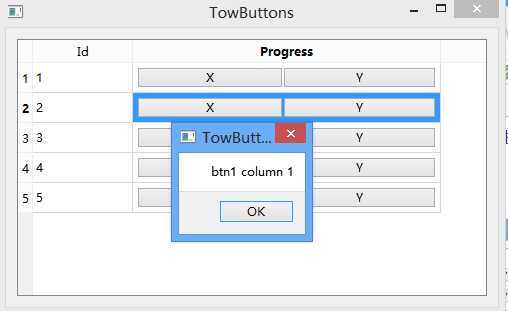
看一下添加两个按钮的效果点击第一个按钮弹出 but1 +当前列 点击第二个按钮弹出but2 + 当前行

下面是主要实现
继承自 QItemDelegate
主要是实现 了它的painter方法,把两个自定义的按钮绘制到视图并保存
还有editorEvent事件,用来处理点击事件,在点击时我们算一下鼠标的坐标在哪个按钮下,
再处理相应的点击事件
#ifndef BUTTONDELEGATE_H
#define BUTTONDELEGATE_H

#include <QItemDelegate>

class ButtonDelegate : public QItemDelegate
{
    Q_OBJECT
public:
    explicit ButtonDelegate(QObject *parent = 0);
    void paint(QPainter *painter, const QStyleOptionViewItem &option, const QModelIndex &index) const;
    bool editorEvent(QEvent *event, QAbstractItemModel *model, const QStyleOptionViewItem &option, const QModelIndex &index);

signals:

public slots:

private:
    void showMsg(QString str);

private:

    typedef QMap<QModelIndex, QPair<QStyleOptionButton*, QStyleOptionButton*>* >  collButtons;
    collButtons m_btns;

};

#endif // BUTTONDELEGATE_H
按钮的具体实现
#include "buttondelegate.h"

#include <QApplication>
#include <QMouseEvent>
#include <QMessageBox>
#include <QPainter>
#include <QStyleOption>
#include <QDesktopWidget>

ButtonDelegate::ButtonDelegate(QObject *parent) :
    QItemDelegate(parent)
{
}


void ButtonDelegate::paint(QPainter *painter, const QStyleOptionViewItem &option, const QModelIndex &index) const
{
    QPair<QStyleOptionButton*, QStyleOptionButton*>* buttons = m_btns.value(index);
    if (!buttons) {
        QStyleOptionButton* button1 = new QStyleOptionButton();
        //button1->rect = option.rect.adjusted(4, 4, -(option.rect.width() / 2 + 4) , -4); //
        button1->text = "X";
        button1->state |= QStyle::State_Enabled;

        QStyleOptionButton* button2 = new QStyleOptionButton();
        //button2->rect = option.rect.adjusted(button1->rect.width() + 4, 4, -4, -4);
        button2->text = "Y";
        button2->state |= QStyle::State_Enabled;
        buttons =new  QPair<QStyleOptionButton*, QStyleOptionButton*>(button1, button2);
        (const_cast<ButtonDelegate *>(this))->m_btns.insert(index, buttons);
    }
    buttons->first->rect = option.rect.adjusted(4, 4, -(option.rect.width() / 2 + 4) , -4); //
    buttons->second->rect = option.rect.adjusted(buttons->first->rect.width() + 4, 4, -4, -4);
    painter->save();

    if (option.state & QStyle::State_Selected) {
        painter->fillRect(option.rect, option.palette.highlight());

    }
    painter->restore();
    QApplication::style()->drawControl(QStyle::CE_PushButton, buttons->first, painter);
    QApplication::style()->drawControl(QStyle::CE_PushButton, buttons->second, painter);
}

bool ButtonDelegate::editorEvent(QEvent *event, QAbstractItemModel *model, const QStyleOptionViewItem &option, const QModelIndex &index)
{
    if (event->type() == QEvent::MouseButtonPress) {

        QMouseEvent* e =(QMouseEvent*)event;

        if (m_btns.contains(index)) {
            QPair<QStyleOptionButton*, QStyleOptionButton*>* btns = m_btns.value(index);
            if (btns->first->rect.contains(e->x(), e->y())) {
                btns->first->state |= QStyle::State_Sunken;
            }
            else if(btns->second->rect.contains(e->x(), e->y())) {
                btns->second->state |= QStyle::State_Sunken;
            }
        }
    }
    if (event->type() == QEvent::MouseButtonRelease) {
        QMouseEvent* e =(QMouseEvent*)event;

        if (m_btns.contains(index)) {
            QPair<QStyleOptionButton*, QStyleOptionButton*>* btns = m_btns.value(index);
            if (btns->first->rect.contains(e->x(), e->y())) {
                btns->first->state &= (~QStyle::State_Sunken);
                showMsg(tr("btn1 column %1").arg(index.column()));
            } else if(btns->second->rect.contains(e->x(), e->y())) {
                btns->second->state &= (~QStyle::State_Sunken);
                showMsg(tr("btn2 row %1").arg(index.row()));
            }
        }
    }
}

void ButtonDelegate::showMsg(QString str)
{
    QMessageBox msg;
    msg.setText(str);
    msg.exec();
}
好了自定义按钮处理完了
我们建一个Table添加一些数据
#ifndef TABLEMODEL_H
#define TABLEMODEL_H

#include <QAbstractTableModel>

class TableModel : public QAbstractTableModel
{
    Q_OBJECT
public:
    explicit TableModel(QObject *parent = 0);
    int rowCount(const QModelIndex &parent) const;
    int columnCount(const QModelIndex &parent) const;
    QVariant data(const QModelIndex &index, int role) const;
    Qt::ItemFlags flags(const QModelIndex &index) const;
    void setHorizontalHeader(const QStringList& headers);
    QVariant headerData(int section, Qt::Orientation orientation, int role) const;
    void setData(const QVector<QStringList>& data);
    QVector<QStringList>& DataVector() {return m_data;}
    ~TableModel(void);

signals:

public slots:


private:
    QStringList m_HorizontalHeader;
    QVector<QStringList> m_data;
};

#endif // TABLEMODEL_H
model的实现 并添加一些数据
#include "tablemodel.h"

TableModel::TableModel(QObject *parent) :
    QAbstractTableModel(parent)
{
}

TableModel::~TableModel()
{

}


int TableModel::rowCount(const QModelIndex &parent) const
{
    return m_data.size();
}

int TableModel::columnCount(const QModelIndex &parent) const
{
    return m_HorizontalHeader.count();
}

QVariant TableModel::data(const QModelIndex &index, int role) const
{
    if (!index.isValid())
        return QVariant();
    if (role == Qt::DisplayRole) {
        int ncol = index.column();
        int nrow =  index.row();
        QStringList values = m_data.at(nrow);
        if (values.size() > ncol)
            return values.at(ncol);
        else
        return QVariant();
    }
    return QVariant();
}

Qt::ItemFlags TableModel::flags(const QModelIndex &index) const
{
    if (!index.isValid())
        return Qt::NoItemFlags;

    Qt::ItemFlags flag = QAbstractItemModel::flags(index);

    // flag|=Qt::ItemIsEditable // 设置单元格可编辑,此处注释,单元格无法被编辑
    return flag;
}

void TableModel::setHorizontalHeader(const QStringList &headers)
{
    m_HorizontalHeader =  headers;
}


QVariant TableModel::headerData(int section, Qt::Orientation orientation, int role) const
{
    if (role == Qt::DisplayRole && orientation == Qt::Horizontal) {
        return m_HorizontalHeader.at(section);
    }
    return QAbstractTableModel::headerData(section, orientation, role);
}

void TableModel::setData(const QVector<QStringList> &data)
{
    m_data = data;
}
TableView的实现,和model关联
#ifndef TABLEVIEW_H
#define TABLEVIEW_H

#include <QTableView>
#include "tablemodel.h"
#include "buttondelegate.h"

class TableView : public QTableView
{
    Q_OBJECT
public:
    explicit TableView(QWidget *parent = 0);
    TableModel* tableModel() {return m_model;}

    ~TableView();

signals:

public slots:

private:
    void iniData();

private:
    TableModel *m_model;
    ButtonDelegate *m_buttonDelegate;

};

#endif // TABLEVIEW_H
#include "tableview.h"

#include "tablemodel.h"
#include "buttondelegate.h"

TableView::TableView(QWidget *parent) :
    QTableView(parent)
{
    iniData();
}

TableView::~TableView()
{
    delete m_model;
}

void TableView::iniData()
{
    m_model = new TableModel();
    this->setModel(m_model);
    QStringList headers;
    headers << "Id" << "Progress";
    m_model->setHorizontalHeader(headers);

    QVector<QStringList> data;
    data.append(QStringList() << "1" << "22");
    data.append(QStringList() << "2" << "32");
    data.append(QStringList() << "3" << "2");
    data.append(QStringList() << "4" << "80");
    data.append(QStringList() << "5" << "40");
    m_model->setData(data);

    m_buttonDelegate = new ButtonDelegate(this);
    this->setItemDelegateForColumn(1, m_buttonDelegate);
    emit m_model->layoutChanged();
    this->setColumnWidth(1, 500);
}
这就完成了
我们看一下调用
    this->resize(800, 600);
    TableView *tv = new TableView(this);
    QVBoxLayout* layout = new QVBoxLayout();

    layout->addWidget(tv);
    this->setLayout(layout);
标签:des style blog http color io os ar for
原文地址:http://www.cnblogs.com/li-peng/p/4029885.html