标签:ext 头像 分享 rip 不显示 box 标题 阴影 plugins
“后续会再做修改”
GitHub Corners#22201
GitHub Ribbons - The GitHub Blog
【转载】详谈如何定制自己的博客园皮肤 - 云+社区 - 腾讯云谢谢!!
【PS】3步搞定博客园界面风格 - nowgood - 博客园
页面定制CSS代码
不必添加内容,但是需要勾选、禁用模板默认CSS。(视情况而定)
博客侧边公告
<!-- 小老鼠游戏控件 -->
<div className="sidebarMouse"><object type="application/x-shockwave-flash" style="outline:none;" data="http://cdn.abowman.com/widgets/hamster/hamster.swf?up_bodyColor=f0e9cc& up_feetColor=D4C898&up_eyeColor=000567&up_wheelSpokeColor=DEDEDE&up_wheelColor=FFFFFF& up_waterColor=E0EFFF&up_earColor=b0c4de&up_wheelOuterColor=FF4D4D&up_snoutColor=F7F4E9& amp;up_bgColor=F0E4E4&up_foodColor=cba920&up_wheelCenterColor=E4EB2F&up_tailColor=E6DEBE& amp;" width="240" height="160"><param name="movie" value="http://cdn.abowman.com/ widgets/hamster/hamster.swf?up_bodyColor=f0e9cc&up_feetColor=D4C898&up_eyeColor=000567& up_wheelSpokeColor=DEDEDE&up_wheelColor=FFFFFF&up_waterColor=E0EFFF&up_earColor=b0c4de& amp;up_wheelOuterColor=FF4D4D&up_snoutColor=F7F4E9&up_bgColor=F0E4E4&up_foodColor=cba920& amp;up_wheelCenterColor=E4EB2E&up_tailColor=E6DEBE&"><param name="AllowScriptAccess" value="always"><param name="wmode" value="opaque"></object></div>
<!-- 公告栏时钟控件 -->
<embed wmode="transparent" src="http://chabudai.sakura.ne.jp/blogparts/honehoneclock/ honehone_clock_tr.swf" quality="high" bgcolor="#FDF6E3" width="240" height="110" name="honehoneclock" align="middle" allowscriptaccess="always" type="application/x-shockwave-flash" pluginspage="http:// www.macromedia.com/go/getflashplayer">
<!-- 百度分享栏控件 -->
<script>
window._bd_share_config={"common":{"bdSnsKey":{},"bdText":"","bdMini":"2","bdMiniList":false, "bdPic":"","bdStyle":"0","bdSize":"16"},"slide":{"type":"slide","bdImg":"3","bdPos":"right", "bdTop":"105.5"},"image":{"viewList":["qzone","tsina","tqq","renren","weixin"],"viewText":"分享到:", "viewSize":"16"},"selectShare":{"bdContainerClass":null,"bdSelectMiniList":["qzone","tsina","tqq", "renren","weixin"]}};with(document){0[(getElementsByTagName("head")[0]||body).appendChild (createElement("script")).src="http://bdimg.share.baidu.com/static/api/js/share.js?v=89860593.js? cdnversion="+~(-new Date()/3600000)]};
</script>页首Html代码
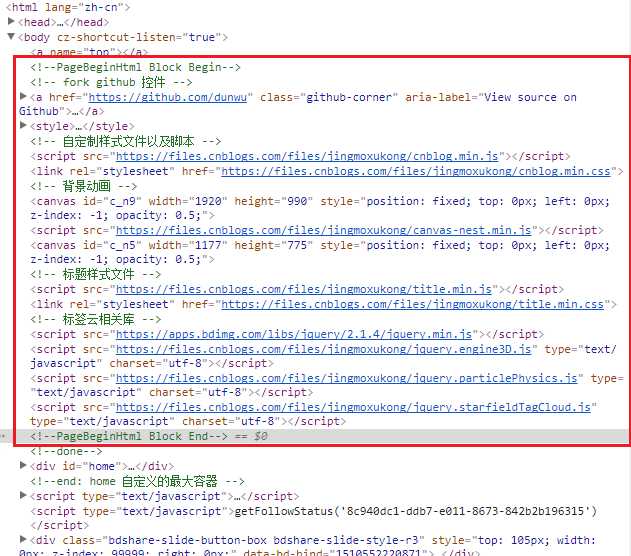
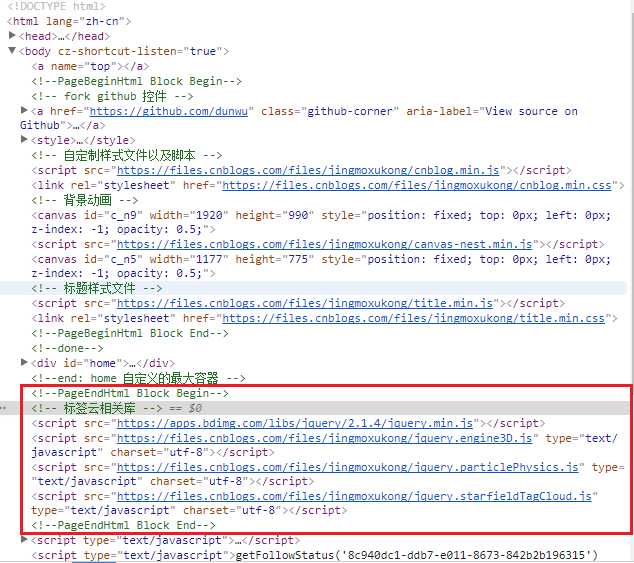
<!-- fork github 控件 -->
<a href="https://github.com/dunwu" class="github-corner" aria-label="View source on Github"><svg    width="80" height="80" viewBox="0 0 250 250" style="fill:#FD6C6C; color:#fff; position: absolute;  top: 0; border: 0; right: 0;" aria-hidden="true"><path d="M0,0 L115,115 L130,115 L142,142 L250,250   L250,0 Z"></path><path d="M128.3,109.0 C113.8,99.7 119.0,89.6 119.0,89.6 C122.0,82.7 120.5,78.6 120.5,    78.6 C119.2,72.0 123.4,76.3 123.4,76.3 C127.3,80.9 125.5,87.3 125.5,87.3 C122.9,97.6 130.6,101.9    134.4,103.2" fill="currentColor" style="transform-origin: 130px 106px;" class="octo-arm"></path><path  d="M115.0,115.0 C114.9,115.1 118.7,116.5 119.8,115.4 L133.7,101.6 C136.9,99.2 139.9,98.4 142.2,98.6  C133.8,88.0 127.5,74.4 143.8,58.0 C148.5,53.4 154.0,51.2 159.7,51.0 C160.3,49.4 163.2,43.6 171.4,40.1    C171.4,40.1 176.1,42.5 178.8,56.2 C183.1,58.6 187.2,61.8 190.9,65.4 C194.5,69.0 197.7,73.2 200.1,77.6  C213.8,80.2 216.3,84.9 216.3,84.9 C212.7,93.1 206.9,96.0 205.4,96.6 C205.1,102.4 203.0,107.8 198.3,  112.5 C181.9,128.9 168.3,122.5 157.7,114.1 C157.9,116.9 156.7,120.9 152.7,124.9 L141.0,136.5 C139.8,  137.7 141.6,141.9 141.8,141.8 Z" fill="currentColor" class="octo-body"></path></svg></    a><style>.github-corner:hover .octo-arm{animation:octocat-wave 560ms ease-in-out}@keyframes     octocat-wave{0%,100%{transform:rotate(0)}20%,60%{transform:rotate(-25deg)}40%,80%{transform:rotate  (10deg)}}@media (max-width:500px){.github-corner:hover .octo-arm{animation:none}.github-corner    .octo-arm{animation:octocat-wave 560ms ease-in-out}}</style>

<!-- 自定制样式文件以及脚本 -->
<script src="https://files.cnblogs.com/files/jingmoxukong/cnblog.min.js"></script>
<link rel="stylesheet" href="https://files.cnblogs.com/files/jingmoxukong/cnblog.min.css" />

<!-- 背景动画 -->
<canvas id="c_n9" width="1920" height="990" style="position: fixed; top: 0px; left: 0px; z-index: -1;   opacity: 0.5;"></canvas>
<script src="https://files.cnblogs.com/files/jingmoxukong/canvas-nest.min.js"></script>

<!-- 标签云相关库 -->
<script src="https://apps.bdimg.com/libs/jquery/2.1.4/jquery.min.js"></script>
<script src="https://files.cnblogs.com/files/jingmoxukong/jquery.engine3D.js" type="text/javascript"    charset="utf-8"></script>
<script src="https://files.cnblogs.com/files/jingmoxukong/jquery.particlePhysics.js" type="text/    javascript" charset="utf-8"></script>
<script src="https://files.cnblogs.com/files/jingmoxukong/jquery.starfieldTagCloud.js" type="text/ javascript" charset="utf-8"></script>为了帮助理解,说明这些输入框的作用时,我都截取了浏览器开发者工具的截图。
博客侧边栏公告
在这里添加代码会被嵌入到博客园页面的sideBar下。
页首Html代码
在这里添加代码会被嵌入到博客园页面的body标签下。
页脚Html代码
在这里添加代码会被嵌入到博客园页面的body标签下。
从两个截图不难看出,在博客园管理后台的页首或页脚输入框写入代码,并无区别。
独立控件
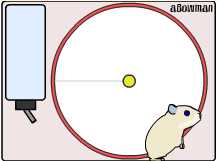
<div className="sidebarMouse"><object type="application/x-shockwave-flash" style="outline:none;" data="http://cdn.abowman.com/widgets/hamster/hamster.swf?up_bodyColor=f0e9cc&up_feetColor=D4C898&up_eyeColor=000567&up_wheelSpokeColor=DEDEDE&up_wheelColor=FFFFFF&up_waterColor=E0EFFF&up_earColor=b0c4de&up_wheelOuterColor=FF4D4D&up_snoutColor=F7F4E9&up_bgColor=F0E4E4&up_foodColor=cba920&up_wheelCenterColor=E4EB2F&up_tailColor=E6DEBE&" width="240" height="160"><param name="movie" value="http://cdn.abowman.com/widgets/hamster/hamster.swf?up_bodyColor=f0e9cc&up_feetColor=D4C898&up_eyeColor=000567&up_wheelSpokeColor=DEDEDE&up_wheelColor=FFFFFF&up_waterColor=E0EFFF&up_earColor=b0c4de&up_wheelOuterColor=FF4D4D&up_snoutColor=F7F4E9&up_bgColor=F0E4E4&up_foodColor=cba920&up_wheelCenterColor=E4EB2E&up_tailColor=E6DEBE&"><param name="AllowScriptAccess" value="always"><param name="wmode" value="opaque"></object></div>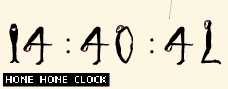
<embed wmode="transparent" src="http://chabudai.sakura.ne.jp/blogparts/honehoneclock/honehone_clock_tr.swf" quality="high" bgcolor="#FDF6E3" width="240" height="110" name="honehoneclock" align="middle" allowscriptaccess="always" type="application/x-shockwave-flash" pluginspage="http://www.macromedia.com/go/getflashplayer">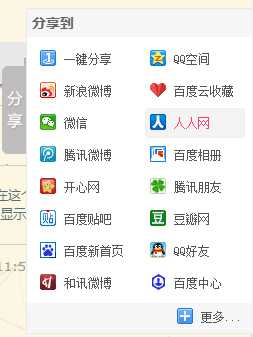

<!-- 标签云相关库 -->
<script src="https://apps.bdimg.com/libs/jquery/2.1.4/ jquery.min.js"></script>
<script src="https://files.cnblogs.com/files/jingmoxukong/ jquery.engine3D.js" type="text/javascript" charset="utf-8"></script>
<script src="https://files.cnblogs.com/files/jingmoxukong/ jquery.particlePhysics.js" type="text/javascript" charset="utf-8"></ script>
<script src="https://files.cnblogs.com/files/jingmoxukong/ jquery.starfieldTagCloud.js" type="text/javascript" charset="utf-8"></script>
<!-- 定时器 -->
<script>
function customTimer(inpId, fn) {
if ($(inpId).length) {
fn();
}
else {
var intervalId = setInterval(function () {
if ($(inpId).length) { //如果存在了
clearInterval(intervalId); // 则关闭定时器
customTimer(inpId, fn); //执行自身
}
}, 100);
}
}
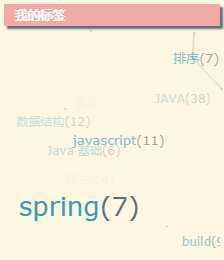
function generateTagClouds() {
$('.catListTag>ul').wrap('<div class=\'wrap\' ></div>').parent() .css({ 'width': '240px', 'height': '240px' });
var options = {
'range': [-200, 300],
'gravity': -10,
'xPos': 0.5,
'yPos': 0.5,
'gravityVector': [0, 0, 1],
'interval': 100,
'hoverGravityFactor': 0
};
$('div.wrap').starfieldTagCloud(options);
}
$(function () {
.
stomTimer('.catListTag', generateTagClouds);
.
});
</script><!-- 背景动画 -->
<canvas id="c_n9" width="1920" height="990" style="position: fixed; top: 0px; left: 0px; z-index: -1; opacity: 0.5;"></canvas>
<script src="https://files.cnblogs.com/files/jingmoxukong/ canvas-nest.min.js"></script>这段代码的意思就是定义一个 canvas 元素,然后使用我下载的 canvas-nest.min.js 库文件去渲染动画。

<script src="https://files.cnblogs.com/files/jingmoxukong/  title.min.js"></script>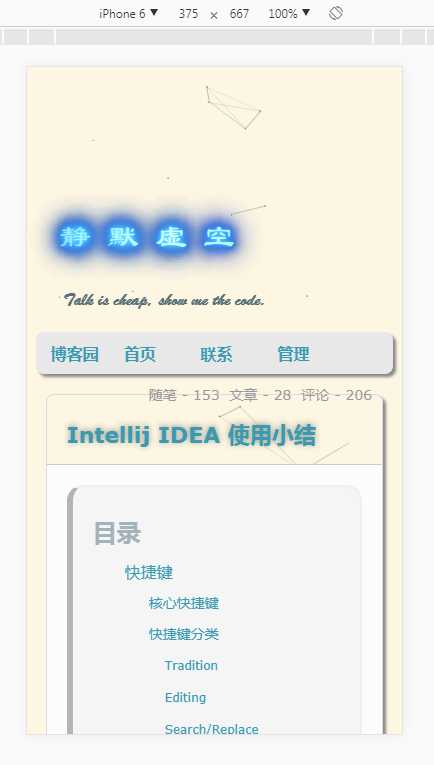
<link rel="stylesheet" href="https://files.cnblogs.com/files/ jingmoxukong/title.min.css" />如果你也想使用这种动态标题,需要对源码做一些修改
// 为了渲染 cavans 效果的标题,生成一个 title 列表
function generateBlogTitle() {
var root=document.createElement("div");
root.id='ui';
for (var i=0; i < 50; i++) {
var node=document.createElement("div");
node.className='text';
node.innerHTML='静默虚空';
root.appendChild(node);
}
document.getElementById("blogTitle").appendChild(root);
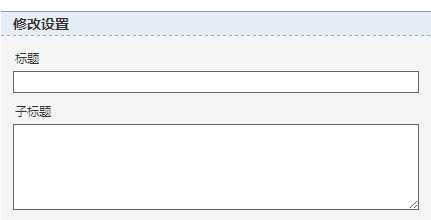
var subTitle=document.createElement("h2");
subTitle.innerHTML='Talk is cheap, show me the code.';
document.getElementById("blogTitle").appendChild (subTitle);
}将上面代码中的node.innerHTML=‘静默虚空‘;替换为你的主标题;
将subTitle.innerHTML=‘Talk is cheap, show me the code.‘;替换为你的子标题。
另外,需要将博客管理后台的主标题、子标题清空。
文章内容样式定制
有关文章内容的样式定制,我都写入了cnblog.js和cnblog.css。当然,为了提高访问速度,这两个文件被我压缩了。
添加以下代码到 页首Html代码
<!-- 自定制样式文件以及脚本 -->
<script src="https://files.cnblogs.com/files/jingmoxukong/cnblog.min.js"></script>
<link rel="stylesheet" href="https://files.cnblogs.com/files/jingmoxukong/cnblog.min.css" />
由于,我实在是懒得一一讲解代码,所以仅在下面罗列这两个文件支持的特性。如果想在我的源码基础上作一些修改,可以在这里访问源码:
cnblog.js、cnblog.css
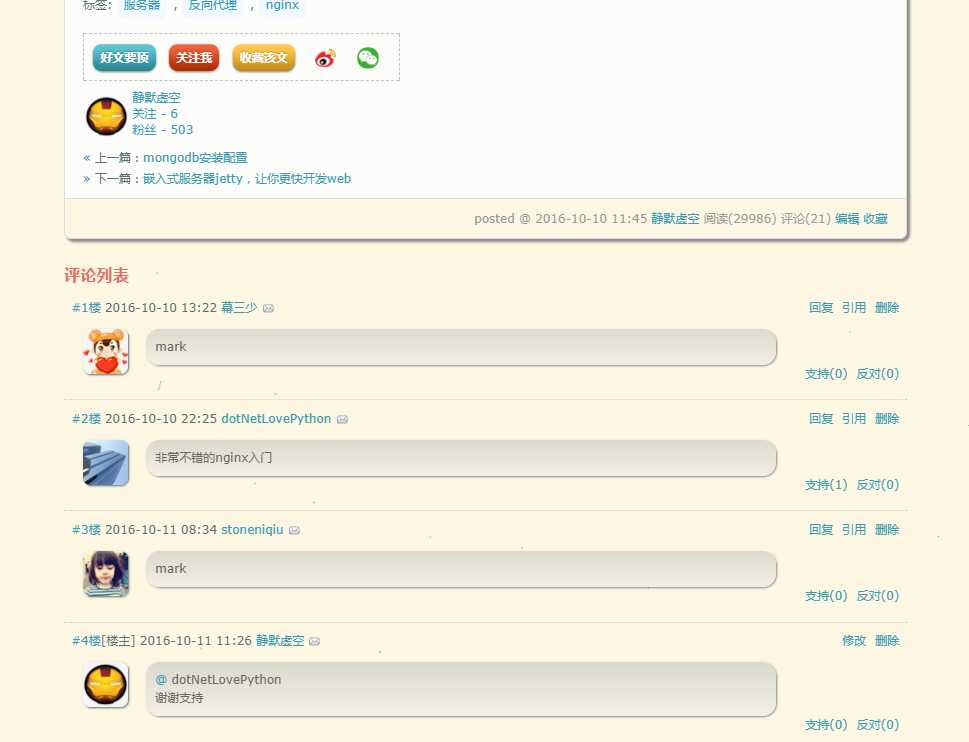
带头像的评论栏
博客园的评论栏默认不显示用户头像,这样显得非常单调。所以我添加了一段定制代码。
JS源码
自动生成文章目录
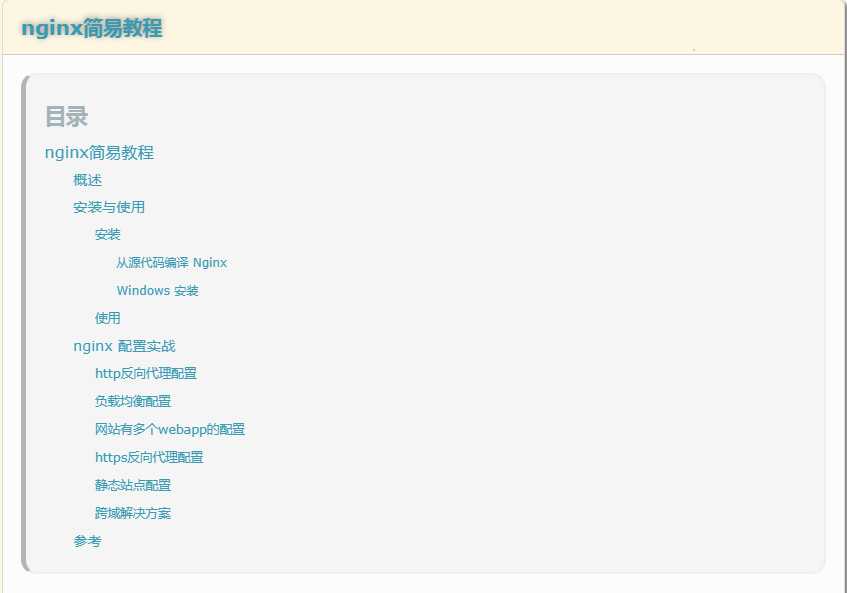
如果你的文章内容较长,有个目录,可以帮读者快速定位感兴趣的内容。
快捷操作栏
响应式布局
我对于博客做了一些简单的响应式布局处理。使得读者在移动端上访问时不至于有过于糟糕的体验。
使用 @media 查询,你可以针对不同的媒体类型定义不同的样式。
@media 可以针对不同的屏幕尺寸设置不同的样式,特别是如果你需要设置设计响应式的页面,@media 是非常有用的。
当你重置浏览器大小的过程中,页面也会根据浏览器的宽度和高度重新渲染页面。
javascript @media only screen and (max-width: 736px) { #navigator { width: 90%; margin: auto; float: none; } #mainContent { width: 90%; margin: auto; float: none; } #sideBar { width: 90%; margin: auto; float: none; } ...
样式的美化
剩下的内容就是一些琐碎的美化细节了。比如我对标题文字增加了阴影效果,表格重新渲染了颜色等等。如果不喜欢,请自行参考我的源码修改。
标签:ext 头像 分享 rip 不显示 box 标题 阴影 plugins
原文地址:https://www.cnblogs.com/gitwow/p/10417317.html