标签:disk tst tmp one util 环境变量 setting ORC reboot
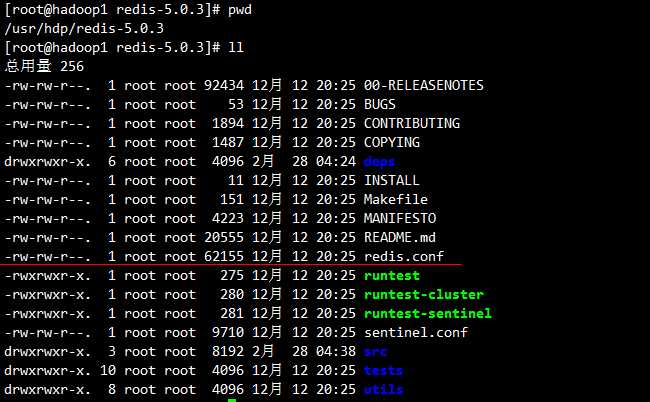
在redis的解压目录中,有一个redis.conf配置文件:

此时我们将之复制到redis的bin同级目录下:
[root@hadoop1 redis]# ll
总用量 68
drwxr-xr-x. 2 root root  4096 2月  28 04:39 bin
-rw-r--r--. 1 root root 62155 2月  28 04:46 redis.conf
[root@hadoop1 redis]# pwd
/usr/redis
备注:其实没有redis.conf文件也可以运行,但是加载的是默认配置,不利于修改端口号等信息。
将源码目录的src下的redis-sentinel脚本拷贝到redis安装目录下,与bin目录同级。
cp /usr/hdp/redis-5.0.3/src/redis-sentinel /usr/redis/
然后配置环境变量,在/etc/profile中末尾添加如下内容:
# SET REDIS_HOME
export REDIS_HOME=/usr/redis/
export PATH=$PATH:$REDIS_HOME/bin
配置完环境变量之后,就可以不用到redis的安装目录下启动相关的redis服务了。可在任何目录下运行redis-server来启动服务。
进入到/usr/hdp/redis-5.0.3/utils/,执行相应脚本来安装服务:
[root@hadoop1 utils]# ./install_server.sh
Welcome to the redis service installer
This script will help you easily set up a running redis server

Please select the redis port for this instance: [6379]   # 可以输入自己想要的端口
Selecting default: 6379
Please select the redis config file name [/etc/redis/6379.conf]    # 可以输入自己想要的配置文件名称,回车默认6739.conf
Selected default - /etc/redis/6379.conf
Please select the redis log file name [/var/log/redis_6379.log]
Selected default - /var/log/redis_6379.log
Please select the data directory for this instance [/var/lib/redis/6379]
Selected default - /var/lib/redis/6379
Please select the redis executable path [/usr/local/bin/redis-server]
Selected config:
Port           : 6379
Config file    : /etc/redis/6379.conf       # 6379.conf放到了/etc/redis目录下
Log file       : /var/log/redis_6379.log
Data dir       : /var/lib/redis/6379
Executable     : /usr/local/bin/redis-server
Cli Executable : /usr/local/bin/redis-cli
Is this ok? Then press ENTER to go on or Ctrl-C to abort.
Copied /tmp/6379.conf => /etc/init.d/redis_6379
Installing service...
Successfully added to chkconfig!
Successfully added to runlevels 345!
Starting Redis server...
Installation successful!
进入相应的目录执行命令:
[root@hadoop1 ~]# cd /etc/init.d/
[root@hadoop1 init.d]# ll
总用量 36
-rw-r--r--. 1 root root 13948 9月  16 2015 functions
-rwxr-xr-x. 1 root root  2989 9月  16 2015 netconsole
-rwxr-xr-x. 1 root root  6630 9月  16 2015 network
-rw-r--r--. 1 root root  1160 11月 20 2015 README
-rwxr-xr-x. 1 root root  1702 2月  28 05:01 redis_6379
[root@hadoop1 init.d]# mv redis_6379 redis
执行完上面的命令之后,即可使用service redis start命令来启动服务了。如果你是这种方式启动的redis,修改配置文件的话就需要到/etc/redis/6379.conf中去修改。
前端启动方式很简单,但是不方便部署集群....如何启动呢,就是进入到redis的目录中,执行./bin/redis-server命令即可启动:
[root@hadoop1 redis]# ./bin/redis-server
3367:C 28 Feb 2019 05:12:30.830 # oO0OoO0OoO0Oo Redis is starting oO0OoO0OoO0Oo
3367:C 28 Feb 2019 05:12:30.830 # Redis version=5.0.3, bits=64, commit=00000000, modified=0, pid=3367, just started
3367:C 28 Feb 2019 05:12:30.830 # Warning: no config file specified, using the default config. In order to specify a config file use ./bin/redis-server /path/to/redis.conf
3367:M 28 Feb 2019 05:12:30.832 * Increased maximum number of open files to 10032 (it was originally set to 1024).
                _._
           _.-``__ ‘‘-._
      _.-``    `.  `_.  ‘‘-._           Redis 5.0.3 (00000000/0) 64 bit
  .-`` .-```.  ```\/    _.,_ ‘‘-._
 (    ‘      ,       .-`  | `,    )     Running in standalone mode
 |`-._`-...-` __...-.``-._|‘` _.-‘|     Port: 6379
 |    `-._   `._    /     _.-‘    |     PID: 3367
  `-._    `-._  `-./  _.-‘    _.-‘
 |`-._`-._    `-.__.-‘    _.-‘_.-‘|
 |    `-._`-._        _.-‘_.-‘    |           http://redis.io
  `-._    `-._`-.__.-‘_.-‘    _.-‘
 |`-._`-._    `-.__.-‘    _.-‘_.-‘|
 |    `-._`-._        _.-‘_.-‘    |
  `-._    `-._`-.__.-‘_.-‘    _.-‘
      `-._    `-.__.-‘    _.-‘
          `-._        _.-‘
              `-.__.-‘

3367:M 28 Feb 2019 05:12:30.833 # WARNING: The TCP backlog setting of 511 cannot be enforced because /proc/sys/net/core/somaxconn is set tothe lower value of 128.
3367:M 28 Feb 2019 05:12:30.833 # Server initialized
3367:M 28 Feb 2019 05:12:30.833 # WARNING overcommit_memory is set to 0! Background save may fail under low memory condition. To fix this issue add ‘vm.overcommit_memory = 1‘ to /etc/sysctl.conf and then reboot or run the command ‘sysctl vm.overcommit_memory=1‘ for this to take effect.
3367:M 28 Feb 2019 05:12:30.833 # WARNING you have Transparent Huge Pages (THP) support enabled in your kernel. This will create latency and memory usage issues with Redis. To fix this issue run the command ‘echo never > /sys/kernel/mm/transparent_hugepage/enabled‘ as root, and add it to your /etc/rc.local in order to retain the setting after a reboot. Redis must be restarted after THP is disabled.
3367:M 28 Feb 2019 05:12:30.833 * DB loaded from disk: 0.000 seconds
3367:M 28 Feb 2019 05:12:30.833 * Ready to accept connections
启动后可以看到redis相应信息,这时候要是要连接到服务,需要另外开一个会话窗口:
[root@hadoop1 redis]# pwd
/usr/redis
[root@hadoop1 redis]# ./bin/redis-cli
127.0.0.1:6379>
简单运用:

前面我们已经将redis.conf复制到redis的安装目录下了,同样进入redis的安装目录下:
vi redis.conf
然后将daemonize no修改为daemonize yes,这时候执行如下命令:
[root@hadoop1 redis]# ./bin/redis-server ./redis.conf
3377:C 28 Feb 2019 05:18:29.030 # oO0OoO0OoO0Oo Redis is starting oO0OoO0OoO0Oo
3377:C 28 Feb 2019 05:18:29.030 # Redis version=5.0.3, bits=64, commit=00000000, modified=0, pid=3377, just started
3377:C 28 Feb 2019 05:18:29.030 # Configuration loaded
[root@hadoop1 redis]# netstat -ntlp
Active Internet connections (only servers)
Proto Recv-Q Send-Q Local Address           Foreign Address         State       PID/Program name
tcp        0      0 127.0.0.1:6379          0.0.0.0:*               LISTEN      3378/./bin/redis-se
tcp        0      0 0.0.0.0:22              0.0.0.0:*               LISTEN      964/sshd
tcp        0      0 127.0.0.1:25            0.0.0.0:*               LISTEN      1792/master
tcp6       0      0 :::22                   :::*                    LISTEN      964/sshd
tcp6       0      0 ::1:25                  :::*                    LISTEN      1792/master
[root@hadoop1 redis]#
此时就会发现不会像前端一样占用界面,这样子就能够方便集群部署。
关闭redis则需要执行命令如下:
[root@hadoop1 redis]# ./bin/redis-cli shutdown
[root@hadoop1 redis]# netstat -ntlp
Active Internet connections (only servers)
Proto Recv-Q Send-Q Local Address           Foreign Address         State       PID/Program name
tcp        0      0 0.0.0.0:22              0.0.0.0:*               LISTEN      964/sshd
tcp        0      0 127.0.0.1:25            0.0.0.0:*               LISTEN      1792/master
tcp6       0      0 :::22                   :::*                    LISTEN      964/sshd
tcp6       0      0 ::1:25                  :::*                    LISTEN      1792/master
[root@hadoop1 redis]#
坚壁清野
标签:disk tst tmp one util 环境变量 setting ORC reboot
原文地址:https://www.cnblogs.com/hzhiping/p/10447116.html