标签:ant 运行时 示例 col 定义 size ict stack mission
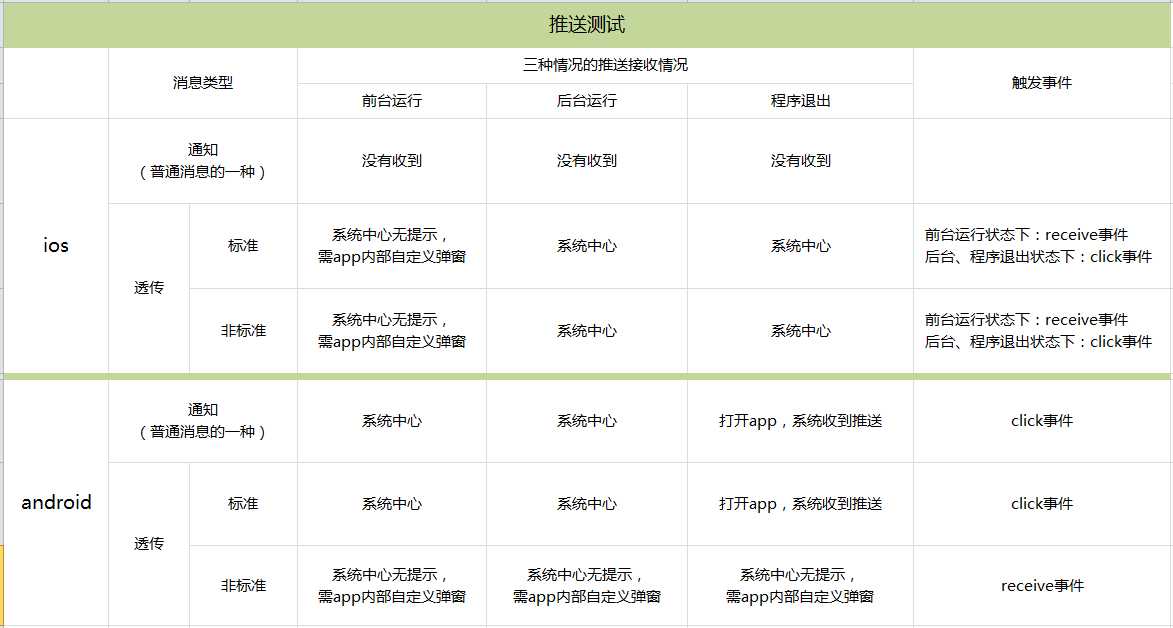
1、下图是我在个推平台中设置推送,ios和android的接收测试情况:
测试机型和版本:
ios: iphone 6s plus,ios12.1.4
android: 红米5plus, android 8.1.0

注意:
1.1、根据项目需求,选择推送的消息类型。
比如,我们的项目需求是,ios和android在前台运行时,能弹出通知。在后台和退出时,系统能收到推送通知。
综合考虑,我们选择的是推送的消息格式为 标准的透传消息。
1.2、标准的透传消息格式如:{"title":"1","content":"2","payload":"数据"}
非标准的透传消息格式如: {"title":"1","content":"2""payload":"数据"}
2、前后端分工
我们的项目需求是,将 clientid 和 手机号 绑定起来,后台设置推送。
前端:获取clientid 和 手机号,提交至后台绑定(需后台同事提供接口)。刚下载app后,打开第一次,有时会获取不到clientid。
我这边的处理是,第一次获取失败后,尝试10次请求。经测试,重获取一次,就很快获取到clientid。
plusready.js 是进入app,就调用的js。而绑定手机号和clientid的函数,是在另一个单独的js里定义的。调用时间在 plusready.js 之后。
下图是plusready.js中关于clientid的获取:
// 获取客户端标识信息
var info = plus.push.getClientInfo();

window.regid = info.clientid;
下图是绑定手机号和clientid的函数:
function bindTelAndCid(tel) {
    // 获取clientId 和 手机号,发至后台绑定。
    if(window.plus) {
        getCidAgain();
    } else {
        document.addEventListener(‘plusready‘,getCidAgain,false);
    }
    function getCidAgain() {
        //首次进入app获取clientId失败,再次获取
        var count = 0;
        //如果cid不存在,就每隔1秒重新获取,尝试最多10次。
        if(!window.regid || window.regid == ‘null‘) {
            var timer = window.setInterval(function(){
                if(count > 9) return false;
                var info = plus.push.getClientInfo();
                window.regid = info.clientid;
                if(window.regid && window.regid != ‘null‘) {
                    clearInterval(timer);
                    sendTelAndCid();
                }
                count++;
            }, 1000);
        } else {
            sendTelAndCid();
        }
    }
    //发送手机号和cid至后台,绑定和推送
    function sendTelAndCid() {
        $.ajax({
            type:"get",
            data: {phone: tel, clientId: window.regid},
            dataType: "json",
            url: "http://xxxxxxxxxxxxxx",
            success:function(res){

            }
        })
    }
}
后台:调个推文档中相关的推送接口,进行推送。个推文档:http://docs.getui.com/getui/more/word/
下面是后台同事(JAVA)提供的推送设置示例代码:
 public static TransmissionTemplate getTemplate2(String title,String content) {
        TransmissionTemplate template = new TransmissionTemplate();
        template.setAppId(appId);
        template.setAppkey(appKey);
        template.setTransmissionContent("{\"title\":\""+title+"\",\"content\":\""+content+"\",\"payload\":{\"type\":1,\"total_count\":5}}");
        template.setTransmissionType(2);
        APNPayload payload = new APNPayload();
        //在已有数字基础上加1显示,设置为-1时,在已有数字上减1显示,设置为数字时,显示指定数字
        payload.setAutoBadge("0");
        payload.setContentAvailable(1);
        //ios 12.0 以上可以使用 Dictionary 类型的 sound
        payload.setSound("default");
        payload.setCategory("$由客户端定义");
        payload.addCustomMsg("payload", "payload");
        //简单模式APNPayload.SimpleMsg
        payload.setAlertMsg(new APNPayload.SimpleAlertMsg(content)); //hello

        //字典模式使用APNPayload.DictionaryAlertMsg
        //payload.setAlertMsg(getDictionaryAlertMsg());

        //设置语音播报类型,int类型,0.不可用 1.播放body 2.播放自定义文本
        //payload.setVoicePlayType(0);
        //设置语音播报内容,String类型,非必须参数,用户自定义播放内容,仅在voicePlayMessage=2时生效
        //注:当"定义类型"=2, "定义内容"为空时则忽略不播放
        //payload.setVoicePlayMessage("定义内容");

        // 添加多媒体资源
        payload.addMultiMedia(new MultiMedia().setResType(MultiMedia.MediaType.video)
                .setResUrl("http://www.baidu.com")
                .setOnlyWifi(true));
        //需要使用IOS语音推送,请使用VoIPPayload代替APNPayload
        // VoIPPayload payload = new VoIPPayload();
        // JSONObject jo = new JSONObject();
        // jo.put("key1","value1");
        //         payload.setVoIPPayload(jo.toString());
        //
        template.setAPNInfo(payload);
        return template;
    }


   public static Map<String, Object> pushToApp(String CID1,String title,String content) {
        IGtPush push = new IGtPush(host, appKey, masterSecret);
        TransmissionTemplate template = getTemplate2(title,content);
        SingleMessage message = new SingleMessage();
        message.setOffline(true);
        // 离线有效时间,单位为毫秒,可选
        message.setOfflineExpireTime(24 * 3600 * 1000);
        message.setData(template);
        // 可选,1为wifi,0为不限制网络环境。根据手机处于的网络情况,决定是否下发
        message.setPushNetWorkType(0);
        Target target = new Target();
        target.setAppId(appId);
        target.setClientId(CID1);
        //target.setAlias(Alias);
        IPushResult ret = null;
        try {
            ret = push.pushMessageToSingle(message, target);
        } catch (RequestException e) {
            e.printStackTrace();
            ret = push.pushMessageToSingle(message, target, e.getRequestId());
        }
        Map<String, String> mapOne = new HashMap<>();
        Map<String, String> mapTwo = new HashMap<>();
        Map<String, Object> map= new HashMap<>();
        if (ret != null) {
            Map<String, Object> resultMap = ret.getResponse();
            System.out.println("resultMap=" + resultMap);

            String result = resultMap.get("result").toString();
            String taskId = "";
            String status = "";
            if(Constant.IS_OK.equals(result)){
                taskId = resultMap.get("taskId").toString();
                status = resultMap.get("status").toString();
            }

            System.out.println("resultMap.get(\"result\")=" + result);
            GeTuiResult geTuiResult = GeTuiResult.getGeTuiResult(result);
            System.out.println("code=" + geTuiResult.code + ";reason=" + geTuiResult.reason);
            mapOne.put(geTuiResult.code, geTuiResult.reason);
            mapTwo.put("taskId",taskId);
            mapTwo.put("status",status);
            map.put("mapOne",mapOne);
            map.put("mapTwo",mapTwo);
            return map;
        } else {
            map.put("500", "服务器响应异常");
            return map;
        }
    }
标签:ant 运行时 示例 col 定义 size ict stack mission
原文地址:https://www.cnblogs.com/zy20160429/p/10530941.html