标签:type 维护 ace span details substr sde creat enabled
四、HBase 项目
4.1、涉及概念梳理:命名空间
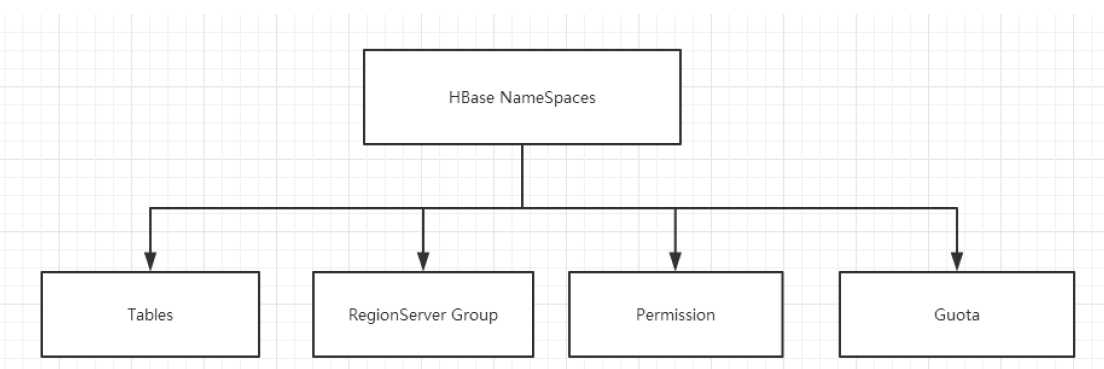
4.1.1、命名空间的结构

1) Table:表,所有的表都是命名空间的成员,即表必属于某个命名空间,如果没有指定, 则在 default 默认的命名空间中。
2) RegionServer group:一个命名空间包含了默认的 RegionServer Group。
3) Permission:权限,命名空间能够让我们来定义访问控制列表 ACL(Access Control List)。 例如,创建表,读取表,删除,更新等等操作。
4) Quota:限额,可以强制一个命名空间可包含的 region 的数量。(属性:hbase.quota.enabled)
4.1.2、命名空间的使用
1) 创建命名空间
hbase(main):002:0> create_namespace ‘ns_school‘
2) 创建表时指定命名空间
hbase(main):004:0> create ‘ns_school:tbl_student‘,‘info‘

4.2、微博系统
4.1.1、需求分析
1) 微博内容的浏览,数据库表设计
2) 用户社交体现:关注用户,取关用户
3) 拉取关注的人的微博内容
4.1.2、代码实现
代码设计总览:
1) 创建命名空间以及表名的定义
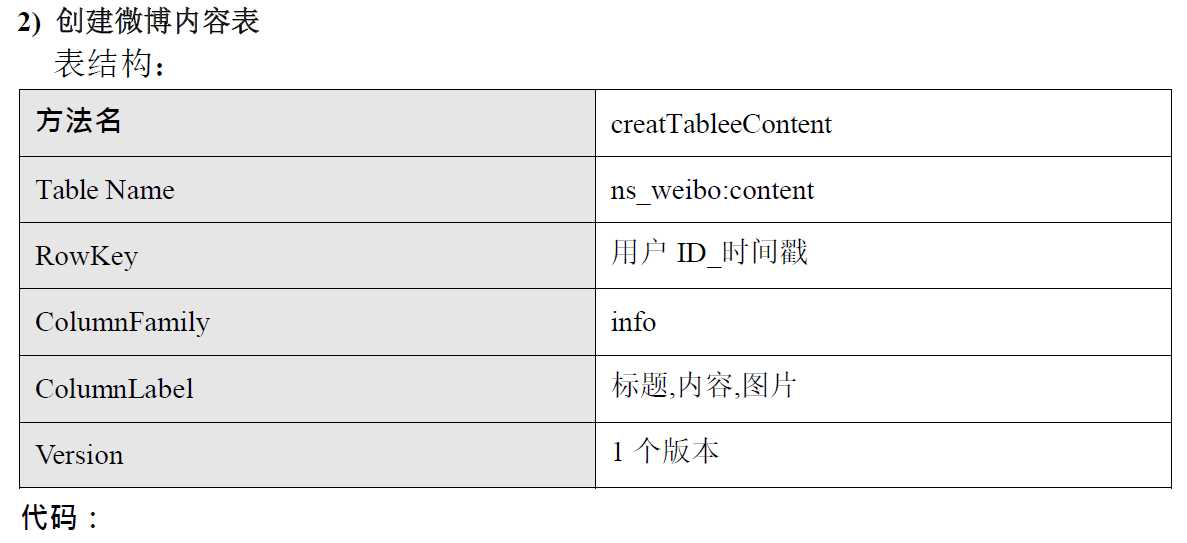
2) 创建微博内容表
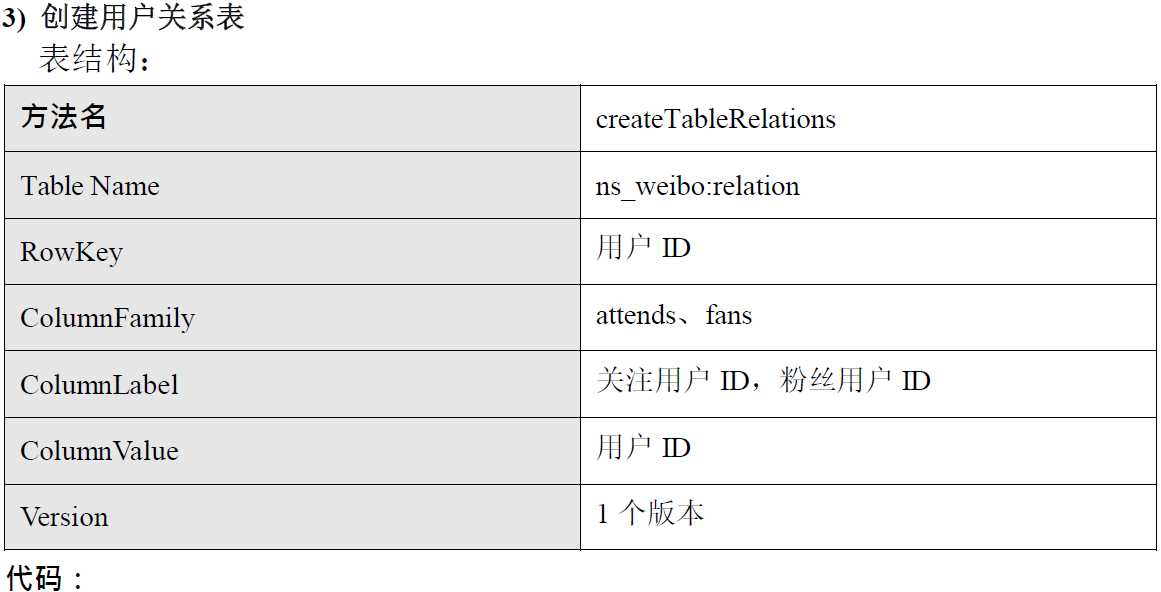
3) 创建用户关系表
4) 创建用户微博内容接收邮件表
5) 发布微博内容
6) 添加关注用户
7) 移除(取关)用户
8) 获取关注的人的微博内容
9) 测试
1) 创建命名空间以及表名的定义
//获取配置 conf
private Configuration conf = HBaseConfiguration.create();
//微博内容表的表名
private static final byte[] TABLE_CONTENT= Bytes.toBytes("ns_weibo:content");
//用户关系表的表名
private static final byte[] TABLE_RELATION = Bytes.toBytes("ns_weibo:relation");
//微博收件箱表的表名
private static final byte[] TABLE_INBOX = Bytes.toBytes("ns_weibo:inbox");
/**
* 初始化命名空间
* @param args
*/
public void initNamespace(){
HBaseAdmin admin = null;
try {
Connection connection = ConnectionFactory.createConnection(conf); admin = (HBaseAdmin) connection.getAdmin();
//命名空间类似于关系型数据库中的 schema,可以想象成文件夹
NamespaceDescriptor weibo = NamespaceDescriptor.create("ns_weibo")
.addConfiguration("creator", "Jinji")
.addConfiguration("create_time", System.currentTimeMillis() + "")
.build(); admin.createNamespace(weibo);
} catch (MasterNotRunningException e) {
e.printStackTrace();
} catch (ZooKeeperConnectionException e) {
e.printStackTrace();
} catch (IOException e) {
e.printStackTrace();
}finally{
if(null != admin){
try {
admin.close();
} catch (IOException e) {
e.printStackTrace();
}
}
}
}

/**
* 创建微博内容表
* Table Name:ns_weibo:content
* RowKey:用户 ID_时间戳
* ColumnFamily:info
* ColumnLabel:标题,内容,图片 URL
* Version:1 个版本
*/
public void createTableContent(){
HBaseAdmin admin = null; Connection connection = null;
try {
connection = ConnectionFactory.createConnection(conf);
admin = (HBaseAdmin) connection.getAdmin();
//创建表表述
HTableDescriptor contentTableDescriptor = new HTableDescriptor(TableName.valueOf(TABLE_CONTENT));
//创建列族描述
HColumnDescriptor infoColumnDescriptor = new
HColumnDescriptor(Bytes.toBytes("info"));
//设置块缓存
infoColumnDescriptor.setBlockCacheEnabled(true);
//设置块缓存大小 infoColumnDescriptor.setBlocksize(2097152);
//设置压缩方式
//infoColumnDescriptor.setCompressionType(Algorithm.SNAPPY);
//设置版本确界 infoColumnDescriptor.setMaxVersions(1); infoColumnDescriptor.setMinVersions(1);
contentTableDescriptor.addFamily(infoColumnDescriptor);
admin.createTable(contentTableDescriptor);
} catch (IOException e) {
e.printStackTrace();
} finally{
if(null != admin){
try {
admin.close();
connection.close();
} catch (IOException e) {
e.printStackTrace();
}
}
}
}

/**
* 用户关系表
* Table Name:ns_weibo:relation
* RowKey:用户 ID
* ColumnFamily:attends,fans
* ColumnLabel:关注用户 ID,粉丝用户 ID
* ColumnValue:用户 ID
* Version:1 个版本
*/
public void createTableRelation(){
HBaseAdmin admin = null;
try {
Connection connection = ConnectionFactory.createConnection(conf);
admin = (HBaseAdmin) connection.getAdmin();
HTableDescriptor relationTableDescriptor = new
HTableDescriptor(TableName.valueOf(TABLE_RELATION));
//关注的人的列族
HColumnDescriptor attendColumnDescriptor = new HColumnDescriptor(Bytes.toBytes("attends"));
//设置块缓存
attendColumnDescriptor.setBlockCacheEnabled(true);
//设置块缓存大小 attendColumnDescriptor.setBlocksize(2097152);
//设置压缩方式
//attendColumnDescriptor.setCompressionType(Algorithm.SNAPPY);
//设置版本确界 attendColumnDescriptor.setMaxVersions(1);
attendColumnDescriptor.setMinVersions(1);
//粉丝列族
HColumnDescriptor fansColumnDescriptor = new
HColumnDescriptor(Bytes.toBytes("fans"));
fansColumnDescriptor.setBlockCacheEnabled(true);
fansColumnDescriptor.setBlocksize(2097152);
fansColumnDescriptor.setMaxVersions(1);
fansColumnDescriptor.setMinVersions(1);
relationTableDescriptor.addFamily(attendColumnDescriptor);
relationTableDescriptor.addFamily(fansColumnDescriptor);
admin.createTable(relationTableDescriptor);
} catch (MasterNotRunningException e) {
e.printStackTrace();
} catch (ZooKeeperConnectionException e) {
e.printStackTrace();
} catch (IOException e) {
e.printStackTrace();
}finally{
if(null != admin){
try {
admin.close();
} catch (IOException e) {
e.printStackTrace();
}
}
}
}
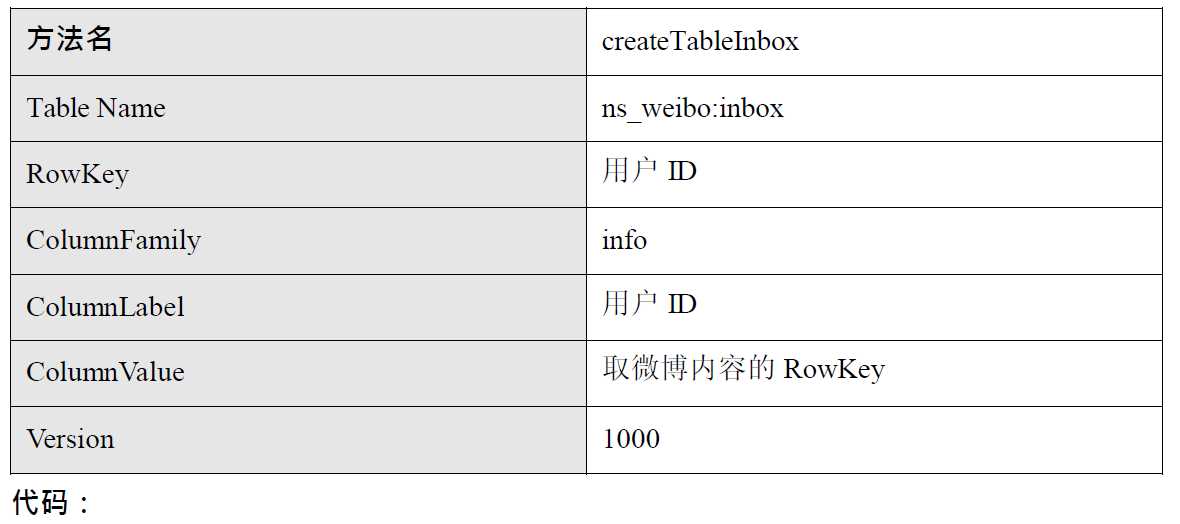
4) 创建微博收件箱表
表结构:

/**
* 创建微博收件箱表
* Table Name: ns_weibo:inbox
* RowKey:用户 ID
* ColumnFamily:info
* ColumnLabel:用户 ID_发布微博的人的用户 ID
* ColumnValue:关注的人的微博的 RowKey
* Version:1000
*/
public void createTableInbox(){
HBaseAdmin admin = null;
try {
Connection connection = ConnectionFactory.createConnection(conf);
admin = (HBaseAdmin) connection.getAdmin();
HTableDescriptor inboxTableDescriptor = new HTableDescriptor(TableName.valueOf(TABLE_INBOX));
HColumnDescriptor infoColumnDescriptor = new
HColumnDescriptor(Bytes.toBytes("info"));
infoColumnDescriptor.setBlockCacheEnabled(true);
infoColumnDescriptor.setBlocksize(2097152);
infoColumnDescriptor.setMaxVersions(1000);
infoColumnDescriptor.setMinVersions(1000);
inboxTableDescriptor.addFamily(infoColumnDescriptor);;
admin.createTable(inboxTableDescriptor);
} catch (MasterNotRunningException e) {
e.printStackTrace();
} catch (ZooKeeperConnectionException e) {
e.printStackTrace();
} catch (IOException e) {
e.printStackTrace();
}finally{
if(null != admin){
try {
admin.close();
} catch (IOException e) {
e.printStackTrace();
}
}
}
}
5) 发布微博内容
a、微博内容表中添加 1 条数据
b、微博收件箱表对所有粉丝用户添加数据
代码:Message.java
package com.z.hbase.weibo;
public class Message {
private String uid;
private String timestamp; private String content;
public String getUid() {
return uid;
}
public void setUid(String uid) { this.uid = uid;
}
public String getTimestamp() {
return timestamp;
}
public void setTimestamp(String timestamp) { this.timestamp = timestamp;
}
public String getContent() { return content;
}
public void setContent(String content) { this.content = content;
}
@Override
public String toString() {
return "Message [uid=" + uid + ", timestamp=" + timestamp + ", content=" + content +
"]";
}
}
代码:public void publishContent(String uid, String content)
/**
* 发布微博
* a、微博内容表中数据+1
* b、向微博收件箱表中加入微博的 Rowkey
*/
public void publishContent(String uid, String content){ Connection connection = null;
try {
connection = ConnectionFactory.createConnection(conf);
//a、微博内容表中添加 1 条数据,首先获取微博内容表描述
Table contentTable = connection.getTable(TableName.valueOf(TABLE_CONTENT));
//组装 Rowkey
long timestamp = System.currentTimeMillis();
Table relationTable = connection.getTable(TableName.valueOf(TABLE_RELATION));
//b.2、取出目标数据
Get get = new Get(Bytes.toBytes(uid)); get.addFamily(Bytes.toBytes("fans"));
Result result = relationTable.get(get);
List<byte[]> fans = newArrayList<byte[]>();
//遍历取出当前发布微博的用户的所有粉丝数据
for(Cell cell : result.rawCells()){ fans.add(CellUtil.cloneQualifier(cell));
}
//如果该用户没有粉丝,则直接 return if(fans.size() <= 0) return;
//开始操作收件箱表
Table inboxTable = connection.getTable(TableName.valueOf(TABLE_INBOX));
//每一个粉丝,都要向收件箱中添加该微博的内容,所以每一个粉丝都是一个 Put
对象
List<Put> puts = newArrayList<Put>(); for(byte[] fan : fans){
Put fansPut = new Put(fan);
fansPut.addColumn(Bytes.toBytes("info"), Bytes.toBytes(uid), timestamp, Bytes.toBytes(rowKey));
puts.add(fansPut);
}
inboxTable.put(puts);
} catch (IOException e) {
e.printStackTrace();
}finally{
if(null != connection){ try {
connection.close();
} catch (IOException e) { e.printStackTrace();
}
}
}
}
6) 添加关注用户
a、在微博用户关系表中,对当前主动操作的用户添加新关注的好友 b、在微博用户关系表中,对被关注的用户添加新的粉丝 c、微博收件箱表中添加所关注的用户发布的微博
代码实现:public void addAttends(String uid, String... attends)
/**
* 关注用户逻辑
* a、在微博用户关系表中,对当前主动操作的用户添加新的关注的好友
* b、在微博用户关系表中,对被关注的用户添加粉丝(当前操作的用户)
* c、当前操作用户的微博收件箱添加所关注的用户发布的微博 rowkey
*/
public void addAttends(String uid, String... attends){
//参数过滤
if(attends == null || attends.length <= 0 || uid == null || uid.length() <= 0){ return;
}
Connection connection = null;
try {
connection = ConnectionFactory.createConnection(conf);
//用户关系表操作对象(连接到用户关系表)
Table relationTable = connection.getTable(TableName.valueOf(TABLE_RELATION)); List<Put> puts = newArrayList<Put>();
//a、在微博用户关系表中,添加新关注的好友
Put attendPut = new Put(Bytes.toBytes(uid)); for(String attend : attends){
//为当前用户添加关注的人
attendPut.addColumn(Bytes.toBytes("attends"), Bytes.toBytes(attend), Bytes.toBytes(attend));
//b、为被关注的人,添加粉丝
Put fansPut = new Put(Bytes.toBytes(attend)); fansPut.addColumn(Bytes.toBytes("fans"), Bytes.toBytes(uid),
Bytes.toBytes(uid));
//将所有关注的人一个一个的添加到 puts(List)集合中 puts.add(fansPut);
}
puts.add(attendPut); relationTable.put(puts);
//c.1、微博收件箱添加关注的用户发布的微博内容(content)的 rowkey
Table contentTable = connection.getTable(TableName.valueOf(TABLE_CONTENT));
Scan scan = new Scan();
//用于存放取出来的关注的人所发布的微博的 rowkey
List<byte[]> rowkeys = new ArrayList<byte[]>();
for(String attend : attends){
//过滤扫描 rowkey,即:前置位匹配被关注的人的 uid_
RowFilter filter = new RowFilter(CompareFilter.CompareOp.EQUAL, new SubstringComparator(attend + "_"));
//为扫描对象指定过滤规则
scan.setFilter(filter);
//通过扫描对象得到 scanner
ResultScanner result = contentTable.getScanner(scan);
//迭代器遍历扫描出来的结果集 Iterator<Result> iterator = result.iterator(); while(iterator.hasNext()){
//取出每一个符合扫描结果的那一行数据
Result r = iterator.next(); for(Cell cell : r.rawCells()){
//将得到的 rowkey 放置于集合容器中
rowkeys.add(CellUtil.cloneRow(cell));
}
}
}
//c.2、将取出的微博 rowkey 放置于当前操作的用户的收件箱中
if(rowkeys.size() <= 0) return;
//得到微博收件箱表的操作对象
Table inboxTable = connection.getTable(TableName.valueOf(TABLE_INBOX));
//用于存放多个关注的用户的发布的多条微博 rowkey 信息
List<Put> inboxPutList = newArrayList<Put>(); for(byte[] rk : rowkeys){
Put put = new Put(Bytes.toBytes(uid));
//uid_timestamp
String rowKey= Bytes.toString(rk);
//截取 uid
String attendUID = rowKey.substring(0, rowKey.indexOf("_"));
long timestamp = Long.parseLong(rowKey.substring(rowKey.indexOf("_") + 1));
//将微博 rowkey 添加到指定单元格中
put.addColumn(Bytes.toBytes("info"), Bytes.toBytes(attendUID), timestamp, rk); inboxPutList.add(put);
}
inboxTable.put(inboxPutList);
} catch (IOException e) {
e.printStackTrace();
}finally{
if(null != connection){ try {
connection.close();
} catch (IOException e) {
// TODO Auto-generated catch block e.printStackTrace();
}
}
}
}
7) 移除(取关)用户
a、在微博用户关系表中,对当前主动操作的用户移除取关的好友(attends) b、在微博用户关系表中,对被取关的用户移除粉丝 c、微博收件箱中删除取关的用户发布的微博
代码:public void removeAttends(String uid, String... attends)
/**
* 取消关注(remove)
* a、在微博用户关系表中,对当前主动操作的用户删除对应取关的好友
* b、在微博用户关系表中,对被取消关注的人删除粉丝(当前操作人)
* c、从收件箱中,删除取关的人的微博的 rowkey
*
*/
public void removeAttends(String uid, String... attends){
//过滤数据
if(uid == null || uid.length() <= 0 || attends == null || attends.length <= 0) return;
try {
Connection connection = ConnectionFactory.createConnection(conf);
//a、在微博用户关系表中,删除已关注的好友
Table relationTable = connection.getTable(TableName.valueOf(TABLE_RELATION));
//待删除的用户关系表中的所有数据
List<Delete> deleteList = newArrayList<Delete>();
//当前取关操作者的 uid 对应的 Delete 对象
Delete attendDelete = new Delete(Bytes.toBytes(uid));
//遍历取关,同时每次取关都要将被取关的人的粉丝-1 for(String attend : attends){
attendDelete.addColumn(Bytes.toBytes("attends"), Bytes.toBytes(attend));
//b、在微博用户关系表中,对被取消关注的人删除粉丝(当前操作人) Delete fansDelete = new Delete(Bytes.toBytes(attend)); fansDelete.addColumn(Bytes.toBytes("fans"), Bytes.toBytes(uid));
deleteList.add(fansDelete);
}
deleteList.add(attendDelete);
relationTable.delete(deleteList);
//c、删除取关的人的微博 rowkey 从 收件箱表中
Table inboxTable = connection.getTable(TableName.valueOf(TABLE_INBOX));
Delete inboxDelete = new Delete(Bytes.toBytes(uid));
for(String attend : attends){
inboxDelete.addColumn(Bytes.toBytes("info"), Bytes.toBytes(attend));
}
inboxTable.delete(inboxDelete);
} catch (IOException e) { e.printStackTrace();
}
}
8) 获取关注的人的微博内容
a、从微博收件箱中获取所关注的用户的微博 RowKey b、根据获取的 RowKey,得到微博内容
代码实现:public List<Message> getAttendsContent(String uid)
/**
* 获取微博实际内容
* a、从微博收件箱中获取所有关注的人的发布的微博的 rowkey
* b、根据得到的 rowkey 去微博内容表中得到数据
* c、将得到的数据封装到 Message 对象中
*/
public List<Message> getAttendsContent(String uid){ Connection connection = null;
try {
connection = ConnectionFactory.createConnection(conf);
Table inboxTable = connection.getTable(TableName.valueOf(TABLE_INBOX));
//a、从收件箱中取得微博 rowKey Get get = new Get(Bytes.toBytes(uid));
//设置最大版本号 get.setMaxVersions(5);
List<byte[]> rowkeys = new ArrayList<byte[]>(); Result result = inboxTable.get(get);
for(Cell cell : result.rawCells()){ rowkeys.add(CellUtil.cloneValue(cell));
}
//b、根据取出的所有 rowkey 去微博内容表中检索数据
Table contentTable = connection.getTable(TableName.valueOf(TABLE_CONTENT)); List<Get> gets = newArrayList<Get>();
//根据 rowkey 取出对应微博的具体内容
for(byte[] rk : rowkeys){ Get g = new Get(rk); gets.add(g);
}
//得到所有的微博内容的 result 对象
Result[] results = contentTable.get(gets);
//将每一条微博内容都封装为消息对象 List<Message> messages = newArrayList<Message>(); for(Result res : results){
for(Cell cell : res.rawCells()){
Message message = new Message();
String rowKey = Bytes.toString(CellUtil.cloneRow(cell));
String userid = rowKey.substring(0, rowKey.indexOf("_")); String timestamp = rowKey.substring(rowKey.indexOf("_") + 1);
String content = Bytes.toString(CellUtil.cloneValue(cell));
message.setContent(content);
message.setTimestamp(timestamp);
message.setUid(userid);
messages.add(message);
}
}
return messages;
} catch (IOException e) { e.printStackTrace();
}finally{
try {
connection.close();
} catch (IOException e) { e.printStackTrace();
}
}
return null;
}
9) 测试
-- 测试发布微博内容
public void testPublishContent(WeiBo wb)
-- 测试添加关注
public void testAddAttend(WeiBo wb)
-- 测试取消关注
public void testRemoveAttend(WeiBo wb)
-- 测试展示内容
public void testShowMessage(WeiBo wb)
代码:
/**
* 发布微博内容
* 添加关注
* 取消关注
* 展示内容
*/
public void testPublishContent(WeiBo wb){
wb.publishContent("0001", "今天买了一包空气,送了点薯片,非常开心!!"); wb.publishContent("0001", "今天天气不错。");
}
public void testAddAttend(WeiBo wb){ wb.publishContent("0008", "准备下课!");
wb.publishContent("0009", "准备关机!"); wb.addAttends("0001", "0008", "0009");
}
public void testRemoveAttend(WeiBo wb){
wb.removeAttends("0001", "0008");
}
public void testShowMessage(WeiBo wb){
List<Message> messages = wb.getAttendsContent("0001"); for(Message message : messages){
System.out.println(message);
}
}
public static void main(String[] args) {
WeiBo weibo = new WeiBo(); weibo.initTable();
weibo.testPublishContent(weibo);
weibo.testAddAttend(weibo); weibo.testShowMessage(weibo); weibo.testRemoveAttend(weibo);
weibo.testShowMessage(weibo);
}
五、总结
不一定所有的企业都会使用 HBase,大数据的框架可以是相互配合相互依赖的,同时,根据 不同的业务,部分框架之间的使用也可以是相互独立的。例如有些企业在处理整个业务时, 只是用 HDFS+Spark 部分的内容。所以在学习 HBase 框架时,一定要有宏观思维,了解其 框架特性,不一定非要在所有的业务中使用所有的框架,要具体情况具体分析,酌情选择。
5.1、HBase在商业项目中的能力
每天:
1) 消息量:发送和接收的消息数超过 60 亿
2) 将近 1000 亿条数据的读写
3) 高峰期每秒 150 万左右操作
4) 整体读取数据占有约 55%,写入占有 45%
5) 超过 2PB 的数据,涉及冗余共 6PB 数据
6) 数据每月大概增长 300 千兆字节。
5.2、HBase2.0 新特性
2017 年 8 月 22 日凌晨 2 点左右,HBase 发布了 2.0.0 alpha-2,相比于上一个版本,修复了
500 个补丁,我们来了解一下 2.0 版本的 HBase 新特性。
最新文档:
http://hbase.apache.org/book.html#ttl
官方发布主页:
http://mail-archives.apache.org/mod_mbox/www-announce/201708.mbox/<CADcMMgFzmX0x
YYso-UAYbU7V8z-Obk1J4pxzbGkRzbP5Hps+iA@mail.gmail.com
举例:
1) region 进行了多份冗余
主 region 负责读写,从 region 维护在其他 HregionServer 中,负责读以及同步主 region 中的 信息,如果同步不及时,是有可能出现 client 在从 region 中读到了脏数据(主 region 还没来 得及把 memstore 中的变动的内容 flush)。
2) 更多变动
https://issues.apache.org/jira/secure/ReleaseNote.jspa?version=12340859&styleName=&projectId
=12310753&Create=Create&atl_token=A5KQ-2QAV-T4JA-FDED%7Ce6f233490acdf4785b697
d4b457f7adb0a72b69f%7Clout
https://blog.csdn.net/a519781181/article/details/79423512
标签:type 维护 ace span details substr sde creat enabled
原文地址:https://www.cnblogs.com/pursue339/p/10540305.html