标签:nginx mic status 管理工具 ext pre proxy 压缩 url

Tengine是由淘宝网发起的Web服务器项目。它在Nginx的基础上,针对大访问量网站的需求,添加了很多高级功能和特性。它的目的是打造一个高效、安全的Web平台。
Tengine的性能和稳定性已经在大型的网站如淘宝网,天猫商城等得到了很好的检验。
从2011年12月开始,Tengine成为一个开源项目,Tengine团队在积极地开发和维护着它。Tengine团队的核心成员来自于淘宝、搜狗等互联网企业。Tengine是社区合作的成果,我们欢迎大家参与其中,贡献自己的力量。
1.安装依赖包
[root@Tengine ~]# yum -y install gcc \
gcc-c++ \ bzip2 perl curl curl-devel \
expat-devel gettext-devel openssl-devel \
libxml2 libxml2-devel libjpeg-devel libpng-devel \
freetype-devel libmcrypt-devel autoconf
2.配置扩展包安装源
[root@Tengine ~]# yum -y install epel-release
[root@Tengine ~]# yum -y install libmcrypt libmcrypt-devel mcrypt mhash
3.安装编译所需要的组件
(1)pcre:是一个Perl库,包括 perl 兼容的正则表达式库。nginx rewrite依赖于PCRE库,所以在安装Tengine前一定要先安装PCRE。
[root@Tengine ~]# cd /usr/local/src && wget ftp://ftp.csx.cam.ac.uk/pub/software/programming/pcre/pcre-8.42.tar.gz && tar zxvf pcre-8.42.tar.gz && cd pcre-8.42 && ./configure --prefix=/usr/local/pcre && make && make install
(2)zlib:Zlib是提供资料压缩之用的函式库,当Tengine想启用GZIP压缩的时候就需要使用到Zlib。
[root@Tengine pcre-8.42]# cd /usr/local/src && wget http://zlib.net/zlib-1.2.11.tar.gz && tar zxvf zlib-1.2.11.tar.gz && cd zlib-1.2.11 && ./configure --prefix=/usr/local/zlib && make && make install
(3)jemalloc:是一个更好的内存管理工具,使用jemalloc可以更好的优化Tengine的内存管理。
[root@Tengine zlib-1.2.11]# cd /usr/local/src && wget https://github.com/jemalloc/jemalloc/releases/download/5.1.0/jemalloc-5.1.0.tar.bz2 && tar xvf jemalloc-5.1.0.tar.bz2 && cd jemalloc-5.1.0 && ./configure --prefix=/usr/local/jemalloc && make && make install
(4)OpenSSL:是一个强大的安全套接字层密码库,囊括主要的密码算法、常用的密钥和证书封装管理功能及SSL协议,并提供丰富的应用程序供测试或其它目的使用。主要是为了让tengine支持Https的访问请求。
[root@Tengine jemalloc-5.1.0]# cd /usr/local/src && wget https://www.openssl.org/source/openssl-1.1.1.tar.gz && tar zxvf openssl-1.1.1.tar.gz && cd openssl-1.1.1 && ./config --prefix=/usr/local/openssl && make && make install
在主要核心的组件安装完毕以后就可以安装Tegine了,最新版本的Tegine可从官网(http://tengine.taobao.org/)获取。
在编译安装前还需要做的一件事是添加一个专门的用户来执行Tengine。不建议使用root用户启动
[root@Tengine openssl-1.1.1]# useradd www -s /sbin/nologin -M
下载Tengine
[root@Tengine openssl-1.1.1]# cd /usr/local/src && wget http://tengine.taobao.org/download/tengine-2.2.3.tar.gz && tar -zxvf tengine-2.2.3.tar.gz && cd tengine-2.2.3
配置编译安装
[root@Tengine tengine-2.2.3]# ./configure --prefix=/usr/local/tengine > --user=www > --group=www > --with-pcre=/usr/local/src/pcre-8.42 > --with-openssl=/usr/local/src/openssl-1.1.1 > --with-jemalloc=/usr/local/src/jemalloc-5.1.0 > --with-http_gzip_static_module > --with-http_realip_module > --with-http_stub_status_module > --with-http_concat_module=shared > --with-zlib=/usr/local/src/zlib-1.2.11
[root@Tengine tengine-2.2.3]# echo $?
0
[root@Tengine tengine-2.2.3]# make -j 4&&make install

[root@Tengine tengine-2.2.3]# echo $?
0
加入到系统服务
[root@Tengine tengine-2.2.3]# cd /lib/systemd/system
[root@Tengine system]# vi tengine.service
[Unit]
Description=The nginx HTTP and reverse proxy server
After=syslog.target network.target remote-fs.target nss-lookup.target

[Service]
Type=forking
PIDFile=/usr/local/nginx/logs/nginx.pid
ExecStartPre=/usr/local/nginx/sbin/nginx -t
ExecStart=/usr/local/nginx/sbin/nginx -c /usr/local/nginx/conf/nginx.conf
ExecReload=/bin/kill -s HUP $MAINPID
ExecStop=/bin/kill -s QUIT $MAINPID
PrivateTmp=true

[Install]
WantedBy=multi-user.target
[root@Tengine system]# chmod 745 nginx.service  # 修改权限
[root@Tengine system]# systemctl enable tengine.service  # 开机自启
Created symlink from /etc/systemd/system/multi-user.target.wants/tengine.service to /usr/lib/systemd/system/tengine.service.
[root@Tengine system]# systemctl start tengine.service  #启动Tengine
安装完成
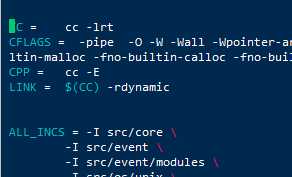
可能有的人在make的时候会报这个错 我在安装2.2.3时也碰到了这个问题

上面出错根本原因是编译nginx找不到实时库librt
只要将tengine文件中的objs/Makefile中的第一行的 CC = cc 改成 CC = cc -lrt后在编译安装就可以了
-lrt的意思是让编译的时候加入实时库librt

标签:nginx mic status 管理工具 ext pre proxy 压缩 url
原文地址:https://www.cnblogs.com/bigdevilking/p/10620930.html