标签:系统默认 items variable 报错 print 就是 使用 有一个 参数

•
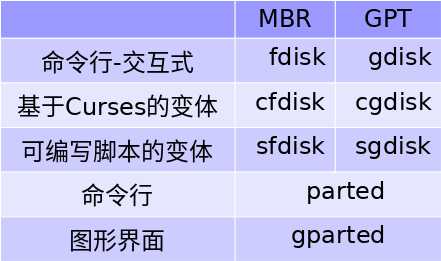
fdisk(变体:cfdisk,sfdisk),MBR格式分区工具,只能识别2Tb以内的磁盘空间。
•
gdisk(变体:cgdisk,sgdisk),GPT格式分区工具。
•
parted(图形界面工具:gparted),同时支持MBR及GPT的分区工具。
以 /dev/sdc 磁盘为例:注:此优盘同时支持BIOS和UEFI模式
$ sudo fdisk -l
/dev/sdc
Disk /dev/sdc: 7.4
GiB, 7985954816 bytes, 15597568 sectors
Disk model: Flash
Reader
Units: sectors of 1
* 512 = 512 bytes
Sector size
(logical/physical): 512 bytes / 512 bytes
I/O size
(minimum/optimal): 512 bytes / 512 bytes
Disklabel type: gpt
Disk identifier:
1F02DD53-1D97-435E-832A-E12C86CEE311
Device Start
End Sectors Size Type
/dev/sdc1 2048
15595519 15593472 7.4G EFI System
/dev/sdc2 15595520
15597534 2015 1007.5K BIOS boot
$ sudo gdisk -l
/dev/sdc //或者使用
sgdisk -p
GPT fdisk (gdisk)
version 1.0.4
Partition table
scan:
MBR: protective
BSD: not present
APM: not present
GPT: present
Found valid GPT with
protective MBR; using GPT.
Disk /dev/sdc:
15597568 sectors, 7.4 GiB
Model: Flash Reader
Sector size
(logical/physical): 512/512 bytes
Disk identifier
(GUID): 1F02DD53-1D97-435E-832A-E12C86CEE311
Partition table
holds up to 128 entries
Main partition table
begins at sector 2 and ends at sector 33
First usable sector
is 34, last usable sector is 15597534
Partitions will be
aligned on 2048-sector boundaries
Total free space is
2014 sectors (1007.0 KiB)
Number Start
(sector) End (sector) Size Code Name
1 2048
15595519 7.4 GiB EF00
2 15595520
15597534 1007.5 KiB EF02 BIOS boot partition
$ sudo parted -l
Model: Multi Flash
Reader (scsi)
Disk /dev/sdc:
7986MB
Sector size
(logical/physical): 512B/512B
Partition Table: gpt
Disk Flags:
Number Start End
Size File system Name Flags
1 1049kB
7985MB 7984MB fat32 boot, esp
2 7985MB
7986MB 1032kB BIOS boot partition bios_grub


GPT fdisk 是编辑 GPT(Globally Unique Identifier Partition Table)硬盘的文本模式工具集。由 gdisk, sgdisk 和 cgdisk 组成. 用于 GPT 而不是老的 MBR(Master Boot Record) 分区表。
$ sudo gdisk
/dev/sdc
GPT fdisk (gdisk)
version 1.0.4
Partition table
scan:
MBR: protective
BSD: not present
APM: not present
GPT: present
Found valid GPT with
protective MBR; using GPT.
Command (? for
help): ?
b back up GPT data
to a file // 将GPT数据备份到文件
c change a
partition‘s name // 更改分区的名称
d delete a
partition // 删除分区
i show detailed
information on a partition // 显示有关分区的详细信息
l list known
partition types // 列出已知的分区类型
n add a new
partition // 添加一个新分区
o create a new empty
GUID partition table (GPT) // 创建新的空GUID分区表(GPT)
p print the
partition table // 打印分区表
q quit without
saving changes // 不保存退出
r recovery and
transformation options (experts only) // 恢复和转换选项(仅限专家)
s sort
partitions // 排序分区
t change a
partition‘s type code // 更改分区的类型代码
v verify
disk // 验证磁盘
w write table to
disk and exit // 保存退出
x extra
functionality (experts only) // 额外功能(仅限专家)
? print this
menu // 打印此菜单
sgdisk可以创建一个二进制备份,包含MBR,GPT主表头,GPT备份表头和分区表。
下面示例将
/dev/sda 的分区表信息备份到
sgdisk-sda.bin:
# sgdisk
-b=sgdisk-sda.bin /dev/sda
通过下面命令恢复备份:
# sgdisk
-l=sgdisk-sda.bin /dev/sda
如果要复制分区到其它磁盘,例如从
/dev/sda 复制到
/dev/sdc:
# sgdisk -R=/dev/sdc
/dev/sda
如果两个磁盘位于同一个计算机,使用下面命令设置随机的分区
GUIDs:
# sgdisk -G /dev/sdc
GPT
在硬盘末尾存储了第二分区表。这个数据结构默认有
33512B 空间。
如果主GPT标头或备用GPT标头损坏,您可以使用gdisk从另一个恢复。/dev/sda在此示例中使用。
#gdisk / dev / sda
选择r恢复和转换选项(仅限专家)。从那里选择其中之一
b:使用备份GPT标头(重建主要)
d:使用主GPT标头(重建备份)
完成后将表写入磁盘并通过w命令退出。
$ sudo parted -h
Usage: parted
[OPTION]... [DEVICE [COMMAND [PARAMETERS]...]...]
Apply COMMANDs with
PARAMETERS to DEVICE. If no COMMAND(s) are given, run in
interactive mode.
OPTIONs:
-h,
--help displays this help message // 显示此帮助消息
-l, --list lists
partition layout on all block devices // 列出所有块设备上的分区布局
-m,
--machine displays machine parseable output // 显示机器可解析的输出
-s,
--script never prompts for user intervention // 从不提示用户干预
-v,
--version displays the version // 显示版本
-a,
--align=[none|cyl|min|opt] alignment for new partitions // 新分区的对齐方式
COMMANDs:
align-check TYPE
N check partition N for TYPE(min|opt) alignment // 检查分区N是否为TYPE(min
| opt)对齐
help
[COMMAND] print general help, or help on COMMAND // 打印一般帮助,或帮助COMMAND
mklabel,mktable
LABEL-TYPE create a new disklabel (partition
table) // 创建一个新的disklabel(分区表)
mkpart PART-TYPE
[FS-TYPE] START END make a partition // 做一个分区
name NUMBER
NAME name partition NUMBER as NAME // 将分区NUMBER命名为NAME
print
[devices|free|list,all|NUMBER] display the partition table, available
devices, free space, all found partitions, or a particular
partition // 显示分区表,可用设备,可用空间,所有找到的分区或特定分区
quit exit
program // 退出计划
rescue START
END rescue a lost partition near START and END // 在START和END附近救出丢失的分区
resizepart NUMBER
END resize partition NUMBER // 调整分区NUMBER
rm NUMBER delete
partition NUMBER // 删除分区NUMBER
select
DEVICE choose the device to edit // 选择要编辑的设备
disk_set FLAG
STATE change the FLAG on selected device // 更改所选设备上的FLAG
disk_toggle
[FLAG] toggle the state of FLAG on selected device // 在所选设备上切换FLAG的状态
set NUMBER FLAG
STATE change the FLAG on partition NUMBER // 更改分区NUMBER上的FLAG
toggle [NUMBER
[FLAG]] toggle the state of FLAG on partitio NUMBER // 在partitio
NUMBER上切换FLAG的状态
unit UNIT set the
default unit to UNIT // 将默认单位设置为UNIT
version display
the version number and copyright information of GNU Parted // 显示GNU
Parted的版本号和版权信息
http://man.linuxde.net/parted
https://linux.cn/article-9536-1.html
http://www.rodsbooks.com/gdisk/
https://www.rodsbooks.com/gdisk/mbr2gpt.html
https://wiki.archlinux.org/index.php/GPT_fdisk
https://wiki.archlinux.org/index.php/Parted
https://wiki.archlinux.org/index.php/GRUB#GUID_Partition_Table_(GPT)_specific_instructions
https://wiki.archlinux.org/index.php/Partitioning
https://wiki.archlinux.org/index.php/Dual_boot_with_Windows
https://help.ubuntu.com/community/Installation/FromUSBStick
https://help.ubuntu.com/community/Installation/UEFI-and-BIOS/original-attempt
Linux系统:Arch
Linux
空白U盘
Linux下支持GPT分区的工具:
parted, gdisk。
软件:Grub2,
Windows环境下有Grub4Dos,
Grub2win等软件可使用。
参考:https://blog.51cto.com/bluetom/1730895
[grub实现]U盘引导多个linux镜像安装,同时支持BIOS和UEFI模式
注:可能由于硬件环境或系统环境,软件版本不同,该文内启动菜单搬到我当前的环境下无法使用。
可以引导硬盘上的各种操作系统,硬盘上Linux的iso镜像文件,U盘里各种Linux的iso镜像文件。
主要步骤:
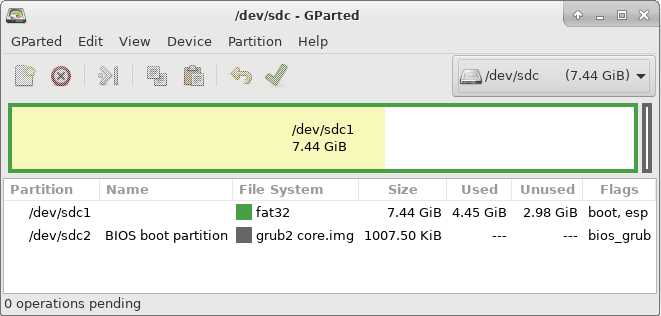
选择使用图形化的gparted,主要是操作简单。
步骤:建立GPT分区表,建立分区,格式化为FAT32,标记分区为boot
(注:
尽管ESP支持多种分区,但是为了通用性与兼容性还是建议FAT32,缺点是不支持大于4Gb的iso镜像文件。默认最大空间,能够最大化利用有限的U盘存储空间。)
操作:打开gparted软件,右上角选择sdc设备,删除已有分区。
如果要让grub在GPT上使用MBR模式安装的话,需要设置这个标记。这个分区有以下几个特点:
如果用gdisk,
parted,
gparted这些工具分区的时候,你会发现总会有一个1MB的剩余空间,就是这个用途,只要给这个剩余空间分区,并打上bios_grub标记就行了(EF02),不用格式化。
$ sudo gdisk
/dev/sdc
GPT fdisk (gdisk)
version 1.0.4
Partition table
scan:
MBR: protective
BSD: not present
APM: not present
GPT: present
Found valid GPT with
protective MBR; using GPT.
Command (? for
help): n //new新建分区
Partition number
(2-128, default 2): 2
//第二个分区
First sector
(34-15597534, default = 15595520) or {+-}size{KMGTP}: //直接回车
Last sector
(15595520-15597534, default = 15597534) or {+-}size{KMGTP}: //直接回车
Current type is
‘Linux filesystem‘
Hex code or GUID (L
to show codes, Enter = 8300): EF02
//输入代码
Changed type of
partition to ‘BIOS boot partition‘
Command (? for
help): p //打印分区表
Disk /dev/sdc:
15597568 sectors, 7.4 GiB
Model: Flash Reader
Sector size
(logical/physical): 512/512 bytes
Disk identifier
(GUID): 1F02DD53-1D97-435E-832A-E12C86CEE311
Partition table
holds up to 128 entries
Main partition table
begins at sector 2 and ends at sector 33
First usable sector
is 34, last usable sector is 15597534
Partitions will be
aligned on 2048-sector boundaries
Total free space is
2014 sectors (1007.0 KiB)
Number Start
(sector) End (sector) Size Code Name
1 2048
15595519 7.4 GiB EF00
2 15595520
15597534 1007.5 KiB EF02 BIOS boot partition
Command (? for
help): w //保存退出
Final checks
complete. About to write GPT data. THIS WILL OVERWRITE EXISTING
PARTITIONS!!
Do you want to
proceed? (Y/N): y //再次确认
OK; writing new GUID
partition table (GPT) to /dev/sdc.
The operation has
completed successfully.
$
获得2个分区:
第一个是EF00标记的ESP
boot分区,FAT32格式。
第二个是EF02标记的BIOS
boot分区,没有文件系统,也不需要格式化。
mount U盘
//可加
-o uid=$USER,gid=$USER 编辑文件不需要使用sudo
$ sudo mount
/dev/sdc1 /mnt/sc1
$ sudo mkdir
/mnt/sc1/boot
$ sudo grub-install
--target=i386-pc --recheck --boot-directory=/mnt/boot /dev/sdb
//$ sudo grub-install
--boot-directory=/mnt/sc1/boot /dev/sdc
Installing for
i386-pc platform.
Installation
finished. No error reported.
安装后查看该目录:/mnt/sc1/boot/grub,
包含内容:353
items, totalling 10.6 MiB (11,071,082 bytes)
特别注意--removable参数,安装到移动设备上一定要用这个参数
$ sudo grub-install
--target=x86_64-efi --efi-directory=/mnt/sc1
--boot-directory=/mnt/sc1/boot –removable
报错:
grub-install: error: efibootmgr: not found.
由于本机是老机器,本身并不支持UEFI模式,所以Linux系统默认也没有相应的软件包。只需要手动安装efibootmgr包即可,注意:不同的发行版本,相关的包名称可能不同。
$ sudo pacman -S
efibootmgr
$ sudo grub-install
--target=x86_64-efi --efi-directory=/mnt/sc1
--boot-directory=/mnt/sc1/boot –removable
Installing for
x86_64-efi platform.
EFI variables are
not supported on this system.
EFI variables are
not supported on this system.
Installation
finished. No error reported.
安装后查看该目录:/mnt/sc1/boot/grub,
增加了目录:/mnt/sc1/boot/grub/x86_64-efi
新增文件夹包含:269
items, totalling 2.6 MiB (2,694,596 bytes)
可使用如下命令,查找现有系统生成启动菜单,也可以将已有的grub.cfg复制到如下文件夹。
$ sudo grub-mkconfig
-o /mnt/sc1/boot/grub/grub.cfg
Generating grub
configuration file ...
Found linux image:
/boot/vmlinuz-linux
Found initrd image:
/boot/initramfs-linux.img
Found fallback
initrd image(s) in /boot: initramfs-linux-fallback.img
Found Windows Server
2008 R2 on /dev/sdb1
done
这样U盘就可以直接启动硬盘上已安装的Windwos系统及Linux系统了。
使用上面命令查找生成的启动菜单,默认使用分区的uuid,通常可以直接被使用,不需要修改。
若是手动添加启动菜单内容,使用分区编号时,不确定分区编号。
可使用U盘启动,在启动菜单界面,按c进入command模式,输入ls查看分区信息,参考修改即可。
参考硬盘启动安装Linux一文,将启动菜单内容添加到U盘的grub.cfg文件内。
注:指定磁盘部分需要微调一下。
硬盘启动时,硬盘本身默认(hd0,1);
U盘启动时,U盘本身默认为(hd0,1),
硬盘则为(hd1,1)
实际内容可在启动菜单页面按c进入命令行界面,输入ls查看分区状况。
menuentry "Ubuntu
LiveCD" {
set root=(hd1,3)
linux
/ubuntu18/vmlinuz boot=casper
iso-scan/filename=/ubuntu18/ubuntu-18.iso ro quiet splash
locale=zh_CN.UTF-8
initrd
/ubuntu18/initrd
}
menuentry "Mint
LiveCD" {
set root=(hd1,3)
linux
/mint191/vmlinuz boot=casper
iso-scan/filename=/mint191/linuxmint-19.1-xfce-64bit.iso ro quiet
splash locale=zh_CN.UTF-8
initrd
/mint191/initrd.lz
}
menuentry "Install
Arch" {
set root=(hd1,3)
linux
/arch/vmlinuz archisolabel=ARCH_201903
initrd
/arch/archiso.img
}
menuentry
"manjaro.xfce LiveCD" {
set root=(hd1,3)
linux
/manjaro/vmlinuz-x86_64 misolabel=M1803 boot=boot
iso-scan/filename=/manjaro/manjaro-xfce-18.0.3-stable-x86_64.iso
locale=zh_CN.UTF-8
initrd
/manjaro/initramfs-x86_64.img
}
复制ISO文件,编辑菜单
7.4Gb的空间放了4个iso镜像文件,启动菜单如下
menuentry "Mint
usb-boot-iso-mint" {
set root=(hd0,1)
linux
/boot/iso/mint/vmlinuz boot=casper
iso-scan/filename=/boot/iso/mint/linuxmint-19.1-xfce-64bit.iso ro
quiet splash locale=zh_CN.UTF-8
initrd
/boot/iso/mint/initrd.lz
}
menuentry "Arch
usb-boot-iso-arch" {
set root=(hd0,1)
linux/boot/iso/arch/vmlinuz archisolabel=ARCH_201903
initrd/boot/iso/arch/archiso.img
}
menuentry "manjarousb-boot-iso-manjaro" {
set root=(hd0,1)
linux
/boot/iso/manjaro/vmlinuz-x86_64 boot=boot
iso-scan/filename=/boot/iso/manjaro/manjaro-xfce-18.0.3-stable-x86_64.iso
locale=zh_CN.UTF-8
initrd
/boot/iso/manjaro/initramfs-x86_64.img
}
https://www.pendrivelinux.com/boot-multiple-iso-from-usb-via-grub2-using-linux/
http://xstarcd.github.io/wiki/Linux/boot-multiple-iso-from-usb-via-grub2-using-linux.html
使用grub2制作U盘引导iso
将U盘分为两个分区:
sdb1:用于放数据(NTFS),使用剩余空间(Windows只能识别到U盘上的第一个分区)。
sdb2:用于引导(FAT32),设置boot标志,安装grub,放置用于启动文件,约2GB(grub/winpe/CDlinux/linuxmint),若加上win7安装包,约需6GB。
具体没有实测,请参考原文,原文有大量启动菜单代码可供参考。
标签:系统默认 items variable 报错 print 就是 使用 有一个 参数
原文地址:https://www.cnblogs.com/sztom/p/10739863.html