标签:compile mysql ash package active current 3.3 创建 输出
一、认识
MyBatis-Plus(简称 MP)是一个 MyBatis 的增强工具,在 MyBatis 的基础上只做增强不做改变,为简化开发、提高效率而生。
支持多种数据库:支持 MySQL、MariaDB、Oracle、DB2、H2、HSQL、SQLite、Postgre、SQLServer2005、SQLServer 等多种数据库。
内置通用 Mapper、通用 Service,仅仅通过少量配置即可实现单表大部分 CRUD 操作,更有强大的条件构造器,满足各类使用需求,
内置代码生成器:采用代码或者 Maven 插件可快速生成 Mapper 、 Model 、 Service 、 Controller 层代码,支持模板引擎,更有超多自定义配置,
内置分页插件:基于 MyBatis 物理分页,开发者无需关心具体操作,配置好插件之后,写分页等同于普通 List 查询。
二、代码生成器
2.1.1 构建maven项目 mybatis_plus
2.1.2 引入pom.xml依赖(springboot)
 1 <properties>
 2         <project.build.sourceEncoding>UTF-8</project.build.sourceEncoding>
 3         <project.reporting.outputEncoding>UTF-8</project.reporting.outputEncoding>
 4         <java.version>1.8</java.version>
 5         <springboot.version>2.0.5.RELEASE</springboot.version>
 6     </properties>
 7
 8
 9     <dependencyManagement>
10         <dependencies>
11             <dependency>
12                 <groupId>org.springframework.boot</groupId>
13                 <artifactId>spring-boot-dependencies</artifactId>
14                 <version>${springboot.version}</version>
15                 <type>pom</type>
16                 <scope>import</scope>
17             </dependency>
18         </dependencies>
19     </dependencyManagement>
20
21     <build>
22         <plugins>
23             <plugin>
24                 <groupId>org.apache.maven.plugins</groupId>
25                 <artifactId>maven-compiler-plugin</artifactId>
26                 <version>3.5.1</version>
27                 <configuration>
28                     <source>1.8</source>
29                     <target>1.8</target>
30                 </configuration>
31             </plugin>
32         </plugins>
33     </build>
2.2.1 创建代码生成器模板模块 mp_generator
2.2.2 导入pom.xml依赖
 1 <dependencies>
 2         <dependency>
 3             <groupId>org.springframework.boot</groupId>
 4             <artifactId>spring-boot-starter-web</artifactId>
 5         </dependency>
 6         <dependency>
 7             <groupId>org.springframework.boot</groupId>
 8             <artifactId>spring-boot-starter-test</artifactId>
 9         </dependency>
10
11         <dependency>
12             <groupId>com.baomidou</groupId>
13             <artifactId>mybatis-plus-boot-starter</artifactId>
14             <version>2.2.0</version>
15         </dependency>
16
17         <!--模板引擎-->
18         <dependency>
19             <groupId>org.apache.velocity</groupId>
20             <artifactId>velocity-engine-core</artifactId>
21             <version>2.0</version>
22         </dependency>
23         <!--数据库驱动支持-->
24         <dependency>
25             <groupId>mysql</groupId>
26             <artifactId>mysql-connector-java</artifactId>
27         </dependency>
28
29     </dependencies>
2.2.3 构建maven模块 mp_project
2.2.4 导入依赖
 1 <dependencies>
 2         <dependency>
 3             <groupId>org.springframework.boot</groupId>
 4             <artifactId>spring-boot-starter-web</artifactId>
 5         </dependency>
 6         <dependency>
 7             <groupId>org.springframework.boot</groupId>
 8             <artifactId>spring-boot-starter-test</artifactId>
 9         </dependency>
10
11         <dependency>
12             <groupId>com.baomidou</groupId>
13             <artifactId>mybatis-plus-boot-starter</artifactId>
14             <version>2.2.0</version>
15         </dependency>
16
17         <dependency>
18             <groupId>mysql</groupId>
19             <artifactId>mysql-connector-java</artifactId>
20         </dependency>
21
22     </dependencies>
2.2.5 代码生成配置文件 mpconfig.properties
 1 #此处为本项目src所在路径(代码生成器输出路径),注意一定是当前项目所在的目录哟
 2 OutputDir=E:/susu/ideawork/mybatis_plus/mp_project/src/main/java
 3 #mapper.xml SQL映射文件目录
 4 OutputDirXml=E:/susu/ideawork/mybatis_plus/mp_project/src/main/resources
 5
 6 #我们生产代码要放的项目的地址:
 7 OutputDirBase=E:/susu/ideawork/mybatis_plus/mp_project/src/main/java
 8 #设置作者
 9 author=bin
10 #自定义包路径
11 parent=cn.su.yicheng.mp
12
13 #数据库连接信息
14 jdbc.driver=com.mysql.jdbc.Driver
15 jdbc.url=jdbc:mysql:///aigou_mp
16 jdbc.user=root
17 jdbc.pwd=000000
2.2.6 代码生成方法 GenteratorCode.java
执行主方法,就能按照配置文件,根据数据库表字段生成相应代码
  1 package cu.su.yicheng.mp;
  2
  3 import com.baomidou.mybatisplus.generator.AutoGenerator;
  4 import com.baomidou.mybatisplus.generator.InjectionConfig;
  5 import com.baomidou.mybatisplus.generator.config.*;
  6 import com.baomidou.mybatisplus.generator.config.converts.MySqlTypeConvert;
  7 import com.baomidou.mybatisplus.generator.config.po.TableInfo;
  8 import com.baomidou.mybatisplus.generator.config.rules.DbType;
  9 import com.baomidou.mybatisplus.generator.config.rules.NamingStrategy;
 10
 11 import java.util.*;
 12
 13 public class GenteratorCode {
 14
 15     public static void main(String[] args) throws InterruptedException {
 16         //用来获取Mybatis-Plus.properties文件的配置信息
 17         ResourceBundle rb = ResourceBundle.getBundle("mpconfig");
 18         AutoGenerator mpg = new AutoGenerator();
 19         // 全局配置
 20         GlobalConfig gc = new GlobalConfig();
 21         gc.setOutputDir(rb.getString("OutputDir"));
 22         //覆盖
 23         gc.setFileOverride(true);
 24         gc.setActiveRecord(true);// 开启 activeRecord 模式
 25         gc.setEnableCache(false);// XML 二级缓存
 26         gc.setBaseResultMap(true);// XML ResultMap
 27         gc.setBaseColumnList(false);// XML columList
 28         gc.setAuthor(rb.getString("author"));
 29         gc.setOpen(false);//不打开文件夹
 30         mpg.setGlobalConfig(gc);
 31         // 数据源配置
 32         DataSourceConfig dsc = new DataSourceConfig();
 33         //设置你数据库类型:
 34         dsc.setDbType(DbType.MYSQL);
 35         dsc.setTypeConvert(new MySqlTypeConvert());
 36         dsc.setDriverName(rb.getString("jdbc.driver"));
 37         dsc.setUsername(rb.getString("jdbc.user"));
 38         dsc.setPassword(rb.getString("jdbc.pwd"));
 39         dsc.setUrl(rb.getString("jdbc.url"));
 40         mpg.setDataSource(dsc);
 41         // 策略配置
 42         StrategyConfig strategy = new StrategyConfig();
 43         strategy.setTablePrefix(new String[] { "t_" });// 此处可以修改为您的表前缀
 44         strategy.setNaming(NamingStrategy.underline_to_camel);// 表名生成策略
 45         strategy.setInclude(new String[]{"t_emp"}); // 需要生成的表
 46         mpg.setStrategy(strategy);
 47         // 包配置
 48         PackageConfig pc = new PackageConfig();
 49         // parent:cn.itsource.aigou.mp
 50         pc.setParent(rb.getString("parent"));
 51         pc.setController("controller");
 52         pc.setService("service");
 53         pc.setServiceImpl("service.impl");
 54         pc.setEntity("domain");
 55         pc.setMapper("mapper");
 56         mpg.setPackageInfo(pc);
 57
 58         // 注入自定义配置,可以在 VM 中使用 cfg.abc 【可无】
 59         InjectionConfig cfg = new InjectionConfig() {
 60             @Override
 61             public void initMap() {
 62                 Map<String, Object> map = new HashMap<String, Object>();
 63                 map.put("abc", this.getConfig().getGlobalConfig().getAuthor() + "-rb");
 64                 this.setMap(map);
 65             }
 66         };
 67
 68         List<FileOutConfig> focList = new ArrayList<FileOutConfig>();
 69
 70         // 调整 domain 生成目录演示
 71         focList.add(new FileOutConfig("/templates/entity.java.vm") {
 72             @Override
 73             public String outputFile(TableInfo tableInfo) {
 74                 return rb.getString("OutputDirBase")+ "/cn/su/yicheng/mp/domain/" + tableInfo.getEntityName() + ".java";
 75             }
 76         });
 77
 78         // 调整 xml 生成目录演示:本来mybatis的mapper.xml应该放到resources下:路径应该和Mapper.java的路径一致:
 79         focList.add(new FileOutConfig("/templates/mapper.xml.vm") {
 80             @Override
 81             public String outputFile(TableInfo tableInfo) {
 82                 return rb.getString("OutputDirXml")+ "/cn/su/yicheng/mp/mapper/" + tableInfo.getEntityName() + "Mapper.xml";
 83             }
 84         });
 85         cfg.setFileOutConfigList(focList);
 86         mpg.setCfg(cfg);
 87
 88         // 自定义模板配置,可以 copy 源码 mybatis-plus/src/main/resources/templates 下面内容修改,
 89         // 放置自己项目的 src/main/resources/templates 目录下, 默认名称一下可以不配置,也可以自定义模板名称
 90         TemplateConfig tc = new TemplateConfig();
 91         tc.setService("/templates/service.java.vm");
 92         tc.setServiceImpl("/templates/serviceImpl.java.vm");
 93         tc.setEntity(null);
 94         tc.setMapper("/templates/mapper.java.vm");
 95         tc.setController(null);
 96         tc.setXml(null);
 97         // 如上任何一个模块如果设置 空 OR Null 将不生成该模块。
 98         mpg.setTemplate(tc);
 99
100         // 执行生成
101         mpg.execute();
102     }
103
104 }
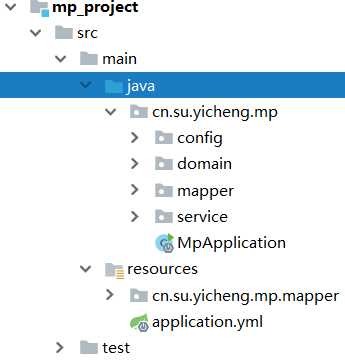
2.2.7 结果效果

2.3.1 测试
2.3.2 创建启动类(MpApplication .java)和配置文件(application.yml)
 1 package cn.su.yicheng.mp;
 2
 3 import org.mybatis.spring.annotation.MapperScan;
 4 import org.springframework.boot.SpringApplication;
 5 import org.springframework.boot.autoconfigure.SpringBootApplication;
 6
 7 @SpringBootApplication
 8 //扫描mapper文件
 9 @MapperScan(basePackages = "cn.su.yicheng.mp.mapper")
10 public class MpApplication {
11     public static void main(String[] args) {
12         SpringApplication.run(MpApplication.class);
13     }
14 }
 1 spring:
 2   datasource:
 3     driver-class-name: com.mysql.jdbc.Driver
 4     url: jdbc:mysql://172.16.7.230:3306/wc
 5 #    url: jdbc:mysql:///yicheng_mp
 6     username: root
 7     password: admin
 8 mybatis-plus:
 9   # mapper.xml中给domain取别名
10   type-aliases-package: cn.su.yicheng.mp.domain
2.3.3 crud测试
 1 package cn.su.yicheng;
 2
 3 import cn.su.yicheng.mp.MpApplication;
 4 import cn.su.yicheng.mp.domain.Emp;
 5 import cn.su.yicheng.mp.service.IEmpService;
 6 import com.baomidou.mybatisplus.mapper.EntityWrapper;
 7 import com.baomidou.mybatisplus.mapper.Wrapper;
 8 import com.baomidou.mybatisplus.plugins.Page;
 9 import org.junit.Test;
10 import org.junit.runner.RunWith;
11 import org.springframework.beans.factory.annotation.Autowired;
12 import org.springframework.boot.test.context.SpringBootTest;
13 import org.springframework.test.context.junit4.SpringRunner;
14
15 @RunWith(SpringRunner.class)
16 @SpringBootTest(classes = MpApplication.class)
17 public class MpTest {
18
19     @Autowired
20     private IEmpService empService;
21
22
23     //添加测试
24     @Test
25     public void testAdd() throws Exception{
26         Wrapper<Emp> wrapper = new EntityWrapper<>();
27         empService.delete(wrapper);
28
29         for (long i = 1; i <=10L ; i++) {
30             Emp emp = new Emp();
31             emp.setId(i);
32             emp.setUsername("su"+i);
33             emp.setPassword("125"+i);
34             empService.insert(emp);
35         }
36     }
37
38
39     //查询一条
40     @Test
41     public void testSelectOne() throws Exception{
42         System.out.println(empService.selectById(2L));
43     }
44
45     //查询全部
46     @Test
47     public void testSelectAll() throws Exception{
48         Wrapper<Emp> wrapper = new EntityWrapper<>();
49         empService.selectList(wrapper).forEach(e->{
50             System.out.println(e);
51         });
52     }
53
54     //条件查询
55     @Test
56     public void testSelectWhere() throws Exception{
57         Wrapper<Emp> wrapper = new EntityWrapper<>();
58         wrapper.eq("username", "su1");
59         empService.selectList(wrapper).forEach(e->{
60             System.out.println(e);
61         });
62     }
63
64 }
三、分页
3.1 创建配置文件 MybatisPlusConfig.java
 1 package cn.su.yicheng.mp.config;
 2
 3 import com.baomidou.mybatisplus.plugins.PaginationInterceptor;
 4 import org.mybatis.spring.annotation.MapperScan;
 5 import org.springframework.context.annotation.Bean;
 6 import org.springframework.context.annotation.Configuration;
 7 import org.springframework.transaction.annotation.EnableTransactionManagement;
 8
 9 //Spring boot方式
10 @EnableTransactionManagement
11 @Configuration
12 @MapperScan("cn.su.yicheng.mp.mapper")
13 public class MybatisPlusConfig {
14
15     /**
16      * 分页插件
17      */
18     @Bean
19     public PaginationInterceptor paginationInterceptor() {
20         return new PaginationInterceptor();
21     }
22 }
3.2 继上面测试继续
 1 //分页查询
 2     @Test
 3     public void testPage() throws Exception{
 4         Page page=new Page();
 5         page.setSize(3);
 6         page.setCurrent(1);
 7         Page empPage = empService.selectPage(page);
 8         System.out.println(page.getTotal());
 9         empPage.getRecords().forEach(e->{
10             System.out.println(e);
11         });
12     }
标签:compile mysql ash package active current 3.3 创建 输出
原文地址:https://www.cnblogs.com/guangbin0125/p/10836066.html