标签:data dem 地址 条件编译 scan src 单片机 配置 bit
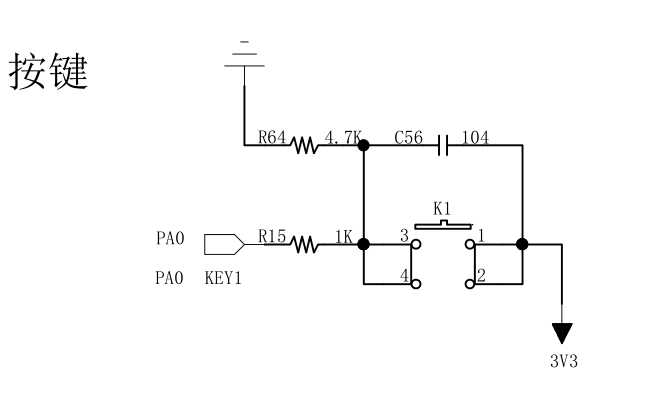
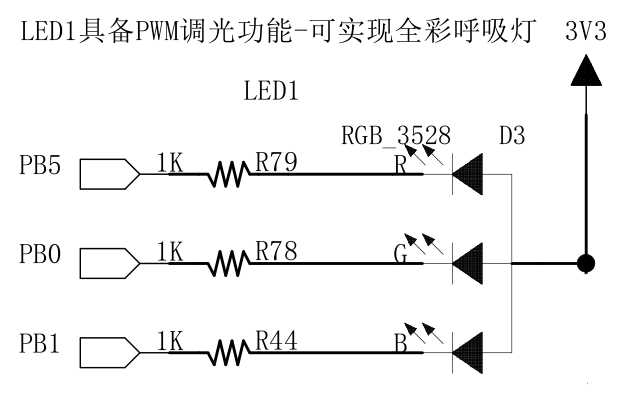
本例程基于先前的库函数版demo工程模板,主要内容为:bsp_led.h、bsp_led.c、bsp_key.h、bsp_key.c、main.c
1、bsp_led.h
 1 #ifndef __BSP_LED_H      //条件编译,如果没有定义这个宏,向下执行;如果已经定义则不向下执行,结束条件编译。
 2 #define __BSP_LED_H      //没有定义,则定义该宏。   当下次该头文件被编译时,该宏已经编译,即直接结束条件编译。
 3
 4 #include "stm32f10x.h"   //下面用到外设的寄存器映射
 5 //绿色led宏定义一下,便于移植
 6 #define LED_G_GPIO_PIN              GPIO_Pin_0
 7 #define LED_G_GPIO_PORT             GPIOB
 8 #define LED_G_GPIO_CLK              RCC_APB2Periph_GPIOB
 9
10
11 #define    ON        1
12 #define    OFF       0
13
14 // \  续行符,后面不能有任何东西
15
16 #define   LED_G(a)   if(a) 17                            GPIO_ResetBits(LED_G_GPIO_PORT, LED_G_GPIO_PIN); \        //复位,PB0的ODR寄存器对应位置0
18                      else  GPIO_SetBits(LED_G_GPIO_PORT, LED_G_GPIO_PIN);            //PB0的ODR寄存器对应位置1
19
20 // ^ 异或
21
22 #define LED_G_TOGGLE        {LED_G_GPIO_PORT->ODR ^= LED_G_GPIO_PIN;} //端口设置寄存器BSRR对应位为1,ODR寄存器对应位反复与BSRR取异或,实现0变1,1变0
23
24 void LED_GPIO_Config(void);   //在头文件中定义bsp_led.c中的函数,目的是便于其他c文件调用。
25
26 #endif /* __BSP_LED_H */     //结束条件编译
2、bsp_led.c
 1 #include "bsp_led.h"
 2
 3 void LED_GPIO_Config(void)
 4 {
 5     GPIO_InitTypeDef  GPIO_InitStruct;//定义GPIO结构体
 6
 7     RCC_APB2PeriphClockCmd(LED_G_GPIO_CLK, ENABLE);//使能APB2总线时钟
 8
 9     GPIO_InitStruct.GPIO_Pin = LED_G_GPIO_PIN;//0号引脚
10     GPIO_InitStruct.GPIO_Mode = GPIO_Mode_Out_PP;//推挽输出
11     GPIO_InitStruct.GPIO_Speed = GPIO_Speed_50MHz;//输出频率50MHz
12
13     GPIO_Init(LED_G_GPIO_PORT, &GPIO_InitStruct);//GPIO初始化函数,入口参数1为GPIOB,入口参数2为GPIO结构体首地址,因此&取地址
14 }
3、bsp_key.h
 1 #ifndef __BSP_KEY_H
 2 #define __BSP_KEY_H
 3
 4 #include "stm32f10x.h"
 5
 6 #define  KEY_ON      1
 7 #define  KEY_OFF     0
 8
 9 #define KEY1_GPIO_PIN              GPIO_Pin_0
10 #define KEY1_GPIO_PORT             GPIOA
11 #define KEY1_GPIO_CLK              RCC_APB2Periph_GPIOA
12
13 void KEY_GPIO_Config(void);
14 uint8_t Key_Scan(GPIO_TypeDef *GPIOx,uint16_t GPIO_Pin);
15
16 #endif /* __BSP_KEY_H */
17
18 //该头文件与bsp_led.h结构完全一致,不做说明。
4、bsp_key.c
 1 #include "bsp_key.h"
 2
 3
 4 void KEY_GPIO_Config(void)
 5 {
 6     GPIO_InitTypeDef  GPIO_InitStruct;
 7
 8     RCC_APB2PeriphClockCmd(KEY1_GPIO_CLK, ENABLE);
 9
10     GPIO_InitStruct.GPIO_Pin = KEY1_GPIO_PIN;
11     GPIO_InitStruct.GPIO_Mode = GPIO_Mode_IN_FLOATING;
12
13     GPIO_Init(KEY1_GPIO_PORT, &GPIO_InitStruct);
14 }
15 //以上重复部分不做说明。
16 uint8_t Key_Scan(GPIO_TypeDef *GPIOx,uint16_t GPIO_Pin)
//此为自定义按键扫描函数,入口参数定义来自于标准函数GPIO_ReadInputDataBit(GPIOx,GPIO_Pin)入口参数,读取的是IDR寄存器对应位
17 {
18     if( GPIO_ReadInputDataBit(GPIOx, GPIO_Pin) == KEY_ON )  //key1按下,PA0输入高电平,GPIO_ReadInputDataBit()读1
19     {
20         // 松手检测
21         while( GPIO_ReadInputDataBit(GPIOx, GPIO_Pin) == KEY_ON ); //key1按下后未断开,执行该死循环,执行语句为空;
22         return KEY_ON;    //按键断开后,返回1
23     }
24     else return KEY_OFF;  //没有检测到key1按下返回0
25 }
5、main.c


 1 #include "stm32f10x.h"   // 相当于51单片机中的  #include <reg51.h>
 2 #include "bsp_key.h"
 3 #include "bsp_led.h"
 4 void Delay( uint32_t count )//软件延时,未用
 5 {
 6     for(; count!=0; count--);
 7 }
 8
 9 int main(void)
10 {
11     // 来到这里的时候,系统时钟已经被配置成72M
12     LED_GPIO_Config();
13     KEY_GPIO_Config();
14
15     while(1)
16     {
17         if( Key_Scan(KEY1_GPIO_PORT,KEY1_GPIO_PIN) ==KEY_ON )
18             LED_G_TOGGLE;
19
20         // 每按下key1一次,执行一次LED反转
21     }
22 }
7
标签:data dem 地址 条件编译 scan src 单片机 配置 bit
原文地址:https://www.cnblogs.com/wuguangzong/p/10881170.html