标签:als 系统环境 dstat plugins 软件下载 change char png home
本文选自程序员s博客(https://blog.csdn.net/u012448904/article/details/81706283),根据其步骤结合自己情况做了一些改动。感谢网络,让我们总能站在巨人的肩膀上!
系统环境:centos7.0 -x86_64(精简安装)
前置条件:jdk1.8 , mysql-5.7
软件下载目录:/usr/local/
软件安装目录:/usr/local/
软件版本:sonarqube-6.7.7,sonar-runner-dist-2.4
sonarqube下载地址:http://www.sonarqube.org/downloads/
sonar-runner下载地址:https://link.jianshu.com/?t=http://repo1.maven.org/maven2/org/codehaus/sonar/runner/sonar-runner-dist/2.4/sonar-runner-dist-2.4.zip
1、需要Mysql数据库支持;虽然SonarQube自带了H2数据库,但是为了方便管理数据推荐使用Mysql数据库。
安装Mysql数据库,jdk1.8 ,安装完成后进入数据库配置。
1 mysql -u root -p (进入数据库)
2 mysql> CREATE DATABASE sonar CHARACTER SET utf8 COLLATE utf8_general_ci;
3 mysql> CREATE USER ‘sonar‘ IDENTIFIED BY ‘sonar‘;
4 mysql> GRANT ALL ON sonar. TO ‘sonar‘@‘%‘ IDENTIFIED BY ‘sonar‘;
5 mysql> GRANT ALL ON sonar. TO ‘sonar‘@‘localhost‘ IDENTIFIED BY ‘sonar‘;
6 mysql> FLUSH PRIVILEGES;
2、安装SonarQube
第一步:将下载的sonarqube-6.7.5.zip解压后移动到/usr/local目录下
unzip sonarqube-6.7.5.zip 解压包(如果解压不了,可能你没有unzip。通过yum下就可以了)
第二步:配置环境变量
1 [root@localhost local]# vim /etc/profile
2
3 export SONAR_HOME=/usr/local/sonarqube-6.7.7
4 export SONAR_SCANNER_HOME=/usr/local/sonar-runner
5 PATH=$PATH:$SONAR_HOME/bin:$SONAR_RUNNER_HOME/bin
6
7 [root@localhost local]# source /etc/profile
第三步:配置sonar.properties
1 [root@localhost local]# vim sonarqube-6.7.5/conf/sonar.properties
 1 #数据库的账号密码,刚才创建的
 2 sonar.jdbc.username=sonar
 3 sonar.jdbc.password=sonar
 4 #连接数据库
 5 sonar.jdbc.url=jdbc:mysql://192.168.6.178:3306/sonar?useUnicode=true&characterEncoding=utf8&rewriteBatchedStatements=true&useConfigs=maxPerformance&useSSL=false
 6 #驱动程序类名,其实可以不写的
 7 sonar.jdbc.driverClassName=org.gjt.mm.mysql.Driver
 8 sonar.sorceEncoding=UTF-8
 9 sonar.login=admin
10 sonar.password=admin
11
12 #开启端口
13 sonar.web.port=9000
SonarQube 启动不能用root启动,所以新建一个用户。必须先启动elasticsearch,才能在启动sonar。sonar文件目录里面有 elasticsearch这个目录。
1 //创建esuser用户
2 //目录组和用户都是esuser
3 //sonarqube文件设置777
4 //编写配置文件
5 [root@localhost ]# useradd esuser
6 [root@localhost local]# chown -R esuser.esuser sonarqube-6.7.5
7 [root@localhost local]#chmod 777 -R sonarqube-6.7.5
8 [root@localhost local]# vim sonarqube-6.7.5/elasticsearch/config/elasticsearch.yml
1 //开启端口和指定服务
2 network.host: 192.168.6.178
3 http.port: 9200
1 // 切换用户
2 [root@localhost sonarqube-6.7]# su - esuser
3 [esuser@localhost elasticsearch]# ./bin/elasticsearch
启动的时候会报错,下面是报错的资料。
几乎每一次装都会遇到的坑,这些坑只有5.x.x版本有,2.x.x版本的几乎没有遇到过:
1、机器内剩余内存较少,会启动失败,并且有类似如下报错:
Java HotSpot(TM) 64-Bit Server VM warning: INFO: os::commit_memory(0x000000008a660000, 1973026816, 0) failed; error=‘Cannot allocate memory‘ (errno=12)
这是因为es的jvm参数-Xmx和-Xms默认都为2G
修改config下的jvm.option文件
# vim elasticsearch/elasticsearch-5.5.1/config/jvm.opstions
将
-Xms2g
-Xmx2g
改为
-Xms1g
-Xmx1g
或更小
-Xms512M
-Xmx512M
再次启动即可


2、启动的时候出现:


1、
ERROR: bootstrap checks failed
system call filters failed to install; check the logs and fix your configuration or disable system call filters at your own risk...
问题原因:因为Centos6不支持SecComp,而ES5.x.x默认bootstrap.system_call_filter为true进行检测,所以导致检测失败,失败后直接导致ES不能启动。详见 :https://github.com/elastic/elasticsearch/issues/22899


解决方法:在elasticsearch.yml中配置bootstrap.system_call_filter为false,注意要在Memory下面:
bootstrap.memory_lock: false
bootstrap.system_call_filter: false


2、
ERROR: bootstrap checks failed
max file descriptors [4096] for elasticsearch process likely too low, increase to at least [65536]
max number of threads [1024] for user [lishang] likely too low, increase to at least [2048]


解决方法:切换到root用户,编辑limits.conf 添加类似如下内容


#vim /etc/security/limits.conf


添加如下内容:
* soft nofile 65536
* hard nofile 131072
* soft nproc 2048
* hard nproc 4096


3、
max number of threads [1024] for user [lish] likely too low, increase to at least [2048]


解决方法:切换到root用户,进入limits.d目录下修改配置文件。
#vim /etc/security/limits.d/90-nproc.conf


修改如下内容:

* soft nproc 1024
修改为
* soft nproc 2048

4、
max virtual memory areas vm.max_map_count [65530] likely too low, increase to at least [262144]

解决方法:切换到root用户修改配置sysctl.conf

#vim /etc/sysctl.conf

添加下面配置:
vm.max_map_count=655360
并执行命令:
#sysctl -p
然后,再启动elasticsearch,即可启动成功。
---------------------
作者:程序员s
来源:CSDN
原文:https://blog.csdn.net/u012448904/article/details/81624037/
版权声明:本文为博主原创文章,转载请附上博文链接!
不报错后,再次执行elasticsearch,直到不出现error信息。最后再执行elasticsearch后台运行
1 [esuser@localhost elasticsearch]# ./bin/elasticsearch -d -d代表后台运行
验证elasticsearch运行成功
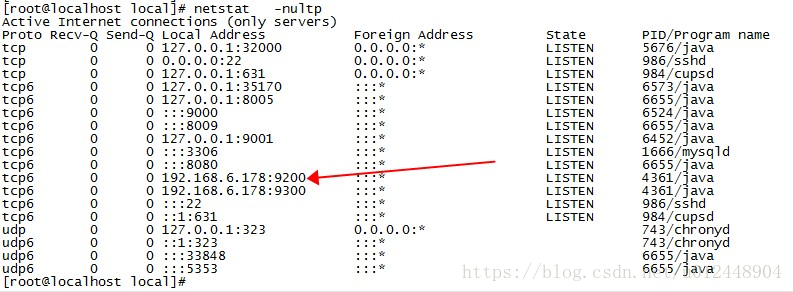
1、netstat -nultp 查看端口,能看到9200和9300证明就成功了。
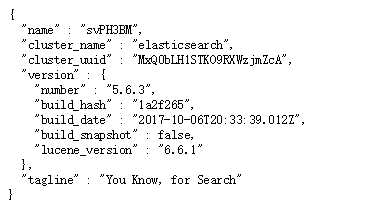
2、访问:http://192.168.6.178:9200 能给你一个json的文件。
启动sonar(用esuser启动)
1 [esuser@localhost sonarqube-6.7.7]# ./bin/linux-x86-64/sonar.sh start
1. 在https://github.com/SonarCommunity/sonar-l10n-zh,下载汉化包源码;
2. 本地打包,cmd里面,在解压包里面运行: mvn install
3. 将打好的jar包,放到:/sonarqube/extensions/plugins目录;
4. 重启sonar,即可
1 //解压文件
2 //进入文件
3 //编辑文件
4 [root@localhost local]#unzip  sonar-runner-dist-2.4.zip
5 [root@localhost local]#mv sonar-runner-dist-2.4.zip  sonar-runner6 [root@localhost local]# cd sonar-runner7 [root@localhost sonar-scanner]# vim conf/sonar-runner.properties
 1 #Configure here general information about the environment, such as SonarQube DB details for example
 2 #No information about specific project should appear here
 3
 4
 5
 6 #----- Default source code encoding
 7 sonar.sourceEncoding=UTF-8
 8
 9 sonar.host.url=http://192.168.6.178:9000
10 sonar.jdbc.username=sonar
11 sonar.jdbc.password=sonar
12 sonar.jdbc.url=jdbc:mysql://192.168.6.178:3306/sonar?useUnicode=true&characterEncoding=utf8
13 sonar.login=admin
14 sonar.password=admin
我的项目放在/root/java/sell 目录下来了,项目放在哪都行的。
创建一个sonar-project.properties

 1 [root@localhost sell]# vim sonar-project.properties
 2
 3 #项目的key
 4 sonar.projectKey=itil:change
 5 #项目的名字(可以随便写,这个名字在sonar显示的)
 6 sonar.projectName=sell
 7 #项目的版本
 8 sonar.projectVersion=1.0
 9 #需要分析的源码的目录
10 sonar.sources=src/
11 #这是target(如果没编译可以不写)
12 sonar.java.binaries=target/classes
13 #java语言
14 sonar.language=java
15 #编码格式
16 #sonar.sourceEncoding=UTF-8
1  //开始扫描,
2 [root@localhost sell]# /usr/local/sonar-runner/bin/sonar-runner
执行结果显示执行成功,如下。

标签:als 系统环境 dstat plugins 软件下载 change char png home
原文地址:https://www.cnblogs.com/winter2018/p/10943854.html