标签:上传文件 close art 专用 serve node etc something print
????在前面博文关于ESP8266WiFiWebServer的例程中,大家可以发现,博主基本上都是手动拼装html内容返回,html的内容被固定写在我们的Arduino ESP代码中。
????那么这样就有两点弊端:
????基于以上两点弊端,正式引入本篇章需要研究的ESP8266 文件系统(SPI Flash FileSystem,简称为SPIFFS)。
????先来看一个概念图:

????这个文件系统可以帮助我们存储一些变更频率不频繁的文件例如网页、配置或者是某些固化的数据等。
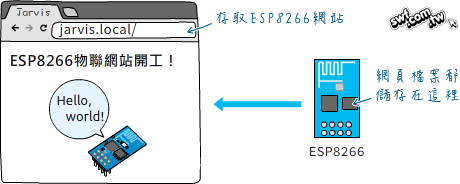
????其实,我们用得更多的是存储网页,将网页和相关资源(如:图片、html、css、javaScript)存入到flash的SPIFFS区域。
????原理如下图:
????在讲解SPIFFS之前,我们来看看在Arduino环境下ESP8266的flash存储分配,请看下图:

????具体可以分为几部分:
即使文件系统与程序存储在同一个闪存芯片上,烧入新的代码也不会修改文件系统内容。这允许使用文件系统来存储Web服务器的代码数据、配置文件或内容。而这个SPIFFS文件系统的大小可以通过烧写环境来配置,目前一般有1M,2M,3M等等。博主建议如果是NodeMcu板子,可以配置成3M;
为了使用文件系统,需要把下面的头文件包含在代码中:
#include <FS.h>????ESP8266的文件系统实现必须满足芯片的限制,其中最重要是有限的RAM。SPIFFS之所以被ESP8266选择作为文件系统,是因为它是为小型系统专门设计的,同时是以一些简化和限制为代价的。
????首先,SPIFFS不支持目录,它只存储一个“扁平化”的文件列表。但是与传统的文件系统相反,斜杠字符“/”在文件名中是允许的,因此处理目录列表的函数(例如,openDir("/website"))基本上只是过滤文件名,并保留以前缀(/website/)开始的那些文件。
????然后,对于文件名,总共有32个字符限制。一个“\0”字符被保留用于c字符串终止符,因此留给我们31个可用字符长度。
????综合起来,这意味着建议保持短文件名,不要使用深嵌套的目录,因为每个文件的完整路径(包括目录、“/”字符、基本名称、点和扩展名)最多只能是31个字符长度。例如,/website/images/bird_thumbnail.jpg 达到了34个字符长度,如果使用它,将导致一些问题。
????警告:这个限制很容易达到,如果忽略,问题可能会被忽略,因为在编译和运行时不会出现错误信息。
????使用文件系统目的就是为了存储文件,那么存储文件的方式其实可以分为3种:
????本质上,无论是通过ESP8266FS或者OTA Update的方式把文件上传到SPIFFS,其底层都是通过调用FS提供的API去完成,所以我们只需要了解FS常用API即可。
????了解一下SPIFFS文件系统常用的操作方法,以下是博主总结的百度脑图:
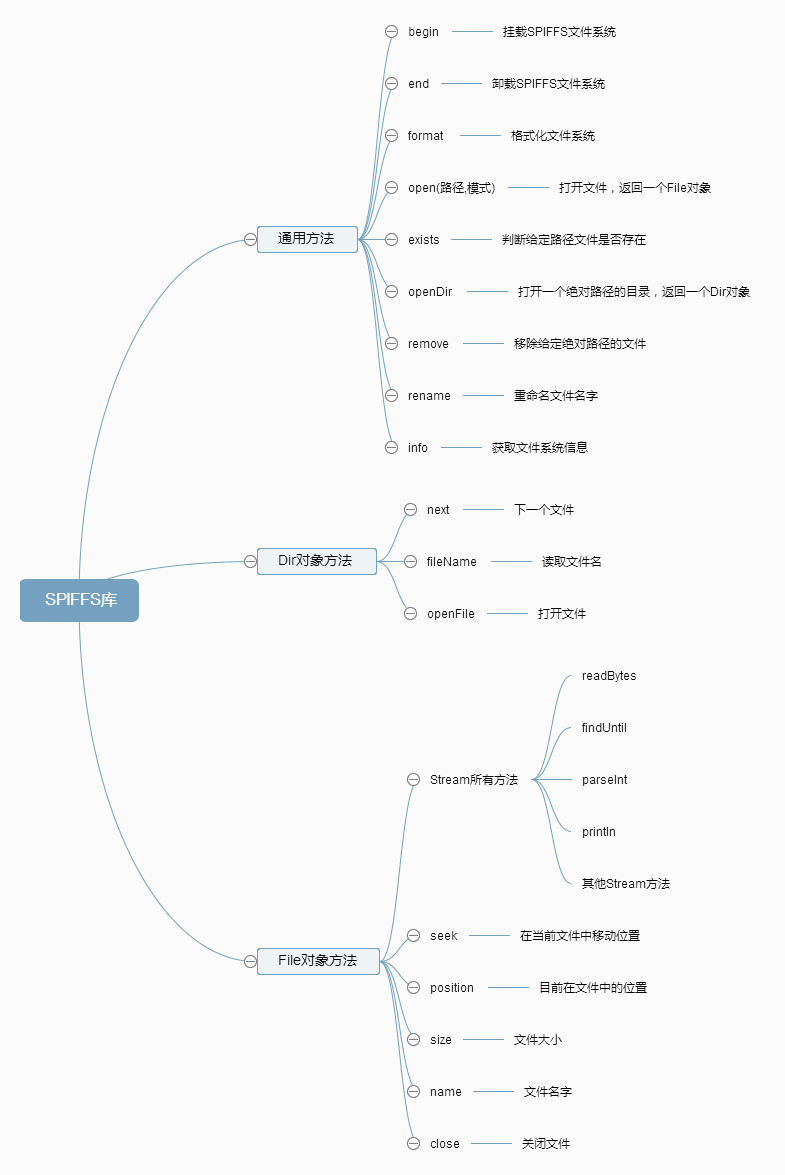
????方法分为3大类:
函数说明:
/**
 * 挂载SPIFFS文件系统
 * @return  bool  如果文件系统挂载成功,返回true,否则返回false
 */
bool begin();
注意点:
函数说明:
/**
 * 格式化文件系统
 * @return  bool 如果格式化成功则返回true
 */
bool format();
注意点:
函数说明:
/**
 * 打开文件,某种模式下会创建文件
 * @param path 文件路径
 * @param mode 存取模式
 * @return File 返回一个File对象
 */
File open(const char* path, const char* mode);
File open(const String& path, const char* mode);
注意点:
如果要检查文件是否打开成功,请使用以下代码:
File f = SPIFFS.open("/f.txt", "w");
if (!f) {
    Serial.println("file open failed");
}函数说明:
/**
 * 路径是否存在
 * @param path 文件路径
 * @return bool 如果指定的路径存在,则返回true,否则返回false
 */
bool exists(const char* path);
bool exists(const String& path);函数说明:
/**
 * 打开绝对路径文件夹
 * @param path 文件路径
 * @return Dir 打开绝对路径文件夹,返回一个Dir对象
 */
Dir openDir(const char* path);
Dir openDir(const String& path);函数说明:
/**
 * 删除绝对路径的文件
 * @param path 文件路径
 * @return bool 如果删除成功则返回true,否则返回false
 */
bool remove(const char* path);
bool remove(const String& path);函数说明:
/**
 * 重新命名文件
 * @param pathFrom 原始路径文件名
 * @param pathTo   新路径文件名
 * @return bool 如果重新命名成功则返回true,否则返回fals
 */
bool rename(const char* pathFrom, const char* pathTo);
bool rename(const String& pathFrom, const String& pathTo);函数说明:
/**
 * 获取文件系统的信息,存储在FSInfo对象
 * @param info FSInfo对象
 * @return bool 是否获取成功
 */
bool info(FSInfo& info);
FSInfo定义如下:
struct FSInfo {
    size_t totalBytes;//整个文件系统的大小
    size_t usedBytes;//文件系统所有文件占用的大小
    size_t blockSize;//SPIFFS块大小
    size_t pageSize;//SPIFFS逻辑页数大小
    size_t maxOpenFiles;//能够同时打开的文件最大个数
    size_t maxPathLength;//文件名最大长度(包括一个字节的字符串结束符)
};在上面的方法中,我们可以获取到Dir对象,那么看看Dir对象定义是什么?
class Dir {
public:
    Dir(DirImplPtr impl = DirImplPtr()): _impl(impl) { }

    File openFile(const char* mode);//打开文件
    String fileName();//获取文件名字
    size_t fileSize();//文件大小
    bool next();//下一个文件

protected:
    DirImplPtr _impl;
};
注意点:
函数说明:
/**
 * 打开文件
 * @param mode 打开模式,请参考open方法
 * @return File 返回一个File对象
 */
File openFile(const char* mode);函数说明:
/**
 * 获取文件大小
 * @return size_t 文件大小
 */
size_t fileSize();函数说明:
/**
 * 是否还有下一个文件
 * @return bool true 表示还有文件
 */
bool next();
注意点:
那么,我们来看看File对象结构:
class File : public Stream
{
public:
    File(FileImplPtr p = FileImplPtr()) : _p(p) {}

    // Print methods:
    size_t write(uint8_t) override;
    size_t write(const uint8_t *buf, size_t size) override;

    // Stream methods:
    int available() override;
    int read() override;
    int peek() override;
    void flush() override;
    size_t readBytes(char *buffer, size_t length)  override {
        return read((uint8_t*)buffer, length);
    }
    size_t read(uint8_t* buf, size_t size);
    bool seek(uint32_t pos, SeekMode mode);
    bool seek(uint32_t pos) {
        return seek(pos, SeekSet);
    }
    size_t position() const;
    size_t size() const;
    void close();
    operator bool() const;
    const char* name() const;

protected:
    FileImplPtr _p;
};
File对象支持Stream的所有方法,因此可以使用readBytes、findUntil、parseInt、printIn以及其他stream方法。以下是File对象特有的一些方法:
函数说明:
/**
 * 设置文件位置偏移
 * @param pos 偏移量
 * @param mode 偏移模式
 * @return bool 如果移动成功,则返回true,否则返回false
 */
bool seek(uint32_t pos, SeekMode mode);
bool seek(uint32_t pos) {
     return seek(pos, SeekSet);
}
注意点:
函数说明:
/**
 * 返回目前在文件中的位置
 * @return size_t 当前位置
 */
size_t position();函数说明:
/**
 * 返回文件大小
 * @return size_t 文件大小
 */
size_t size();函数说明:
/**
 * 返回文件名字
 * @return const char* 文件名字
 */
const char* name();函数说明:
/**
 * 关闭文件
 */
void close();
注意点:
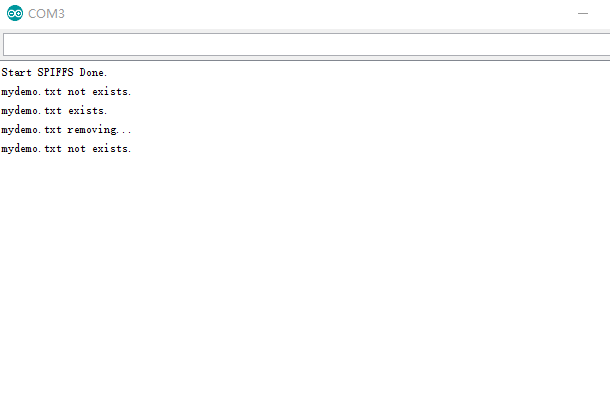
实例说明:
spiffs文件操作常见方法使用,包括文件查找、创建、打开、关闭、删除
实例源码:
/**
 * 功能描述:spiffs文件操作常见方法使用,包括文件查找、创建、打开、关闭、删除
 */
#include <FS.h>

//以下三个定义为调试定义
#define DebugBegin(baud_rate)    Serial.begin(baud_rate)
#define DebugPrintln(message)    Serial.println(message)
#define DebugPrint(message)    Serial.print(message)

#define myFileName  "mydemo.txt"

void setup(){
  DebugBegin(9600);
  DebugPrintln("Check Start SPIFFS...");
  //启动SPIFFS,如果下载配置没有配置SPIFFS,返回false
  if(!SPIFFS.begin()){
     DebugPrintln("Start SPIFFS Failed!please check Arduino Download Config.");
     return;
  }
  DebugPrintln("Start SPIFFS Done.");
  //判断文件是否存在
  if(SPIFFS.exists(myFileName)){
    DebugPrintln("mydemo.txt exists.");
  }else{
    DebugPrintln("mydemo.txt not exists.");
  }

  File myFile;
  //打开文件 不存在就创建一个 可读可写
  myFile = SPIFFS.open(myFileName,"w+");
  //关闭文件
  myFile.close();
  //再次判断文件是否存在
  if(SPIFFS.exists(myFileName)){
    DebugPrintln("mydemo.txt exists.");
  }else{
    DebugPrintln("mydemo.txt not exists.");
  }
  //删除文件
  DebugPrintln("mydemo.txt removing...");
  SPIFFS.remove(myFileName);
  //再次判断文件是否存在
  if(SPIFFS.exists(myFileName)){
    DebugPrintln("mydemo.txt exists.");
  }else{
    DebugPrintln("mydemo.txt not exists.");
  }
}

void loop(){
}实验结果:
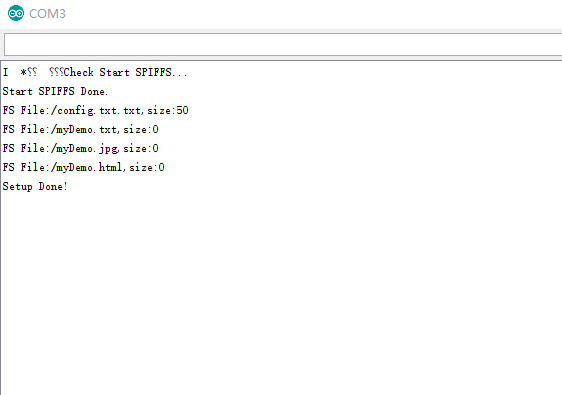
实例说明:
查看spiffs文件系统列表
实例准备:
实例源码:
/**
 * 功能描述:查看spiffs文件系统列表
 */
#include <FS.h>

//以下三个定义为调试定义
#define DebugBegin(baud_rate)    Serial.begin(baud_rate)
#define DebugPrintln(message)    Serial.println(message)
#define DebugPrint(message)    Serial.print(message)

void setup(){
  DebugBegin(9600);
  DebugPrintln("Check Start SPIFFS...");
  //启动SPIFFS,如果下载配置没有配置SPIFFS,返回false
  if(!SPIFFS.begin()){
     DebugPrintln("Start SPIFFS Failed!please check Arduino Download Config.");
   return;
  }
  DebugPrintln("Start SPIFFS Done.");

  File myFile;
  //打开文件 不存在就创建一个 可读可写
  myFile = SPIFFS.open("/myDemo.txt","w+");
  //关闭文件
  myFile.close();

  //打开文件 不存在就创建一个 可读可写
  myFile = SPIFFS.open("/myDemo.jpg","w+");
  //关闭文件
  myFile.close();

    //打开文件 不存在就创建一个 可读可写
  myFile = SPIFFS.open("/myDemo.html","w+");
  //关闭文件
  myFile.close();

  Dir dir = SPIFFS.openDir("/");
  while(dir.next()){
    String fileName = dir.fileName();
  size_t fileSize = dir.fileSize();
  Serial.printf("FS File:%s,size:%d\n",fileName.c_str(),fileSize);
  }
  DebugPrintln("Setup Done!");
}

void loop(){
}实验结果:
实例说明:
往文件myDemo.txt中写入“单片机菜鸟博哥666”并读取出来显示。
实例源码:
/**
 * 功能描述:演示文件读写功能
 */
#include <FS.h>

//以下三个定义为调试定义
#define DebugBegin(baud_rate)    Serial.begin(baud_rate)
#define DebugPrintln(message)    Serial.println(message)
#define DebugPrint(message)    Serial.print(message)

void setup(){
  DebugBegin(9600);
  DebugPrintln("Check Start SPIFFS...");
  //启动SPIFFS,如果下载配置没有配置SPIFFS,返回false
  if(!SPIFFS.begin()){
     DebugPrintln("Start SPIFFS Failed!please check Arduino Download Config.");
   return;
  }
  DebugPrintln("Start SPIFFS Done.");

  File myFile;
  //打开文件 不存在就创建一个 可读可写
  myFile = SPIFFS.open("myDemo.txt","w+");
  if(myFile){
    DebugPrintln("Writing something to myDemo.txt...");
  myFile.println("单片机菜鸟博哥666");
  myFile.close();
  DebugPrintln("Writing Done.");
  }else{
    DebugPrintln("Open File Failed.");
  }

  //打开文件 可读
  myFile = SPIFFS.open("myDemo.txt","r");
  if(myFile){
    DebugPrintln("Reading myDemo.txt...");
  while(myFile.available()){
    //读取文件输出
    Serial.write(myFile.read());
  }
  myFile.close();
  }else{
    DebugPrintln("Open File Failed.");
  }

  DebugPrintln("Setup Done!");
}

void loop(){
}实验结果:
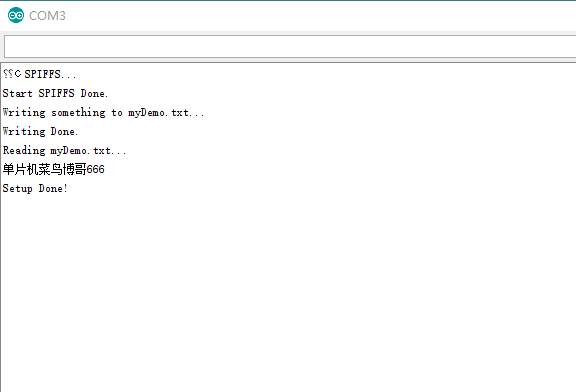
实验说明:
????在上面的例子中,我们都是自己手动在SPIFFS文件系统中创建或者写入文件,但是对于习惯web开发的人员来说,肯定是直接把写好的web程序(html、css、js、资源文件等)直接烧入文件系统更加令人容易接受。所以本例子主要是讲解如何往SPIFFS里面烧写文件。
????这个例子是重点,因为绝大部分的web开发(web配网、web页面等)都是常用烧写文件的方式,请读者仔细阅读。
????要存入SPIFFS区域的文件,都得事先放在代码目录里的“data”目录(请自行新增“data”目录)。
????例如,存在一个项目工程叫做espStaticWeb,其文件结构如下:
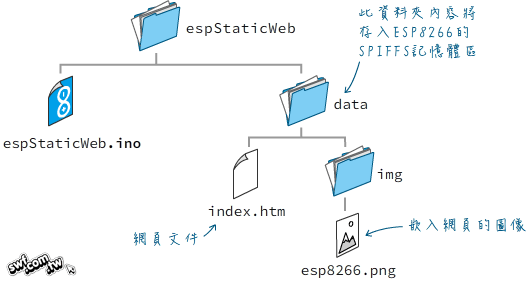
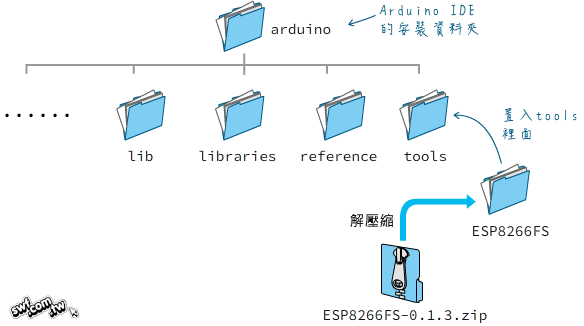
????负责将文件上传到SPIFFS的工具叫做 ESP8266FS。ESP8266FS是一个集成到Arduino IDE中的工具,它将一个菜单项添加到工具菜单,用于将skench data目录的内容上传到ESP8266 Flash文件系统中。
????这个工具需要另外安装,整个上传文件步骤如下:
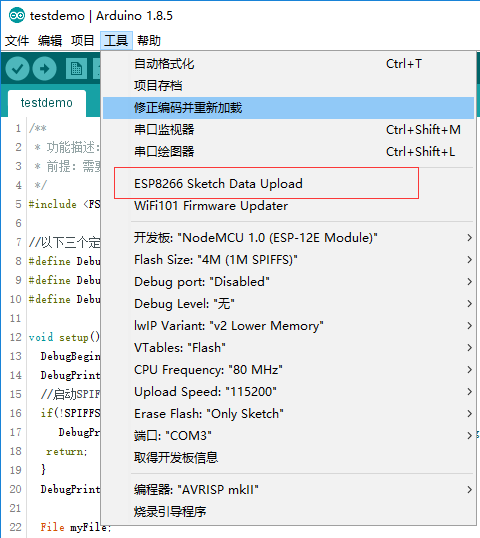
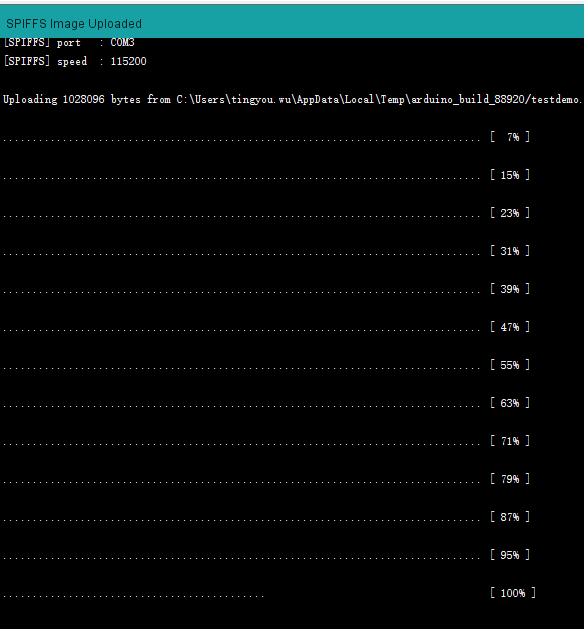
然后就会开始上传文件到ESP8266 flash文件系统。
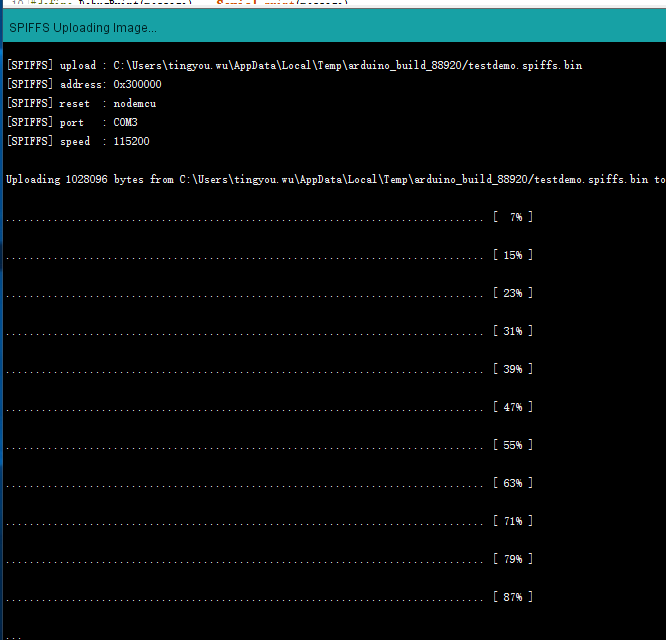
当IDE显示“SPIFFS Image Uploaded”,代表上传完毕。
????那么接下来说明一下本例子内容:
{"name":"esp8266","flash":"QIO","board":"NodeMcu"}实验准备:
实验源码:
/**
 * 功能描述:演示上传文件并读取文件内容
 * 前提:需要先往SPIFFS里面上传config.txt文件
 */
#include <FS.h>

//以下三个定义为调试定义
#define DebugBegin(baud_rate)    Serial.begin(baud_rate)
#define DebugPrintln(message)    Serial.println(message)
#define DebugPrint(message)    Serial.print(message)

void setup(){
  DebugBegin(9600);
  DebugPrintln("Check Start SPIFFS...");
  //启动SPIFFS,如果下载配置没有配置SPIFFS,返回false
  if(!SPIFFS.begin()){
     DebugPrintln("Start SPIFFS Failed!please check Arduino Download Config.");
   return;
  }
  DebugPrintln("Start SPIFFS Done.");

  File myFile;
  //打开文件 不存在就创建一个 可读可写
  myFile = SPIFFS.open("/config.txt","r");
  if(myFile){
    //打印文件大小
    int size = myFile.size();
  Serial.printf("Size=%d\r\n", size);
  //读取文件内容
  DebugPrintln(myFile.readString());
  myFile.close();
  DebugPrintln("Reading Done.");
  }else{
    DebugPrintln("Open File Failed.");
  }
}

void loop(){
}实验结果:
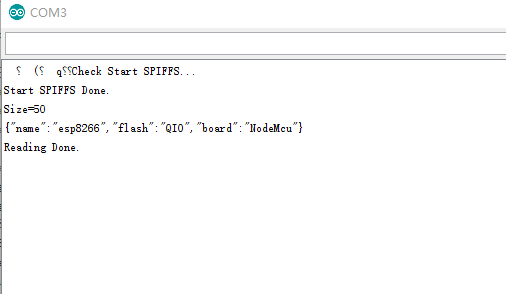
SPIFFS文件系统属于非常重要的一篇,希望读者可以认真理解使用。
ESP8266开发之旅 网络篇? SPIFFS——ESP8266 SPIFFS文件系统
标签:上传文件 close art 专用 serve node etc something print
原文地址:https://www.cnblogs.com/danpianjicainiao/p/11048396.html