标签:hit src get sha min 就是 def esc linu
项目GitHub地址:
Dlib是一个深度学习开源工具,基于C++开发,也支持Python开发接口,功能类似于TensorFlow与PyTorch。但是由于Dlib对于人脸特征提取支持很好,有很多训练好的人脸特征提取模型供开发者使用,所以Dlib人脸识别开发很适合做人脸项目开发。
上面所说的人脸识别开发,主要是指人脸验证,就是输入两张人脸照片,系统会对比输出0或者1,代表判断是否是同一个人。一般的人脸识别开发可以简单分为1.人脸特征建模与2.使用人脸特征模型进行验证(其实还应包括人脸对齐等,这些也可以划分到1中)。使用Dlib进行开发时,我们直接可以使用训练好的人脸特征提取模型,主要的工作就变成了如何进行人脸的验证。
人脸的验证其实就是计算相似度,同一个人的相似度就会大,不同的人就会比较小。可以采用余弦相似度或者欧式距离来计算相似度。其中余弦相似度就是计算角度,欧式距离就是指平方差。都可以用来表示两个特征的相似度(距离)。
安装可以参考我的这篇博客:[深度学习工具]·极简安装Dlib人脸识别库,下面说一下需要注意的点::
此博文针对Windows10安装,其他平台可以仿照这个步骤来安装
安装Miniconda
使用conda指令来安装Dlib库,使用Miniconda与Anaconda都可以,我习惯用Miniconda,简单占用内存小。
推荐使用清华源,下载安装,选择合适的平台版本。python==3.6
安装dlib
注意一定要以管理员身份进入CMD,执行(如果是Linux Mac 就使用 sudo)
conda install -c conda-forge dlib
需要imageio 库,可以使用下述命令安装conda install imageio
face_test.py
import dlib
from imageio import imread
import glob
detector = dlib.get_frontal_face_detector()
win = dlib.image_window()
path = "f1.jpg"
img = imread(path)
dets = detector(img)
print(‘检测到了 %d 个人脸‘ % len(dets))
for i, d in enumerate(dets):
print(‘- %d:Left %d Top %d Right %d Bottom %d‘ % (i, d.left(), d.top(), d.right(), d.bottom()))
win.clear_overlay()
win.set_image(img)
win.add_overlay(dets)
dlib.hit_enter_to_continue()
代码很简单,通过imread读取照片,然后进行检测,输出结果为dets的list,有几张人脸就会有几个item, 每个item都有.left(), .top(), .right(), .bottom()四个元素,代表人脸框的四个边界位置。最后通过win.add_overlay(dets)可以将标记的框显示在原图上。
原始照片
输出照片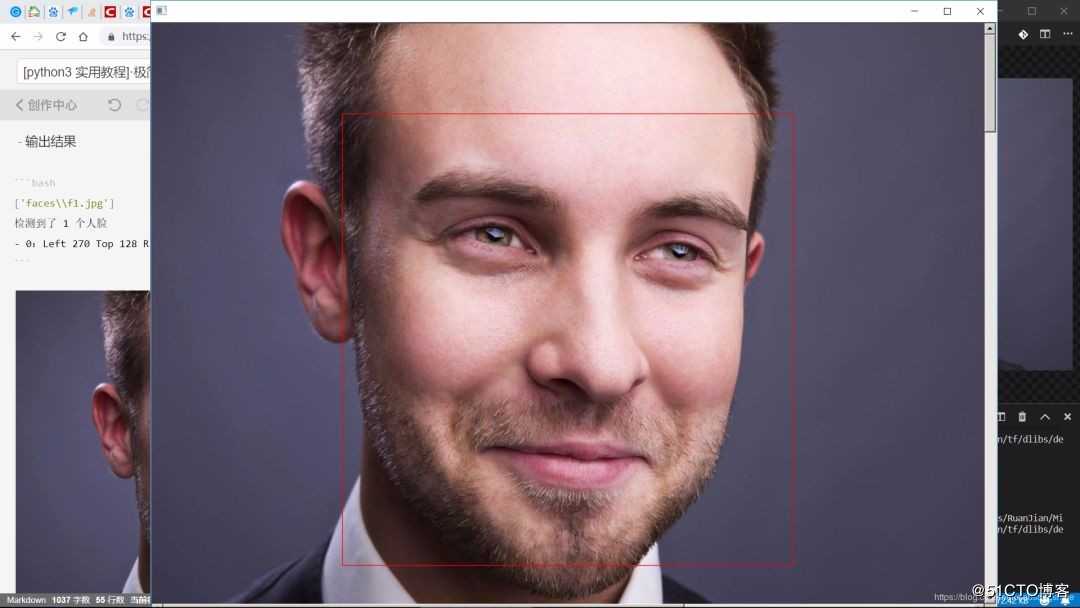
其实我们就可以使用这个功能做一个简单的应用,用来检测图片或者视频中人脸的个数。
在实战1的基础上添加人脸特征提取功能。
import dlib
from imageio import imread
import glob
detector = dlib.get_frontal_face_detector()
win = dlib.image_window()
predictor_path = ‘shape_predictor_68_face_landmarks.dat‘
predictor = dlib.shape_predictor(predictor_path)
path = "f2.jpg"
img = imread(path)
dets = detector(img)
print(‘检测到了 %d 个人脸‘ % len(dets))
for i, d in enumerate(dets):
print(‘- %d: Left %d Top %d Right %d Bottom %d‘ % (i, d.left(), d.top(), d.right(), d.bottom()))
shape = predictor(img, d)
# 第 0 个点和第 1 个点的坐标
print(‘Part 0: {}, Part 1: {}‘.format(shape.part(0), shape.part(1)))
win.clear_overlay()
win.set_image(img)
win.add_overlay(dets)
win.add_overlay(shape)
dlib.hit_enter_to_continue()
这段代码就是在test.py基础上加入了shape_predictor功能,使之可以在检测出人脸基础上,找到人脸的68个特征点。反映在图中就是蓝色的线。
原始图片
输出图片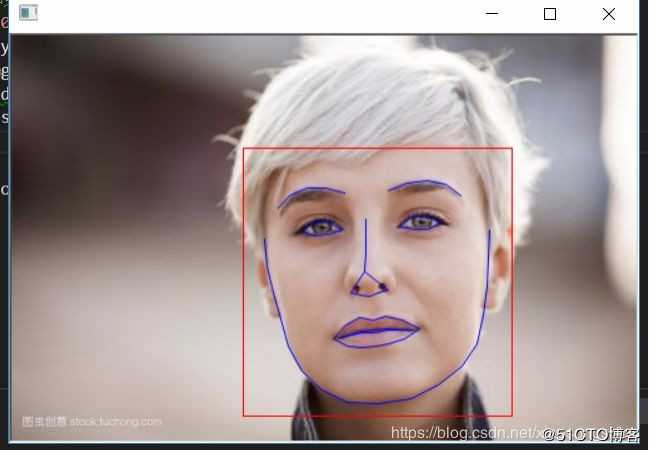
注意运行这段代码需要这个文件predictor_path = ‘shape_predictor_68_face_landmarks.dat‘,我会放在我的github中,方便大家下载使用。
在第二步的基础上,我们再进一步,实现将人脸提取为特征向量,从而我们就可以对特征向量进行比对来实现人脸的验证,这里采用的是对比欧式距离的方法。
face_recognition.py
import dlib
from imageio import imread
import glob
import numpy as np
detector = dlib.get_frontal_face_detector()
predictor_path = ‘shape_predictor_68_face_landmarks.dat‘
predictor = dlib.shape_predictor(predictor_path)
face_rec_model_path = ‘dlib_face_recognition_resnet_model_v1.dat‘
facerec = dlib.face_recognition_model_v1(face_rec_model_path)
def get_feature(path):
img = imread(path)
dets = detector(img)
print(‘检测到了 %d 个人脸‘ % len(dets))
# 这里假设每张图只有一个人脸
shape = predictor(img, dets[0])
face_vector = facerec.compute_face_descriptor(img, shape)
return(face_vector)
def distance(a,b):
a,b = np.array(a), np.array(b)
sub = np.sum((a-b)**2)
add = (np.sum(a**2)+np.sum(b**2))/2.
return sub/add
path_lists1 = ["f1.jpg","f2.jpg"]
path_lists2 = ["赵丽颖照片.jpg","赵丽颖测试.jpg"]
feature_lists1 = [get_feature(path) for path in path_lists1]
feature_lists2 = [get_feature(path) for path in path_lists2]
print("feature 1 shape",feature_lists1[0].shape)
out1 = distance(feature_lists1[0],feature_lists1[1])
out2 = distance(feature_lists2[0],feature_lists2[1])
print("diff distance is",out1)
print("same distance is",out2)
out1 = distance(feature_lists1[0],feature_lists1[1])
out2 = distance(feature_lists2[0],feature_lists2[1])
输出结果
检测到了 1 个人脸
检测到了 1 个人脸
检测到了 1 个人脸
检测到了 1 个人脸
feature 1 shape (128, 1)
diff distance is 0.254767715912
same distance is 0.0620976363391
我们可以看出,每张人脸都被提取为了128维的向量,我们可以理解为128维的坐标(xyz是三维,128维就是有128个轴组成),我们下面需要做的就是计算两个特征的距离,设定好合适的阈值,小于这个阈值则识别为同一个人。代码正确运行需要这个文件face_rec_model_path = ‘dlib_face_recognition_resnet_model_v1.dat‘,我已经放在自己的github(https://github.com/xiaosongshine/dlib_face_recognition)中,方便大家使用。
我们从上面测试的结果可以看出,不同的距离为0.25,同一个人为0.06,阈值就可以先设置为其间的一个值。我这里先设置为0.09,这个阈值也是需要大量数据来计算的,选择的准则为使错误识别为最低。
下面我们把阈值设置为0.09,来测试系统能否区分出不同的人:在face_recognition.py加入下面代码
def classifier(a,b,t = 0.09):
if(distance(a,b)<=t):
 ret = True
else :
 ret = False
return(ret)
print("f1 is 赵丽颖",classifier(feature_lists1[0],feature_lists2[1]))
print("f2 is 赵丽颖",classifier(feature_lists1[1],feature_lists2[1]))
print("赵丽颖照片.jpg is 赵丽颖测试.jpg",classifier(feature_lists2[0],feature_lists2[1]))
输出结果
f1 is 赵丽颖 False
f2 is 赵丽颖 False
赵丽颖照片.jpg is 赵丽颖测试.jpg True
从上面可以看出,已基本满足对人脸区分的功能,如果如要实用化则需要继续调优阈值与代码,调优的准则就是选择合适的阈值使错误识别为最低。
想要获取更多人工智能方面的资料
可以加V、、信:hcgx0904(备注“人工智能”)
点击《深度学习&计算机视觉精讲》,开始学习吧!!!
标签:hit src get sha min 就是 def esc linu
原文地址:https://blog.51cto.com/14352303/2412881