标签:env 状态码 stream 命名 脚本 dbr 一个个 ping ftp
变量就是用一个固定的字符串(也可能是字符、数字等的组合)代替更多、更复杂的内容,该内容里可能还会包含变量、路径、字符串等其他的内容。
是命名的内存空间,可以改变的内容。比如前面的PATH变量代表的内容是可以改的。
变量是暂时存储数据的地方及数据标记,所存储的数据存在于内存空间中,通过正确地调用内存空间中变量的名字就可以取出与变量对应的数据。
使用变量的最大好处就是使程序开发更为方便,当然,在编程中使用变量也是必须的,否则就很难完成相关的程序开发工作。
1、数据存储格式
2、参与的运算
3、表示的数据范围
变量是暂时存储数据的地方及数据标记,所存储的数据存在于内存空间中,通过正确地调用内存空间中变量的名字就可以取出与变量对应的数据。
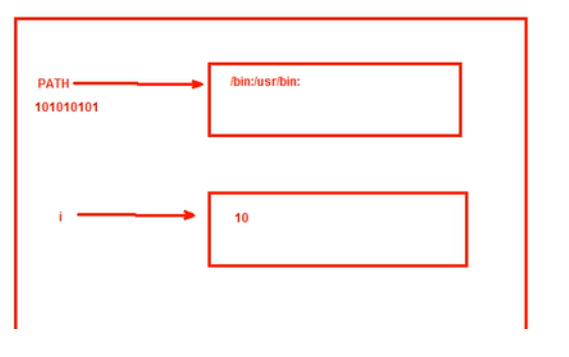
变量会在系统内存空间开辟一块空间,比如下图的PATH变量
PATH相当于一个指针,一个路径。可以把他理解为房间的地址。

修改PATH变量,外部命令就无法执行了,因为外部命令是需要找路径的。
ls是别名,由于他调用了外部命令,所以也是报错了。
[root@centos733 shell_scripts]# pwd
/root/shell_scripts
[root@centos733 shell_scripts]# echo  $PATH
/root/shell_scripts:/usr/local/sbin:/usr/local/bin:/usr/sbin:/usr/bin:/root/bin
[root@centos733 shell_scripts]# cd
[root@centos733 ~]# ls
19:31:05     9           anaconda-ks.cfg  CST      f2       fun.awk2  percona-xtrabackup-24-2.4.9-1.el7.x86_64.rpm  shell_scripts
1.sh         access_log  array            df.log   fstab    history   Sat                                           tftp
2019history  access.log  crontab.txt      dir10Qq  fun.awk  Mar       score.sh
[root@centos733 ~]# PATH=/
[root@centos733 ~]# ls
-bash: ls: command not found
[root@centos733 ~]# echo   $PATH
/
[root@centos733 ~]# alias   ls
alias ls=‘ls --color=auto‘
[root@centos733 ~]# type  ls
ls is aliased to `ls --color=auto‘
[root@centos73 bin]# PATH=/
[root@centos73 bin]# echo $PATH
/
[root@centos73 bin]# pwd
/root/bin
[root@centos73 bin]# cat /etc/passwd
-bash: cat: command not found
[root@centos73 bin]# ls
-bash: ls: command not found
[root@centos73 bin]# alias ls
alias ls=‘ls --color=auto‘
[root@centos73 bin]# type ls
ls is aliased to `ls --color=auto‘
因为刚才是临时性的更改,所以退出终端再进来又恢复默认的了。
[root@centos73 bin]# type ls
ls is aliased to `ls --color=auto‘
[root@centos73 bin]# exit
logout

Connection closed by foreign host.

Disconnected from remote host(192.168.137.73:22) at 12:01:19.

Type `help‘ to learn how to use Xshell prompt.
[c:\~]$ ssh 192.168.137.73


Connecting to 192.168.137.73:22...
Connection established.
To escape to local shell, press Ctrl+Alt+].

Last login: Mon Dec 10 11:34:46 2018 from 172.25.67.1
[root@centos73 ~]# pwd
/root
[root@centos73 ~]# echo $PATH
/usr/local/sbin:/usr/local/bin:/usr/sbin:/usr/bin:/root/bin
[root@centos73 ~]# cat /etc/passwd
root:x:0:0:root:/root:/bin/bash
bin:x:1:1:bin:/bin:/sbin/nologin
daemon:x:2:2:daemon:/sbin:/sbin/nologin
adm:x:3:4:adm:/var/adm:/sbin/nologin
lp:x:4:7:lp:/var/spool/lpd:/sbin/nologin
[root@centos733 ~]# exit
logout

Connection closed by foreign host.

Disconnected from remote host(192.168.137.73:22) at 22:54:45.

Type `help‘ to learn how to use Xshell prompt.
[c:\~]$
[c:\~]$ ssh   192.168.137.73


Connecting to 192.168.137.73:22...
Connection established.
To escape to local shell, press Ctrl+Alt+].

WARNING! The remote SSH server rejected X11 forwarding request.
Last login: Thu Mar 14 21:36:58 2019 from 192.168.137.34
[root@centos733 ~]# echo   $PATH
/root/shell_scripts:/usr/local/sbin:/usr/local/bin:/usr/sbin:/usr/bin:/root/bin
[root@centos733 ~]# ls
19:31:05     9           anaconda-ks.cfg  CST      f2       fun.awk2  percona-xtrabackup-24-2.4.9-1.el7.x86_64.rpm  shell_scripts
1.sh         access_log  array            df.log   fstab    history   Sat                                           tftp
2019history  access.log  crontab.txt      dir10Qq  fun.awk  Mar       score.sh
[root@centos733 ~]# type  ls
ls is aliased to `ls --color=auto‘
[root@centos733 ~]# alias   ls
alias ls=‘ls --color=auto‘
变量命名法则
1、不能使程序中的保留字例如if, for
2、只能使用数字、字母及下划线,且不能以数字开头
3、见名知义,可以马上就知道含义。
4、统一命名规则:驼峰命名法,有大小写。
两个单词的组合,为了看的更清楚就加下划线
统一命名规则:驼峰命名法,有大小写。
大驼峰:只要是单词的首字母就大写。
C语言的类就是这样的。除了第一个单词,后面的单词的首字母都是大写的。
在Linux里面写变量是不声明类型的,但是在某些语言里面就要,比如C,Java
bash的功能并不强大,但是应付一般的运维工作还是够用的。
对i进行定义i=10,默认是字符串类型
注意赋值不要带空格。不同的语言的语法有所不同,有些语言是需要带空格的,带空格了就是比较了。
定义变量i=10的原理就是在内存中开辟了一块内存空间。
存放了一个10,可能是数字,也可能是字符串,默认是字符串。一个叫i的变量,指向到了10。以后要调用i只要在前面加上$就可以了。
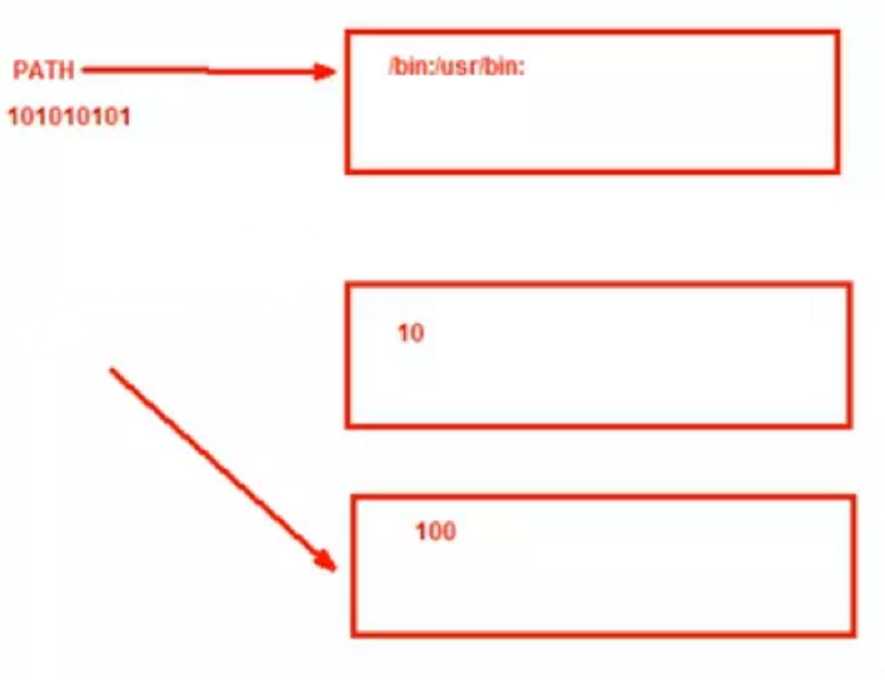
因为i是变量,如果更改了变量i的值,内存空间就会拿出一块空间存放100。i的指针指向100,但是前面的10在内存中还没有完全消失。
系统看到了i不用这个10了,也没有人在用10了。
这个时候10在内存空间没人用了,将来就可以标记为可以被别的程序占用了。
没有办法恢复这个10,除非再赋值一个10了。
再赋值一个10,和之前的10是不一样的。用哲学的话来讲就是世界上没有两片相同的叶子。
删除变量使用unset
因为unset就是删除变量的,所以后面的变量前面是不需要加是$的。
注意系统搞不清是字符串还是变量的时候才加$
这就好比如果你是北京人,你在中国上学,向班上的同学介绍的时候就说我是北京人。
而如果你到了国外你就可以说你来自中国北京。
[root@centos73 ~]# i=10
[root@centos73 ~]# echo $i
10
[root@centos73 ~]# j=20
[root@centos73 ~]# echo $j
20
[root@centos73 ~]# i=100
[root@centos73 ~]# echo $i
100
[root@centos73 ~]# unset i
[root@centos73 ~]# echo $i
为什么是100,而不是200呢?
[root@centos73 ~]# i=10
[root@centos73 ~]# echo $i
10
[root@centos73 ~]# j=20
[root@centos73 ~]# echo $j
20
[root@centos73 ~]# i=100
[root@centos73 ~]# echo $i
100
[root@centos73 ~]# unset i
[root@centos73 ~]# echo $i

[root@centos73 ~]# echo $j
20
[root@centos73 ~]# unset $j
-bash: unset: `20‘: not a valid identifier
[root@centos73 ~]# unset j
[root@centos73 ~]# i=100
[root@centos73 ~]# j=i
[root@centos73 ~]# echo $j
i
[root@centos73 ~]# j=$i
[root@centos73 ~]# echo $j
100
工作原理:在内存空间,i通过指针指向了100,j=i,那么j和i是一样的值100。
i重新赋值了,是200,那么就会再占一块内存空间,那么i的值不再指向100,而是200。
注销之后,i和j的值就没有了。


[root@centos73 ~]# i=100
[root@centos73 ~]# j=i
[root@centos73 ~]# echo $j
i
[root@centos73 ~]# j=$i
[root@centos73 ~]# echo $j
100
[root@centos73 ~]# echo $j
100
[root@centos73 ~]# exit
logout

Connection closed by foreign host.

Disconnected from remote host(192.168.137.73:22) at 12:16:55.

Type `help‘ to learn how to use Xshell prompt.
[c:\~]$ ssh 192.168.137.73


Connecting to 192.168.137.73:22...
Connection established.
To escape to local shell, press Ctrl+Alt+].

Last login: Mon Dec 10 12:01:27 2018 from 172.25.67.1
[root@centos73 ~]# echo $i

[root@centos73 ~]# echo $j
默认情况下,在bash Shell中是不会区分变量类型的,例如:常见的变量类型为整数、字符串、小数等。
shell脚本语言的运行时会隐式做数据类型转换,无须指定类型,默认均为字符型。
参与运算会自动进行隐式类型转换;变量无须事先定义可直接调用,所以shell语言是弱类型。
如果需要指定Shell变量的类型,也可以使用declare显示定义变量的类型,但在一般情况下没有这个需求。
这和其他强类型语言(例如: Java,C语言)是有区别的。
而强类型是变量不经过强制转换,它永远是这个数据类型,不允许隐式的类型转换。
一般定义变量时必须指定类型、参与运算必须符合类型要求;调用未声明变量会产生错误,如java,c#。
变量不经过强制转换,它永远是这个数据类型,不允许隐式的类型转换。
一般定义变量时必须指定类型、参与运算必须符合类型要求;调用未声明变量会产生错误如java,c#
语言的运行时会隐式做数据类型转换,无须指定类型,默认均为字符型。
参与运算会自动进行隐式类型转换;变量无须事先定义可直接调用。
如: bash不支持浮点数, php?
1局部变量:生效范围为当前shell进程;对当前shell之外的其它shell进程,包括当前shell的子shell进程均无效。
(1)变量赋值:name=‘value’,变量值最好加上引号,否则可能会有问题。
如果值是有空格的,就会把空格后面的东西当做命令执行了。
如果不是命令就会报错命令无法找到
[root@centos73 ~]# name=wang
[root@centos73 ~]# echo   $wang

[root@centos73 ~]# echo   $name
wang
[root@centos73 ~]# name=wan linux
-bash: linux: command not found
[root@centos73 ~]# name=wan ls
anaconda-ks.cfg fstab tftp
(2)可以使用引用value:
1可以是直接字串; name=“root"
[root@centos73 ~]# name="wan linux"
[root@centos73 ~]# echo   $name
wan linux
[root@centos73 ~]# name=‘wan linux‘
[root@centos73 ~]# echo   $name
wan linux
2变量引用:name="$USER"
3命令引用:name=` COMMAND ` 或者name =$(COMMAND)
注意` `是反引号,在tab键上面
[root@centos73 ~]# name=`whoami`
[root@centos73 ~]# echo   $name
root
[root@centos73 ~]# name=$USER
[root@centos73 ~]# echo   $name
root
变量值可以是很长的文章或者文件的内容。但是一般不这样做。
[root@centos73 ~]# name=`cat  /etc/issue`
[root@centos73 ~]# echo   $name
\S Kernel \r on an \m
[root@centos73 ~]# cat  /etc/issue
\S
Kernel \r on an \m
调用变量要加双引号引起来
变量引用:${name} , $name
"":弱引用,其中的变量引用会被替换为变量值
[root@centos73 ~]# echo   "${name}"
\S
Kernel \r on an \m

[root@centos73 ~]# echo   "$name"
\S
Kernel \r on an \m
‘‘:强引用,其中的变量引用不会被替换为变量值,而保持原字符串
[root@centos73 ~]# echo   ‘${name}‘
${name}
[root@centos73 ~]# echo   ‘$name‘
$name
显示已定义的所有变量:set
删除变量:unset name
1、编写脚本/root/bin/systeminfo.sh,显示当前主机系统信息,包括主机名,IPv4地址,操作系统版本,内核版本,CPU型号,内存大小,硬盘大小
[root@centos73 shell_scripts]# cat systeminfo.sh
#!/bin/bash
#Author=wang
hostname=`hostname`
ipv4=`ifconfig ens33 |grep "inet " |egrep "[0-9]{1,3}(\.[0-9]{1,3}){3}" -o |head -n 1`
os_version=`cat /etc/redhat-release`
kernel_version=`uname -r`
cpu_info=`lscpu |grep "Model name:" |cut -c 12- |grep "[^[:space:]].*" -o`
mem_size=`cat /proc/meminfo  |grep "MemTotal" |cut -c 10- | grep "[^[:space:]].*" -o`
disk_size=`df -h`

echo "system info is:
hostname=$hostname
ipv4=$ipv4
kernel_version=$kernel_version
cpu_info=$cpu_info
mem_size=$mem_size
disk_size=$disk_size"
执行脚本
[root@centos73 shell_scripts]# bash systeminfo.sh
system info is:
hostname=centos73.huawei.com
ipv4=192.168.137.73
kernel_version=3.10.0-862.el7.x86_64
cpu_info=Intel(R) Core(TM) i7-7500U CPU @ 2.70GHz
mem_size=997980 kB
disk_size=Filesystem      Size  Used Avail Use% Mounted on
/dev/sda2        50G  1.4G   49G   3% /
devtmpfs        477M     0  477M   0% /dev
tmpfs           488M     0  488M   0% /dev/shm
tmpfs           488M  7.6M  480M   2% /run
tmpfs           488M     0  488M   0% /sys/fs/cgroup
/dev/sr0        4.2G  4.2G     0 100% /mnt
/dev/sda3        20G   86M   20G   1% /app
/dev/sda1      1014M  124M  891M  13% /boot
tmpfs            98M     0   98M   0% /run/user/0
2、编写脚本/root/bin/backup.sh,可实现每日将/etc/目录备份到/root/etcYYYY-mm-dd中
下面是两种方法
法1:
[root@centos73 shell_scripts]# cat   backup.sh
#!/bin/bash
name=`date +%F`
cp  -a   /etc   /root/etc$name
执行脚本
[root@centos73 shell_scripts]# bash backup.sh
[root@centos73 shell_scripts]# ls  /root/etc2019-04-26/
adjtime                  dracut.conf         inputrc                   NetworkManager     rc4.d             sudoers
aliases                  dracut.conf.d       iproute2                  networks           rc5.d             sudoers.d
aliases.db               e2fsck.conf         issue                     nsswitch.conf      rc6.d             sudo-ldap.conf
alternatives             environment         issue.net                 nsswitch.conf.bak  rc.d              sysconfig
anacrontab               ethertypes          kdump.conf                ntp                rc.local          sysctl.conf
asound.conf              exports             kernel                    ntp.conf           redhat-release    sysctl.d
at.deny                  favicon.png         krb5.conf                 openldap           resolv.conf       systemd
audisp                   filesystems         krb5.conf.d               opt                resolv.conf.save  system-release
audit                    firewalld           ld.so.cache               os-release         rpc               system-release-cpe
bash_completion.d        fstab               ld.so.conf                pam.d              rpm               tcsd.conf
bashrc                   fuse.conf           ld.so.conf.d              passwd             rsyncd.conf       terminfo
binfmt.d                 gcrypt              lftp.conf                 passwd-            rsyslog.conf      tmpfiles.d
centos-release           GeoIP.conf          libaudit.conf             passwd_bak         rsyslog.d         tuned
centos-release-upstream  GeoIP.conf.default  libnl                     pkcs11             rwtab             udev
chkconfig.d              gnupg               libuser.conf              pki                rwtab.d           vconsole.conf
cron.d                   GREP_COLORS         locale.conf               plymouth           sasl2             vimrc
cron.daily               groff               localtime                 pm                 securetty         vimrc_bak
cron.deny                group               login.defs                polkit-1           security          virc
cron.hourly              group-              logrotate.conf            popt.d             selinux           vmware-tools
cron.monthly             grub2.cfg           logrotate.d               postfix            services          vsftpd
crontab                  grub.d              machine-id                ppp                sestatus.conf     wpa_supplicant
cron.weekly              gshadow             magic                     prelink.conf.d     shadow            X11
crypttab                 gshadow-            mailcap                   printcap           shadow-           xdg
csh.cshrc                gss                 makedumpfile.conf.sample  profile            shells            xinetd.d
csh.login                host.conf           man_db.conf               profile.d          skel              yum
dbus-1                   hostname            mime.types                protocols          ssh               yum.conf
default                  hosts               mke2fs.conf               pulse              ssl               yum.repos_bak
depmod.d                 hosts.allow         modprobe.d                python             statetab          yum.repos.d
dhcp                     hosts.deny          modules-load.d            rc0.d              statetab.d
DIR_COLORS               httpd               motd                      rc1.d              subgid
DIR_COLORS.256color      init.d              mtab                      rc2.d              subuid
DIR_COLORS.lightbgcolor  inittab             my.cnf.d                  rc3.d              sudo.conf
[root@centos73 shell_scripts]# ls  /root/etc2019-04-26/  -d
/root/etc2019-04-26/
[root@centos73 shell_scripts]# ls  /root/etc2019-04-26/  -dl
drwxr-xr-x. 79 root root 8192 Apr 26 10:06 /root/etc2019-04-26/
法2:
[root@centos73 shell_scripts]# ls backup*
backup.sh
[root@centos73 shell_scripts]# cp  backup{,1}.sh
[root@centos73 shell_scripts]# ls backup*
backup1.sh  backup.sh
[root@centos73 shell_scripts]# vim  backup1.sh
[root@centos73 shell_scripts]# cat  backup1.sh
#!/bin/bash
cp -a /etc /root/etc$(date "+%Y-%m-%d")
执行脚本
[root@centos73 shell_scripts]# rm  -rf  /root/etc2019-04-26/
[root@centos73 shell_scripts]# ls   /root/etc2019-04-26/
ls: cannot access /root/etc2019-04-26/: No such file or directory
[root@centos73 shell_scripts]# bash backup1.sh
[root@centos73 shell_scripts]# ls   /root/etc2019-04-26/
adjtime                  dracut.conf         inputrc                   NetworkManager     rc4.d             sudoers
aliases                  dracut.conf.d       iproute2                  networks           rc5.d             sudoers.d
aliases.db               e2fsck.conf         issue                     nsswitch.conf      rc6.d             sudo-ldap.conf
alternatives             environment         issue.net                 nsswitch.conf.bak  rc.d              sysconfig
anacrontab               ethertypes          kdump.conf                ntp                rc.local          sysctl.conf
asound.conf              exports             kernel                    ntp.conf           redhat-release    sysctl.d
at.deny                  favicon.png         krb5.conf                 openldap           resolv.conf       systemd
audisp                   filesystems         krb5.conf.d               opt                resolv.conf.save  system-release
audit                    firewalld           ld.so.cache               os-release         rpc               system-release-cpe
bash_completion.d        fstab               ld.so.conf                pam.d              rpm               tcsd.conf
bashrc                   fuse.conf           ld.so.conf.d              passwd             rsyncd.conf       terminfo
binfmt.d                 gcrypt              lftp.conf                 passwd-            rsyslog.conf      tmpfiles.d
centos-release           GeoIP.conf          libaudit.conf             passwd_bak         rsyslog.d         tuned
centos-release-upstream  GeoIP.conf.default  libnl                     pkcs11             rwtab             udev
chkconfig.d              gnupg               libuser.conf              pki                rwtab.d           vconsole.conf
cron.d                   GREP_COLORS         locale.conf               plymouth           sasl2             vimrc
cron.daily               groff               localtime                 pm                 securetty         vimrc_bak
cron.deny                group               login.defs                polkit-1           security          virc
cron.hourly              group-              logrotate.conf            popt.d             selinux           vmware-tools
cron.monthly             grub2.cfg           logrotate.d               postfix            services          vsftpd
crontab                  grub.d              machine-id                ppp                sestatus.conf     wpa_supplicant
cron.weekly              gshadow             magic                     prelink.conf.d     shadow            X11
crypttab                 gshadow-            mailcap                   printcap           shadow-           xdg
csh.cshrc                gss                 makedumpfile.conf.sample  profile            shells            xinetd.d
csh.login                host.conf           man_db.conf               profile.d          skel              yum
dbus-1                   hostname            mime.types                protocols          ssh               yum.conf
default                  hosts               mke2fs.conf               pulse              ssl               yum.repos_bak
depmod.d                 hosts.allow         modprobe.d                python             statetab          yum.repos.d
dhcp                     hosts.deny          modules-load.d            rc0.d              statetab.d
DIR_COLORS               httpd               motd                      rc1.d              subgid
DIR_COLORS.256color      init.d              mtab                      rc2.d              subuid
DIR_COLORS.lightbgcolor  inittab             my.cnf.d                  rc3.d              sudo.conf
3、编写脚本/root/bin/disk.sh,显示当前硬盘分区中空间利用率最大的值
[root@centos73 shell_scripts]# cat  disk.sh
#!/bin/bash
#Author=wang
disk_usage_val=`df  |egrep "[0-9]{1,3}%" -o |tr -d "%" |sort  -n |tail -n 1`
echo   $disk_usage_val
[root@centos73 shell_scripts]# df
Filesystem     1K-blocks    Used Available Use% Mounted on
/dev/sda2       52403200 1509680  50893520   3% /
devtmpfs          487964       0    487964   0% /dev
tmpfs             498988       0    498988   0% /dev/shm
tmpfs             498988    7776    491212   2% /run
tmpfs             498988       0    498988   0% /sys/fs/cgroup
/dev/sr0         4364408 4364408         0 100% /mnt
/dev/sda3       20961280   87448  20873832   1% /app
/dev/sda1        1038336  126596    911740  13% /boot
tmpfs              99800       0     99800   0% /run/user/0
执行脚本
[root@centos73 shell_scripts]# bash disk.sh
100
4、编写脚本/root/bin/links.sh,显示正连接本主机的每个远程主机的IPv4地址和连接数,并按连接数从大到小排序
[root@centos73 shell_scripts]# cat  links.sh
#!/bin/bash
#Author=wang
links=`ss -tan |grep "^ESTAB" |egrep "[0-9]{1,3}(\.[0-9]{1,3}){3}:[0-9]{1,6}[[:space:]]*$" -o |cut -d ":" -f 1
|sort |uniq -c | sort  -r -n -t " " -k1`
echo "$links"
[root@centos73 shell_scripts]# ss -tan
State      Recv-Q Send-Q                      Local Address:Port                                     Peer Address:Port
LISTEN     0      128                                     *:22                                                  *:*
LISTEN     0      100                             127.0.0.1:25                                                  *:*
ESTAB      0      52                         192.168.137.73:22                                      192.168.137.1:50232
LISTEN     0      128                                    :::22                                                 :::*
LISTEN     0      100                                   ::1:25                                                 :::*
执行脚本
[root@centos73 shell_scripts]# bash  links.sh
      1 192.168.137.1
环境(全局)变量:生效范围为当前shell进程及其子进程。
当前的进程
[root@centos73 ~]# echo   $$
1223
[root@centos73 ~]# pstree   -p
systemd(1)─┬─NetworkManager(632)─┬─{NetworkManager}(684)
           │                     └─{NetworkManager}(690)
           ├─VGAuthService(592)
           ├─agetty(613)
           ├─auditd(564)───{auditd}(565)
           ├─crond(607)
           ├─dbus-daemon(596)───{dbus-daemon}(601)
           ├─firewalld(617)───{firewalld}(760)
           ├─irqbalance(589)
           ├─master(1030)─┬─pickup(1065)
           │              └─qmgr(1066)
           ├─polkitd(594)─┬─{polkitd}(605)
           │              ├─{polkitd}(606)
           │              ├─{polkitd}(609)
           │              ├─{polkitd}(614)
           │              └─{polkitd}(615)
           ├─rsyslogd(943)─┬─{rsyslogd}(945)
           │               └─{rsyslogd}(946)
           ├─sshd(941)───sshd(1219)───bash(1223)───pstree(1311)
           ├─systemd-journal(384)
           ├─systemd-logind(591)
           ├─systemd-udevd(418)
           ├─tuned(942)─┬─{tuned}(1182)
           │            ├─{tuned}(1183)
           │            ├─{tuned}(1184)
           │            └─{tuned}(1205)
           └─vmtoolsd(593)───{vmtoolsd}(621)
定义一个变量,再运行一个子进程
[root@centos73 ~]# name=1223
[root@centos73 ~]# echo   $name
1223
[root@centos73 ~]# bash
[root@centos73 ~]# bash
[root@centos73 ~]# echo $$
1313
[root@centos73 ~]# echo $$
1313
[root@centos73 ~]# pstree   -p
systemd(1)─┬─NetworkManager(632)─┬─{NetworkManager}(684)
           │                     └─{NetworkManager}(690)
           ├─VGAuthService(592)
           ├─agetty(613)
           ├─anacron(1340)
           ├─auditd(564)───{auditd}(565)
           ├─crond(607)
           ├─dbus-daemon(596)───{dbus-daemon}(601)
           ├─firewalld(617)───{firewalld}(760)
           ├─irqbalance(589)
           ├─master(1030)─┬─pickup(1065)
           │              └─qmgr(1066)
           ├─polkitd(594)─┬─{polkitd}(605)
           │              ├─{polkitd}(606)
           │              ├─{polkitd}(609)
           │              ├─{polkitd}(614)
           │              └─{polkitd}(615)
           ├─rsyslogd(943)─┬─{rsyslogd}(945)
           │               └─{rsyslogd}(946)
           ├─sshd(941)───sshd(1219)───bash(1223)───bash(1313)───pstree(1343)
           ├─systemd-journal(384)
           ├─systemd-logind(591)
           ├─systemd-udevd(418)
           ├─tuned(942)─┬─{tuned}(1182)
           │            ├─{tuned}(1183)
           │            ├─{tuned}(1184)
           │            └─{tuned}(1205)
           └─vmtoolsd(593)───{vmtoolsd}(621)
开启bash的时候开启了一个子进程,子进程调用父进程的变量显示不出来。
[root@centos73 ~]# echo   $name

[root@centos73 ~]# exit
exit
[root@centos73 ~]# echo   $name
1223
export name=VALUE declare -x name=VALUE
为了让子进程也能够继承父进程的变量,就必须把父进程的变量定义成环境变量。
可以边定义边赋值,也可以先赋值然后声明为环境变量。
父进程定义的环境变量可以一直继承到下面去,包括孙子进程。
[root@centos7 ~]# echo $$
1223
[root@centos7 ~]# var1=1223  在父进程里面先赋值
[root@centos7 ~]# bash  开启开启子进程
[root@centos7 ~]# echo $var1

[root@centos7 ~]# echo $PPID
1223
[root@centos7 ~]# echo $$
1344
[root@centos7 ~]# exit  退出子进程
exit
[root@centos7 ~]# export    var1   父进程的变量声明为环境变量
  [root@centos73 ~]# echo $var1
  1223


[root@centos7 ~]# bash  开启子进程
[root@centos7 ~]# echo $PPID
1223
[root@centos7 ~]# echo $var1
1223
[root@centos7 ~]# echo $$
1359
[root@centos7 ~]# var1=1359   在子进程里面定义变量

[root@centos7 ~]# echo $var1
 1359
[root@centos7 ~]# bash  开启孙子进程
[root@centos7 ~]# echo $var1

1359  因为var1在父进程设置为环境变量了,所以在孙子进程也生效的。

[root@centos73 ~]# echo $var1
1390
[root@centos73 ~]# echo $$
1468
[root@centos73 ~]# var1=1468
[root@centos73 ~]# echo $$
1468
[root@centos73 ~]# echo $var1
1468
[root@centos73 ~]# echo $var1
1468
[root@centos73 ~]# pstree -p
systemd(1)─┬─NetworkManager(632)─┬─{NetworkManager}(684)
│ └─{NetworkManager}(690)
├─VGAuthService(592)
├─agetty(613)
├─anacron(1340)
├─auditd(564)───{auditd}(565)
├─crond(607)
├─dbus-daemon(596)───{dbus-daemon}(601)
├─firewalld(617)───{firewalld}(760)
├─irqbalance(589)
├─master(1030)─┬─pickup(1065)
│ └─qmgr(1066)
├─polkitd(594)─┬─{polkitd}(605)
│ ├─{polkitd}(606)
│ ├─{polkitd}(609)
│ ├─{polkitd}(614)
│ └─{polkitd}(615)
├─rsyslogd(943)─┬─{rsyslogd}(945)
│ └─{rsyslogd}(946)
├─sshd(941)───sshd(1219)───bash(1223)───bash(1390)───bash(1405)───bash(1421)───bash(1437)───bash(1452)───bash(1468)───pstree(1483)
├─systemd-journal(384)
├─systemd-logind(591)
├─systemd-udevd(418)
├─tuned(942)─┬─{tuned}(1182)
│ ├─{tuned}(1183)
│ ├─{tuned}(1184)
│ └─{tuned}(1205)
└─vmtoolsd(593)───{vmtoolsd}(621)
env , printenv ,export,declare -x
[root@centos73 ~]# env
XDG_SESSION_ID=3
HOSTNAME=centos73.huawei.com
SELINUX_ROLE_REQUESTED=
TERM=xterm
SHELL=/bin/bash
HISTSIZE=1000
SSH_CLIENT=192.168.137.34 52652 22
SELINUX_USE_CURRENT_RANGE=
SSH_TTY=/dev/pts/0
USER=root
LS_COLORS=rs=0:di=01;34:ln=01;36:mh=00:pi=40;33:so=01;35:do=01;35:bd=40;33;01:cd=40;33;01:or=40;31;01:mi=01;05;37;41:su=37;41:sg=30;43:ca=30;41:tw=30;42:ow=34;42:st=37;44:ex=01;32:*.tar=01;31:*.tgz=01;31:*.arc=01;31:*.arj=01;31:*.taz=01;31:*.lha=01;31:*.lz4=01;31:*.lzh=01;31:*.lzma=01;31:*.tlz=01;31:*.txz=01;31:*.tzo=01;31:*.t7z=01;31:*.zip=01;31:*.z=01;31:*.Z=01;31:*.dz=01;31:*.gz=01;31:*.lrz=01;31:*.lz=01;31:*.lzo=01;31:*.xz=01;31:*.bz2=01;31:*.bz=01;31:*.tbz=01;31:*.tbz2=01;31:*.tz=01;31:*.deb=01;31:*.rpm=01;31:*.jar=01;31:*.war=01;31:*.ear=01;31:*.sar=01;31:*.rar=01;31:*.alz=01;31:*.ace=01;31:*.zoo=01;31:*.cpio=01;31:*.7z=01;31:*.rz=01;31:*.cab=01;31:*.jpg=01;35:*.jpeg=01;35:*.gif=01;35:*.bmp=01;35:*.pbm=01;35:*.pgm=01;35:*.ppm=01;35:*.tga=01;35:*.xbm=01;35:*.xpm=01;35:*.tif=01;35:*.tiff=01;35:*.png=01;35:*.svg=01;35:*.svgz=01;35:*.mng=01;35:*.pcx=01;35:*.mov=01;35:*.mpg=01;35:*.mpeg=01;35:*.m2v=01;35:*.mkv=01;35:*.webm=01;35:*.ogm=01;35:*.mp4=01;35:*.m4v=01;35:*.mp4v=01;35:*.vob=01;35:*.qt=01;35:*.nuv=01;35:*.wmv=01;35:*.asf=01;35:*.rm=01;35:*.rmvb=01;35:*.flc=01;35:*.avi=01;35:*.fli=01;35:*.flv=01;35:*.gl=01;35:*.dl=01;35:*.xcf=01;35:*.xwd=01;35:*.yuv=01;35:*.cgm=01;35:*.emf=01;35:*.axv=01;35:*.anx=01;35:*.ogv=01;35:*.ogx=01;35:*.aac=01;36:*.au=01;36:*.flac=01;36:*.mid=01;36:*.midi=01;36:*.mka=01;36:*.mp3=01;36:*.mpc=01;36:*.ogg=01;36:*.ra=01;36:*.wav=01;36:*.axa=01;36:*.oga=01;36:*.spx=01;36:*.xspf=01;36:
MAIL=/var/spool/mail/root
PATH=/usr/local/sbin:/usr/local/bin:/usr/sbin:/usr/bin:/root/bin
PWD=/root
LANG=en_US.UTF-8
SELINUX_LEVEL_REQUESTED=
HISTCONTROL=ignoredups
SHLVL=1
HOME=/root
LOGNAME=root
SSH_CONNECTION=192.168.137.34 52652 192.168.137.73 22
LESSOPEN=||/usr/bin/lesspipe.sh %s
XDG_RUNTIME_DIR=/run/user/0
_=/usr/bin/env
[root@centos73 ~]# printenv
XDG_SESSION_ID=3
HOSTNAME=centos73.huawei.com
SELINUX_ROLE_REQUESTED=
TERM=xterm
SHELL=/bin/bash
HISTSIZE=1000
SSH_CLIENT=192.168.137.34 52652 22
SELINUX_USE_CURRENT_RANGE=
SSH_TTY=/dev/pts/0
USER=root
LS_COLORS=rs=0:di=01;34:ln=01;36:mh=00:pi=40;33:so=01;35:do=01;35:bd=40;33;01:cd=40;33;01:or=40;31;01:mi=01;05;37;41:su=37;41:sg=30;43:ca=30;41:tw=30;42:ow=34;42:st=37;44:ex=01;32:*.tar=01;31:*.tgz=01;31:*.arc=01;31:*.arj=01;31:*.taz=01;31:*.lha=01;31:*.lz4=01;31:*.lzh=01;31:*.lzma=01;31:*.tlz=01;31:*.txz=01;31:*.tzo=01;31:*.t7z=01;31:*.zip=01;31:*.z=01;31:*.Z=01;31:*.dz=01;31:*.gz=01;31:*.lrz=01;31:*.lz=01;31:*.lzo=01;31:*.xz=01;31:*.bz2=01;31:*.bz=01;31:*.tbz=01;31:*.tbz2=01;31:*.tz=01;31:*.deb=01;31:*.rpm=01;31:*.jar=01;31:*.war=01;31:*.ear=01;31:*.sar=01;31:*.rar=01;31:*.alz=01;31:*.ace=01;31:*.zoo=01;31:*.cpio=01;31:*.7z=01;31:*.rz=01;31:*.cab=01;31:*.jpg=01;35:*.jpeg=01;35:*.gif=01;35:*.bmp=01;35:*.pbm=01;35:*.pgm=01;35:*.ppm=01;35:*.tga=01;35:*.xbm=01;35:*.xpm=01;35:*.tif=01;35:*.tiff=01;35:*.png=01;35:*.svg=01;35:*.svgz=01;35:*.mng=01;35:*.pcx=01;35:*.mov=01;35:*.mpg=01;35:*.mpeg=01;35:*.m2v=01;35:*.mkv=01;35:*.webm=01;35:*.ogm=01;35:*.mp4=01;35:*.m4v=01;35:*.mp4v=01;35:*.vob=01;35:*.qt=01;35:*.nuv=01;35:*.wmv=01;35:*.asf=01;35:*.rm=01;35:*.rmvb=01;35:*.flc=01;35:*.avi=01;35:*.fli=01;35:*.flv=01;35:*.gl=01;35:*.dl=01;35:*.xcf=01;35:*.xwd=01;35:*.yuv=01;35:*.cgm=01;35:*.emf=01;35:*.axv=01;35:*.anx=01;35:*.ogv=01;35:*.ogx=01;35:*.aac=01;36:*.au=01;36:*.flac=01;36:*.mid=01;36:*.midi=01;36:*.mka=01;36:*.mp3=01;36:*.mpc=01;36:*.ogg=01;36:*.ra=01;36:*.wav=01;36:*.axa=01;36:*.oga=01;36:*.spx=01;36:*.xspf=01;36:
MAIL=/var/spool/mail/root
PATH=/usr/local/sbin:/usr/local/bin:/usr/sbin:/usr/bin:/root/bin
PWD=/root
LANG=en_US.UTF-8
SELINUX_LEVEL_REQUESTED=
HISTCONTROL=ignoredups
SHLVL=1
HOME=/root
LOGNAME=root
SSH_CONNECTION=192.168.137.34 52652 192.168.137.73 22
LESSOPEN=||/usr/bin/lesspipe.sh %s
XDG_RUNTIME_DIR=/run/user/0
_=/usr/bin/printenv
[root@centos73 ~]# export
declare -x HISTCONTROL="ignoredups"
declare -x HISTSIZE="1000"
declare -x HOME="/root"
declare -x HOSTNAME="centos73.huawei.com"
declare -x LANG="en_US.UTF-8"
declare -x LESSOPEN="||/usr/bin/lesspipe.sh %s"
declare -x LOGNAME="root"
declare -x LS_COLORS="rs=0:di=01;34:ln=01;36:mh=00:pi=40;33:so=01;35:do=01;35:bd=40;33;01:cd=40;33;01:or=40;31;01:mi=01;05;37;41:su=37;41:sg=30;43:ca=30;41:tw=30;42:ow=34;42:st=37;44:ex=01;32:*.tar=01;31:*.tgz=01;31:*.arc=01;31:*.arj=01;31:*.taz=01;31:*.lha=01;31:*.lz4=01;31:*.lzh=01;31:*.lzma=01;31:*.tlz=01;31:*.txz=01;31:*.tzo=01;31:*.t7z=01;31:*.zip=01;31:*.z=01;31:*.Z=01;31:*.dz=01;31:*.gz=01;31:*.lrz=01;31:*.lz=01;31:*.lzo=01;31:*.xz=01;31:*.bz2=01;31:*.bz=01;31:*.tbz=01;31:*.tbz2=01;31:*.tz=01;31:*.deb=01;31:*.rpm=01;31:*.jar=01;31:*.war=01;31:*.ear=01;31:*.sar=01;31:*.rar=01;31:*.alz=01;31:*.ace=01;31:*.zoo=01;31:*.cpio=01;31:*.7z=01;31:*.rz=01;31:*.cab=01;31:*.jpg=01;35:*.jpeg=01;35:*.gif=01;35:*.bmp=01;35:*.pbm=01;35:*.pgm=01;35:*.ppm=01;35:*.tga=01;35:*.xbm=01;35:*.xpm=01;35:*.tif=01;35:*.tiff=01;35:*.png=01;35:*.svg=01;35:*.svgz=01;35:*.mng=01;35:*.pcx=01;35:*.mov=01;35:*.mpg=01;35:*.mpeg=01;35:*.m2v=01;35:*.mkv=01;35:*.webm=01;35:*.ogm=01;35:*.mp4=01;35:*.m4v=01;35:*.mp4v=01;35:*.vob=01;35:*.qt=01;35:*.nuv=01;35:*.wmv=01;35:*.asf=01;35:*.rm=01;35:*.rmvb=01;35:*.flc=01;35:*.avi=01;35:*.fli=01;35:*.flv=01;35:*.gl=01;35:*.dl=01;35:*.xcf=01;35:*.xwd=01;35:*.yuv=01;35:*.cgm=01;35:*.emf=01;35:*.axv=01;35:*.anx=01;35:*.ogv=01;35:*.ogx=01;35:*.aac=01;36:*.au=01;36:*.flac=01;36:*.mid=01;36:*.midi=01;36:*.mka=01;36:*.mp3=01;36:*.mpc=01;36:*.ogg=01;36:*.ra=01;36:*.wav=01;36:*.axa=01;36:*.oga=01;36:*.spx=01;36:*.xspf=01;36:"
declare -x MAIL="/var/spool/mail/root"
declare -x OLDPWD
declare -x PATH="/usr/local/sbin:/usr/local/bin:/usr/sbin:/usr/bin:/root/bin"
declare -x PWD="/root"
declare -x SELINUX_LEVEL_REQUESTED=""
declare -x SELINUX_ROLE_REQUESTED=""
declare -x SELINUX_USE_CURRENT_RANGE=""
declare -x SHELL="/bin/bash"
declare -x SHLVL="1"
declare -x SSH_CLIENT="192.168.137.34 52652 22"
declare -x SSH_CONNECTION="192.168.137.34 52652 192.168.137.73 22"
declare -x SSH_TTY="/dev/pts/0"
declare -x TERM="xterm"
declare -x USER="root"
declare -x XDG_RUNTIME_DIR="/run/user/0"
declare -x XDG_SESSION_ID="3"
[root@centos73 ~]# declare -x
declare -x HISTCONTROL="ignoredups"
declare -x HISTSIZE="1000"
declare -x HOME="/root"
declare -x HOSTNAME="centos73.huawei.com"
declare -x LANG="en_US.UTF-8"
declare -x LESSOPEN="||/usr/bin/lesspipe.sh %s"
declare -x LOGNAME="root"
declare -x LS_COLORS="rs=0:di=01;34:ln=01;36:mh=00:pi=40;33:so=01;35:do=01;35:bd=40;33;01:cd=40;33;01:or=40;31;01:mi=01;05;37;41:su=37;41:sg=30;43:ca=30;41:tw=30;42:ow=34;42:st=37;44:ex=01;32:*.tar=01;31:*.tgz=01;31:*.arc=01;31:*.arj=01;31:*.taz=01;31:*.lha=01;31:*.lz4=01;31:*.lzh=01;31:*.lzma=01;31:*.tlz=01;31:*.txz=01;31:*.tzo=01;31:*.t7z=01;31:*.zip=01;31:*.z=01;31:*.Z=01;31:*.dz=01;31:*.gz=01;31:*.lrz=01;31:*.lz=01;31:*.lzo=01;31:*.xz=01;31:*.bz2=01;31:*.bz=01;31:*.tbz=01;31:*.tbz2=01;31:*.tz=01;31:*.deb=01;31:*.rpm=01;31:*.jar=01;31:*.war=01;31:*.ear=01;31:*.sar=01;31:*.rar=01;31:*.alz=01;31:*.ace=01;31:*.zoo=01;31:*.cpio=01;31:*.7z=01;31:*.rz=01;31:*.cab=01;31:*.jpg=01;35:*.jpeg=01;35:*.gif=01;35:*.bmp=01;35:*.pbm=01;35:*.pgm=01;35:*.ppm=01;35:*.tga=01;35:*.xbm=01;35:*.xpm=01;35:*.tif=01;35:*.tiff=01;35:*.png=01;35:*.svg=01;35:*.svgz=01;35:*.mng=01;35:*.pcx=01;35:*.mov=01;35:*.mpg=01;35:*.mpeg=01;35:*.m2v=01;35:*.mkv=01;35:*.webm=01;35:*.ogm=01;35:*.mp4=01;35:*.m4v=01;35:*.mp4v=01;35:*.vob=01;35:*.qt=01;35:*.nuv=01;35:*.wmv=01;35:*.asf=01;35:*.rm=01;35:*.rmvb=01;35:*.flc=01;35:*.avi=01;35:*.fli=01;35:*.flv=01;35:*.gl=01;35:*.dl=01;35:*.xcf=01;35:*.xwd=01;35:*.yuv=01;35:*.cgm=01;35:*.emf=01;35:*.axv=01;35:*.anx=01;35:*.ogv=01;35:*.ogx=01;35:*.aac=01;36:*.au=01;36:*.flac=01;36:*.mid=01;36:*.midi=01;36:*.mka=01;36:*.mp3=01;36:*.mpc=01;36:*.ogg=01;36:*.ra=01;36:*.wav=01;36:*.axa=01;36:*.oga=01;36:*.spx=01;36:*.xspf=01;36:"
declare -x MAIL="/var/spool/mail/root"
declare -x OLDPWD
declare -x PATH="/usr/local/sbin:/usr/local/bin:/usr/sbin:/usr/bin:/root/bin"
declare -x PWD="/root"
declare -x SELINUX_LEVEL_REQUESTED=""
declare -x SELINUX_ROLE_REQUESTED=""
declare -x SELINUX_USE_CURRENT_RANGE=""
declare -x SHELL="/bin/bash"
declare -x SHLVL="1"
declare -x SSH_CLIENT="192.168.137.34 52652 22"
declare -x SSH_CONNECTION="192.168.137.34 52652 192.168.137.73 22"
declare -x SSH_TTY="/dev/pts/0"
declare -x TERM="xterm"
declare -x USER="root"
declare -x XDG_RUNTIME_DIR="/run/user/0"
declare -x XDG_SESSION_ID="3"
set查看系统的变量。
使用less更方便查看 set | less
BASH=/bin/bash
BASHOPTS=checkwinsize:cmdhist:expand_aliases:extglob:extquote:force_fignore:histappend:interactive_comments:login_shell:progcomp:promptvars:sourcepath
BASH_ALIASES=()
BASH_ARGC=()
BASH_ARGV=()
BASH_CMDS=()
BASH_COMPLETION_COMPAT_DIR=/etc/bash_completion.d
BASH_LINENO=()
BASH_REMATCH=()
BASH_SOURCE=()
BASH_VERSINFO=([0]="4" [1]="2" [2]="46" [3]="2" [4]="release" [5]="x86_64-redhat-linux-gnu")
BASH_VERSION=‘4.2.46(2)-release‘
COLUMNS=157
COMP_WORDBREAKS=$‘ \t\n"\‘><=;|&(:‘
DIRSTACK=()
EUID=0
GROUPS=()
HISTCONTROL=ignoredups
HISTFILE=/root/.bash_history
HISTFILESIZE=1000
HISTSIZE=1000
HOME=/root
HOSTNAME=centos73.huawei.com
HOSTTYPE=x86_64
ID=0
IFS=$‘ \t\n‘
LANG=en_US.UTF-8
LESSOPEN=‘||/usr/bin/lesspipe.sh %s‘
LINES=31
LOGNAME=root
[root@centos73 ~]# set  |  less
[root@centos73 ~]# set  |  less  |  wc
   1876    6466   66831
PATH
SHELL
USER
UID
HOME
PWD
[root@centos73 ~]# echo   $PATH
/usr/local/sbin:/usr/local/bin:/usr/sbin:/usr/bin:/root/bin
[root@centos73 ~]# echo   $SHELL
/bin/bash
[root@centos73 ~]# echo   $UAER

[root@centos73 ~]# echo   $USER
root
[root@centos73 ~]# echo   $UID
0
[root@centos73 ~]# echo   $HOME
/root
[root@centos73 ~]# echo   $PWD
/root
[root@centos73 ~]# echo   $SHLVL
1
SHLVL查看shell的嵌套深度
[root@centos73 ~]# echo   $SHLVL
1
[root@centos73 ~]# bash
[root@centos73 ~]# echo   $SHLVL
2
[root@centos73 ~]# bash
[root@centos73 ~]# echo   $SHLVL
3
[root@centos73 ~]# exit
exit
[root@centos73 ~]# echo   $SHLVL
2
[root@centos73 ~]# exit
exit
LANG
MAIL
HOSTNAME
HISTSIZE
[root@centos73 ~]# echo   $LANG
en_US.UTF-8
[root@centos73 ~]# echo   $MAIL
/var/spool/mail/root
[root@centos73 ~]# echo   $HOSTMAME

[root@centos73 ~]# echo   $HOSTNAME
centos73.huawei.com
[root@centos73 ~]# echo   $HISTSIZE
1000
_也是一个变量。存的是上一个命令的参数。在脚本中可以调用。
[root@centos7 bin]# ll /etc/issue
-rw-r--r--. 1 root root 23 Apr 29 2018 /etc/issue
[root@centos7 bin]# cat $_
\S
Kernel \r on an \m
只读变量:只能声明,但不能修改和删除。
只读变量也是常量
查看只读变量:readonly –p
声明只读变量:readonly name 或者 declare -r name
查看系统定义的所有常量,使用declare -r 或者 readonly -p。显示的结果都是一样的。
[root@centos73 ~]# declare -r
declare -r BASHOPTS="checkwinsize:cmdhist:expand_aliases:extglob:extquote:force_fignore:histappend:interactive_comments:login_shell:progcomp:promptvars:sourcepath"
declare -ir BASHPID
declare -r BASH_COMPLETION_COMPAT_DIR="/etc/bash_completion.d"
declare -ar BASH_REMATCH=‘([0]="\$HISTS" [1]="\$" [2]="HISTS")‘
declare -ar BASH_VERSINFO=‘([0]="4" [1]="2" [2]="46" [3]="2" [4]="release" [5]="x86_64-redhat-linux-gnu")‘
declare -ir EUID="0"
declare -ir PPID="1485"
declare -r SHELLOPTS="braceexpand:emacs:hashall:histexpand:history:interactive-comments:monitor"
declare -ir UID="0"
[root@centos7 bin]# readonly -p
declare -r BASHOPTS="checkwinsize:cmdhist:expand_aliases:extglob:extquote:force_fignore:histappend:interactive_comments:progcomp:promptvars:sourcepath"
declare -ir BASHPID
declare -r BASH_COMPLETION_COMPAT_DIR="/etc/bash_completion.d"
declare -ar BASH_REMATCH=‘()‘
declare -ar BASH_VERSINFO=‘([0]="4" [1]="2" [2]="46" [3]="2" [4]="release" [5]="x86_64-redhat-linux-gnu")‘
declare -ir EUID="0"
declare -ir PPID="29362"
declare -r SHELLOPTS="braceexpand:emacs:hashall:histexpand:history:interactive-comments:monitor"
declare -ir UID="0"
declare -r pi="3.14"
[root@centos7 bin]# echo $pi
3.14
[root@centos7 bin]# pi=1234

bash: pi: readonly variable
声明只读变量:readonly name 或者 declare -r name
退出子进程,到父进程,那么刚才定义的常量就看不到了。
[root@centos73 ~]# echo   $$
1490
[root@centos73 ~]# bash
[root@centos73 ~]# echo   $$
1757
[root@centos73 ~]# pi
bash: pi: command not found
[root@centos73 ~]# readonly     pi=3.14
[root@centos73 ~]#  echo $pi
3.14
[root@centos73 ~]# pi=3.14
bash: pi: readonly variable
[root@centos73 ~]# pi=3.123445
bash: pi: readonly variable
[root@centos73 ~]# echo $$
1757
[root@centos73 ~]# exit
exit
[root@centos73 ~]# echo   $$
1490
[root@centos73 ~]#  echo $pi

[root@centos73 ~]#  echo $pi
先定义变量后续声明也可以的
[root@centos73 ~]# var1=xxxxxxxxxxxxx
[root@centos73 ~]# declare   -r  var1
[root@centos73 ~]# var1=234567890
-bash: var1: readonly variable
[root@centos73 ~]# var2=hhhhhhhhhhhhh;declare   -r  var2
[root@centos73 ~]# echo   $var2
hhhhhhhhhhhhh
[root@centos73 ~]# var2=yyyyyyyyyy
-bash: var2: readonly variable
子进程的特殊写法
[root@centos73 ~]# name=test;(echo  $name );
test
[root@centos73 ~]# name=test;(echo$name);
-bash: echotest: command not found
[root@centos73 ~]# name=test;( echo  $name );
test
[root@centos73 ~]# name=test;( echo  $ name );
$ name
[root@centos73 ~]# name=test; echo  $name;( echo  $name );
test
test

[root@centos73 ~]# name=test; (echo  $name; name=12345; echo  $name;) echo  $name ;
-bash: syntax error near unexpected token `echo‘
[root@centos73 ~]# name=test; (echo  $name; name=12345; echo  $name); echo  $name ;
test
12345
test
[root@centos73 ~]# cd  /etc/;pwd
/etc
[root@centos73 etc]# cd
[root@centos73 ~]# pwd
/root
[root@centos73 ~]# (cd /etc/ ; pwd)
/etc
[root@centos73 ~]# pwd
/root
上面的两个例子都是子进程的特殊写法,非常有用的。
因为有时就想执行临时的命令,但是又不想影响当前的工作环境就可以使用小括号,这样就可以临时开启子进程。
如果不用小括号就会把当前的路径都改了。
创建一个权限是600的文件
下面会把umask整个都改了,这样创建新的文件的权限也是600.
[root@centos73 ~]# cd  /app/
[root@centos73 app]# ls
[root@centos73 app]# cd
[root@centos73 ~]# umask   066
[root@centos73 ~]# touch   /app/f1
[root@centos73 ~]# ll  /app/
total 0
-rw-------. 1 root root 0 Feb  8 16:59 f1
[root@centos73 ~]# umask
0066
退出终端。加上括号,就相当于在子进程里面创建文件。
要创建的文件的权限修改了,是600,但是没有影响到原来的umask
[root@centos73 ~]# umask
0066
[root@centos73 ~]# exit
logout

Connection closed by foreign host.

Disconnected from remote host(192.168.137.73:22) at 17:06:52.

Type `help‘ to learn how to use Xshell prompt.
[c:\~]$ ssh   192.168.137.73


Connecting to 192.168.137.73:22...
Connection established.
To escape to local shell, press Ctrl+Alt+].

WARNING! The remote SSH server rejected X11 forwarding request.
Last login: Fri Feb  8 16:48:53 2019 from 192.168.137.34
[root@centos73 ~]# umask
0022
[root@centos73 ~]# ll  /app/
total 0
-rw-------. 1 root root 0 Feb  8 17:06 f1
[root@centos73 ~]# rm  -f  /app/*
[root@centos73 ~]# ll  /app/
total 0
[root@centos73 ~]# (umask   066 ;touch   /app/f1)
[root@centos73 ~]# ll  /app/
total 0
-rw-------. 1 root root 0 Feb  8 17:07 f1
[root@centos73 ~]# umask
0022
利用这个特性定义变量。临时用完就结束了,不用uset了。建议小括号中间的内容和小括号空格,更清楚。
[root@centos73 ~]# (name=abcdef ;touch   /app/$name.txt)
[root@centos73 ~]# ls   /app/
abcdef.txt  f1
[root@centos73 ~]# echo   $name
两个命令的执行结果要放到一个文件中,也是需要使用小括号。
实际上加小括号也是开了一个子进程。
[root@centos73 ~]# ls
anaconda-ks.cfg  fstab  tftp
[root@centos73 ~]# pwd
/root
[root@centos73 ~]# ( ls;pwd )  >   /app/abcdef.txt
[root@centos73 ~]# cat  /app/abcdef.txt
anaconda-ks.cfg
fstab
tftp
/root
1、编写脚本/root/bin/argsnum.sh
接受一个文件路径作为参数;如果参数个数小于1,则提示用户“至少应该给一个参数”,并立即退出。
如果参数个数不小于1,则显示第一个参数所指向的文件中的空白行数。
[root@centos73 shell_scripts]# cat  argsnum.sh
#!/bin/bash
#Author=wang
[ $# -lt 1 ] && echo "must one parameter" && exit 1
[ ! -f $1 ] && echo " file not exist" && exit 2
echo `cat $1 |grep "^[[:space:]]*$" |wc -l`
[root@centos73 shell_scripts]# cat /etc/passwd
root:x:0:0:user20,,123456:/root:/bin/bash
bin:x:1:1:bin:/bin:/sbin/nologin
daemon:x:2:2:daemon:/sbin:/sbin/nologin
adm:x:3:4:adm:/var/adm:/sbin/nologin
lp:x:4:7:lp:/var/spool/lpd:/sbin/nologin
sync:x:5:0:sync:/sbin:/bin/sync
shutdown:x:6:0:shutdown:/sbin:/sbin/shutdown
halt:x:7:0:halt:/sbin:/sbin/halt
mail:x:8:12:mail:/var/spool/mail:/sbin/nologin
operator:x:11:0:operator:/root:/sbin/nologin
games:x:12:100:games:/usr/games:/sbin/nologin
ftp:x:14:50:FTP User:/var/ftp:/sbin/nologin
nobody:x:99:99:Nobody:/:/sbin/nologin
systemd-network:x:192:192:systemd Network Management:/:/sbin/nologin
dbus:x:81:81:System message bus:/:/sbin/nologin
polkitd:x:999:998:User for polkitd:/:/sbin/nologin
sshd:x:74:74:Privilege-separated SSH:/var/empty/sshd:/sbin/nologin
postfix:x:89:89:postfix,,123456:/var/spool/postfix:/sbin/nologin
dhcpd:x:177:177:DHCP server:/:/sbin/nologin
apache:x:48:48:Apache:/usr/share/httpd:/sbin/nologin
user1:x:1001:1001:user1,,123456:/home/user1:/bin/bash
user2:x:1002:1002:user2,,123456:/home/user2:/bin/bash
user3:x:1003:1003:user3,,123456:/home/user3:/bin/bash
user4:x:1004:1004:user4,,123456:/home/user4:/bin/bash
user5:x:1005:1005:user5,,123456:/home/user5:/bin/bash
user6:x:1006:1006:user6,,123456:/home/user6:/bin/bash
user7:x:1007:1007:user7,,123456:/home/user7:/bin/bash
user8:x:1008:1008:user8,,123456:/home/user8:/bin/bash
user9:x:1009:1009:user9,,123456:/home/user9:/bin/bash
user10:x:1010:1010:user10,,123456:/home/user10:/bin/bash
user11:x:1011:1011:user11,,123456:/home/user11:/bin/bash
user12:x:1012:1012:user12,,123456:/home/user12:/bin/bash
user13:x:1013:1013:user13,,123456:/home/user13:/bin/bash
user14:x:1014:1014:user14,,123456:/home/user14:/bin/bash
user15:x:1015:1015:user15,,123456:/home/user15:/bin/bash
user16:x:1016:1016:user16,,123456:/home/user16:/bin/bash
user17:x:1017:1017:user17,,123456:/home/user17:/bin/bash
user18:x:1018:1018:user18,,123456:/home/user18:/bin/bash
user19:x:1019:1019:user19,,123456:/home/user19:/bin/bash
user20:x:1020:1020:user20,,123456:/home/user20:/bin/bash
tss:x:59:59:Account used by the trousers package to sandbox the tcsd daemon:/dev/null:/sbin/nologin
cracker:x:1021:1021::/home/cracker:/bin/bash
mysql:x:27:27:MariaDB Server:/var/lib/mysql:/sbin/nologin
ntp:x:38:38::/etc/ntp:/sbin/nologin
[root@centos73 shell_scripts]# cat /etc/issue
\S
Kernel \r on an \m
执行脚本
[root@centos73 shell_scripts]# bash  argsnum.sh   /etc/passwd
0
[root@centos73 shell_scripts]# bash  argsnum.sh   /etc/issue
1
[root@centos73 shell_scripts]# bash  argsnum.sh    1
 file not exist
[root@centos73 shell_scripts]# bash  argsnum.sh    100
 file not exist
[root@centos73 shell_scripts]# bash  argsnum.sh
must one parameter
2、编写脚本/root/bin/hostping.sh
接受一个主机的IPv4地址做为参数,测试是否可连通。如果能ping通,则提示用户“该IP地址可访问”。
如果不可ping通,则提示用户“该IP地址不可访问”。
[root@centos73 shell_scripts]# cat hostping.sh
#!/bin/bash
#Author=wang
[ $# -lt 1 ] && echo "must a parameter " && exit 1
[[ "$1" =~ ^(([0-9]|([1-9][0-9])|(1[0-9][0-9])|(2[0-4][0-9])|(25[0-5]))(\.([0-9]|([1-9][0-9])|(1[0-9][0-9])|(2[0-4][0-9])|(25[0-5]))){3})$ ]]
[ $? -ne 0 ] && echo " ip is not reacheable" && exit 2
ping -t 1 -c 1 $1 &>/dev/null  && echo "ip is reachable" ||echo "ip is not reachable"
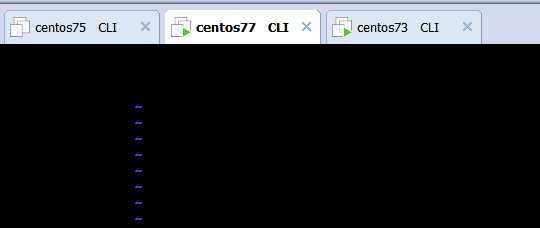
我启动了虚拟机73和77,并且使用xshell远程连接
执行脚本
[root@centos73 shell_scripts]# bash  hostping.sh
must a parameter
[root@centos73 shell_scripts]# bash  hostping.sh   192.168.137.73
ip is reachable
[root@centos73 shell_scripts]# bash  hostping.sh   192.168.137.75
ip is not reachable
[root@centos73 shell_scripts]# bash  hostping.sh   192.168.137.77
ip is reachable
[root@centos73 shell_scripts]# bash  hostping.sh   192.168.137.1
ip is reachable
3、编写脚本/root/bin/checkdisk.sh,检查磁盘分区空间和inode使用率,如果超过80%,就发广播警告空间将满。
[root@centos73 shell_scripts]# cat  diskcheck.sh
#!/bin/bash
#Author=wang

#while  true  ;do
usage=10
df  -h   |  grep  "/dev/sd"  |   while  read   disk  ;do
     per=`echo   $disk  |  cut  -d" "   -f5  |  cut  -d%  -f1`
     part=`echo   $disk  |  cut  -d" "   -f1`
     [   "$per"    -gt  "$usage"  ]   &&   echo  "$part  will  be  full ,over  ${usage}% "
#变量后面有百分号就要加上花括号,以免报错
done


#disk是变量,表示的每一行。
[root@centos73 shell_scripts]# df
Filesystem     1K-blocks    Used Available Use% Mounted on
/dev/sda2       52403200 1509704  50893496   3% /
devtmpfs          487964       0    487964   0% /dev
tmpfs             498988       0    498988   0% /dev/shm
tmpfs             498988    7776    491212   2% /run
tmpfs             498988       0    498988   0% /sys/fs/cgroup
/dev/sr0         4364408 4364408         0 100% /mnt
/dev/sda3       20961280   87448  20873832   1% /app
/dev/sda1        1038336  126596    911740  13% /boot
tmpfs              99800       0     99800   0% /run/user/0
[root@centos73 shell_scripts]#
法2:
[root@centos73 shell_scripts]# cat  diskcheck1.sh
#!/bin/bash
#Author=wang
declare -i data_limit=10
declare -i inode_limit=10
declare -i data_block_max=`df |egrep "/dev/[sh]d.*" |egrep "[0-9]{1,3}%" -o |egrep "[0-9]{1,3}" -o |sort -nr |head -n 1`
declare -i inode_block_max=`df -i |egrep "/dev/[sh]d.*" |egrep "[0-9]{1,3}%" -o |egrep "[0-9]{1,3}" -o |sort -nr |head -n 1`


[ $data_block_max -ge $data_limit ] && wall "data_block beyond $data_limit"
[ $inode_block_max -ge $inode_limit ] && wall "inode_block beyond $inode_limit"
查看脚本执行是否成功。
进程使用退出状态来报告成功或失败。一共有256个值。
0 代表成功,1-255代表失败
$? 变量显示上一条命令的退出状态
这个很好理解,成功只有一种,失败是各种各样的
bash自定义退出状态码
exit [n]:自定义退出状态码
注意:脚本中一旦遇到exit命令,脚本会立即终止;终止退出状态取决于exit命令后面的数字。
注意:如果未给脚本指定退出状态码,整个脚本的退出状态码取决于脚本中执行的最后一条命令的状态码。
如果脚本中有一条错误的命令,最后一条是执行成功的,那么就成功了。
[root@centos73 shell_scripts]# 1.sh
-bash: 1.sh: command not found
[root@centos73 shell_scripts]# echo   $PATH
/usr/local/sbin:/usr/local/bin:/usr/sbin:/usr/bin:/root/bin

[root@centos73 shell_scripts]# PATH=$PATH:/root/shell_scripts/:/usr/local/sbin:/usr/local/bin:/usr/sbin:/usr/bin:/root/bin
[root@centos73 shell_scripts]# echo     $PATH
/usr/local/sbin:/usr/local/bin:/usr/sbin:/usr/bin:/root/bin:/root/shell_scripts/:/usr/local/sbin:/usr/local/bin:/usr/sbin:/usr/bin:/root/bin

[root@centos73 ~]# cat  .bash_profile
# .bash_profile

# Get the aliases and functions
if [ -f ~/.bashrc ]; then
    . ~/.bashrc
fi

# User specific environment and startup programs

PATH=$PATH:$HOME/bin

export PATH

[root@centos73 ~]# source   .bash_profile
[root@centos73 ~]# cat  .bash_profile
# .bash_profile

# Get the aliases and functions
if [ -f ~/.bashrc ]; then
    . ~/.bashrc
fi

# User specific environment and startup programs

PATH=$PATH:$HOME/bin

export PATH
[root@centos73 shell_scripts]# cd
[root@centos73 ~]# 1.sh
anaconda-ks.cfg  fstab    shell_scripts  tftp
ls: cannot access /err: No such file or directory
centos73.huawei.com
[root@centos73 ~]# echo $?
0
退出状态可以人为的指定
之前的返回值是系统自动分配的,可以自己自定义,不过不能超过255.
[root@centos73 ~]# cd  shell_scripts/
[root@centos73 shell_scripts]# ls
1.sh  backup1.sh  backup.sh
[root@centos73 shell_scripts]# cp   1.sh   2.sh
[root@centos73 shell_scripts]# vim  2.sh
[root@centos73 shell_scripts]# cat  2.sh
#!/bin/bash
ls
ls  /err
hostname
exit  99
[root@centos73 shell_scripts]# ll  2.sh
-rwxr-xr-x. 1 root root 42 Feb  8 17:50 2.sh
[root@centos73 shell_scripts]# 2.sh
1.sh  2.sh  backup1.sh    backup.sh
ls: cannot access /err: No such file or directory
centos73.huawei.com
[root@centos73 shell_scripts]# echo   $?
99
加上括号和不加是很大区别的。不加的话就会直接退出shell.但是加了之后就可以执行了。
[root@centos73 shell_scripts]# (exit  256)
[root@centos73 shell_scripts]# echo  $?
0
[root@centos73 shell_scripts]# (exit  25)
[root@centos73 shell_scripts]# echo  $?
25
[root@centos73 shell_scripts]# (exit  456)
[root@centos73 shell_scripts]# echo  $?
200
[root@centos73 shell_scripts]# (exit  0)
[root@centos73 shell_scripts]# echo  $?
0
[root@centos73 shell_scripts]# exit  25
logout

Connection closed by foreign host.

Disconnected from remote host(192.168.137.73:22) at 17:52:48.

Type `help‘ to learn how to use Xshell prompt.
[c:\~]$
位置变量:在脚本代码中调用通过命令行传递给脚本的参数
$1, $2, ...:对应第1、第2等参数,shift [n]换位置
$0: 命令本身
$*: 传递给脚本的所有参数,全部参数合为一个字符串
$@: 传递给脚本的所有参数,每个参数为独立字符串
$#: 传递给脚本的参数的个数
$@ $* 只在被双引号包起来的时候才会有差异
set -- 清空所有位置变量
位置变量
[root@centos73 ~]# n=10

[root@centos73 ~]# echo $n

10

[root@centos73 ~]# m=20

[root@centos73 ~]# echo $m

20


[root@centos73 ~]# echo $mn因为mn不是完整的变量


[root@centos73 ~]# echo ${m}n  这时m是变量,而n是普通的字符串了。

20n
$1表示的是字符里面的第一个字符串,$2表示的字符里面的第一个字符串
写一个脚本来执行
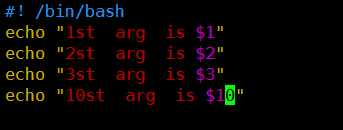
#!/bin/bash

echo "1st arg is $1"
echo "2st arg is $2"
echo "3st arg is $3"
echo "10st arg is $10"
[root@centos73 shell_scripts]# chmod +x arg.sh
[root@centos73 shell_scripts]# . arg.sh
1st arg is
2st arg is
3st arg is
10st arg is 0
为什么显示的是0?因为他不认为是$10,而是$1和0。$1没有参数,就只显示了0
给上面的变量加参数,即26个字母
[root@centos73 shell_scripts]# echo {a..z}

a b c d e f g h i j k l m n o p q r s t u v w x y z
[root@centos73 shell_scripts]# . arg.sh a b c d e f g h i j k l m n o p q r s t u v w x y z
1st arg is a
2st arg is b
3st arg is c
10st arg is a0为什么显示的是a0?因为他不认为是$10,而是$1和0。$1没有参数,就只显示了a0
要显示变量$10,那么就要使用花括号括起来
[root@centos73 shell_scripts]# echo {a..z}

a b c d e f g h i j k l m n o p q r s t u v w x y z
[root@centos73 shell_scripts]# . arg.sh a b c d e f g h i j k l m n o p q r s t u v w x y z
1st arg is a
2st arg is b
3st arg is c
10st arg is a0为什么显示的是a0?因为他不认为是$10,而是$1和0。$1没有参数,就只显示了a0
[root@centos73 shell_scripts]# bash arg.sh a b c
1st arg is a
2st arg is b
3st arg is c
10st arg is
All args are a b c
All args are a b c
All args are 3这个是是你电话费
The scriptname is arg.sh
set - -清空所有位置变量
#!/bin/bash
echo "1st arg is $1"
echo "2st arg is $2"
echo "3st arg is $3"
echo "10st arg is ${10}"
echo "All args are $*"
echo "All args are $@"
echo "All args are $#"
echo "The scriptname is $0"

echo "clear all args"
set --

echo "1st arg is $1"
echo "2st arg is $2"
echo "3st arg is $3"
echo "10st arg is ${10}"


[root@centos73 shell_scripts]# bash arg.sh a b c
1st arg is a
2st arg is b
3st arg is c
10st arg is
All args are a b c
All args are a b c
All args are 3
The scriptname is arg.sh
clear all args
1st arg is
2st arg is
3st arg is
10st arg is

[root@centos73 shell_scripts]# sh arg.sh a b c
1st arg is a
2st arg is b
3st arg is c
10st arg is
All args are a b c
All args are a b c
All args are 3
The scriptname is arg.sh
clear all args
1st arg is
2st arg is
3st arg is
10st arg is
$*: 传递给脚本的所有参数,全部参数合为一个字符串
$@: 传递给脚本的所有参数,每个参数为独立字符串
$@与 $*的区别
$@ $* 只在被双引号包起来的时候才会有差异。
编写一个特殊的脚本
调用第二个脚本a2.sh,但是调用的是第1个脚本中的所有参数。也就是第1个脚本的所有参数也是第2个脚本的所有参数。
创建a2.sh脚本
#!/bin/bash

echo "first is $1"

echo "second is $2"

echo "all args is $*"

echo a2.sh "$*"


#!/bin/bash
echo "a2.sh first  is $1"
echo "a2.sh second is $2"
echo "a2.sh all args is $*"

注意执行脚本之前加一下权限。输入chmod +x a*
shift语句非常有用,可以对位置参数调整位置
shift [n]换位置,其中n代表的是数字。
比如现在有4个位置参数,a,b,c,d。使用shift语句,那么就会把$1删除。
那么就要后面的往前移。那么b就成了$1了,$4没了。
每执行一次就会把位置参数往左移一位。

如果使用shift 2就表示把前面的两个挤掉。a,b就没有了。c就变成$1了,d就变成$2了。
#!/bin/bash
echo "first  is $1"
echo "second is $2"
echo "three is $3"
shift
echo "first  is $1"
echo "second is $2"
echo "three is $3"
[root@centos73 shell_scripts]# chmod +x shift.sh
[root@centos73 shell_scripts]# . shift.sh   a b c
first  is a
second is b
three is c
first  is b
second is c
three is


[root@centos73 shell_scripts]# . shift.sh   a b c d
first  is a
second is b
three is c
first  is b
second is c
three is d
#!/bin/bash
echo "first  is $1"
echo "second is $2"
echo "three is $3"
shift
echo $?
echo "first  is $1"
echo "second is $2"
echo "three is $3"
shift
echo $?
echo "first  is $1"
echo "second is $2"
echo "three is $3"
shift
echo $?


[root@centos73 shell_scripts]# vim  shift.sh
[root@centos73 shell_scripts]# . shift.sh a b
first  is a
second is b
three is
0
first  is b
second is
three is
0
first  is
second is
three is
1因为最后一次执行shift没有值了就会报错。
用户写的参数是不确定个数的。每次处理参数是一个个执行的。
使用shift以及$?,$?显示的是非0,那么就表示全部都处理完了。可以在脚本中只写$1,那么以后不管要处理多少个用户的参数都只要处理$1就可以了。
[root@centos73 shell_scripts]# cat shift1.sh
#!/bin/bash
shift
echo $?
[root@centos73 shell_scripts]# . shift1.sh a
0
[root@centos73 shell_scripts]# . shift1.sh
1
标签:env 状态码 stream 命名 脚本 dbr 一个个 ping ftp
原文地址:https://www.cnblogs.com/wang618/p/11035275.html