标签:动态 win asi 方向 ntb OLE oba mamicode 原理
上一章讲述了如何利用C4D图切割制作闪光效果。本章将讲述如何在上章文章描述的效果基础上加入椭圆动态效果以及闪动控制。如下图所示,椭圆运动主要分成两部分:外圈运动、内圈运动。其中内圈运动看似一个椭圆,实际上是由两个椭圆不同角度组成的。红色指向的是运动的小球,绿箭头是小球运动的方向。下面将讲述如何展示圆球运动,主要是运用canvas画布制作的,探测小球的运动轨迹,以及到点则控制对应块的闪烁。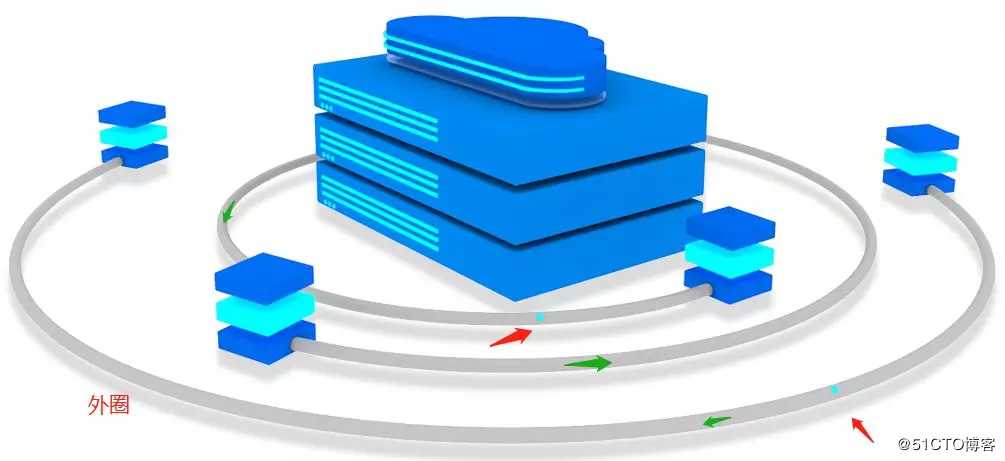
先了解一下椭圆运动函数circleRunEllipse整体,主要使用函数:
ellipseRun — 椭圆运动执行
drawCircle — 绘画指定位置的运动小球点
clearRun — 停止小球运动
drawEllipse — 画椭圆运动轨迹,用于调试匹配设计稿
drawPoint — 起始点、终止点调试
`/**
 * 首页运维与服务背景图动画
 * @param canvasID 画布ID
 * @param ellipseHeight 椭圆运动高度
 * @param ellipseWidth 椭圆运动宽度
 * @param type 哪一个圈,大、中、小--【1 | 2 | 3】
 */export function circleRunEllipse(canvasID, ellipseHeight, ellipseWidth, type) {    // 基础变量
    let canvas: any;    if (document.getElementById(canvasID)) {
        canvas = document.getElementById(canvasID);
    } else {        return ;
    }    let context = canvas.getContext(‘2d‘);    let width = canvas.width = 469;    let height = canvas.height = 1017;    let animationFrame = null; // 记录执行的动画,用于取消
// 椭圆运动
let circleX = width / 2 - 127; // 椭圆运动中心点
let circleY = height / 2; let ellipseA = ellipseWidth; // 长轴a
let ellipseB = ellipseHeight; // 短轴b
let speed = 0.012; // 控制运动速度
let ellipseTime = 0; // 控制运动时间变化
/**
* 椭圆运动执行
*/
function ellipseRun() { if (animationFrame) { window.cancelAnimationFrame(animationFrame);
}
animationFrame = window.requestAnimationFrame(ellipseRun);
context.clearRect(0, 0, width, height); // drawEllipse(circleX, circleY);
drawCircle(circleX + ellipseA * Math.cos(ellipseTime), circleY + ellipseB * Math.sin(ellipseTime)); if (type === 1) {
context.clearRect(0, 80, 35, 55); // 右侧点(25,80),高宽
context.clearRect(0, 880, 10, 5); // 左侧点(0,885)
// 结束点21.09
ellipseTime += speed; if (ellipseTime > 21.09) { if (!clearAnimationFrame()) { document.getElementsByClassName(‘service-cloud1‘)[0].className += ‘ service-cloud‘; document.getElementsByClassName(‘service-cloud4‘)[0].className = ‘service-cloud4‘;
} else { return ;
}
ellipseTime = 16.8;
clearRun(5);
}
} else if (type === 2) {
context.clearRect(0, 720, 210, 200); // 左侧点(208,720),高宽
context.clearRect(0, 308, 20, 415); // 右侧点(2,308),高宽
// 结束点16.29
ellipseTime -= speed; if (ellipseTime < 16.29) { if (!clearAnimationFrame()) { document.getElementsByClassName(‘service-cloud2‘)[0].className = ‘service-cloud2‘;
} else { return ;
}
ellipseTime = 19.45;
clearRun(5);
}
} else {
context.clearRect(0, 300, 43, 400); // 左侧点(40,700),高宽
context.clearRect(0, 0, 175, 307); // 右侧点(175,305),高宽
context.clearRect(142, 716, 30, 62); // 服务器右侧点(142,778),高宽,左侧点(169,716)
// 结束点18.08
ellipseTime -= speed; if (ellipseTime < 18.08) { if (!clearAnimationFrame()) { document.getElementsByClassName(‘service-cloud3‘)[0].className += ‘ service-cloud‘;
} else { return ;
}
ellipseTime = 21.24;
clearRun(5);
}
}
} /**
* 画实体圆,描述位置
*/
function drawCircle(x, y) {
context.save();
context.fillStyle = ‘#0ff‘;
context.globalAlpha = 0.92;
context.beginPath();
context.arc(x, y, 3.5, 0, Math.PI * 2); // 半径3
context.closePath();
context.fill();
context.restore();
} /**
* 画椭圆,用于匹配设计稿路径
* 1、画椭圆,使用lineTo,把椭圆分割许多片段
* 2、椭圆的三角函数表达式 x = a*cos(t), y = b * sin(t);
*/
function drawEllipse(x, y) { // 这样可以使得每次循环所绘制的路径(弧线)接近1像素
let step = (ellipseA > ellipseB) ? 1 / ellipseA : 1 / ellipseB;
context.save();
context.strokeStyle = ‘blue‘;
context.beginPath();
context.moveTo(x + ellipseA, y); for (let i = 0; i < Math.PI * 2; i += step) {
context.lineTo(x + ellipseA * Math.cos(i), y + ellipseB * Math.sin(i));
}
context.closePath();
context.stroke();
context.restore();
} /**
* 定点,用于消除隐藏多余路径
*/
function drawPoint(x, y) {
context.save();
context.fillStyle = ‘red‘;
context.globalAlpha = 0.95;
context.beginPath();
context.arc(x, y, 3, 0, Math.PI * 2);
context.closePath();
context.fill();
context.restore();
} /**
* 停止运动
* @param time 时间,单位【秒】
*/
function clearRun(time) {
context.clearRect(0, 0, width, height); window.cancelAnimationFrame(animationFrame); let timer = null; // 提前一秒执行闪动动画
let restartTimer = setTimeout(function() { if (clearAnimationFrame()) {
clearTimeout(restartTimer);
clearTimeout(timer); return ;
} if (type === 1) { document.getElementsByClassName(‘service-cloud1‘)[0].className = ‘service-cloud1‘; document.getElementsByClassName(‘service-cloud4‘)[0].className += ‘ service-cloud‘;
} else if (type === 2) { document.getElementsByClassName(‘service-cloud2‘)[0].className += ‘ service-cloud‘;
} else { document.getElementsByClassName(‘service-cloud3‘)[0].className = ‘service-cloud3‘;
}
clearTimeout(restartTimer);
}, (time - 1) * 1000);
timer = setTimeout(function() {
animationFrame = window.requestAnimationFrame(ellipseRun);
clearTimeout(timer);
}, time * 1000);
} /**
* 清除运动
*/
function clearAnimationFrame() { ... } // 指定开始点执行椭圆运动
if (type === 1) {
ellipseTime = 16.8; // ellipseTime = 21.09; // 结束点
if (document.getElementsByClassName(‘service-cloud4‘).length > 0) { document.getElementsByClassName(‘service-cloud4‘)[0].className += ‘ service-cloud‘;
}
} else if (type === 2) {
ellipseTime = 19.45; // ellipseTime = 16.29; // 结束点
if (document.getElementsByClassName(‘service-cloud2‘).length > 0) { document.getElementsByClassName(‘service-cloud2‘)[0].className += ‘ service-cloud‘;
}
} else if (type === 3) {
ellipseTime = 21.24; // ellipseTime = 18.08; // 结束点
} let startTimer = setTimeout(function() {
animationFrame = ellipseRun();
clearTimeout(startTimer);
}, 1000);
}`(1)从图上可以知道每个椭圆大小、倾斜角度均不同,那先得准备三个不同的画布,适合不同的椭圆运动。在上一章的代码基础上加上轨迹canvans的html代码,如下:
<div class="servicMainOut">
    ......
    <canvas id="homeCanvasBig" style="transform: rotate(90deg);position: absolute;top: -115px; left: 274px;"></canvas>
    <canvas id="homeCanvasMid" style="transform: rotate(90deg);position: absolute;top:-139px;left:276px;"></canvas>
    <canvas id="homeCanvasSmall" style="transform: rotate(90deg);position: absolute;top:-156px;left: 282px;"></canvas></div>
(2) 调用椭圆运动函数:
// 首页服务与运维动画jscircleRunEllipse(‘homeCanvasBig‘, 487, 169, 1);
circleRunEllipse(‘homeCanvasMid‘, 369, 123, 2);
setTimeout(function() {
    circleRunEllipse(‘homeCanvasSmall‘, 288, 92, 3);
}, 6014);
编写这些代码就可以具体实现了完整的小球沿椭圆运动及到点则闪烁及运动了。
下面以外圈homeCanvasBig为例讲述制作主要原理。
(1) 轨迹探测
上面的代码已具体实现了整个C4D效果了。但在开始椭圆运动之前,其实是先要探索匹配好整个椭圆的运动轨迹。开启测试的匹配轨迹函数drawEllipse(),暂时关闭小球运动drawCircle()以及注释clearRun(5)以便于调试。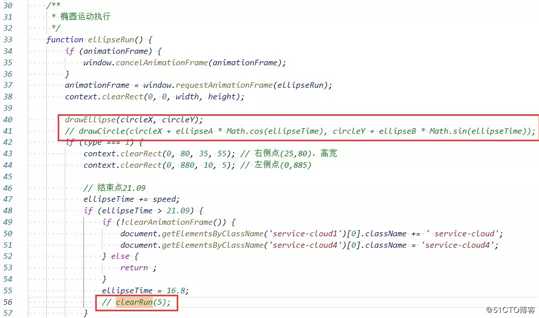
效果如下:
如何匹配椭圆轨迹,一般只要逐步调整以下变量:
ellipseHeight:调整椭圆长袖,椭圆的宽度变化。值越大,圆越大。
ellipseWidth:调整椭圆向北倾斜度。值越大,越倾向北。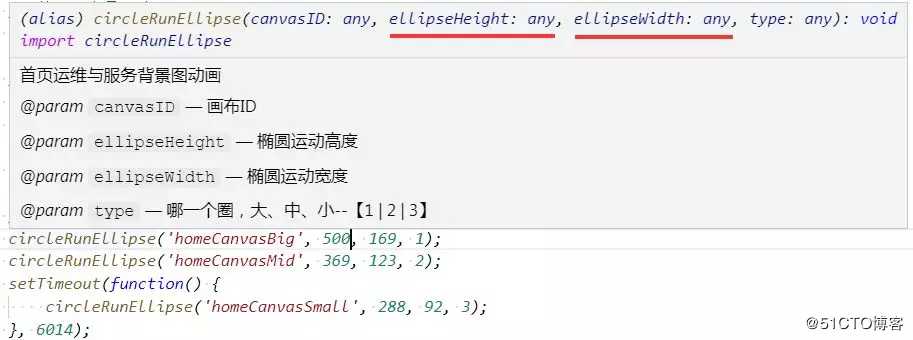
一般还搭配top跟left样式调整。
(2) 起始点、终止点定位
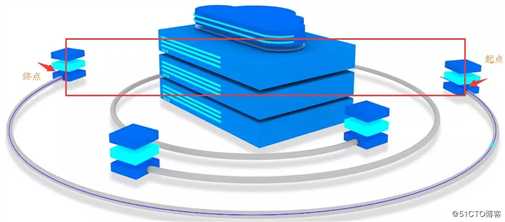
每个椭圆运动都有起始点和终止点,知道这两点的位置才能有利于我们控制隐藏不必要的轨迹以及闪烁效果。其实每个椭圆的开始都是有完整的轨迹的,通过drawPoint(x, y)函数定义到每一个点,这样就可以使用context.clearRect()函数取消不存在的轨迹。譬如:
(3) 闪烁控制
通过上面的起点、终点的定位,我们可以console.log出对应的ellipseTime的值。根据ellipseTime的值则可控制是否应当闪烁。并且ellipseTime增值可控制小球顺时针运动,减值则控制逆时针运动。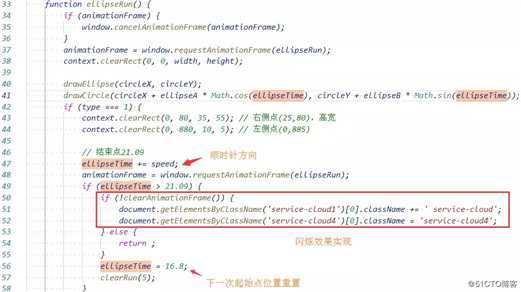

睿江云官网链接:https://www.eflycloud.com/home?from=RJ0027
标签:动态 win asi 方向 ntb OLE oba mamicode 原理
原文地址:https://blog.51cto.com/13475644/2416081