标签:本机 oca ted 根据 安装完成 get cuda window 配置
conda config --add channels https://mirrors.tuna.tsinghua.edu.cn/anaconda/pkgs/free/
conda config --add channels https://mirrors.tuna.tsinghua.edu.cn/anaconda/cloud/conda-forge
conda config --add channels https://mirrors.tuna.tsinghua.edu.cn/anaconda/cloud/msys2/

# 设置搜索时显示通道地址
conda config --set show_channel_urls yes
#添加pytorch的镜像
conda config --add channels https://mirrors.tuna.tsinghua.edu.cn/anaconda/cloud/pytorch/conda config --add channels https://mirrors.ustc.edu.cn/anaconda/pkgs/main/
conda config --add channels https://mirrors.ustc.edu.cn/anaconda/pkgs/free/
conda config --add channels https://mirrors.ustc.edu.cn/anaconda/cloud/conda-forge/
conda config --add channels https://mirrors.ustc.edu.cn/anaconda/cloud/msys2/
conda config --add channels https://mirrors.ustc.edu.cn/anaconda/cloud/bioconda/
conda config --add channels https://mirrors.ustc.edu.cn/anaconda/cloud/menpo/
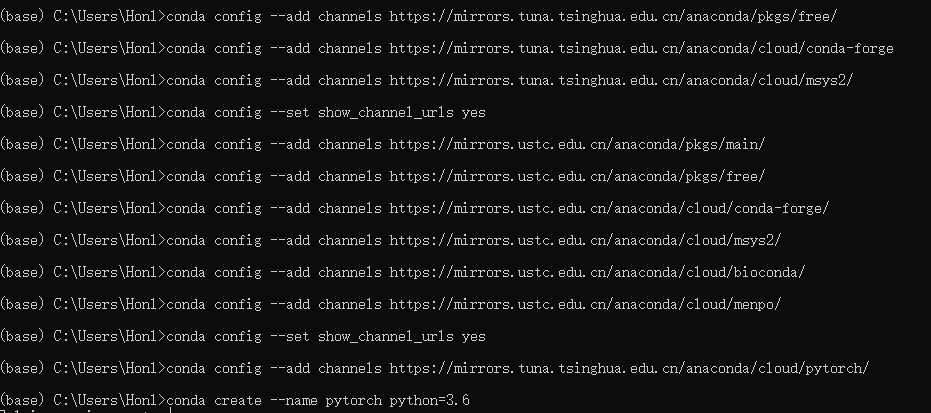
conda config --set show_channel_urls yes在windows下打开Anaconda Prompt中输入上面代码即可添加国内源。如图演示:
这一步影响后面安装的舒服程度。在Linux环境下,可以将上述配置写在配置文件~/.condarc中,如:
channels:
- https://mirrors.ustc.edu.cn/anaconda/pkgs/main/
- https://mirrors.ustc.edu.cn/anaconda/cloud/conda-forge/
- https://mirrors.tuna.tsinghua.edu.cn/anaconda/pkgs/free/
- defaults
show_channel_urls: true我倾向于根据框架创建不同的虚拟环境,创建好之后。
conda activate pytorch #激活环境
conda deactivate pytorch #退出环境
激活完成之后,命令行左边小括号中已经变成新环境的名字。这时候就可以去Pytorch官网查找自己适合的Pytorch。
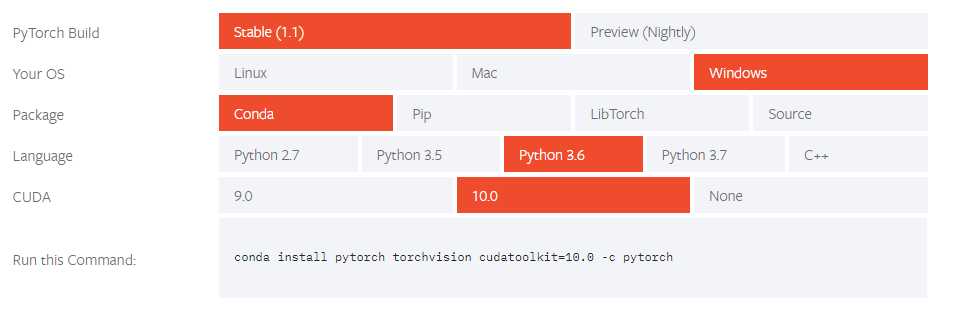
复制conda install 代码,记得去掉-c pytorch,这样才会使用刚刚换了的国内源下载。
按照提示安装,最后显示安装完成后。使用命令行测试是否安装成功,如下图:

这一步主要需要先检查本机显卡的cuda信息及适配cuda-sdk版本
https://www.cnblogs.com/litifeng/p/9094053.html
标签:本机 oca ted 根据 安装完成 get cuda window 配置
原文地址:https://www.cnblogs.com/Shambryce/p/11154574.html