标签:数据库 break 内网地址 版本 端口 ide 说明 ade 天翼
关闭天翼云主机的防火墙和selinux,操作系统是centos 7.6 ,天翼云主机默认不开放80,443端口,需要开放必须去做备案,故下面教程使用其它的端口,如开放了80,443的,请修改配置文件的对应端口即可1.安装epel源和wget和上传下传插件
命令:
yum -y install epel-release wget lrzsz
2.安装nux
命令:
rpm --import http://li.nux.ro/download/nux/RPM-GPG-KEY-nux.ro
rpm -Uvh http://li.nux.ro/download/nux/dextop/el7/x86_64/nux-dextop-release-0-1.el7.nux.noarch.rpm
3.安装python-pip
命令:
yum -y install python-pip
4.更新pip setuptools工具
命令:
pip install --upgrade setuptools -i https://pypi.tuna.tsinghua.edu.cn/simple
5.更新pip
命令:
python -m pip install --upgrade pip -i https://pypi.tuna.tsinghua.edu.cn/simple
6.安装 docker-compose
命令:
pip install docker-compose --ignore-installed requests -i https://pypi.tuna.tsinghua.edu.cn/simple
7.安装依赖包和nginx
命令:
yum -y install python-imaging MySQL-python python-memcached python-ldap python-urllib3 ffmpeg ffmpeg-devel nginx
8.安装pillow moviepy
命令:pip install pillow moviepy
9.编辑Mariadb数据库yum源
命令:
vi /etc/yum.repos.d/mariadb.repo 并输入如下内容
[mariadb]
name = MariaDB
baseurl = https://mirrors.ustc.edu.cn/mariadb/yum/10.4/centos7-amd64
gpgkey = https://mirrors.ustc.edu.cn/mariadb/yum/RPM-GPG-KEY-MariaDB
gpgcheck=1
10.安装mariadb数据库
命令:
yum -y install MariaDB-server MariaDB-client
11.启动数据库
命令:
systemctl start mariadb
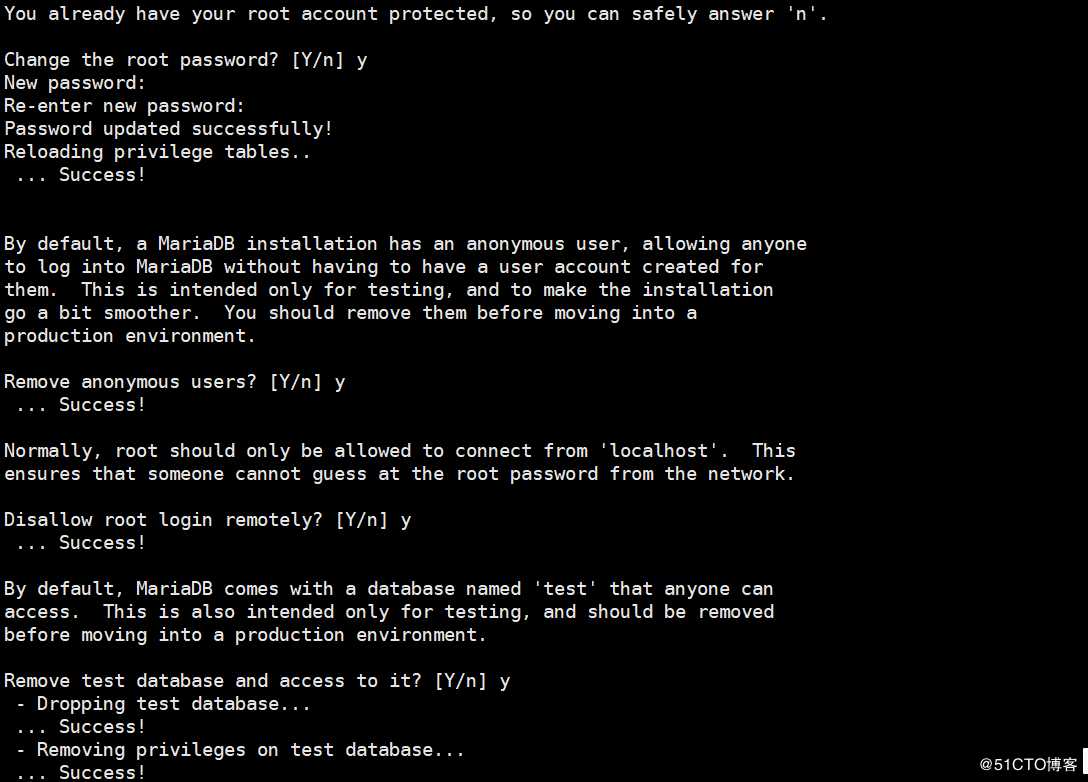
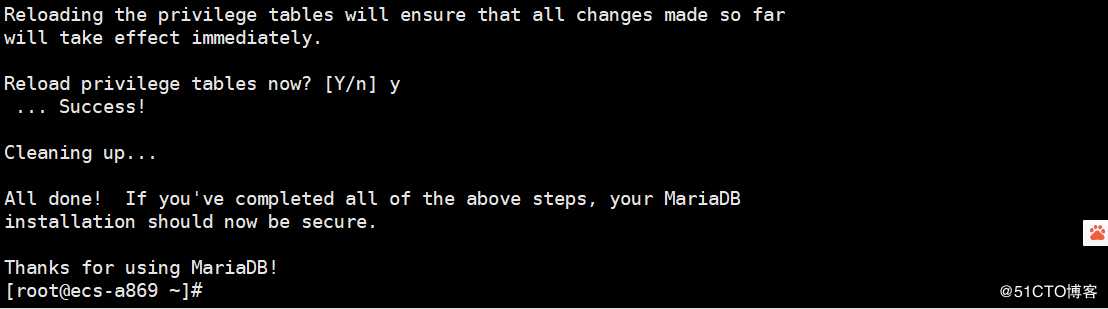
12.对数据库进行密码设置(数据库root用户的密码)
命令:mysql_secure_installation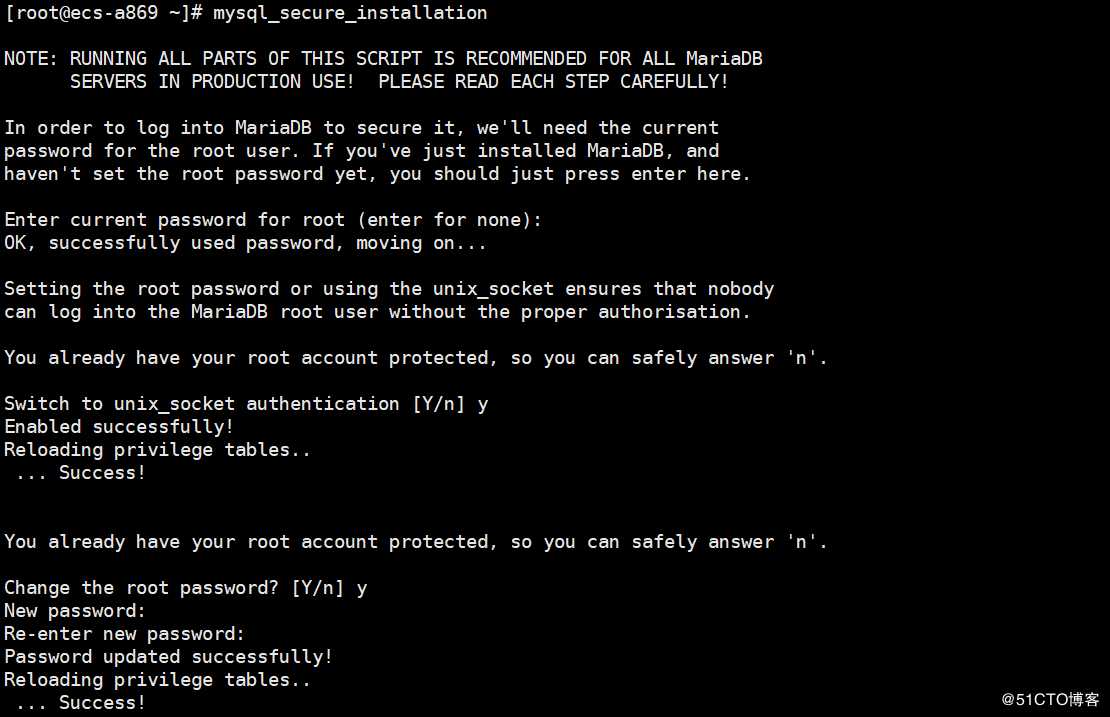
13.登录数据库
命令:
mysql -uroot -pa123456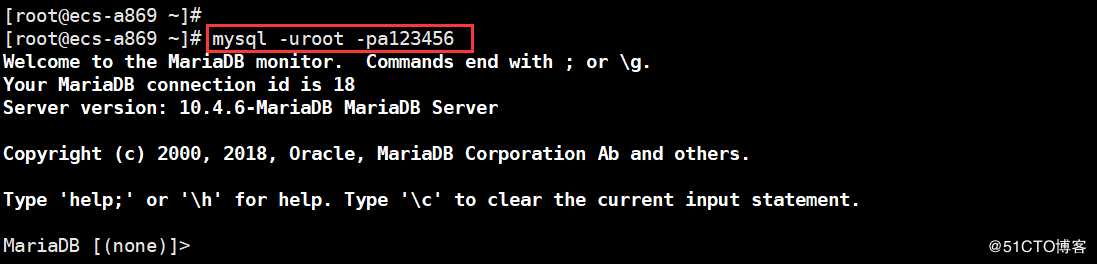
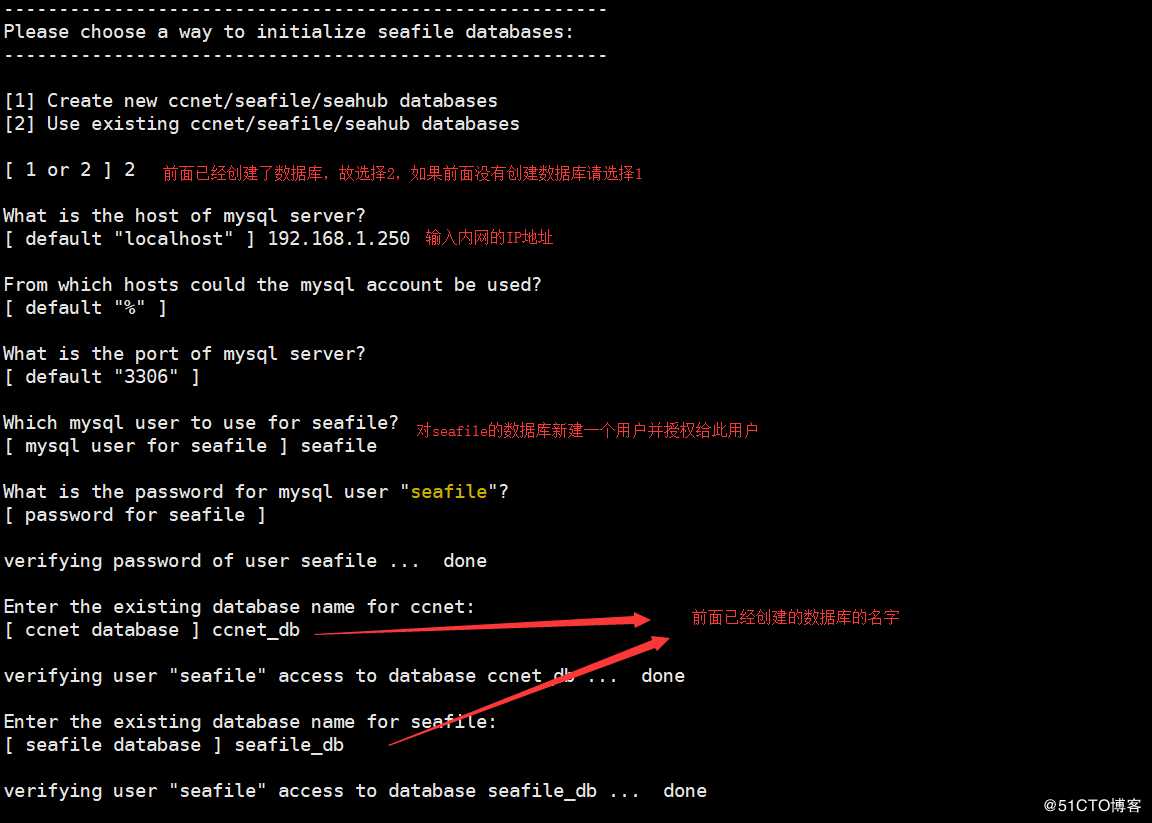
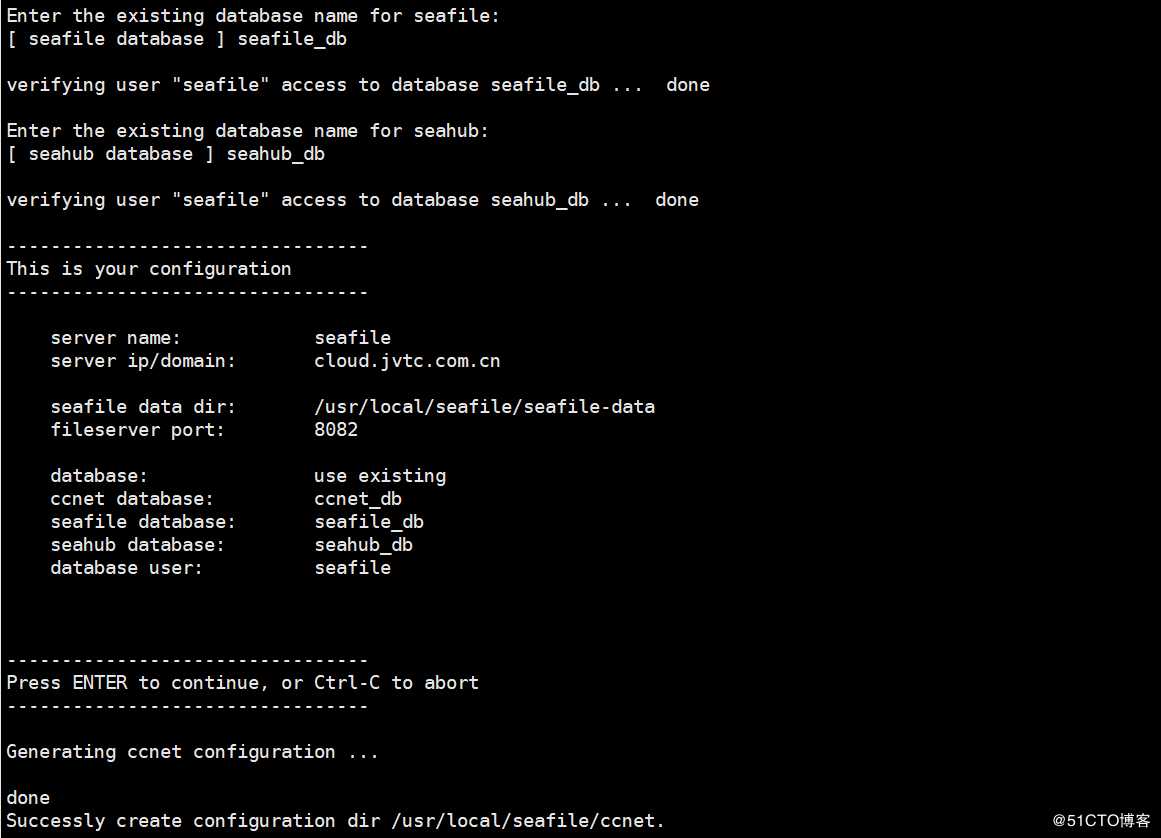
14.创建seafile需要的数据库及用户,并对此些数据库进行授权
命令:
create database ccnet_db character set = ‘utf8‘;
create database seafile_db character set = ‘utf8‘;
create database seahub_db character set = ‘utf8‘;
create user seafile@‘192.168.80.%‘ identified by ‘b123456‘;
grant all privileges on ccnet_db. to seafile@‘192.168.80.%‘ identified by ‘b123456‘;
grant all privileges on seafile_db. to seafile@‘192.168.80.%‘ identified by ‘b123456‘;
grant all privileges on seahub_db.* to seafile@‘192.168.80.%‘ identified by ‘b123456‘;
flush privileges;
exit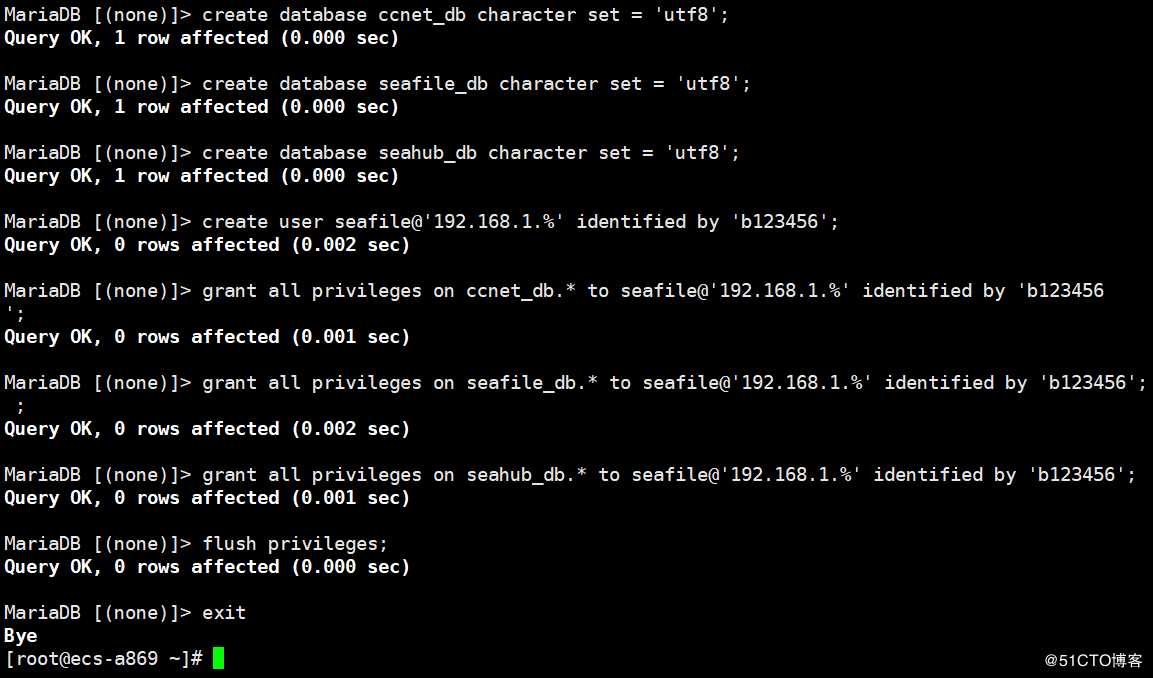
说明:天翼云主机给我分配的内网地址如下(故使用192.168.1.X网段,如果不是此网段请修改)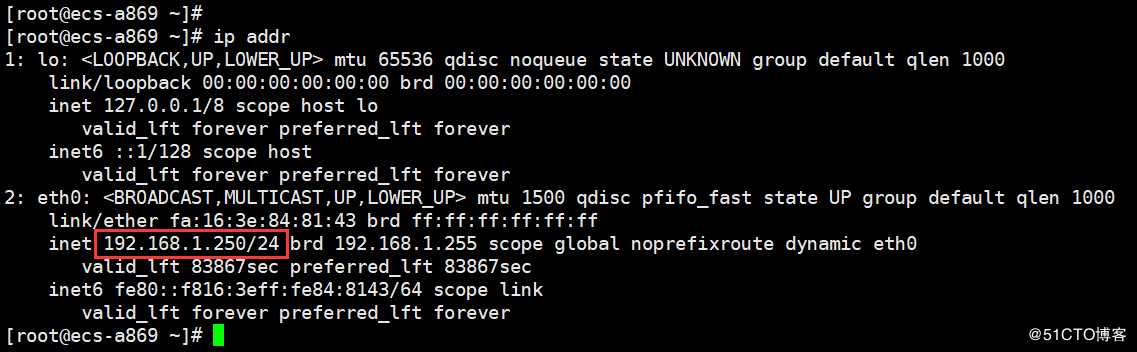
15.新建目录并把seafile安装文件上传至此目录
命令:
mkdir -pv /usr/local/seafile
cd /usr/local/seafile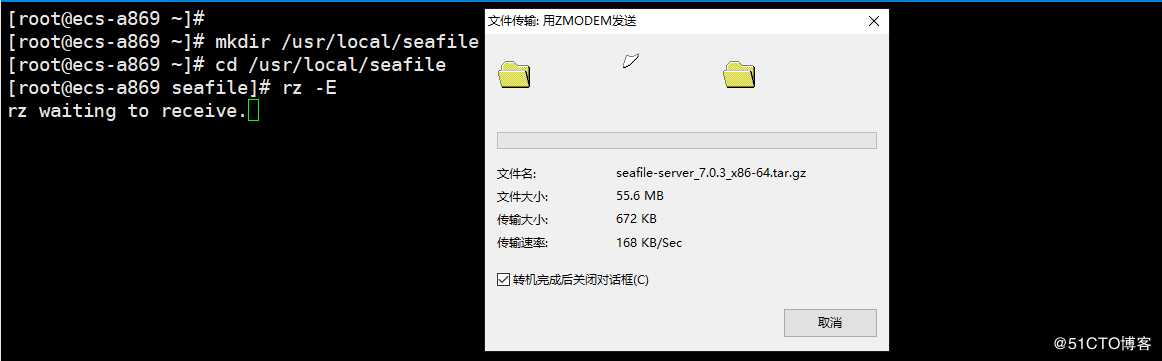
16.解压seafile安装文件并改名(改名是为了方便好记)
命令:
tar xf seafile-server_7.0.3_x86-64.tar.gz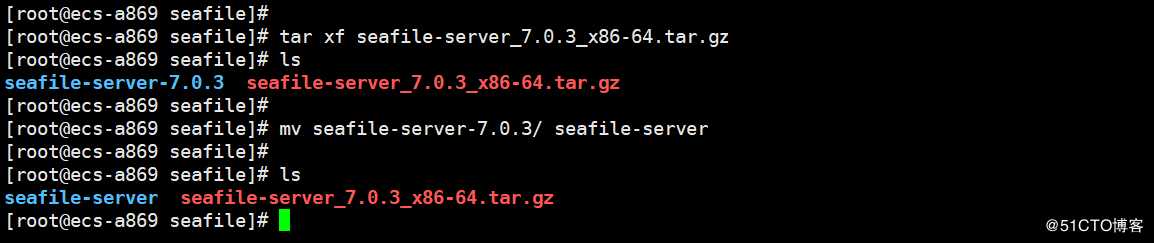
17.安装seafile
命令:
cd /usr/local/seafile/seafile-server
./setup-seafile-mysql.sh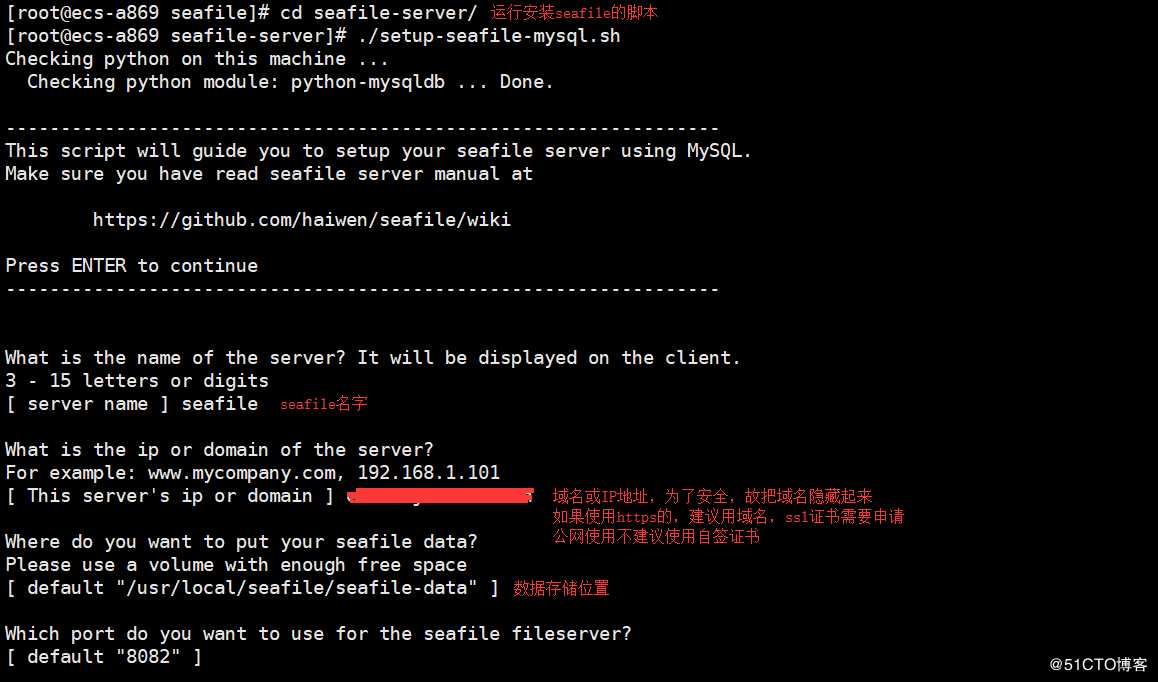
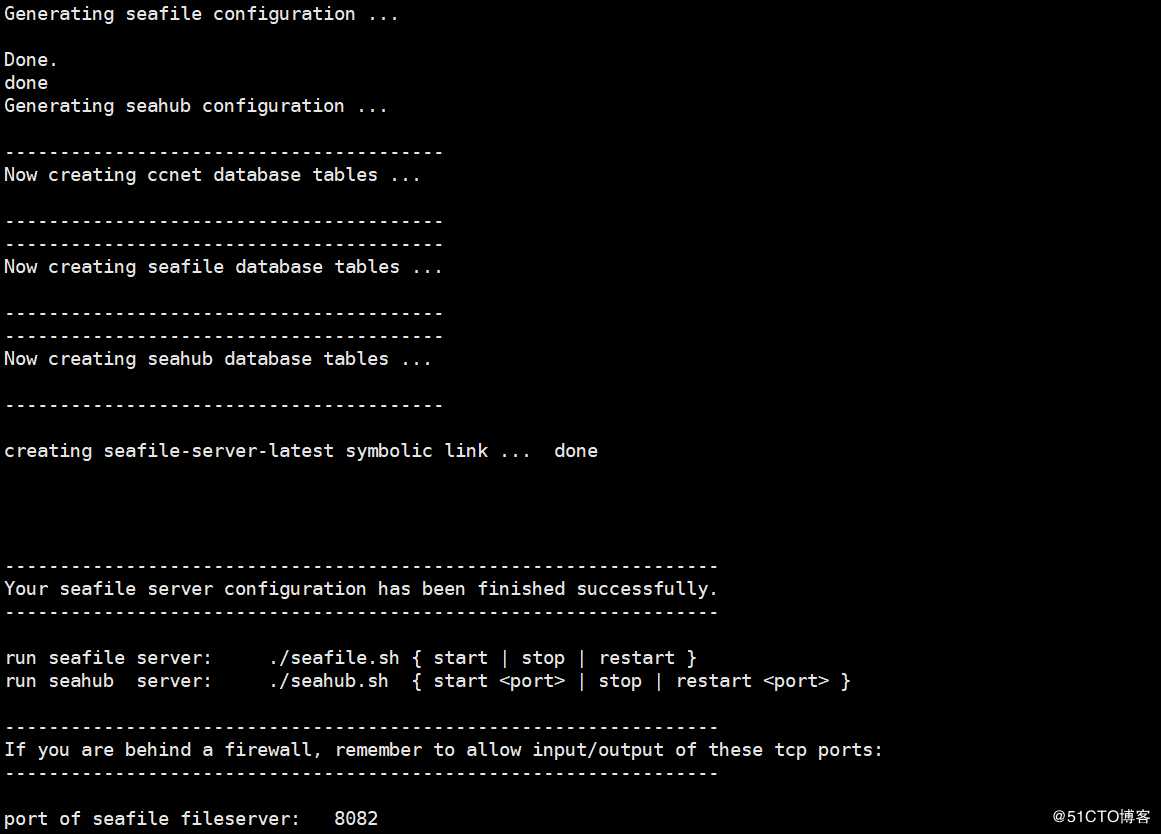
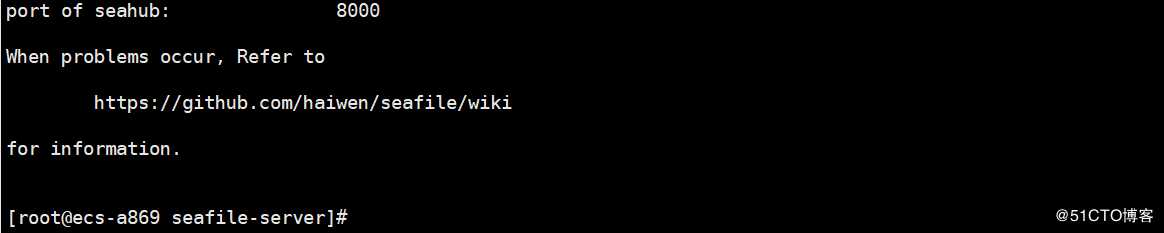
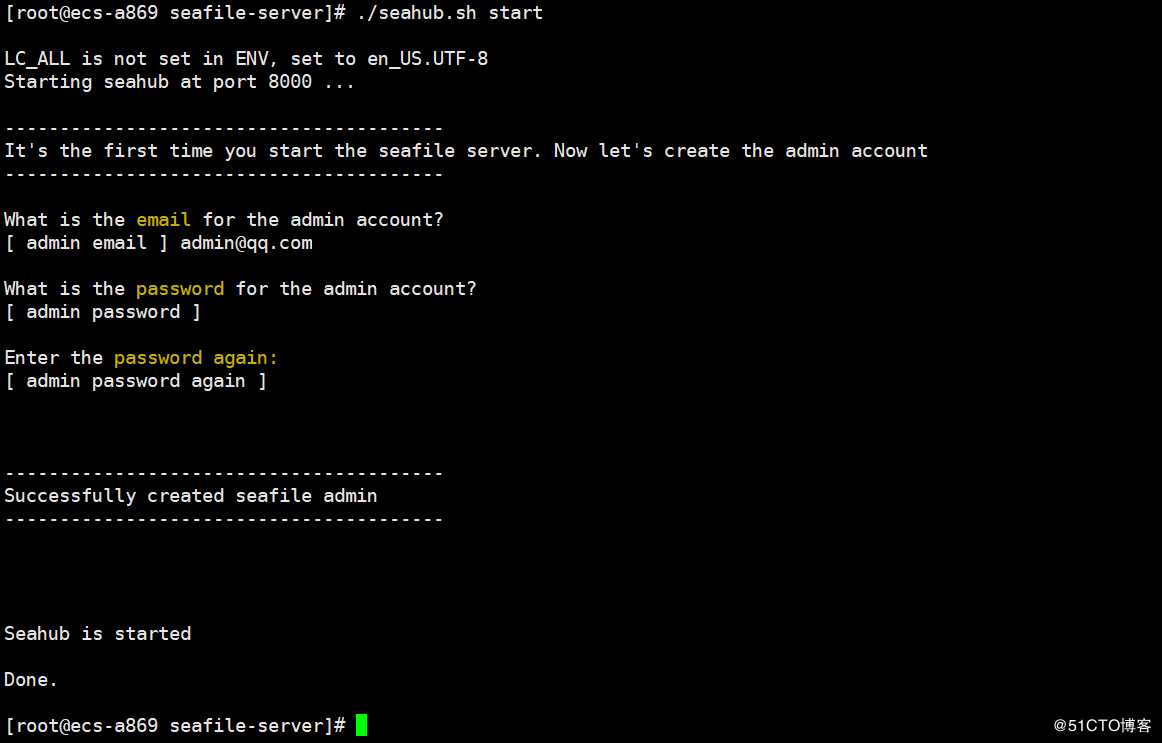
18.启动seafile服务,如果新建并是第一次启动seahub,会让你输入用户名和密码(此用户名和密码是用于登录web的管理员)
命令:
./seafile.sh start
./seahub.sh start
19.修改seafile的conf目录中的gunicorn.conf配置文件(seafile从6.3版本开始,默认不允许直接使用IP:8001访问)
命令:
vi /usr/local/seafile/conf/gunicorn.conf
修改里面的内容,
把bind = "127.0.0.1:8000"修改为bind = "0.0.0.0:8001"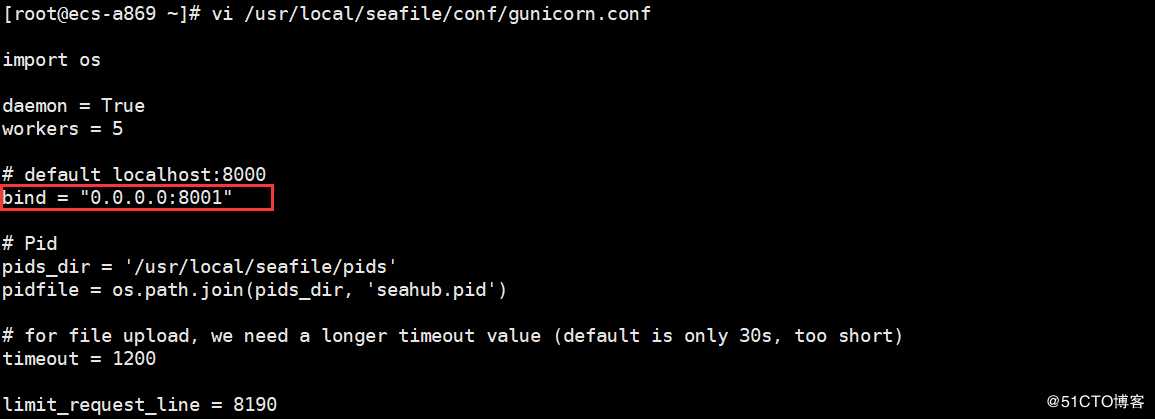
20.重新启动seafile.sh和seahub.sh
命令:
cd /usr/local/seafile/seafile-server
./seafile.sh restart
./seahub.sh restart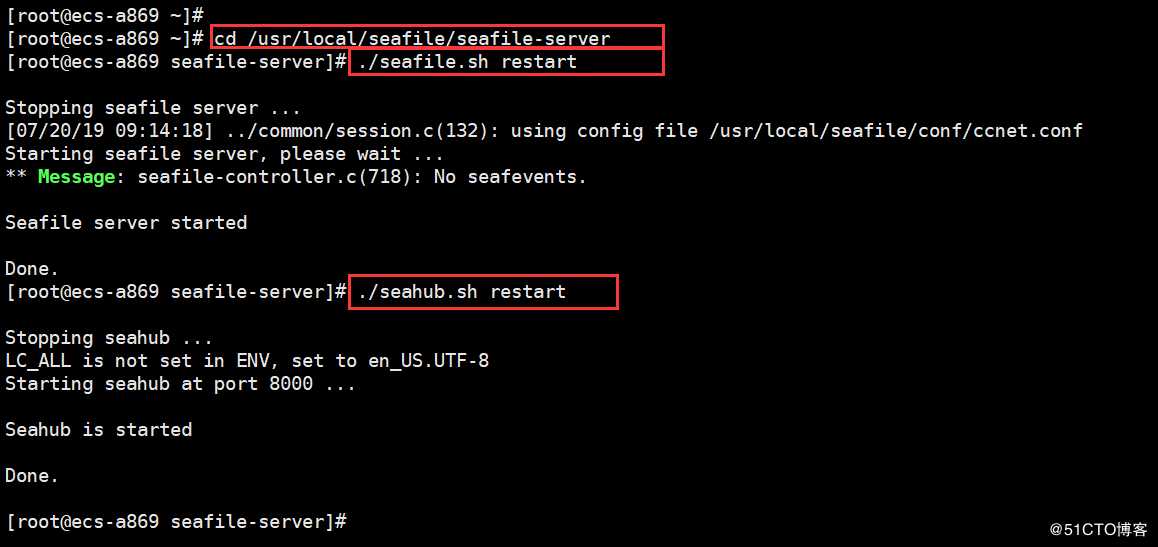
21.在浏览器访问测试是否能正常访问和登录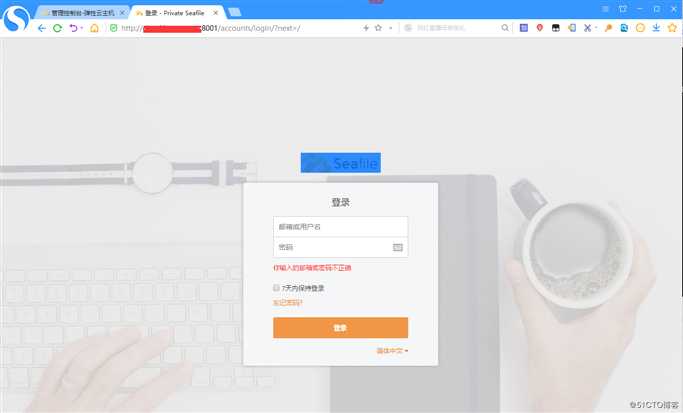
22.如果需要使用80端口直接访问,需要把配置文件gunicorn.con修改回来,并安装nginx和启用编辑nginx
命令:
vi /usr/local/seafile/conf/gunicorn.conf
修改里面的内容,
把bind = "0.0.0.0:8001"修改为bind = "127.0.0.1:8000"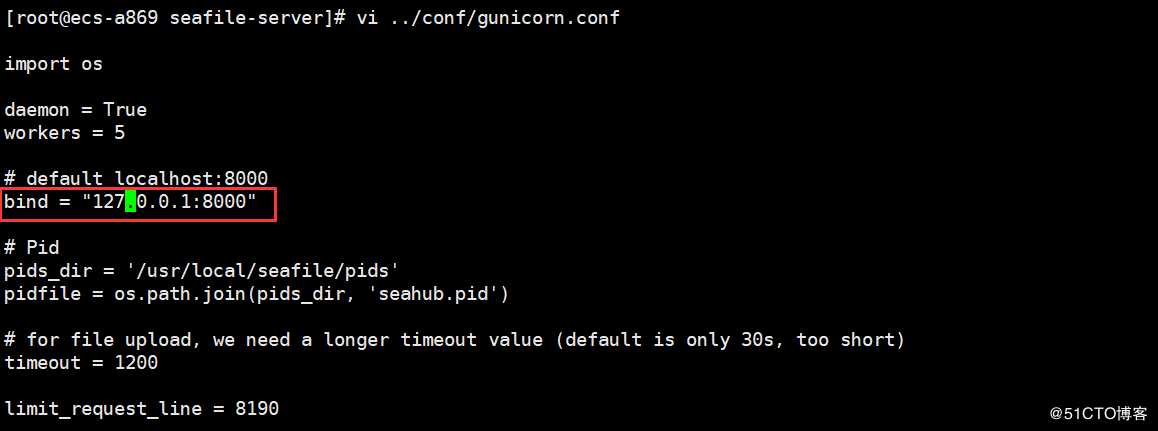
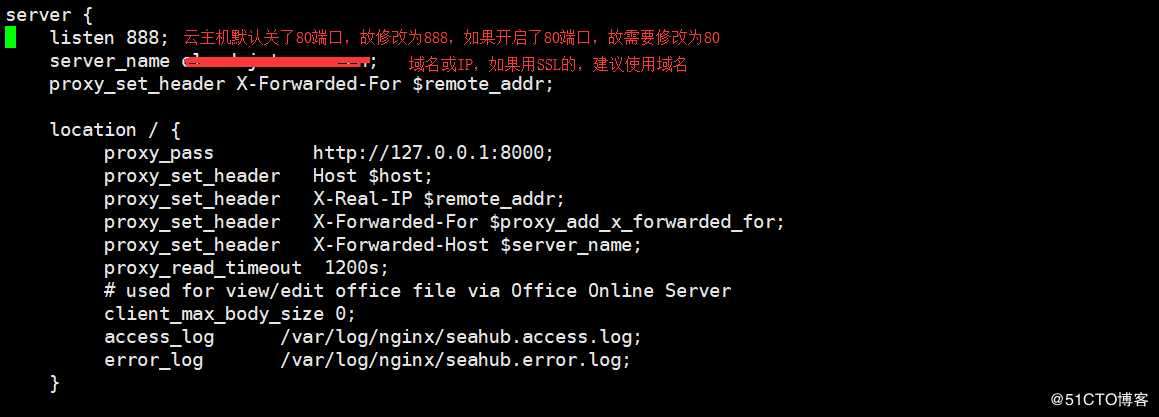
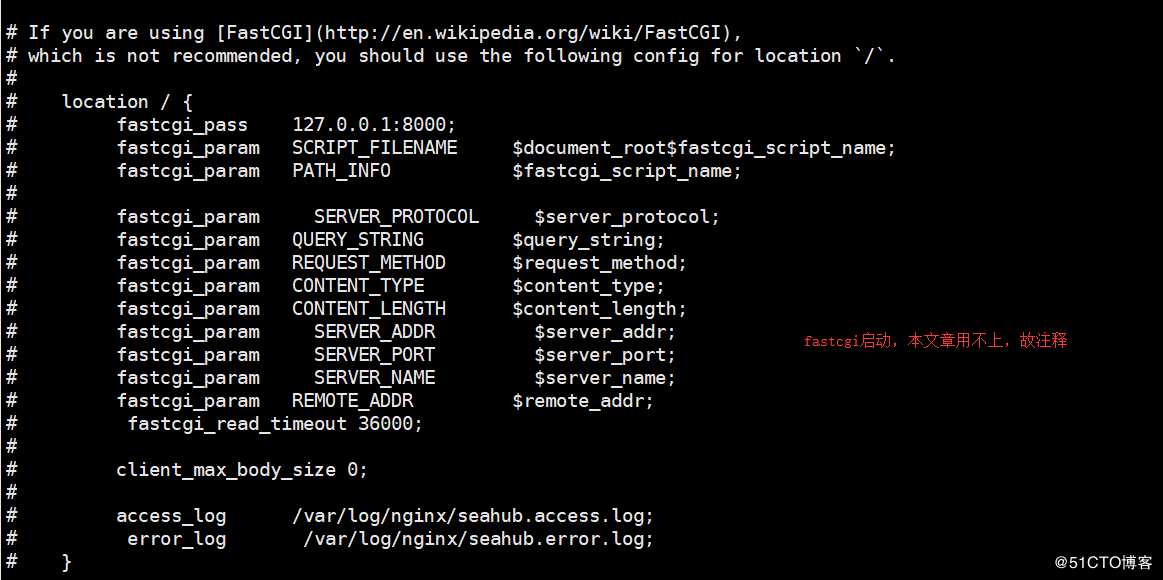
23.前面已经安装了nginx,现修改nginx编辑文件(为了默认的配置文件上修改,故可以在默认配置文件上的包含的conf路径下创建一个seafile.conf文件,以方便管理
命令:
vi /etc/nginx/conf.d/seafile.com
添加如下内容:图片的截图是包含有fastcgi的,在此#被加粗了,故删除,如需要,可以参考官网
server {
listen 888;
server_name cloud.jvtc.com.cn;
proxy_set_header X-Forwarded-For $remote_addr;
location / {
     proxy_pass         http://127.0.0.1:8000;
     proxy_set_header   Host $host;
     proxy_set_header   X-Real-IP $remote_addr;
     proxy_set_header   X-Forwarded-For $proxy_add_x_forwarded_for;
     proxy_set_header   X-Forwarded-Host $server_name;
     proxy_read_timeout  1200s;
     client_max_body_size 0;
     access_log      /var/log/nginx/seahub.access.log;
     error_log       /var/log/nginx/seahub.error.log;
}

location /seafhttp {
    rewrite ^/seafhttp(.*)$ $1 break;
    proxy_pass http://127.0.0.1:8082;
    client_max_body_size 0;
    proxy_set_header   X-Forwarded-For $proxy_add_x_forwarded_for;
    proxy_connect_timeout  36000s;
    proxy_read_timeout  36000s;
    proxy_send_timeout  36000s;
    send_timeout  36000s;
}

location /media {
    root /usr/local/seafile/seafile-server-latest/seahub;
}
}

24.在seafile的配置目录中编辑seahub_settings.py文件
命令:
vi /usr/local/seafile/conf/seahub_settings.py
在文件中添加如下一行
FILE_SERVER_ROOT = ‘http://域名或IP/seafhttp‘
25.重启启动nginx,seafile和seahub
命令:
nginx -t 检查nginx配置文件有没有语法错误,如没有,执行systemctl restart nginx重启nginx
systemctl restart nginx
cd /usr/loca/seafile/seafile-server
./seafile.sh restart
./seahub.sh restart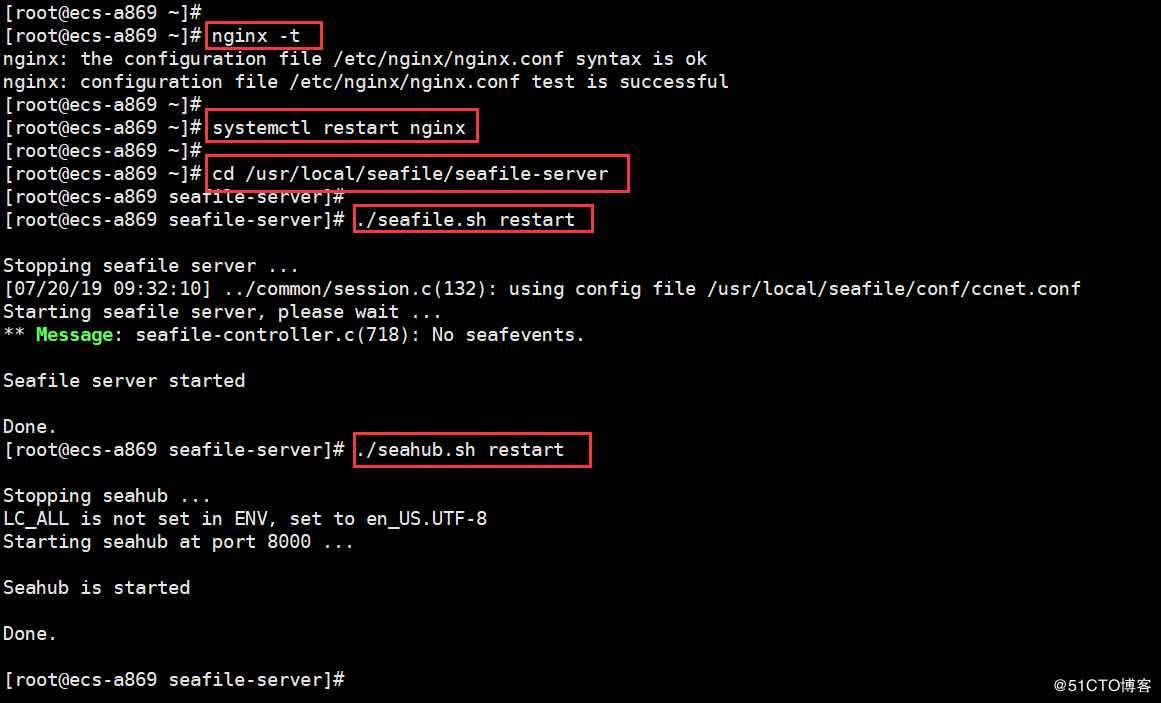
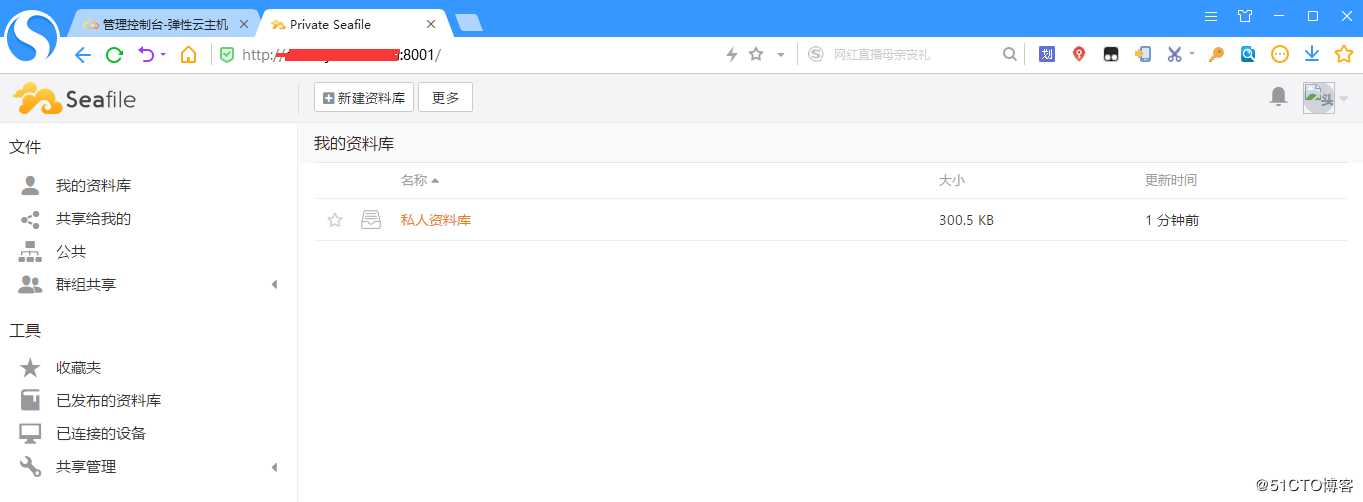
26.浏览器访问是否正常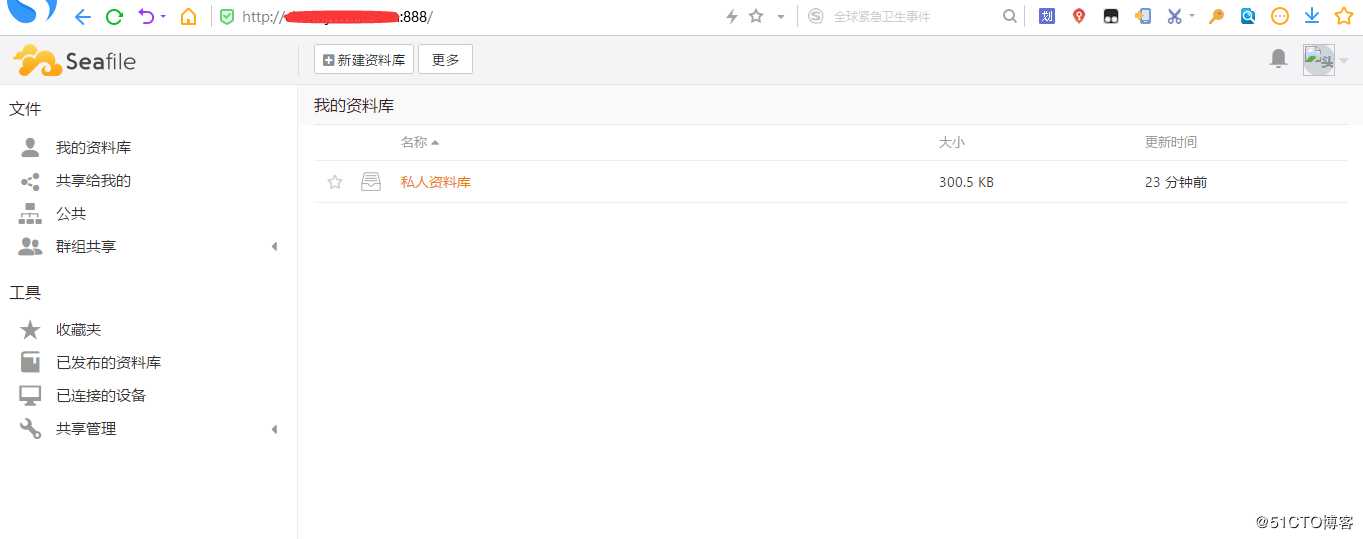
标签:数据库 break 内网地址 版本 端口 ide 说明 ade 天翼
原文地址:https://blog.51cto.com/7309656/2421902