标签:des style blog http color io os ar 使用
文章索引
当谈及 Lock-Free 编程时,我们常将其概念与 Mutex 或 Lock 联系在一起,描述要在编程中尽量少使用这些锁结构,降低线程间互相阻塞的机会,以提高应用程序的性能。类同的概念还有 "Lockless" 和 "Non-Blocking" 等。实际上,这样的描述只涵盖了 Lock-Free 编程的一部分内容。本质上说,Lock-Free 编程仅描述了代码所表述的性质,而没有限定或要求代码该如何编写。
基本上,如果程序中的某一部分符合下面的条件判定描述,则我们称这部分程序是符合 Lock-Free 的。反过来说,如果某一部分程序不符合下面的条件描述,则称这部分程序是不符合 Lock-Free 的。
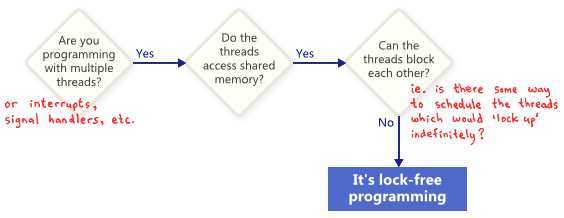
从这个意义上来说,Lock-Free 中的 "Lock" 并没有直接涉及 Mutex 或 Lock 等互斥量结构,而是描述了应用程序因某种原因被锁定的可能性,例如可能因为死锁(DeadLock)、活锁(LiveLock)或线程调度(Thread Scheduling)导致优先级被抢占等。
Lock-Free 编程的一个重要效果就是,在一系列访问 Lock-Free 操作的线程中,如果某一个线程被挂起,那么其绝对不会阻止其他线程继续运行(Non-Blocking)。
下面的这段简单的程序片段中,没有使用任何互斥量结构,但却不符合 Lock-Free 的性质要求。如果用两个线程同时执行这段代码,在线程以某种特定的调度方式运行时,非常有可能两个线程同时陷入死循环,也就是互相阻塞了对方。
  while (x == 0)
  {
    x = 1 - x;
  }
所以说,Lock-Free 编程所带来的挑战不仅来自于其任务本身的复杂性,还要始终着眼于对事物本质的洞察。
通常,应该没有人会期待一个大型的应用程序中全部采用 Lock-Free 技术,而都是在有特定需求的类的设计上采用 Lock-Free 技术。例如,如果需要一个 Stack 类应对多线程并发访问的场景,可以使用 Lock-Free 相关技术实现 ConcurrentStack 类,在其 Push 和 Pop 操作中进行具体的实现。所以,在使用 Lock-Free 技术前,需要预先考虑一些软件工程方面的成本:
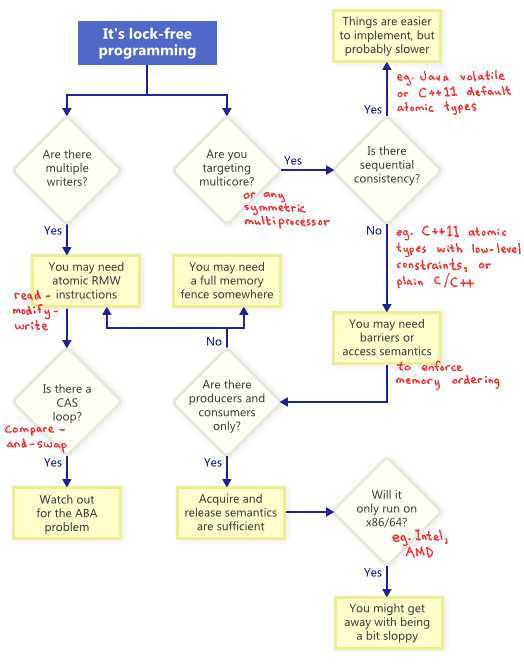
当我们准备要满足 Lock-Free 编程中的非阻塞条件时,有一系列的技术和方法可供使用,如原子操作(Atomic Operations)、内存栅栏(Memory Barrier)、避免 ABA 问题(Avoiding ABA Problem)等。那么我们该如何抉择在何时使用哪种技术呢?可以根据下图中的引导来判断。
原子操作(Atomic Operations)在操作内存时可以被看做是不可分割的(Indivisible),其他线程不会打断该操作,没有操作只被完成一部分之说。在现代的 CPU 处理器上,很多操作已经被设计为原子的,例如对齐读(Aligned Read)和对齐写(Aligned Write)等。
Read-Modify-Write(RMW)操作的设计则让执行更复杂的事务操作变成了原子的,使得当有多个写入者想对相同的内存进行修改时,保证一次只执行一个操作。
例如,常见的对整型值进行加法操作的 RMW 操作:
RMW 操作在不同的 CPU 家族中是通过不同的方式来支持的。
例如在 x86 架构下,通过 LOCK 指令前缀可以使许多指令操作(ADD, ADC, AND, BTC, BTR, BTS, CMPXCHG, CMPXCH8B, DEC, INC, NEG, NOT, OR, SBB, SUB, XOR, XADD, and XCHG)变成原子操作,其中 CMPXCHG 指令可用于实现 CAS 操作。
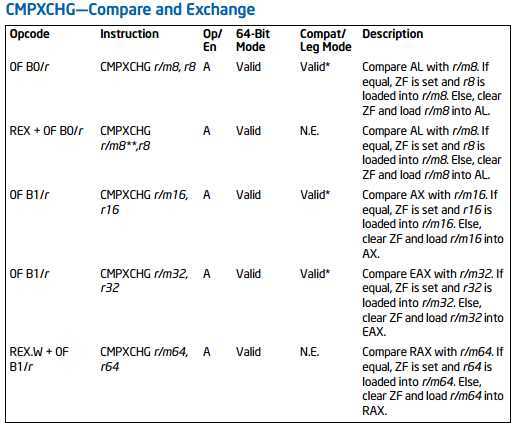
下面是使用 LOCK 和 CMPXCHG 来实现 CAS 操作的代码示例。
__inline int CAS(volatile int & destination, int exchange, int comperand)
{
  __asm {
    MOV eax, comperand
    MOV ecx, exchange
    MOV edx, destination
    LOCK CMPXCHG[edx], ecx /* 如果eax与edx相等, 则ecx送edx且ZF置1;
                              否则edx送ecx, 且ZF清0.*/
  }
}

/* Accumulator = AL, AX, EAX, or RAX depending on
   whether a byte, word, doubleword, or
   quadword comparison is being performed */

IF accumulator = DEST
  THEN
    ZF ← 1;
    DEST ← SRC;
  ELSE
    ZF ← 0;
    accumulator ← DEST;
FI;
在 Win32 平台上,CAS 操作有一组原生的实现,例如 _InterlockedCompareExchange 等。对 RMW 操作最常见的讨论可能就是,如何通过 CAS Loops 来完成对事务的原子处理。
通常,开发人员会设计在一个循环中重复地执行 CAS 操作以试图完成一个事务操作。这个过程分为 3 步:
例如,向 LockFreeStack 中压入新的节点:
 1 void LockFreeStack::Push(Node* newHead)
 2 {
 3   for (;;)
 4   {
 5     // Read the original value from a memory location.
 6     // Copy a shared variable (m_Head) to a local.
 7     Node* oldHead = m_Head;
 8
 9     // Compute the new value to be set.
10     // Do some speculative work, not yet visible to other threads.
11     newHead->next = oldHead;
12
13     // Set the new value only if the memory location is still the original value.
14     // Next, attempt to publish our changes to the shared variable.
15     // If the shared variable hasn‘t changed, the CAS succeeds and we return.
16     // Otherwise, repeat.
17     if (_InterlockedCompareExchange(&m_Head, newHead, oldHead) == oldHead)
18       return;
19   }
20 }
上面代码中的循环操作仍然符合 Lock-Free 条件要求,因为如果 _InterlockedCompareExchange 条件测试失败,也就意味着另外的线程已经成功修改了值,而当前线程可以再下一个循环周期内继续判断以完成操作。
在实现 CAS Loops 时,当存在多个线程交错地对共享的内存地址进行处理时,将可能发生 ABA 问题。
若线程对同一内存地址进行了两次读操作,而两次读操作得到了相同的值,通过判断 "值相同" 来判定 "值没变"。然而,在这两次读操作的时间间隔之内,另外的线程可能已经修改了该值,这样就相当于欺骗了前面的线程,使其认为 "值没变",实际上值已经被篡改了。
下面是 ABA 问题发生的过程:
由于 T1 并不知道在两次读取的值 A 已经被 "隐性" 的修改过,所以可能产生无法预期的结果。
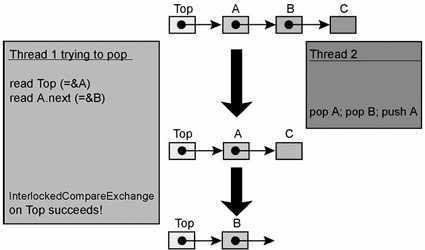
例如,使用 List 来存放 Item,如果将一个 Item 从 List 中移除并释放了其内存地址,然后重新创建一个新的 Item,并将其添加至 List 中,由于优化等因素,有可能新创建的 Item 的内存地址与前面删除的 Item 的内存地址是相同的,导致指向新的 Item 的指针因此也等同于指向旧的 Item 的指针,这将引发 ABA 问题。
举个更生活化的例子:
土豪拿了一个装满钱的 Hermes 黑色钱包去酒吧喝酒,将钱包放到吧台上后,转头和旁边的朋友聊天,小偷趁土豪转头之际拿起钱包,将钱包里的钱取出来并放入餐巾纸保持钱包厚度,然后放回原处,小偷很有职业道德,只偷钱不偷身份证,土豪转过头后发现钱包还在,并且还是他熟悉的 Hermes 黑色钱包,厚度也没什么变化,所以土豪认为什么都没发生,继续和朋友聊天,直到结账时发现钱包中的钱已经被调包成餐巾纸。
所以,我觉得 ABA 问题还可以被俗称为 "调包问题"。那么怎么解决 "调包问题" 呢?土豪开始想办法了。
土豪想的第一个办法是,找根绳子将钱包绑在手臂上,要打开钱包就得先把绳子割断,割绳子就会被发现。这种做法实际上就是 Load-Link/Store-Conditional (LL/SC) 架构中所做的工作。
土豪想的另一个办法是,在钱包上安个显示屏,每次打开钱包显示屏上的数字都会 +1,这样当土豪在转头之前可以先记录下显示屏上的数字,在转过头后可以确认数字是否有变化,也就知道钱包是否被打开过。这种做法实际上就是 x86/64 架构中 Double-Word CAS Tagging 所做的工作。
土豪还担心小偷下次会不会买一个一模一样的钱包,直接调包整个钱包,这样连银行卡和身份证都丢了怎么办,土豪决定买一个宇宙独一无二的钱包,除非把它给烧了,否则就不会再有相同的钱包出现。这种做法实际上就是 Garbage Collection (GC) 所做的工作。
在多线程系统中,当多个线程同时访问共享的内存时,就需要一个规范来约束不同的线程该如何与内存交互,这个规范就称之为内存模型(Memory Model)。
顺序一致性内存模型(Sequential Consistency Memory Model)则是内存模型规范中的一种。在这个模型中,内存与访问它的线程保持独立,通过一个控制器(Memory Controller)来保持与线程的联系,以进行读写操作。在同一个线程内的,读写操作的顺序也就是代码指定的顺序。但多个线程时,读写操作就会与其他线程中的读写操作发生交错。
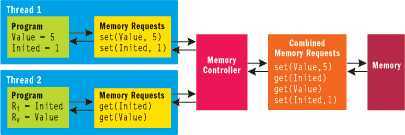
如上图中所示,Thread 1 中在写入 Value 和 Inited 的值,而 Thread 2 中在读取 Inited 和 Value 的值到 Ri 和 Rv 中。由于在内存控制器中发生重排(Memory Reordering),最终的结果可能有很多种情况,如下表所示。

顺序一致性内存模型非常的直观,也易于理解。但实际上,由于该模型在内存硬件实现效率上的限制,导致商用的 CPU 架构基本都没有遵循该模型。一个更贴近实际的多处理器内存模型更类似于下图中的效果。
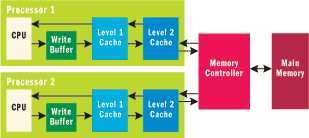
也就是说,每个 CPU 核都会有其自己的缓存模型,例如上图中的 Level 1 Cache 和 Level 2 Cache,用以缓存最近使用的数据,以提升存取效率。同时,所有的写入数据都被缓冲到了 Write Buffer 缓冲区中,在数据在被刷新至缓存前,处理器可以继续处理其他指令。这种架构提升了处理器的效率,但同时也意味着我们不仅要关注 Memory,同时也要关注 Buffer 和 Cache,增加了复杂性。
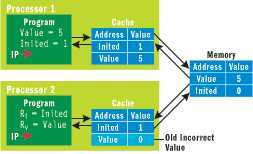
上图所示为缓存不一致问题(Incoherent Caches),当主存(Main Memory)中存储着 Value=5,Inited=0 时,Processor 1 就存在着新写入 Cache 的值没有被及时刷新至 Memory 的问题,而 Processor 2 则存在着读取了 Cache 中旧值的问题。
显然,上面介绍着内存重排和缓存机制会导致混乱,所以实际的内存模型中会引入锁机制(Locking Protocol)。通常内存模型会遵循以下三个规则:
Rule 3 保证了在释放锁之前,所有写入操作已经完成。Rule 2 保证要读取内存就必须先获取锁,不会再有其他线程修改内存。Rule 1 则保证了获得锁之后的操作行为是顺序的。
在体现锁机制(Locking Protocol)的价值的同时,我们也会意识到它所带来的限制,也就是限制了编译器和 CPU 对程序做优化的自由。
我们知道,.NET Framework 遵循 ECMA 标准,而 ECMA 标准中则定义了较为宽松的内存访问模型,将内存访问分为两类:
其中,易变内存访问是特意为 "volatile" 设计,它包含如下两个规则:
对于那些没有使用 "lock" 和 "volatile" 的程序片段,编译器和硬件可以对常规内存访问做任何合理的优化。反过来讲,内存系统仅需在应对 "lock" 和 "volatile" 时采取缓存失效和刷新缓冲区等措施,这极大地提高了性能。
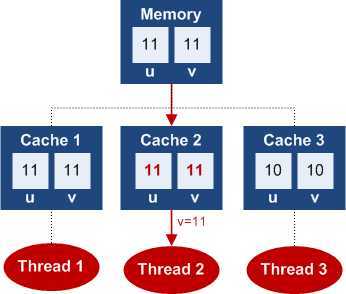
顺序一致性(Sequential Consistency)的要求描述了程序代码描述的顺序与内存操作执行的顺序间的关系。多数编程语言都提供顺序一致性的支持,例如在 C# 中可以将变量标记为 volatile。
A volatile read has "acquire semantics" meaning that the read is guaranteed to occur prior to any references to memory that occur after the read instruction in the CIL instruction sequence.
A volatile write has "release semantics" meaning that the write is guaranteed to happen after any memory references prior to the write instruction in the CIL instruction sequence.
下面的列表展示了 .NET 中内存读写操作的效果。
我们需要在实践中体会 Lock-Free 编程,方能洞察机制的本质,加深理解。下面用实现栈 Stack 类的过程来完成对 Lock-Free 编程的探索。
栈结构实际上就是 FILO 先入后出队列,通常包括两个操作:
这里我们选用单链表结构(Singly Linked List)来实现 FILO 栈,每次入栈的都是新的链表头,每次出栈的也是链表头。

构建一个内部类 Node 用于存放 Item,并包含 Next 引用以指向下一个节点。
1     private class Node<TNode>
2     {
3       public Node<TNode> Next;
4       public TNode Item;
5       public override string ToString()
6       {
7         return string.Format("{0}", Item);
8       }
9     }
这样,实现 Push 操作就是用新压入的节点作为新的链表头部,而实现 Pop 操作则是将链表头部取出后将所指向的下一个节点作为新的链表头。
 1   public class SimpleStack<T>
 2   {
 3     private class Node<TNode>
 4     {
 5       public Node<TNode> Next;
 6       public TNode Item;
 7       public override string ToString()
 8       {
 9         return string.Format("{0}", Item);
10       }
11     }
12
13     private Node<T> _head;
14
15     public SimpleStack()
16     {
17       _head = new Node<T>();
18     }
19
20     public void Push(T item)
21     {
22       Node<T> node = new Node<T>();
23       node.Item = item;
24
25       node.Next = _head.Next;
26       _head.Next = node;
27     }
28
29     public T Pop()
30     {
31       Node<T> node = _head.Next;
32       if (node == null)
33         return default(T);
34
35       _head.Next = node.Next;
36
37       return node.Item;
38     }
39   }
使用如下代码,先 Push 入栈 1000 个元素,然后在多线程中 Pop 元素。
 1   class Program
 2   {
 3     static void Main(string[] args)
 4     {
 5       SimpleStack<int> stack = new SimpleStack<int>();
 6
 7       for (int i = 1; i <= 1000; i++)
 8       {
 9         stack.Push(i);
10       }
11
12       bool[] poppedItems = new bool[10000];
13
14       Parallel.For(0, 1000, (i) =>
15         {
16           int item = stack.Pop();
17           if (poppedItems[item])
18           {
19             Console.WriteLine(
20               "Thread [{0:00}] : Item [{1:0000}] was popped before!",
21               Thread.CurrentThread.ManagedThreadId, item);
22           }
23           poppedItems[item] = true;
24         });
25
26       Console.WriteLine("Done.");
27       Console.ReadLine();
28     }
29   }
运行效果如下图所示。

由上图运行结果可知,当多个线程同时 Pop 数据时,可能发生看起来像同一个数据项 Item 被 Pop 出两次的现象。
那么为了保持一致性和准确性,首先想到的办法就是加锁。lock 不仅可以保护代码区域内的指令不会被重排,还能在获取锁之后阻止其他线程修改数据。
 1   public class SimpleLockedStack<T>
 2   {
 3     private class Node<TNode>
 4     {
 5       public Node<TNode> Next;
 6       public TNode Item;
 7       public override string ToString()
 8       {
 9         return string.Format("{0}", Item);
10       }
11     }
12
13     private Node<T> _head;
14     private object _sync = new object();
15
16     public SimpleLockedStack()
17     {
18       _head = new Node<T>();
19     }
20
21     public void Push(T item)
22     {
23       lock (_sync)
24       {
25         Node<T> node = new Node<T>();
26         node.Item = item;
27
28         node.Next = _head.Next;
29         _head.Next = node;
30       }
31     }
32
33     public T Pop()
34     {
35       lock (_sync)
36       {
37         Node<T> node = _head.Next;
38         if (node == null)
39           return default(T);
40
41         _head.Next = node.Next;
42
43         return node.Item;
44       }
45     }
46   }
加锁之后,显然运行结果就不会出错了。

但显然我们更关注性能问题,当有多个线程在交错 Push 和 Pop 操作时,
所以准备采用 Lock-Free 技术,通过引入 CAS 操作通过细粒度锁来实现。此处 CAS 使用 C# 中的 Interlocked.CompareExchange 方法,该操作是原子的,并且有很多重载方法可供使用。
1     private static bool CAS(
2       ref Node<T> location, Node<T> newValue, Node<T> comparand)
3     {
4       return comparand ==
5         Interlocked.CompareExchange<Node<T>>(
6           ref location, newValue, comparand);
7     }
在实现 CAS Loops 时,我们使用 do..while.. 语法来完成。
 1     public void Push(T item)
 2     {
 3       Node<T> node = new Node<T>();
 4       node.Item = item;
 5
 6       do
 7       {
 8         node.Next = _head.Next;
 9       }
10       while (!CAS(ref _head.Next, node, node.Next));
11     }
这样,新的 LockFreeStack 类就诞生了。
 1   public class LockFreeStack<T>
 2   {
 3     private class Node<TNode>
 4     {
 5       public Node<TNode> Next;
 6       public TNode Item;
 7       public override string ToString()
 8       {
 9         return string.Format("{0}", Item);
10       }
11     }
12
13     private Node<T> _head;
14
15     public LockFreeStack()
16     {
17       _head = new Node<T>();
18     }
19
20     public void Push(T item)
21     {
22       Node<T> node = new Node<T>();
23       node.Item = item;
24
25       do
26       {
27         node.Next = _head.Next;
28       }
29       while (!CAS(ref _head.Next, node, node.Next));
30     }
31
32     public T Pop()
33     {
34       Node<T> node;
35
36       do
37       {
38         node = _head.Next;
39
40         if (node == null)
41           return default(T);
42       }
43       while (!CAS(ref _head.Next, node.Next, node));
44
45       return node.Item;
46     }
47
48     private static bool CAS(
49       ref Node<T> location, Node<T> newValue, Node<T> comparand)
50     {
51       return comparand ==
52         Interlocked.CompareExchange<Node<T>>(
53           ref location, newValue, comparand);
54     }
55   }
这个新的类的测试结果正如我们想象也是正确的。

那实现 LockFreeStack 类之后,实际已经满足了 Lock-Free 的条件要求,我们还能不能做的更好呢?
我们来观察下上面实现的 Push 方法:
 1     public void Push(T item)
 2     {
 3       Node<T> node = new Node<T>();
 4       node.Item = item;
 5
 6       do
 7       {
 8         node.Next = _head.Next;
 9       }
10       while (!CAS(ref _head.Next, node, node.Next));
11     }
发现当 CAS 操作判定失败时,立即进入下一次循环判定。而在实践中,当 CAS 判定失败时,是因为其他线程正在更改相同的内存数据,如果立即再进行 CAS 判定则失败几率会更高,我们需要给那些正在修改数据的线程时间以完成操作,所以这里当前线程最好能 "休息" 一会。
"休息" 操作我们选用 .NET 中提供的轻量级(4 Bytes)线程等待机制 SpinWait 类。
 1     public void Push(T item)
 2     {
 3       Node<T> node = new Node<T>();
 4       node.Item = item;
 5
 6       SpinWait spin = new SpinWait();
 7
 8       while (true)
 9       {
10         Node<T> oldHead = _head;
11         node.Next = oldHead.Next;
12
13         if (Interlocked.CompareExchange(ref _head, node, oldHead) == oldHead)
14           break;
15
16         spin.SpinOnce();
17       }
18     }
实际上 SpinOnce() 方法调用了 Thread.SpinWait() 等若干操作,那么这些操作到底做了什么并且耗时多久呢?
首先,Thread.SpinWait(N) 会在当前 CPU 上紧凑的循环 N 个周期,每个周期都会发送 PAUSE 指令给 CPU,告诉 CPU 当前正在执行等待,不要做其他工作了。所以,重点是 N 的值是多少。在 .NET 中实现的 SpinOne 中根据统计意义的度量,将此处的 N 根据调用次数来变化。
那么在 10 次调用之后呢?
10 次之后 SpinOnce 就不再进行 Spin 操作了,它根据情况选择进入不同的 Yield 流程。
上面三种情况在 SpinOnce 中是根据如下的代码来判断执行的。
 1   int yieldsSoFar = (m_count >= 10 ? m_count - 10 : m_count);
 2
 3   if ((yieldsSoFar % 20) == (20 - 1))
 4   {
 5     Thread.Sleep(1);
 6   }
 7   else if ((yieldsSoFar % 5) == (5 - 1))
 8   {
 9     Thread.Sleep(0);
10   }
11   else
12   {
13     Thread.Yield();
14   }
这样,我们就可以通过添加失败等待来进一步优化,形成了新的 ConcurrentStack 类。
  1   // A stack that uses CAS operations internally to maintain
  2   // thread-safety in a lock-free manner. Attempting to push
  3   // or pop concurrently from the stack will not trigger waiting,
  4   // although some optimistic concurrency and retry is used,
  5   // possibly leading to lack of fairness and/or live-lock.
  6   // The stack uses spinning and back-off to add some randomization,
  7   // in hopes of statistically decreasing the possibility of live-lock.
  8   //
  9   // Note that we currently allocate a new node on every push.
 10   // This avoids having to worry about potential ABA issues,
 11   // since the CLR GC ensures that a memory address cannot be
 12   // reused before all references to it have died.
 13
 14   /// <summary>
 15   /// Represents a thread-safe last-in, first-out collection of objects.
 16   /// </summary>
 17   public class ConcurrentStack<T>
 18   {
 19     // A volatile field should not normally be passed using a ref or out parameter,
 20     // since it will not be treated as volatile within the scope of the function.
 21     // There are exceptions to this, such as when calling an interlocked API.
 22     // As with any warning, you may use the #pragma warning to disable this warning
 23     // in those rare cases where you are intentionally using a volatile field
 24     // as a reference parameter.
 25 #pragma warning disable 420
 26
 27     /// <summary>
 28     /// A simple (internal) node type used to store elements
 29     /// of concurrent stacks and queues.
 30     /// </summary>
 31     private class Node
 32     {
 33       internal readonly T m_value; // Value of the node.
 34       internal Node m_next;        // Next pointer.
 35
 36       /// <summary>
 37       /// Constructs a new node with the specified value and no next node.
 38       /// </summary>
 39       /// <param name="value">The value of the node.</param>
 40       internal Node(T value)
 41       {
 42         m_value = value;
 43         m_next = null;
 44       }
 45     }
 46
 47     // The stack is a singly linked list, and only remembers the head.
 48     private volatile Node m_head;
 49
 50     /// <summary>
 51     /// Inserts an object at the top of the stack.
 52     /// </summary>
 53     /// <param name="item">The object to push onto the stack.
 54     /// The value can be a null reference for reference types.
 55     /// </param>
 56     public void Push(T item)
 57     {
 58       // Pushes a node onto the front of the stack thread-safely.
 59       // Internally, this simply swaps the current head pointer
 60       // using a (thread safe) CAS operation to accomplish lock freedom.
 61       // If the CAS fails, we add some back off to statistically
 62       // decrease contention at the head, and then go back around and retry.
 63
 64       Node newNode = new Node(item);
 65       newNode.m_next = m_head;
 66       if (Interlocked.CompareExchange(
 67         ref m_head, newNode, newNode.m_next) == newNode.m_next)
 68       {
 69         return;
 70       }
 71
 72       // If we failed, go to the slow path and loop around until we succeed.
 73       SpinWait spin = new SpinWait();
 74
 75       // Keep trying to CAS the existing head with
 76       // the new node until we succeed.
 77       do
 78       {
 79         spin.SpinOnce();
 80         // Reread the head and link our new node.
 81         newNode.m_next = m_head;
 82       }
 83       while (Interlocked.CompareExchange(
 84         ref m_head, newNode, newNode.m_next) != newNode.m_next);
 85     }
 86
 87     /// <summary>
 88     /// Attempts to pop and return the object at the top of the stack.
 89     /// </summary>
 90     /// <param name="result">
 91     /// When this method returns, if the operation was successful,
 92     /// result contains the object removed.
 93     /// If no object was available to be removed, the value is unspecified.
 94     /// </param>
 95     /// <returns>true if an element was removed and returned
 96     /// from the top of the stack successfully; otherwise, false.</returns>
 97     public bool TryPop(out T result)
 98     {
 99       // Capture the original value from memory
100       Node head = m_head;
101
102       // Is the stack empty?
103       if (head == null)
104       {
105         result = default(T);
106         return false;
107       }
108
109       if (Interlocked.CompareExchange(
110         ref m_head, head.m_next, head) == head)
111       {
112         result = head.m_value;
113         return true;
114       }
115
116       // Fall through to the slow path.
117       SpinWait spin = new SpinWait();
118
119       // Try to CAS the head with its current next.
120       // We stop when we succeed or when we notice that
121       // the stack is empty, whichever comes first.
122       int backoff = 1;
123
124       // avoid the case where TickCount could return Int32.MinValue
125       Random r = new Random(Environment.TickCount & Int32.MaxValue);
126
127       while (true)
128       {
129         // Capture the original value from memory
130         head = m_head;
131
132         // Is the stack empty?
133         if (head == null)
134         {
135           result = default(T);
136           return false;
137         }
138
139         // Try to swap the new head.  If we succeed, break out of the loop.
140         if (Interlocked.CompareExchange(
141           ref m_head, head.m_next, head) == head)
142         {
143           result = head.m_value;
144           return true;
145         }
146
147         // We failed to CAS the new head.  Spin briefly and retry.
148         for (int i = 0; i < backoff; i++)
149         {
150           spin.SpinOnce();
151         }
152
153         // Arbitrary number to cap back-off.
154         backoff = spin.NextSpinWillYield ? r.Next(1, 8) : backoff * 2;
155       }
156     }
157
158     /// <summary>
159     /// Gets a value that indicates whether the stack is empty.
160     /// </summary>
161     /// <value>true if the stack is empty; otherwise, false.</value>
162     public bool IsEmpty
163     {
164       // Checks whether the stack is empty. Clearly the answer
165       // may be out of date even prior to
166       // the function returning (i.e. if another thread
167       // concurrently adds to the stack). It does
168       // guarantee, however, that, if another thread
169       // does not mutate the stack, a subsequent call
170       // to TryPop will return true
171       // -- i.e. it will also read the stack as non-empty.
172       get { return m_head == null; }
173     }
174
175     /// <summary>
176     /// Gets the number of elements contained in the stack.
177     /// </summary>
178     /// <value>The number of elements contained in the stack.</value>
179     public int Count
180     {
181       // Counts the number of entries in the stack.
182       // This is an O(n) operation. The answer may be out of date before
183       // returning, but guarantees to return a count that was once valid.
184       // Conceptually, the implementation snaps a copy of the list and
185       // then counts the entries, though physically this is not
186       // what actually happens.
187       get
188       {
189         int count = 0;
190
191         // Just whip through the list and tally up the number of nodes.
192         // We rely on the fact that
193         // node next pointers are immutable after being en-queued
194         // for the first time, even as
195         // they are being dequeued. If we ever changed this
196         // (e.g. to pool nodes somehow),
197         // we‘d need to revisit this implementation.
198
199         for (Node curr = m_head; curr != null; curr = curr.m_next)
200         {
201           // we don‘t handle overflow, to be consistent with existing
202           // generic collection types in CLR
203           count++;
204         }
205
206         return count;
207       }
208     }
209
210     /// <summary>
211     /// Removes all objects from the this stack.
212     /// </summary>
213     public void Clear()
214     {
215       // Clear the list by setting the head to null.
216       // We don‘t need to use an atomic operation for this:
217       // anybody who is mutating the head by pushing or popping
218       // will need to use an atomic operation to guarantee they
219       // serialize and don‘t overwrite our setting of the head to null.
220       m_head = null;
221     }
222
223 #pragma warning restore 420
224   }
实际上,上面的 ConcurrentStack<T> 类就是 .NET Framework 中 System.Collections.Concurrent.ConcurrentStack<T> 类的基本实现过程。
本文《Lock Free 编程》由作者 Dennis Gao 发表自博客园博客,任何未经作者本人允许的人为或爬虫转载均为耍流氓。
标签:des style blog http color io os ar 使用
原文地址:http://www.cnblogs.com/gaochundong/p/lock_free_programming.html