标签:The src 变量 java_home 元组 actual 如何 图片 meta
unittest单元测试框架使用DDT进行数据驱动测试,那么身为功能更加强大且更加灵活的Pytest框架怎么可能没有数据驱动的概念呢?其实Pytest是使用@pytest.mark.parametrize装饰器来实现数据驱动测试的,那么今天我们就简单来说说在它是如何进行数据驱动测试的
"""
------------------------------------
@Time : 2019/7/25 19:18
@Auth : linux超
@File : test_parametrize.py
@IDE  : PyCharm
@Motto: Real warriors,dare to face the bleak warning,dare to face the incisive error!
@QQ   : 28174043@qq.com
@GROUP: 878565760
------------------------------------
"""
import pytest

data = [1, 2]


@pytest.mark.parametrize(‘a‘, data)
def test_parametrize(a):
    print(‘\n被加载测试数据为\n{}‘.format(a))


if __name__ == ‘__main__‘:
    pytest.main([‘-s‘])
============================= test session starts =============================
platform win32 -- Python 3.7.2, pytest-4.3.1, py-1.8.0, pluggy-0.9.0
rootdir: E:\CnblogCode\pytest_parametrize, inifile:
plugins: rerunfailures-7.0, metadata-1.8.0, html-1.20.0
collected 2 items

test_parametrize.py
被加载测试数据为
1
.
被加载测试数据为
2
.

========================== 2 passed in 0.16 seconds ===========================

Process finished with exit code 0
如果测试用例只需要一个参数时,我们存放数据的列表无序嵌套序列,@pytest.mark.parametrize(‘a‘, data)装饰器的第一个参数也只需要一个变量接收列表中的每个元素,第二个参数传递存储数据的列表,那么测试用例需要使用同名的字符串接收测试数据(实例中的a)且列表有多少个元素就会生成并执行多少个测试用例
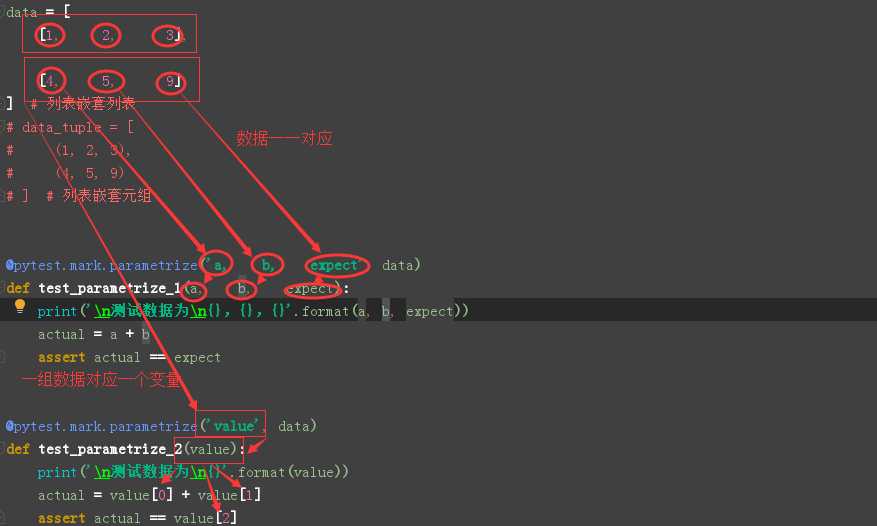
"""
------------------------------------
@Time : 2019/7/25 19:18
@Auth : linux超
@File : test_parametrize.py
@IDE  : PyCharm
@Motto: Real warriors,dare to face the bleak warning,dare to face the incisive error!
@QQ   : 28174043@qq.com
@GROUP: 878565760
------------------------------------
"""
import pytest

data = [
    [1, 2, 3],
    [4, 5, 9]
]  # 列表嵌套列表
# data_tuple = [
#     (1, 2, 3),
#     (4, 5, 9)
# ]  # 列表嵌套元组


@pytest.mark.parametrize(‘a, b, expect‘, data)
def test_parametrize_1(a, b, expect):  # 一个参数接收一个数据
    print(‘\n测试数据为\n{},{},{}‘.format(a, b, expect))
    actual = a + b
    assert actual == expect


@pytest.mark.parametrize(‘value‘, data)
def test_parametrize_2(value):  # 一个参数接收一组数据
    print(‘\n测试数据为\n{}‘.format(value))
    actual = value[0] + value[1]
    assert actual == value[2]


if __name__ == ‘__main__‘:
    pytest.main([‘-s‘])
============================= test session starts =============================
platform win32 -- Python 3.7.2, pytest-4.3.1, py-1.8.0, pluggy-0.9.0
rootdir: E:\CnblogCode\pytest_parametrize, inifile:
plugins: rerunfailures-7.0, metadata-1.8.0, html-1.20.0
collected 4 items

test_parametrize.py
测试数据为
1,2,3
.
测试数据为
4,5,9
.
测试数据为
[1, 2, 3]
.
测试数据为
[4, 5, 9]
.

========================== 4 passed in 0.17 seconds ===========================

Process finished with exit code 0
当测试用例需要多个参数时,需要使用嵌套序列(嵌套元组&嵌套列表)的列表来存放测试数据
装饰器@pytest.mark.parametrize()可以使用单个变量接收数据,也可以使用多个变量接收,同样,测试用例函数也需要与其保持一致
当使用单个变量接收时,测试数据传递到测试函数内部时为列表中的每一个元素或者小列表,需要使用索引的方式取得每个数据
当使用多个变量接收数据时,那么每个变量分别接收小列表或元组中的每个元素
列表嵌套多少个多组小列表或元组,测生成多少条测试用例
"""
------------------------------------
@Time : 2019/7/25 19:18
@Auth : linux超
@File : test_parametrize.py
@IDE  : PyCharm
@Motto: Real warriors,dare to face the bleak warning,dare to face the incisive error!
@QQ   : 28174043@qq.com
@GROUP: 878565760
------------------------------------
"""
import pytest

data_1 = [1, 2]
data_2 = [3, 4]


@pytest.mark.parametrize(‘a‘, data_1)
@pytest.mark.parametrize(‘b‘, data_2)
def test_parametrize_1(a, b):
    print(‘\n测试数据为\n{},{}‘.format(a, b))


if __name__ == ‘__main__‘:
    pytest.main([‘-s‘])
============================= test session starts =============================
platform win32 -- Python 3.7.2, pytest-4.3.1, py-1.8.0, pluggy-0.9.0
rootdir: E:\CnblogCode\pytest_parametrize, inifile:
plugins: rerunfailures-7.0, metadata-1.8.0, html-1.20.0
collected 4 items

test_parametrize.py
测试数据为
1,3
.
测试数据为
2,3
.
测试数据为
1,4
.
测试数据为
2,4
.

========================== 4 passed in 0.24 seconds ===========================

Process finished with exit code 0
通过测试结果,我们发现执行了4条测试用例。不难分析原因是第一组数据的每个数据分别和第二组数据的每个数据结合的结果
可以直接标记测试用例,参数化装饰器也可以识别(标记用例失败或跳过)
标记为无条件跳过(标记为失败为xfail,自己尝试)
"""
------------------------------------
@Time : 2019/7/25 19:18
@Auth : linux超
@File : test_parametrize.py
@IDE  : PyCharm
@Motto: Real warriors,dare to face the bleak warning,dare to face the incisive error!
@QQ   : 28174043@qq.com
@GROUP: 878565760
------------------------------------
"""
import pytest

data_1 = [
    [1, 2, 3],
    pytest.param(3, 4, 8, marks=pytest.mark.skip)
]


def add(a, b):
    return a + b


@pytest.mark.parametrize(‘a, b, expect‘, data_1)
def test_parametrize_1(a, b, expect):
    print(‘\n测试数据为\n{},{}‘.format(a, b))
    assert add(a, b) == expect


if __name__ == ‘__main__‘:
    pytest.main([‘-vs‘])
============================= test session starts =============================
platform win32 -- Python 3.7.2, pytest-4.3.1, py-1.8.0, pluggy-0.9.0 -- C:\Programs\Python\Python37-32\python.exe
cachedir: .pytest_cache
metadata: {‘Python‘: ‘3.7.2‘, ‘Platform‘: ‘Windows-7-6.1.7601-SP1‘, ‘Packages‘: {‘pytest‘: ‘4.3.1‘, ‘py‘: ‘1.8.0‘, ‘pluggy‘: ‘0.9.0‘}, ‘Plugins‘: {‘rerunfailures‘: ‘7.0‘, ‘metadata‘: ‘1.8.0‘, ‘html‘: ‘1.20.0‘}, ‘JAVA_HOME‘: ‘D:\\JDK‘}
rootdir: E:\CnblogCode\pytest_parametrize, inifile:
plugins: rerunfailures-7.0, metadata-1.8.0, html-1.20.0
collecting ... collected 2 items

test_parametrize.py::test_parametrize_1[1-2-3]
测试数据为
1,2
PASSED
test_parametrize.py::test_parametrize_1[3-4-8] SKIPPED

===================== 1 passed, 1 skipped in 0.17 seconds =====================

Process finished with exit code 0
输出结果显示收集到2个用例,一个通过,一个被跳过,当我们不想执行某组测试数据时,我们可以标记skip或skipif;当我们预期某组数据会执行失败时,我们可以标记为xfail等
Pytest中实现数据驱动就是如此了
需要注意几点
1. 装饰器的第一个参数是一个列表形式的字符串参数"a, b, c" 不能写成"a", "b", "c"
2.测试数据需存储在序列类型的变量中,当然也可以使用序列嵌套字典类型
"""
------------------------------------
@Time : 2019/7/25 19:18
@Auth : linux超
@File : test_parametrize.py
@IDE  : PyCharm
@Motto: Real warriors,dare to face the bleak warning,dare to face the incisive error!
@QQ   : 28174043@qq.com
@GROUP: 878565760
------------------------------------
"""
import pytest

data_1 = (
    {
        ‘user‘: 1,
        ‘pwd‘: 2
     },
    {
        ‘user‘: 3,
        ‘pwd‘: 4
    }
)


@pytest.mark.parametrize(‘dic‘, data_1)
def test_parametrize_1(dic):
    print(‘\n测试数据为\n{}‘.format(dic))


if __name__ == ‘__main__‘:
    pytest.main([‘-s‘])
============================= test session starts =============================
platform win32 -- Python 3.7.2, pytest-4.3.1, py-1.8.0, pluggy-0.9.0
rootdir: E:\CnblogCode\pytest_parametrize, inifile:
plugins: rerunfailures-7.0, metadata-1.8.0, html-1.20.0
collected 2 items

test_parametrize.py
测试数据为
{‘user‘: 1, ‘pwd‘: 2}
.
测试数据为
{‘user‘: 3, ‘pwd‘: 4}
.

========================== 2 passed in 0.20 seconds ===========================

Process finished with exit code 0
标签:The src 变量 java_home 元组 actual 如何 图片 meta
原文地址:https://www.cnblogs.com/linuxchao/p/linuxchao-pytest-parametrize.html