标签:show adb mediawiki ant 源安装 term root repo 文件
虚拟机安装1使用yum安装LAMP环境,关闭防火墙和selinux,便于顺利测试:
systemctl status firewalld
systemctl stop firewalld
systemctl disable firewalld
2配置MariaDB yum源安装Http和MariaDB:
vim /etc/yum.repos.d/Mariadb.repo(空文件里输入)
[mariadb]
name = MariaDB
baseurl = https://mirrors.ustc.edu.cn/mariadb/yum/10.2/centos7-amd64
gpgkey=https://mirrors.ustc.edu.cn/mariadb/yum/RPM-GPG-KEY-MariaDB
gpgcheck=1
3yum clean allyum makecache all
4安装httpd和mariadb数据库:yum install httpd mariadb-server mariadb
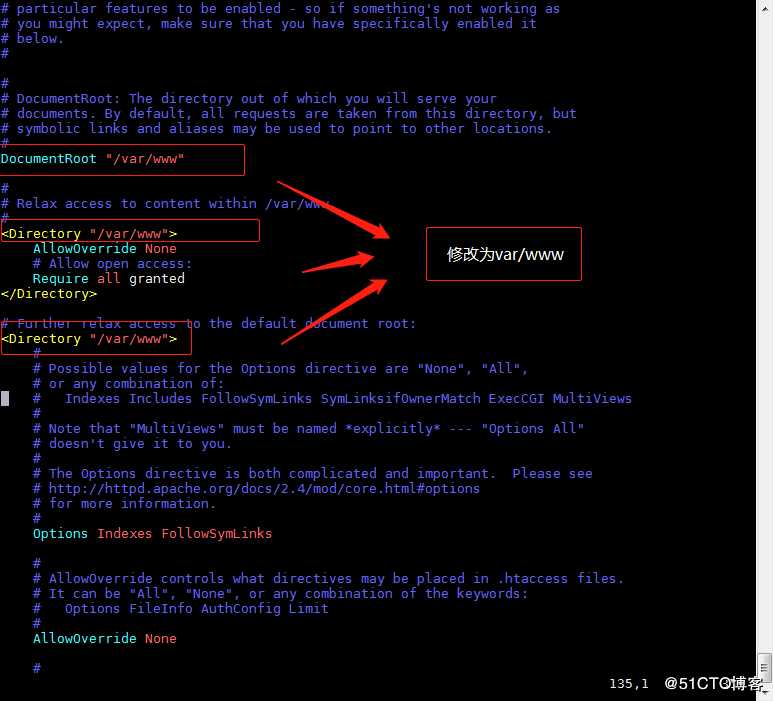
5vim /etc/httpd/conf/httpd.conf
DocumentRoot "/var/www"
<Directory "/var/www">
<Directory "/var/www">
6启动httpd服务和mariadb服务
systemctl enable mariadb
systemctl enable httpd
systemctl start httpd
systemctl start mariadb
7进入数据库创建数据库:mysql -u root -p
MariaDB [(none)]> CREATE USER ‘wiki‘@‘localhost‘ IDENTIFIED BY ‘123‘;

MariaDB [(none)]> CREATE DATABASE wikidatabase;

MariaDB [(none)]> GRANT ALL PRIVILEGES ON wikidatabase.* TO ‘wiki‘@‘localhost‘;

MariaDB [(none)]> FLUSH PRIVILEGES;

MariaDB [(none)]> show databases;

MariaDB [(none)]> SHOW GRANTS FOR ‘wiki‘@‘localhost‘;
8安装PHP7.0
rpm -Uvh https://mirror.webtatic.com/yum/el7/epel-release.rpm
rpm -Uvh https://mirror.webtatic.com/yum/el7/webtatic-release.rpm
yum install -y php71w-fpm php71w-opcache php71w-cli php71w-gd php71w-imap php71w-mysqlnd php71w-mbstring php71w-mcrypt php71w-pdo php71w-pecl-apcu php71w-pecl-mongodb php71w-pecl-redis php71w-pgsql php71w-xml php71w-xmlrpc php71w-devel mod_php71w php71w-ldap
9配置mediawiki
cd /home
wget http://releases.wikimedia.org/mediawiki/1.31/mediawiki-1.31.0.tar.gz
cd /var/www
tar -zxf /home/mediawiki-1.31.0.tar.gz
ln -s mediawiki-1.31.0/ mediawiki
chown -R apache:apache /var/www/mediawiki-1.31.0
systemctl restart htt
```pd
# 安装mediawiki
打开浏览器输入http://ip地址/mediawiki/index.php 开始初始化设置
1选择语言版本字库版本

2选择数据库类型,这里选择MySQL

3设置数据库名称和资料库名称

4选择数据库引擎为InnoDB

5设置全局名称和添加管理员
6开始安装mediawiki标签:show adb mediawiki ant 源安装 term root repo 文件
原文地址:https://blog.51cto.com/14375700/2427487