标签:tar cal yum disable 同步 日志 变量 指定 Lua脚本
X-WAF 是一款方便易用的云WAF,使用反向代理的方式介入Web服务器和访问者之间,不需要像 modSecurity 和 Naxsin 那样作为nginx的模块,需要进行编译安装
X-WAF使用 OpenResty 作为反向代理软件,并借助 OpenResty 的 Lua 作为防御脚本的编写和运作工具
所以,实际上X-WAF就是一个运行在 OpenResty 上的 Lua 脚本,并借助了 OpenResty(nginx) 的多平台适用性,可以在各种操作系统运行
部署X-WAF的过程时间是就是安装 OpenResty,加载Lua脚本,然后建立虚拟主机,并把虚拟主机的访问直接发送给原本的php、tomcat或者nginx的过程
如果是已经有基于nginx+php构建的站点,就需要把网站配置到 OpenResty 上(80或443端口),把原来的nginx里的虚拟主机的端口改为其他端口比如8080,为防止用户通过原有IP或域名+8080端口访问,甚至原有nginx主机配置里面IP都可以直接修改为127.0.0.1。而OpenResty的虚拟主机配置上就通过proxy_pass把访问发送到127.0.0.1:8080的原有nginx上
项目地址:
https://waf.xsec.io/
github:
https://github.com/xsec-lab/x-waf
管理后台
https://github.com/xsec-lab/x-waf-admin
主要特性
安装过程:
1、下载安装 OpenResty http://openresty.org/cn/,即可以用源码编译安装,也可以使用yum安装,这样用源码编译安装的方式
yum -y install pcre pcre-devel
wget https://openresty.org/download/openresty-1.15.8.1.tar.gz
tar -zxvf openresty-1.15.8.1.tar.gz
cd openresty-1.15.8.1
./configure
gmake && gmake install
把openresty加入环境变量,以便可以只用调用openresty命令,实际上 /usr/local/openresty/bin/openresty 是指向 /usr/local/openresty/nginx/sbin/nginx 的一个链接,但我们把环境变量指向openresty,以便和系统已有的 nginx 相区别
export PATH=/usr/local/openresty/bin:$PATH
2、修改原有nginx服务器的虚拟主机IP和端口,还要修改(或者删除)nginx默认虚拟主机的IP和端口,否则启动 openresty 时就是会因为 80 或者 443 端口被占用而无法启动。
3、启动openresty
--启动
openresty
--停止
openresty -s stop
--重启
openresty -s reload
--检验 openresty (nginx)配置是否正确
openresty -t
因为openresty的默认启动用户是nginx,如果系统没有这个用户就需要新建,或者使用系统原有nginx服务器的用户也可以,比如lnmp的nginx默认用户就是www。否则启动openresty会报错
nginx: [emerg] getpwnam("nginx") failed in /usr/local/openresty/nginx/conf/nginx.conf
这个时候就需要新建nginx用户,或者修改nginx.conf里面的配置文件里的nginx启动用户
4、下载x-waf的配置文件和规则包
切换到openresty配置文件目录
cd /usr/local/openresty/nginx/conf/
下载x-waf配置文件和规则文件
git clone https://github.com/xsec-lab/x-waf
下载下来是一个x-waf 的文件夹,里面的 nginx_conf/nginx.conf 文件是一个配置好了lua和x-waf规则目录的模板文件,可以拷贝到 /usr/local/openresty/nginx/conf/nginx.conf 直接覆盖原有openresty的配置文件
cp /usr/local/openresty/nginx/conf/x-waf/nginx_conf/nginx.conf /usr/local/openresty/nginx/conf/nginx.conf
建立虚拟主机配置文件目录
mkdir -p /usr/local/openresty/nginx/conf/vhosts
修改配置文件
local _M = {
-- 开启WAF
config_waf_enable = "on",
-- 日志目录
config_log_dir = "/data/waf/",
-- rule setting
config_rule_dir = "/usr/local/openresty/nginx/conf/x-waf/rules",
-- 启用网址白名单过滤
config_white_url_check = "on",
-- 启用IP白名单过滤
config_white_ip_check = "on",
-- 启用IP黑名单过滤
config_black_ip_check = "on",
-- 启用url过滤
config_url_check = "on",
-- 启用url参数过滤
config_url_args_check = "on",
-- 启用浏览器用户代理过滤
config_user_agent_check = "on",
-- 启用cookie过滤
config_cookie_check = "on",
-- 启用CC攻击检测
config_cc_check = "on",
-- CC攻击检测阈值,10次/60秒
config_cc_rate = "10/60",
-- enable/disable post filtering
config_post_check = "on",
-- 检测攻击后给攻击者的输出,默认html文本串,通过config_output_html配置,或者设置为url,则通过config_waf_redirect_url配置
config_waf_model = "html",
-- if config_waf_output ,setting url
config_waf_redirect_url = "http://xxx.com",
config_expire_time = 600,
config_output_html = [[
<html>
<head>
<meta charset="UTF-8">
<title>非法访问</title>
</head>
<body>
<div>
<div class="table">
<div>
<div class="cell">
非法访问,您的IP为: %s
</div>
<div class="cell">
如需帮助请联系客服
</div>
</div>
</div>
</div>
</body>
</html>
]],
}
5、管理后台安装,管理后台使用GO语言编写,可以直接下载编译好的版本直接运行即可
https://github.com/xsec-lab/x-waf-admin/releases/download/x-waf-admin0.1/x-waf-admin0.1-linux-amd64.tar.gz
解压
tar -xzf x-waf-admin0.1-linux-amd64.tar.gz
进入目录
cd x-waf-admin
编辑配置文件
vi conf/app.ini
RUN_MODE = dev #开发环境使用
;RUN_MODE = prod #生产环境使用
[server]
HTTP_PORT = 5000 #管理后台端口
API_KEY = xsec.io||secdevops.cn
NGINX_BIN = /usr/local/openresty/nginx/sbin/nginx #指定openresty可执行文件位置
NGINX_VHOSTS = /usr/local/openresty/nginx/conf/vhosts/ #指定虚拟主机配置文件位置
API_SERVERS = 127.0.0.1, 你自己的IP #指定管理后台的IP地址,加上你自己的服务器IP即可
[database]
USER = 数据库用户名
PASSWD = 数据库密码
HOST = 127.0.0.1:3306 #数据库地址和端口
NAME = waf #数据库名
[waf]
RULE_PATH = /usr/local/openresty/nginx/conf/x-waf/rules/
已后台进程方式启动管理后台,启动后会自动往MySQL数据库写入配置表,如果没有配置好MySQL,管理后台会因为找不到数据库里面的用户而无法登录
nohup ./server >> x-waf.log 2>&1 &
tail -f x-waf.log 查看运行日志和启动启动
然后就可以访问管理后台 http://ip:5000/login/ 了,默认的管理后台用户是admin,密码是 x@xsec.io,生产环境一点要修改账户密码
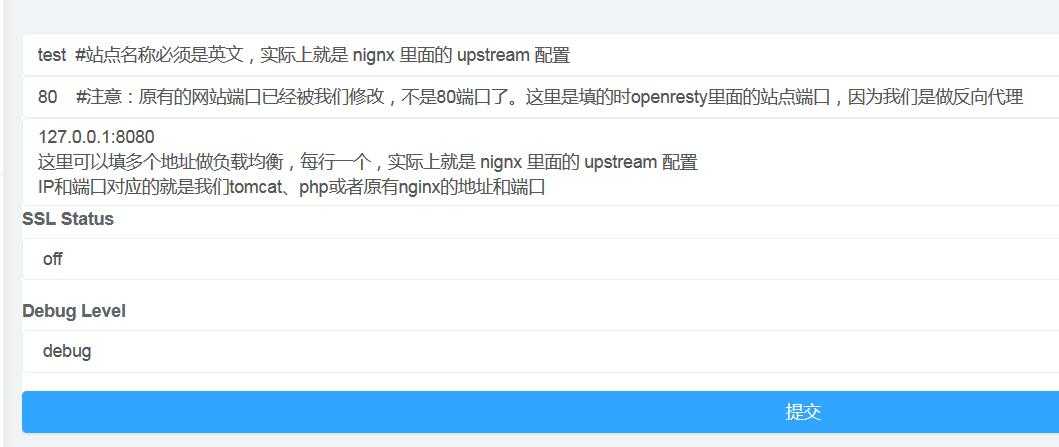
6、通过管理后台添加站点,在Index页面点击新增后端站点

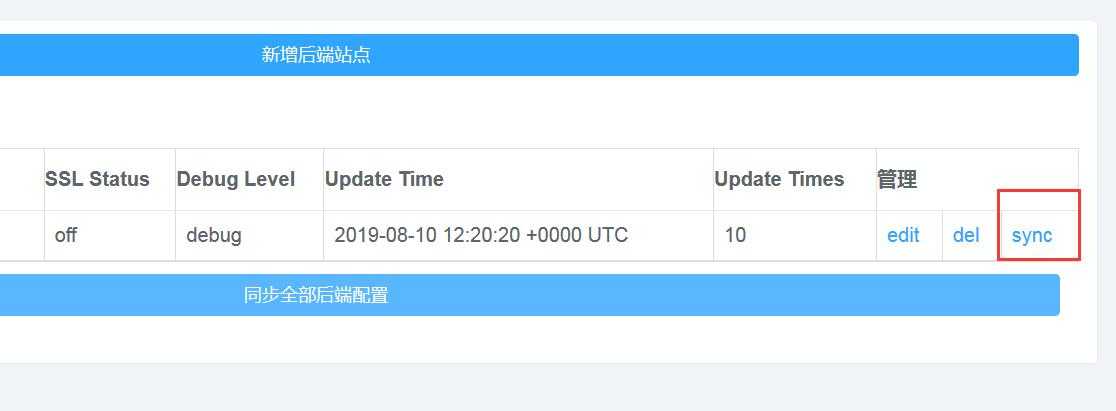
添加以后点击同步按钮,就会把配置写入到openresty的虚拟主机配置文件目录里面(/usr/local/openresty/nginx/conf/vhosts)

我们需要注意的时,管理后台实际是以 x-waf-admin/templates/proxy.tmpl 文件为模板生成虚拟主机配置文件的,所以如果生成的文件不符合要求,也可以修改这个模板文件
或者参考这个模板文件自行在 /usr/local/openresty/nginx/conf/vhosts 目录建立虚拟主机配置文件
点击同步按钮后可能会提示同步失败(实际上配置文件已经写入,只是无法重启openresty),那是因为通过proxy.tmpl生成的配置文件把日志目录放到了 /var/log/nginx/ 里面,这个目录可能不存在。
可以手动建立目录或者修改目录
特别需要注意的时,如果你手动修改了虚拟主机配置文件,就不要使用同步按钮了,点击同步按钮将会用proxy.tmpl重新生成配置文件
7、测试waf是否生效
http://ip/\?id\=1%20union%20select%201,2,3 #应该会显示“”欢迎在遵守白帽子道德准则的情况下进行安全测试“”等字样
8、检查原有网站能否正常访问
9、如果我们想修改waf的拦截提示信息,可以修改 /usr/local/openresty/nginx/conf/x-waf 文件里的 config_output_html 配置
标签:tar cal yum disable 同步 日志 变量 指定 Lua脚本
原文地址:https://www.cnblogs.com/lbnnbs/p/11332914.html