标签:lists oid 持久 forward 属性 解释 class height 后台
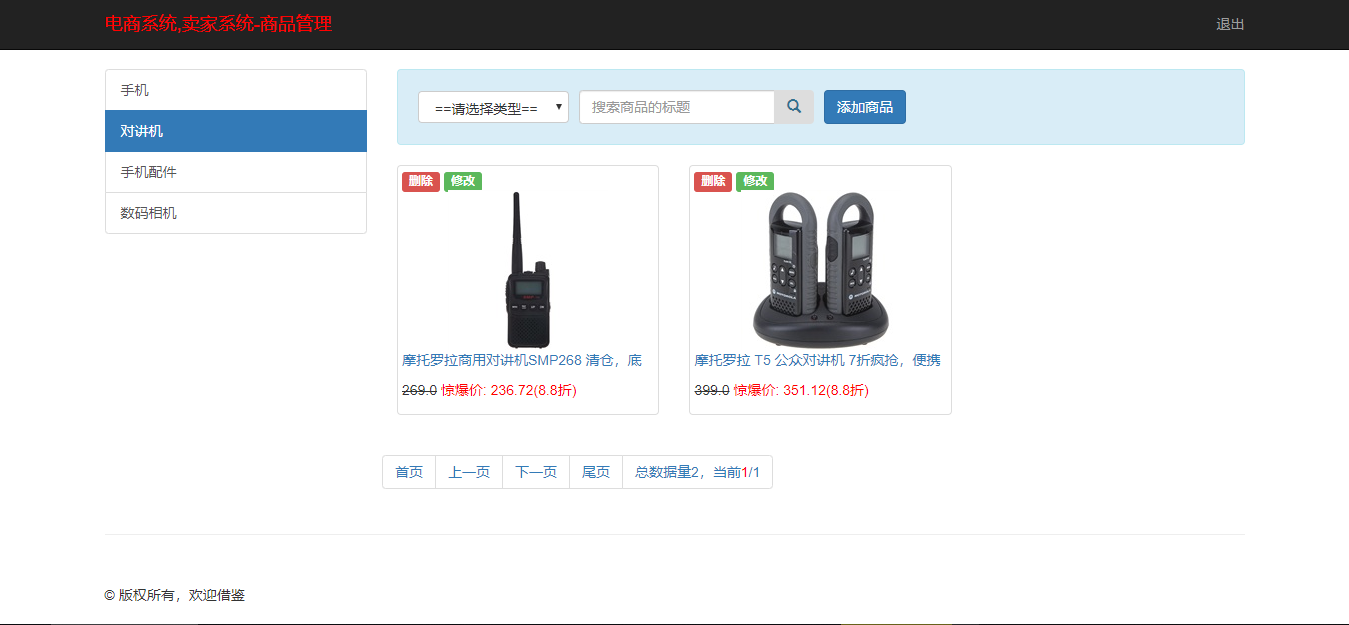
一、 进入主界面,首先要进行商品的查询

上一次在登录成功之后进入ListServlet查询所有商品并进行分页,查询的信息主要包括商品的各类信息,以及分页信息,一级和二级菜单的展示,这里仅以上旬所有商品信息为例,

首先判断request中的method,然后调用getAll()方法:
private void getAll() throws ServletException, IOException {

    //考虑分页查询
    Pager pager = new Pager();
    //看书否传入了分页参数的页码
    String pageIndex = request.getParameter("pageIndex");
    if(!StringUtils.isEmpty(pageIndex)){
        int pSize = Integer.valueOf(pageIndex);
        pager.setPageIndex(pSize);
    }

    //二级类型
    String secondType = request.getParameter("secondType");
    request.setAttribute("secondType", secondType);
    //搜索框中的商品标题
    String title = request.getParameter("title");
    request.setAttribute("title", title);
    //接收一级类型编号查询
    String typeCode = request.getParameter("typeCode");
    //根据一级类型查询对应的二级类型
    if(!StringUtils.isEmpty(typeCode)){
        List<ArticleType> secondTypes = shopService.loadSecondTypes(typeCode);
        request.setAttribute("typeCode", typeCode);
        request.setAttribute("secondTypes", secondTypes);
    }

    //1.查询所有的一级类型数据
    List<ArticleType> firstArticleTypes = shopService.loadArticleTypes();
    //2.查询所有的商品信息
    List<Article> articles = shopService.searchArticles(typeCode, secondType, title, pager);
    request.setAttribute("articleTypes", shopService.getArticleTypes());
    request.setAttribute("firstArticleTypes", firstArticleTypes);
    request.setAttribute("pager", pager);
    request.setAttribute("articles", articles);
    request.getRequestDispatcher("/WEB-INF/jsp/list.jsp").forward(request, response);
}
首先进行分页信息类的设置:
public class Pager {

    //1.当前页码
    private int pageIndex = 1;
    //2.一页需要展示多少条数据
    private int pageSize = 3;
    //3.当前条件下总的数据量
    private int totalCount;
    //4.总共可以分多少页
    private int totalPages;

    public int getPageIndex() {
        //取页码的时候做一些判断
        pageIndex = pageIndex < 1 ?1:pageIndex;
        //判断页码是否越界了
        pageIndex = pageIndex >= this.getTotalPages()? this.getTotalPages():pageIndex;
        return pageIndex;
    }

    public void setPageIndex(int pageIndex) {
        this.pageIndex = pageIndex;
    }

    public int getPageSize() {
        return pageSize;
    }

    public void setPageSize(int pageSize) {
        this.pageSize = pageSize;
    }

    public int getTotalCount() {
        return totalCount;
    }

    public void setTotalCount(int totalCount) {
        this.totalCount = totalCount;
    }

    public int getTotalPages() {
        //总页数
        //根据总数量和每页最多展示多少条来确定
        //卧槽,这里简直精髓啊,之前得做多少判断啊
        return (this.getTotalCount()-1)/this.getPageSize() + 1;
    }

    public int getFirstParam(){
        return (this.getPageIndex()-1)*this.getPageSize();
    }
}
在getAll()方法中判断是否有页码的传递,如果没有,默认显示第一页,然后查询所有商品的信息
shopService.searchArticles(typeCode, secondType, title, pager)
这里有四个参数,第一个参数为商品的一级类型,第二个参数为商品的二级类型,第三个参数为商品的标题,第四个参数为商品的分页信息
public List<Article> searchArticles(String typeCode, String secondType, String title, Pager pager) {
    //界面需要当前总共有多少条数据
    //查询当前条件下有多少条数据
    int count = articleMapper.count(typeCode, secondType, title);
    pager.setTotalCount(count);
    return articleMapper.searchArticles(typeCode, secondType, title, pager);
}
然后在业务层的实现类调用searchArticles方法:

因为我们在Spring中为持久化类做了扫描:

所以别名的设置就简单了,在数据访问层这里设置相关参数,然后在映射文件中书写SQL语句:
<select id="searchArticles" resultType="Article">
    select * from ec_article
    <include refid="pageWhere"/>
    limit #{pager.firstParam}, #{pager.pageSize}
</select>
查询到所有的商品信息并返回,然后跳转到主界面进行展示:
二、 添加商品
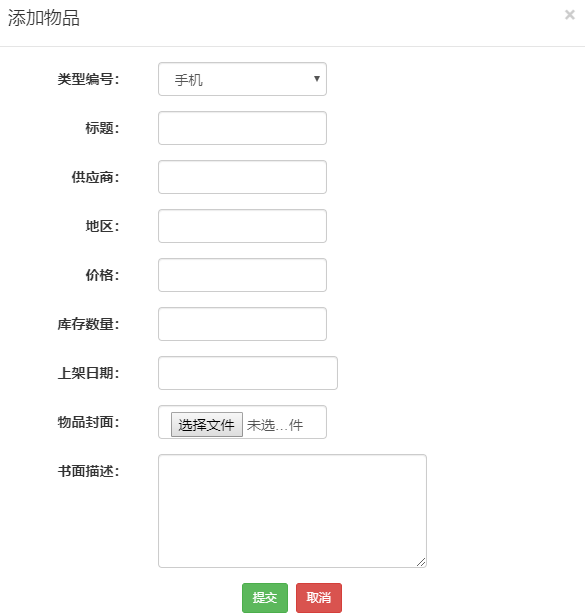
private void addArticle() throws ServletException, IOException, ParseException {
    //接收图片
    String imageUrl = receiveImage();
    //添加商品的相关信息
    Article article = encapsulationArticle(request, imageUrl, "addArticle");

    shopService.saveArticle(article);
   // shopService.updateArticle(article);
    request.setAttribute("tip","添加商品成功");
    getAll();
}
首先接收商品的图片,这里要注意一下,前端form要加上 enctype="multipart/form-data" 用来传递文件,后台的servlet也要加上 @MultipartConfig 用于接收,否则会造成request中参数无法获取,然后调用 encapsulationArticle()方法为Article设置属性信息:
private Article encapsulationArticle(HttpServletRequest request,
                                  String picUrl, String operationType) throws ParseException {
    Article article = new Article();
    ArticleType type = new ArticleType();
    type.setCode(request.getParameter("code"));
    article.setArticleType(type);
    article.setTitle(request.getParameter("titleStr"));
    article.setSupplier(request.getParameter("supplier"));
    article.setLocality(request.getParameter("locality"));
    article.setPrice(Double.parseDouble(request.getParameter("price")));
    article.setStorage(Integer.parseInt(request.getParameter("storage")));
    article.setDescription(request.getParameter("description"));
    article.setImage(picUrl);
    if(operationType.equals("addArticle")){
        SimpleDateFormat sdf = new SimpleDateFormat("yyyy-mm-dd HH:mm:ss");
        article.setPutawayDate(sdf.parse(request.getParameter("putawayDate")));
    }else if(operationType.equals("updateArticle")){
        article.setId(Integer.valueOf(request.getParameter("id")));
    }
    return article;
}
然后执行 shopService.saveArticle(article);方法,在 ArticleMapper.xml书写SQL语句:
<insert id="save" parameterType="Article">
    insert into ec_article(title, supplier, price, locality, putaway_date,
                           storage, image, description, type_code, create_date)
    values(#{title}, #{supplier}, #{price}, #{locality},
           #{putawayDate}, #{storage}, #{image},
           #{description}, #{articleType.code}, #{createDate})
</insert>
三、 修改商品信息
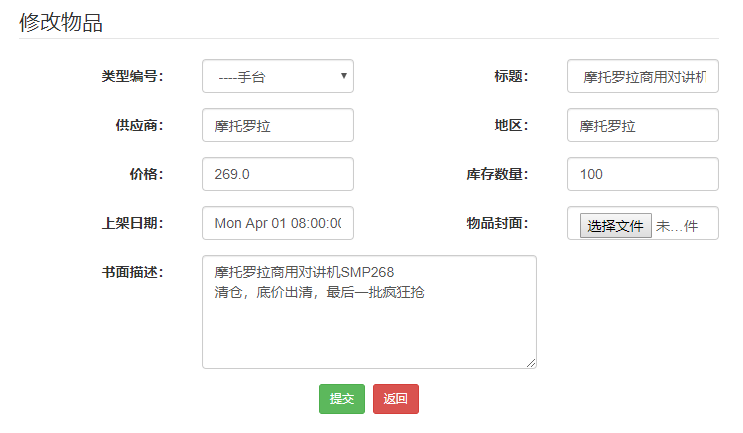
private void updateArticle() throws ParseException {
    //接收界面提交的参数
    String picUrl = request.getParameter("picUrl");  //物品旧封面

    String newUrl = receiveImage();
    picUrl = newUrl != null? newUrl:picUrl;

    Article article = encapsulationArticle(request,picUrl,"updateArticle");
    shopService.updateArticle(article);
    request.setAttribute("tip","修改商品成功");
    showUpdate();
}
首先判断用户是否上传了新的图片信息,如果没有就使用之前的图片,接收图片:
private String receiveImage() {
    try {
        //接收用户可能上传的封面
        //如果用户上传了,这里是不会出现编译异常的
        //如果没有上传,这里出现异常
        Part part = request.getPart("image");
        //保存到项目的路径中去
        String sysPath = request.getSession().getServletContext().getRealPath("/resources/images/article");
        //定义一个新的图片名称
        String fileName = UUID.randomUUID().toString();
        //提取图片的类型
        //上传文件的内容性质
        String contentDispostion = part.getHeader("content-disposition");
        //获取上传文件的后缀名
        String suffix = contentDispostion.substring(contentDispostion.lastIndexOf("."), contentDispostion.length() - 1);
        fileName+=suffix;
        //把图片保存到路径中去
        part.write(sysPath+"/"+fileName);
        return fileName;
    } catch (IOException e) {
        e.printStackTrace();
        return null;
    } catch (ServletException e) {
        e.printStackTrace();
        return null;
    }
}
上面的代码在新增商品的时候一定会用到,但是我忘记解释了,就放在这吧,然后下一步也是设置Article的一些属性信息,然后调用 shopService.updateArticle(article); 方法在
<!-- 修改物品 -->
<update id="update" parameterType="Article">
    update ec_article
    <trim prefix="SET" suffixOverrides=",">
        <if test="title != null">title = #{title},</if>
        <if test="supplier != null">supplier = #{supplier},</if>
        <if test="price != null">price = #{price},</if>
        <if test="locality != null">locality = #{locality},</if>
        <if test="storage != null">storage = #{storage},</if>
        <if test="image != null">image = #{image},</if>
        <if test="description != null">description = #{description},</if>
        <if test="articleType.code != null">type_code = #{articleType.code},</if>
    </trim>
    <where> id = #{id}</where>
</update>
在这里我们是要进行关联映射的,为什么要进行关联映射呢。。。。因为是俩表的关联啊,一个表存储商品信息,另一个表存储商品类型。。新增的时候也用到了,忘说了:
<!-- 配置结果集映射 -->
<resultMap id="articleResultMap" type="Article">
    <result column="putaway_Date" property="putawayDate"/>
    <result column="create_Date" property="createDate"/>
    <!-- 查询出的商品  映射关联  N-1 -->
    <association property="articleType" javaType="ArticleType" column="TYPE_CODE"
                 select="com.fitsoft.shop.repository.ArticleTypeMapper.getTypeByCode"/>
</resultMap>
四、删除商品
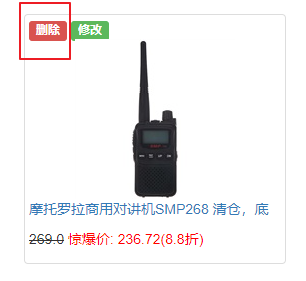
单击删除按钮,调用ListServlet中的deleteById()方法:
private void deleteById() {
    try {
        String id = request.getParameter("id");
        shopService.deleteById(id);
        request.setAttribute("tip", "删除成功");
    } catch (Exception e) {
        request.setAttribute("tip", "删除失败");
        e.printStackTrace();
    }finally {
        try {
            request.getRequestDispatcher("/list?method=getAll").forward(request, response);
        } catch (ServletException e) {
            e.printStackTrace();
        } catch (IOException e) {
            e.printStackTrace();
        }
    }
}
直接看ArticleMapper的数据库语句:
![]()
语句比较短,直接用注解解决,像这种只带一个参数的数据库语句,id就不是特别关键了,只有一个,不会起冲突,把上一个语句改成:
@Delete("delete from ec_article where id = #{xxxx}")
void deleteById(String id);
也是可以的。项目地址:点我跳转
镇妖图:

标签:lists oid 持久 forward 属性 解释 class height 后台
原文地址:https://www.cnblogs.com/zqm-sau/p/11414700.html