标签:支持 页面布局 auto 容器 log 图片 完整 基线 居中
2009年,W3C 提出了一种新的方案----Flex 布局,可以简便、完整、响应式地实现各种页面布局。时至今日,它已获得了所有浏览器的支持,这让flex布局成为未来布局的首选。
一、那何为Flex?
其实Flex是Flexible Box的缩写,意为”弹性盒子”,用来为盒状模型提供最大的灵活性。
任何一个容器(父元素)都可以指定Flex布局,只需要设置:
/*块内元素*/
display:flex;
/*行内元素*/
display:inline-flex;
另外:webkit内核的浏览器,要加上-webkit前缀。
display:-webkit-flex;
display:flex;
注意:设为flex布局之后,子元素的float、clear、和vertical-align属性将失效
附上主流浏览器前缀
-ms-transform:rotate(7deg);      //  -ms-代表IE浏览器识别前缀
-moz-transform:rotate(7deg);      //  -moz-代表火狐浏览器识别前缀
-webkit-transform:rotate(7deg);    //  -webkit-代表谷歌和Safari浏览器识别前缀
-o-transform:rotate(7deg);          //  -o- 代表Opera浏览器识别前缀

transform;rotate(7deg)           // 统一标识语句,符合w3c标准
二、基本概念
采用Flex布局的元素,称为Flex容器,简称“容器”。它的所有子元素自动成为容器成员,成为flex项目,简称“项目”。
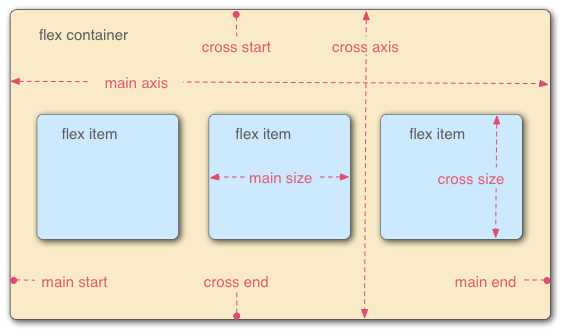
关于这图我就不仔细说了,可以去http://www.ruanyifeng.com/blog/2015/07/flex-grammar.html看阮一峰老师的详解。
个人粗解,容器有两个轴,我名为X轴(水平方向),从左到右,左边为起点;Y轴(垂直方向),从上到下,最上为起点。
三、容器属性:
容器共有六个属性
flex-direction
flex-wrap
flex-flow
justify-content
align-items
align-content
下面一一给大家展示效果,
在演示之前,先弄几个子元素盒子和父元素容器
css部分——子元素小盒子
            .first{
                width: 100px;
                height: 100px;
                background-color: pink;
            }
            .second{
                width: 100px;
                height: 120px;
                background-color: gold;
            }
            .third{
                width: 120px;
                height: 140px;
                background-color: purple;
            }
            .fourth{
                width: 100px;
                height: 100px;
                background-color: cadetblue;
            }
            .fifth{
                width: 100px;
                height: 100px;
                background-color: greenyellow;
            }
            .sixth{
                width: 150px;
                height: 100px;
                background-color: deepskyblue;
            }
css部分——父元素大盒子——box1
       #box1{
                margin: 20px 300px;
                width: 500px;
                height: 300px;
                border: 1px solid red;
                box-sizing: border-box;
                display: flex;
                /*默认值:从左到右水平排序*/
                flex-direction: row;
                /*从右到左逆向排序*/
                /*flex-direction: row-reverse;*/
                /*从上到下顺序排序*/
                /*flex-direction: column;*/
                /*从下到上逆向排序*/
                /*flex-direction: column-reverse;*/
            }
HTML部分
<div id="box1">
            <div class="first">1</div>
            <div class="second">2</div>
            <div class="third">3</div>
            <div class="fourth">4</div>
            <div class="fifth">5</div>
            <div class="sixth">6</div>
</div>
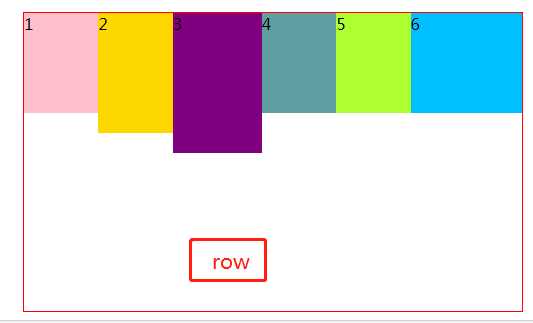
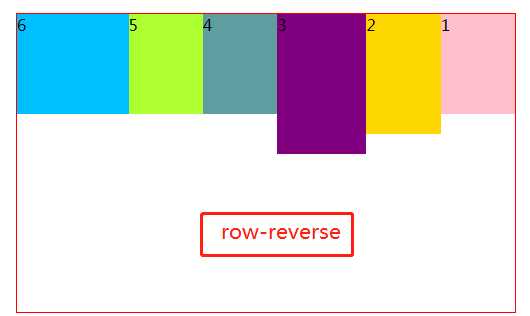
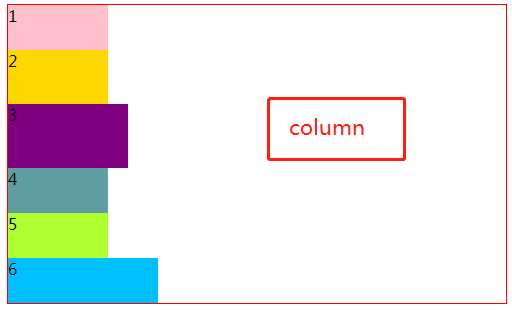
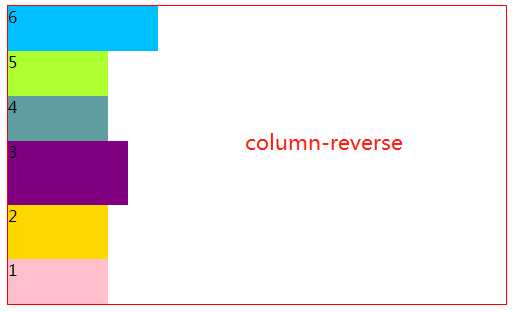
3.1 flex-direction属性,它决定主轴的方向(即项目的排列方向)。
效果:
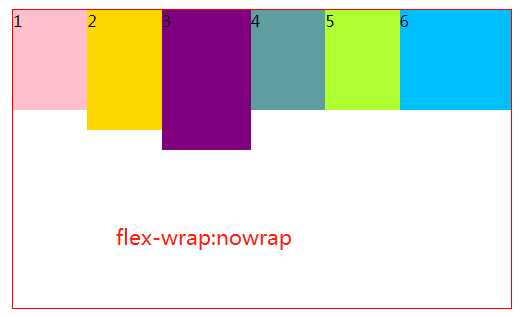
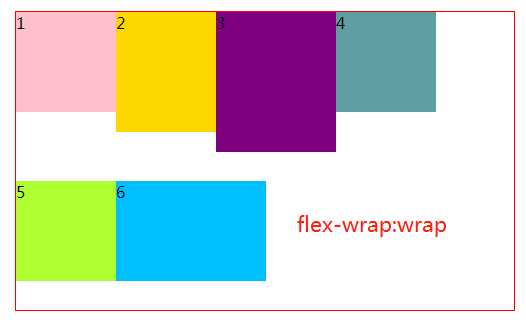
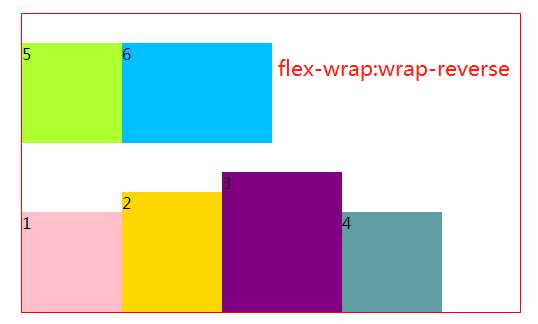
3.2 flex-wrap 属性,若在同一轴上且子元素排不下的情况下,是否决定换行
HTML部分
<div id="box2">
            <div class="first">1</div>
            <div class="second">2</div>
            <div class="third">3</div>
            <div class="fourth">4</div>
            <div class="fifth">5</div>
            <div class="sixth">6</div>
</div>
css部分——父元素大盒子——box2
            #box2{
                margin: 20px 300px;
                width: 500px;
                height: 300px;
                border: 1px solid red;
                box-sizing: border-box;
                display: flex;


                /*默认,不换行*/
                flex-wrap: nowrap;

                /*换行,第一行在上*/
                /*flex-wrap: wrap;*/
                /*换行,第一行在下*/
                /*flex-wrap: wrap-reverse;*/


            }
效果如下:
3.3 flex-flow属性是flex-direction 属性和flex-wrap属性的简写形式,所以下面就不多介绍了。
主要写法 就是
/*格式*/
flex-flow:flex-direction flex-wrap
/*举例*/
flex-flow:column wrap;
3.4 jusify-content属性定义了项目在主轴上的对齐方式。
HTML部分
<div id="box3">
            <div class="first">1</div>
            <div class="second">2</div>
            <div class="third">3</div>
            <div class="fourth">4</div>
 </div>
CSS部分——父级大盒子——box3
#box3{
                margin: 20px 300px;
                width: 500px;
                height: 300px;
                border: 1px solid blueviolet;
                box-sizing: border-box;
                display: flex;
                flex-flow:row  nowrap;
                /*(默认值):左对齐*/
                /*justify-content: flex-start;*/
                /* 右对齐*/
                justify-content: flex-end;
                /*居中对齐*/
                /*justify-content: center;*/
                  /*  两端对齐*/
                /*justify-content: space-around;*/
              /* 每个项目两侧的间隔相等。所以,项目之间的间隔比项目与边框的间隔大一倍。*/
                /*justify-content: space-between;*/

            }
效果如下:以子元素都在水平轴不换行为例
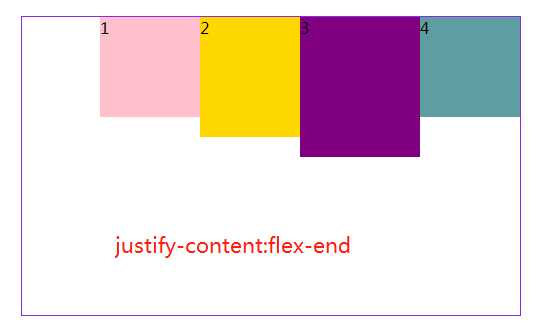
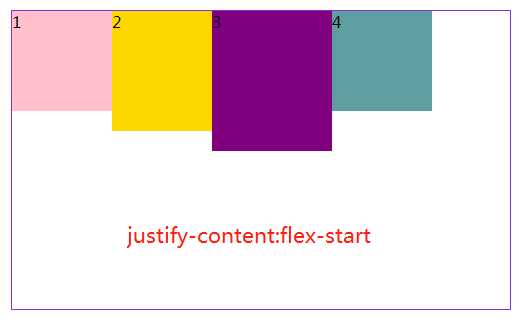
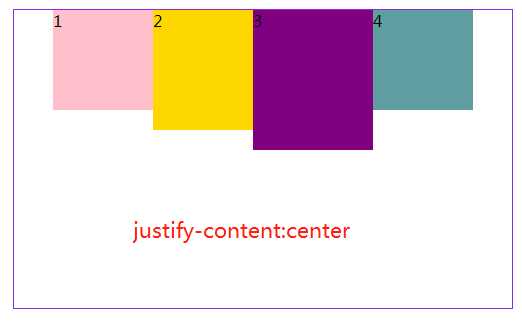
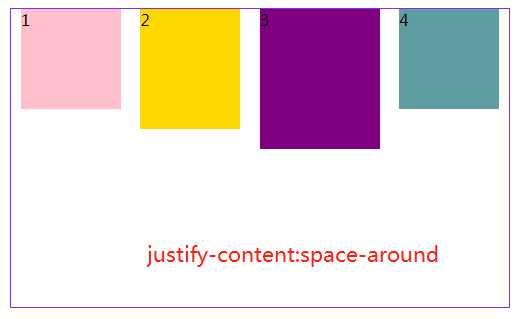
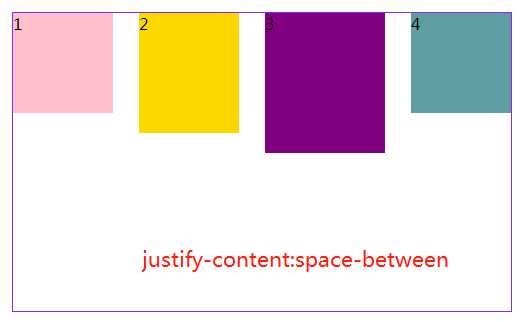
注:justify-content:space-between和justify-content:space-around是有区别的,前者最左和最有靠边框,后者最左和最右离边框还有距离
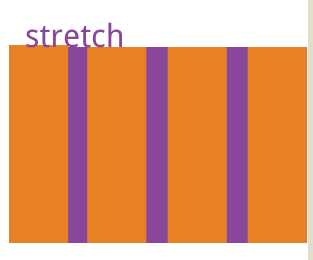
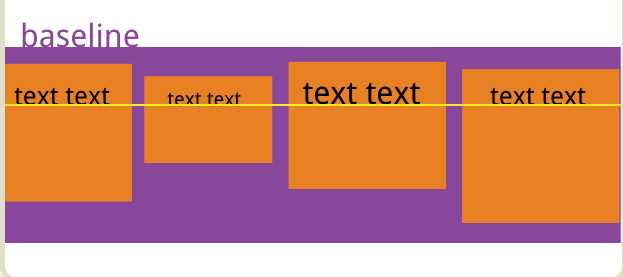
3.5align-items属性定义项目(子元素)在交叉轴(y轴)上如何对齐。
HTML部分
        <div id="box4">
            <div class="first">1
            </div>
            <div class="second">2
            </div>
            <div class="third">3</div>
            <div class="fourth">4</div>
        </div>
css部分——父级大盒子——box4
#box4{
                margin: 20px 300px;
                width: 500px;
                height: 300px;
                border: 1px solid blueviolet;
                box-sizing: border-box;
                display: flex;
                flex-flow:row nowrap;
                /*交叉轴的终点对齐。*/
                align-items: flex-end;
                /*交叉轴的起点对齐。*/
                /*align-items: flex-start;*/
            /*    交叉轴的中点对齐*/
                /*align-items: center;*/
                /*项目的第一行文字的基线对齐。*/
                /*align-items: baseline;*/
                /*默认值,如果项目未设置高度或设为auto,将占满整个容器的高度。*/
                /*align-items: stretch;*/
            }
效果如下:
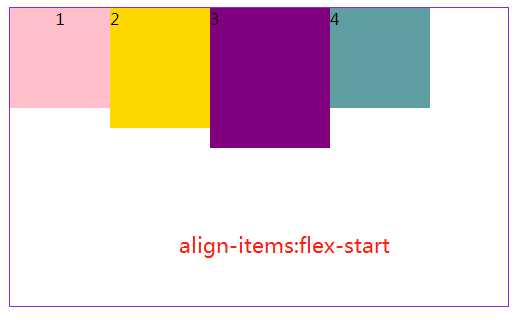
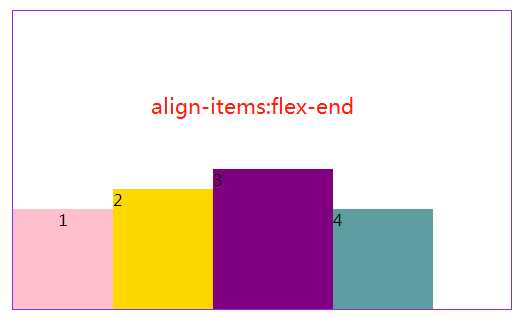
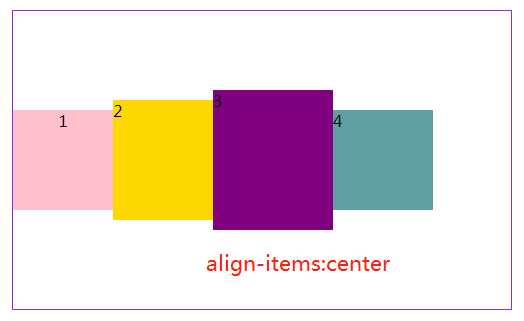
至于另外两个就不好展示了,只好盗下图
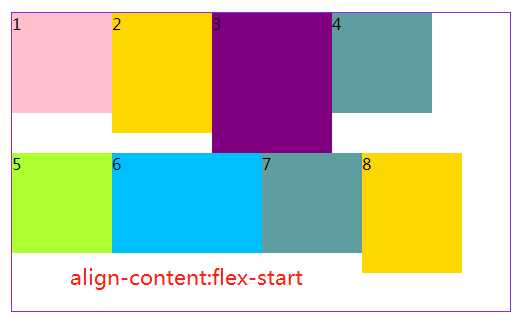
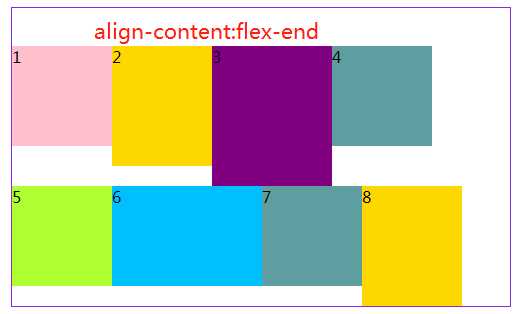
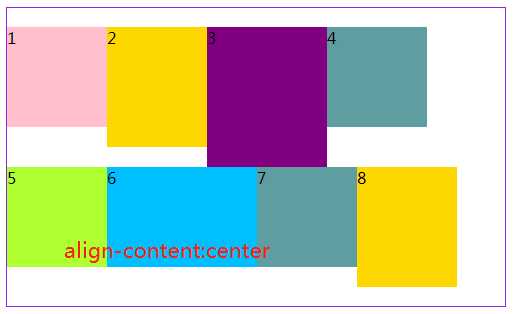
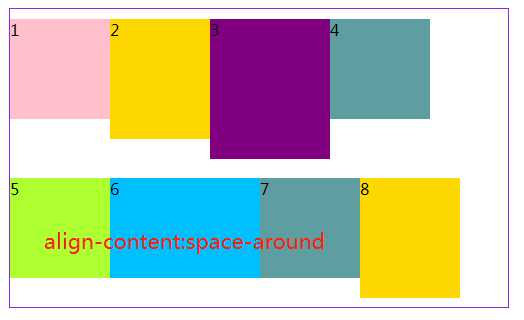
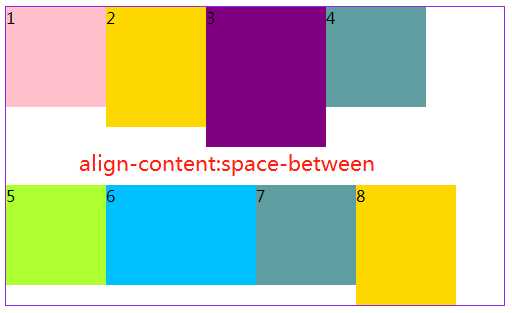
3.6 align-content属性定义了多根轴线的对齐方式。如果项目只有一根轴线,该属性不起作用。
HTML部分:
<div id="box5">
            <div class="first">1</div>
            <div class="second">2</div>
            <div class="third">3</div>
            <div class="fourth">4</div>
            <div class="fifth">5</div>
            <div class="sixth">6</div>
            <div class="fourth">7</div>
            <div class="second">8</div>
 </div>
css部分:
            #box5{
                margin: 20px 300px;
                width: 500px;
                height: 300px;
                border: 1px solid blueviolet;
                box-sizing: border-box;
                display: flex;
                flex-flow:row wrap;
                /*    与交叉轴的起点对齐。*/
                align-content: flex-start;
                /*   与交叉轴的终点对齐。*/
                /*align-content:flex-end;*/
                /*与交叉轴的中点对齐。*/
                /*align-content:center;*/
                /*每根轴线两侧的间隔都相等。所以,轴线之间的间隔比轴线与边框的间隔大一倍。*/
                /*align-content:space-around;*/
                /*与交叉轴两端对齐,轴线之间的间隔平均分布。*/
                /*align-content:space-between;*/
            }
效果如下:
关于容器是属性就写到这,下篇写项目(子元素)的相关知识
标签:支持 页面布局 auto 容器 log 图片 完整 基线 居中
原文地址:https://www.cnblogs.com/smile-xin/p/11436501.html